Dockerfile概述
Dockerfile是docker中镜像文件的的描述文件,说的直白点就是镜像文件到底是由什么东西一步步构成的。
例如:你在淘宝上买了一个衣架,但是卖家并没有给你发一个完整的衣架,而是一些组件和一张图纸,你按照这个图纸一步一步将衣架组装起来,就成了你所需要的样子。那么Dockerfile 就是这张图纸,镜像文件就是你需要的这个衣架,Dockerfile 不建议随便命名,就用 Dockerfile。
因此,Dockerfile其内部包含了一条条的指令,每一条指令构建一层,因此每一条指令的内容,就是描述该层应当如何构建。
Docker 执行 Dockerfile 的大致流程:
(1)docker从基础镜像运行一个容器;
(2)执行一条指令并对容器作出修改;
(3)执行类似dockercommit的操作提交一个新的镜像层
(4)docker再基于刚提交的镜像运行一个新容器;
(5)执行dockerfile中的下一条指令直到所有指令都执行完成。
回顾Dockerfile
说到Dockerfile,就离不开Dockerfile的核心组件,尤其是镜像。镜像是运行容器的基础环境,也就是说镜像是docker容器创建的关键,而创建镜像的三种方式之一的Dockerfile是最为灵活的。
什么是Dockerfile?
Dockerfile可以看做是被Docker程序所解释翻译的脚本,由一组命令集合而成,每一条命令都对应一条操作命令,有其翻译为Linux下的具体命令。用户可以通过自定义内容来快速构建镜像。
其实说简单点,你可以认为Dockerfile是“专门用于构建镜像的shell脚本”。
还记得Dockerfile的严格格式吗?我们先来看一下这个表格。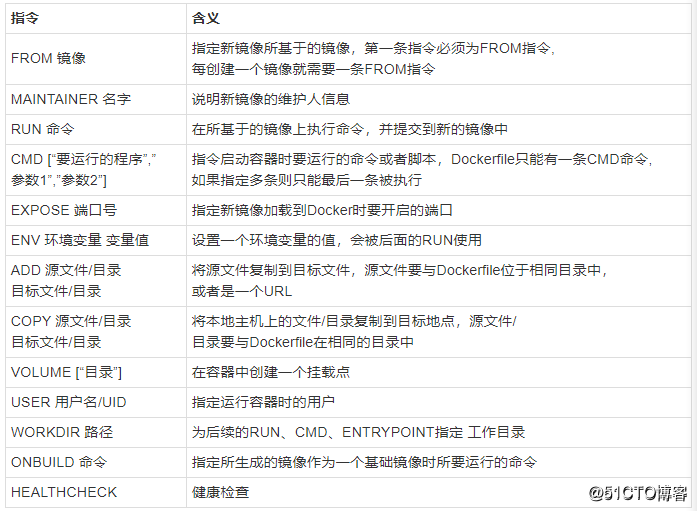
1.构建httpd服务镜像
[root@localhost ~]# cd /opt/
[root@localhost opt]# mkdir apache ##创建目录
[root@localhost opt]# cd apache/
[root@localhost sshd]# vim Dockerfile ##编写dockerfile文件
#基于的基础镜像
FROM centos
#维护镜像的用户信息
MAINTAINER zjz
#镜像操作指令安装Apache软件
RUN yum -y update
RUN yum -y install httpd
#开启 80端口
EXPOSE 80
#复制网站首页文件
ADD index.html /var/www/html/index.html
#将执行脚本复制到镜像中
ADD run.sh /run.sh
RUN chmod 755 /run.sh
#启动容器是执行脚本
CMD ["/run.sh"]
其中注意:run 命令可以有多条CMD只能有一条,若有多条则只会执行最后一条
编写启动httpd服务的shell脚本
vim run.sh
#!/bin/bash
rm -rf /run/httpd/*
exec /usr/sbin/apachectl -D FOREGROUND
编写测试页面
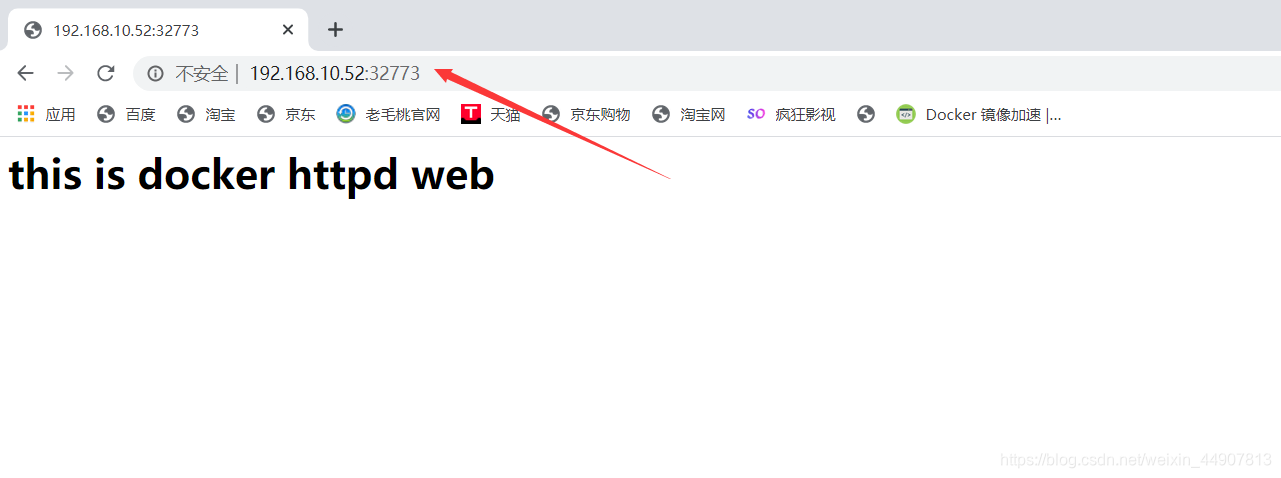
vim index.html
<h1>this is docker httpd web</h1>
使用tree命令查看目录的文件结构
没有tree这个命令,用yum -y install tree 装一哈
[root@localhost apache]# tree ./
./
├── Dockerfile
├── index.html
└── run.sh
0 directories, 3 files构建和使用镜像(创建运行容器)
[root@localhost apache]# docker build -t httpd:new .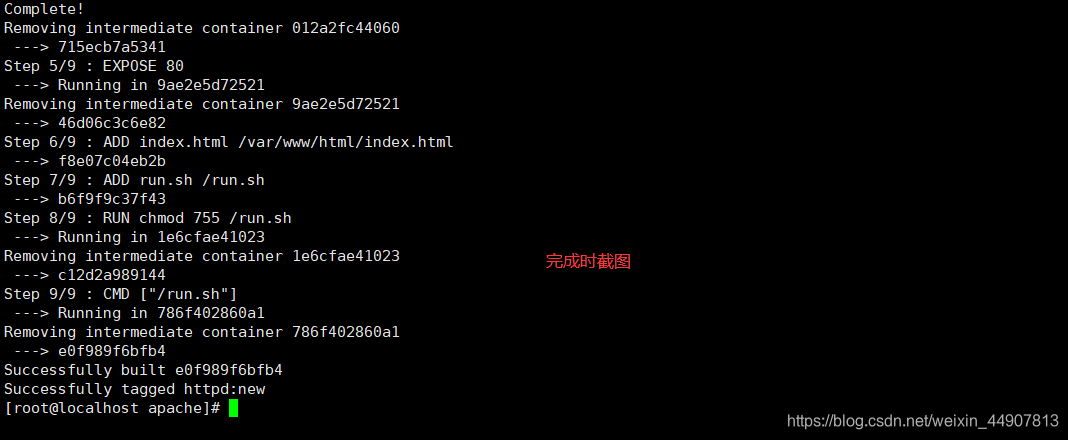
[root@localhost apache]# docker images
#基于构建的镜像创建并运行容器,给容器取名为test
[root@localhost apache]# docker run --name test -d -P httpd:new 
[root@localhost apache]# docker ps -a
这样我们进入容器中检查一下这个页面文件是否存在
[root@localhost apache]# docker exec -it test /bin/bash
[root@0467d8d2d590 /]# cat /var/www/html/index.html
<h1>this is docker httpd web</h1>
2、构建sshd镜像
[root@localhost ~]# cd /opt/
[root@localhost opt]# mkdir sshd  ##创建目录
[root@localhost opt]# cd sshd/
[root@localhost sshd]# vim Dockerfile  ##编写dockerfile文件
#sshd服务的镜像构建——基于Dockerfile
#首先先下载基础镜像centos,创建对应的工作目录
#开始编写nginx的Dockerfile
#第一步:基础镜像
FROM centos:7
#第二步:维护者信息
MAINTAINER zjz
#第三步:指令集
RUN yum -y update
RUN yum -y install openssh* net-tools lsof telnet passwd
RUN echo '123123' | passwd --stdin root
#不以PAM认证登录而是以密钥对登录(非对称密钥),即禁用ssh的PAM认证
RUN sed -i 's/UsePAM yes/UsePAM no/g' /etc/ssh/sshd_config
RUN ssh-keygen -t rsa -f /etc/ssh/ssh_host_rsa_key
#禁用ssh中PAM会话模块
RUN sed -i '/^session\s\+required\s\+pam_loginuid.so/s/^/#/' /etc/pam.d/sshd
#创建ssh工作目录和权限设置
RUN mkdir -p /root/.ssh && chown root:root /root && chmod 700 /root/.ssh
#开放22端口
EXPOSE 22
#第四步:启动容器时执行指令
CMD ["/usr/sbin/sshd","-D"]

构建镜像和运行容器
[root@localhost sshd]# docker run -d -P sshd:new
6005aaad0e99897e11672e081101a43aee169c06acba08a48b1353317d9504eb
[root@localhost sshd]# docker ps -a
CONTAINER ID        IMAGE               COMMAND               CREATED             STATUS              PORTS                   NAMES
6005aaad0e99        sshd:new            "/usr/sbin/sshd -D"   7 seconds ago       Up 6 seconds        0.0.0.0:32768->22/tcp   pensive_poincare

测试
[root@localhost sshd]# ssh 192.168.10.52 -p 32768
The authenticity of host '[192.168.10.52]:32768 ([192.168.10.52]:32768)' can't be established.
RSA key fingerprint is c5:95:5d:0a:ce:b3:d8:cc:43:f7:b6:32:89:12:28:21.
Are you sure you want to continue connecting (yes/no)? yes
Warning: Permanently added '[192.168.10.52]:32768' (RSA) to the list of known hosts.
[email protected]'s password:
Permission denied, please try again.
[email protected]'s password:
[root@6005aaad0e99 ~]# exit
logout
Connection to 192.168.10.52 closed.

此时我们登录该容器(ssh或者docker exec命令)查看sshd服务的状态(但是systemctl无法使用)
[root@6005aaad0e99 ~]# systemctl status sshd
Failed to get D-Bus connection: Operation not permitted

一则我们可以使用下面的命令使用该命令,二则我们可以基于上面构建的镜像作为基础镜像构建systemctl的镜像来测试验证。
[root@localhost sshd]# docker run --privileged -itd -P sshd:new  /usr/sbin/init
bf552af2fb6b7d512bc44c32262a5dcce092e26bb7bec8e73c866a5c5a755d83
[root@localhost sshd]#  docker ps -a
CONTAINER ID        IMAGE               COMMAND               CREATED             STATUS              PORTS                   NAMES
bf552af2fb6b        sshd:new            "/usr/sbin/init"      6 seconds ago       Up 6 seconds        0.0.0.0:32770->22/tcp   adoring_bose
bb24b2efd442        systemctl:new       "/usr/sbin/init"      13 minutes ago      Up 13 minutes       22/tcp                  sleepy_curie
0467d8d2d590        httpd:new           "/run.sh"             27 minutes ago      Up 27 minutes       0.0.0.0:32769->80/tcp   test
6005aaad0e99        sshd:new            "/usr/sbin/sshd -D"   About an hour ago   Up About an hour    0.0.0.0:32768->22/tcp   pensive_poincare
[root@localhost sshd]# ssh 192.168.10.52 -p 32770
The authenticity of host '[192.168.10.52]:32770 ([192.168.10.52]:32770)' can't be established.
ECDSA key fingerprint is e7:5b:57:32:ea:12:db:90:c5:da:d5:3d:95:ff:48:ab.
Are you sure you want to continue connecting (yes/no)? yes
Warning: Permanently added '[192.168.10.52]:32770' (ECDSA) to the list of known hosts.
[email protected]'s password:
[root@bf552af2fb6b ~]#  systemctl status sshd
● sshd.service - OpenSSH server daemon
   Loaded: loaded (/usr/lib/systemd/system/sshd.service; enabled; vendor preset: enabled)
   Active: active (running) since Tue 2020-07-28 02:55:53 UTC; 48s ago
     Docs: man:sshd(8)
           man:sshd_config(5)
 Main PID: 75 (sshd)
   CGroup: /docker/bf552af2fb6b7d512bc44c32262a5dcce092e26bb7bec8e73c866a5c5a755d83/system.slice/sshd.service
           ├─ 75 /usr/sbin/sshd -D
           ├─ 85 sshd: root@pts/1
           ├─ 89 -bash
           └─102 systemctl status sshd
           ‣ 75 /usr/sbin/sshd -D

Jul 28 02:55:53 bf552af2fb6b systemd[1]: Starting OpenSSH server daemon...
Jul 28 02:55:53 bf552af2fb6b sshd[75]: Server listening on 0.0.0.0 port 22.
Jul 28 02:55:53 bf552af2fb6b sshd[75]: WARNING: 'UsePAM no' is not supported in Red Hat Enterprise Linux and ...lems.
Jul 28 02:55:53 bf552af2fb6b sshd[75]: Server listening on :: port 22.
Jul 28 02:55:53 bf552af2fb6b systemd[1]: Started OpenSSH server daemon.
Jul 28 02:56:23 bf552af2fb6b sshd[85]: WARNING: 'UsePAM no' is not supported in Red Hat Enterprise Linux and ...lems.
Jul 28 02:56:27 bf552af2fb6b sshd[85]: Failed password for root from 192.168.10.52 port 35474 ssh2
Jul 28 02:56:29 bf552af2fb6b sshd[85]: Failed password for root from 192.168.10.52 port 35474 ssh2
Jul 28 02:56:31 bf552af2fb6b sshd[85]: Accepted password for root from 192.168.10.52 port 35474 ssh2
Hint: Some lines were ellipsized, use -l to show in full.
3、构建systemctl镜像
[root@localhost ~]# cd /opt/
[root@localhost opt]# mkdir systemctl  ##创建目录
[root@localhost opt]# cd systemctl/
[root@localhost sshd]# vim Dockerfile  ##编写dockerfile文件
FROM sshd:new
MAINTAINER zjz
ENV container docker
#下面的命令是放在一个镜像层中执行的,可以减少镜像层
#括号中的指令含义是遍历进入的目录文件,删除除了systemd-tmpfiles-setup.service的所有文件,之后删除一些其他文件
RUN (cd /lib/systemd/system/sysinit.target.wants/; for i in *; do [ $i == systemd-tmpfiles-setup.service ] || rm -f $i; done); \
rm -f /lib/systemd/system/multi-user.target.wants/*; \
rm -f /etc/systemd/system/*.wants/*; \
rm -f /lib/systemd/system/local-fs.target.wants/*; \
rm -f /lib/systemd/system/sockets.target.wants/*udev*; \
rm -f /lib/systemd/system/sockets.target.wants/*initctl*; \
rm -f /lib/systemd/system/basic.target.wants/*; \
rm -f /lib/systemd/system/anaconda.target.wants/*;
VOLUME [ "/sys/fs/cgroup" ]
CMD ["/usr/sbin/init"]
构建运行及测试
[root@localhost systemctl]# docker build -t systemctl:new . ##创建镜像
[root@localhost systemctl]# docker run --privileged -it -v /sys/fs/cgroup/:/sys/fs/cgroup:ro systemctl:new /usr/sbin/init ##privateged container 内的root拥有真正的root权限,否则,container内的root只是外部的一个普通用户权限。
systemd 219 running in system mode. (+PAM +AUDIT +SELINUX +IMA -APPARMOR +SMACK +SYSVINIT +UTMP +LIBCRYPTSETUP +GCRYPT +GNUTLS +ACL +XZ +LZ4 -SECCOMP +BLKID +ELFUTILS +KMOD +IDN)
Detected virtualization docker.
Detected architecture x86-64.

Welcome to CentOS Linux 7 (Core)!

Set hostname to <bb24b2efd442>.
[  OK  ] Created slice Root Slice.
[  OK  ] Listening on Journal Socket.
[  OK  ] Created slice System Slice.
[  OK  ] Reached target Slices.
[  OK  ] Reached target Paths.
[  OK  ] Listening on Delayed Shutdown Socket.
[  OK  ] Reached target Local File Systems.
         Starting Create Volatile Files and Directories...
[  OK  ] Reached target Swap.
         Starting Journal Service...
[  OK  ] Started Create Volatile Files and Directories.
[ INFO ] Update UTMP about System Boot/Shutdown is not active.
[DEPEND] Dependency failed for Update UTMP about System Runlevel Changes.
Job systemd-update-utmp-runlevel.service/start failed with result 'dependency'.
[  OK  ] Started Journal Service.
[  OK  ] Reached target System Initialization.
[  OK  ] Listening on D-Bus System Message Bus Socket.
[  OK  ] Reached target Sockets.
[  OK  ] Reached target Basic System.
[  OK  ] Reached target Multi-User System.
[  OK  ] Started Daily Cleanup of Temporary Directories.
[  OK  ] Reached target Timers.
重新开启一个终端进行测试
[root@localhost ~]# cd /opt/
[root@localhost opt]# cd systemctl/
[root@localhost systemctl]# docker ps -a
[root@localhost systemctl]# docker ps
CONTAINER ID        IMAGE               COMMAND               CREATED             STATUS              PORTS                   NAMES
bb24b2efd442        systemctl:new       "/usr/sbin/init"      9 minutes ago       Up 9 minutes        22/tcp                  sleepy_curie
0467d8d2d590        httpd:new           "/run.sh"             23 minutes ago      Up 23 minutes       0.0.0.0:32769->80/tcp   test
6005aaad0e99        sshd:new            "/usr/sbin/sshd -D"   44 minutes ago      Up 44 minutes       0.0.0.0:32768->22/tcp   pensive_poincare
[root@localhost systemctl]# docker exec -it sleepy_curie /bin/bash
[root@bb24b2efd442 /]# systemctl status sshd
● sshd.service - OpenSSH server daemon
   Loaded: loaded (/usr/lib/systemd/system/sshd.service; disabled; vendor preset: enabled)
   Active: inactive (dead)
     Docs: man:sshd(8)
           man:sshd_config(5)
[root@bb24b2efd442 /]# ssh 192.168.10.52 -p 22
The authenticity of host '192.168.10.52 (192.168.10.52)' can't be established.
ECDSA key fingerprint is SHA256:X3dOS5bVumqe/7loOyPanoa7rXqlTF79C5mavP1EQW0.
ECDSA key fingerprint is MD5:00:8f:be:85:3b:97:c9:05:bb:fb:fe:17:14:49:19:9f.
Are you sure you want to continue connecting (yes/no)? yes
Warning: Permanently added '192.168.10.52' (ECDSA) to the list of known hosts.
[email protected]'s password:
Last failed login: Tue Jul 28 10:46:42 CST 2020 from 172.17.0.4 on ssh:notty
There were 2 failed login attempts since the last successful login.
Last login: Tue Jul 28 10:43:54 2020 from 192.168.10.1
[root@localhost ~]# exit
logout
Connection to 192.168.10.52 closed.
[root@bb24b2efd442 /]# exit
exit
4.构建Nginx镜像
[root@localhost ~]# cd /opt/
[root@localhost opt]# mkdir nginx   ##创建Nginx目录
[root@localhost opt]# cd nginx/
[root@localhost nginx]# vim Dockerfile
FROM centos:7
MAINTAINER The is nginx <zjz>
RUN yum install -y proc-devel gcc gcc-c++ zlib zlib-devel make openssl-devel wget
ADD nginx-1.14.0.tar.gz /usr/local
WORKDIR /usr/local/nginx-1.14.0/
RUN ./configure --prefix=/usr/local/nginx && make && make install
EXPOSE 80
EXPOSE 443
RUN echo "daemon off;">>/usr/local/nginx/conf/nginx.conf
WORKDIR /root/nginx
ADD run.sh /run.sh
RUN chmod 755 /run.sh
CMD ["/run.sh"]

[root@localhost nginx]# vim run.sh
#!/bin/bash
/usr/local/nginx/sbin/nginx   ##开启Nginx服务

[root@localhost nginx]# rz    ##在xshell里上传nginx安装包

[root@localhost nginx]# ls
nginx-1.14.0.tar.gz
[root@localhost nginx]# docker build -t nginx:new .   ##创建镜像
[root@localhost nginx]# docker run -d -P nginx:new    ##创建容器
ba75ff06051430938bbb014450cd16f7b2b7a2fe023969a6a0ec76051d6872c5
[root@localhost nginx]# docker ps -a   ##查看容器

CONTAINER ID        IMAGE               COMMAND               CREATED             STATUS              PORTS                                           NAMES
ba75ff060514        nginx:new           "/run.sh"             14 seconds ago      Up 14 seconds       0.0.0.0:32772->80/tcp, 0.0.0.0:32771->443/tcp   pedantic_archimedes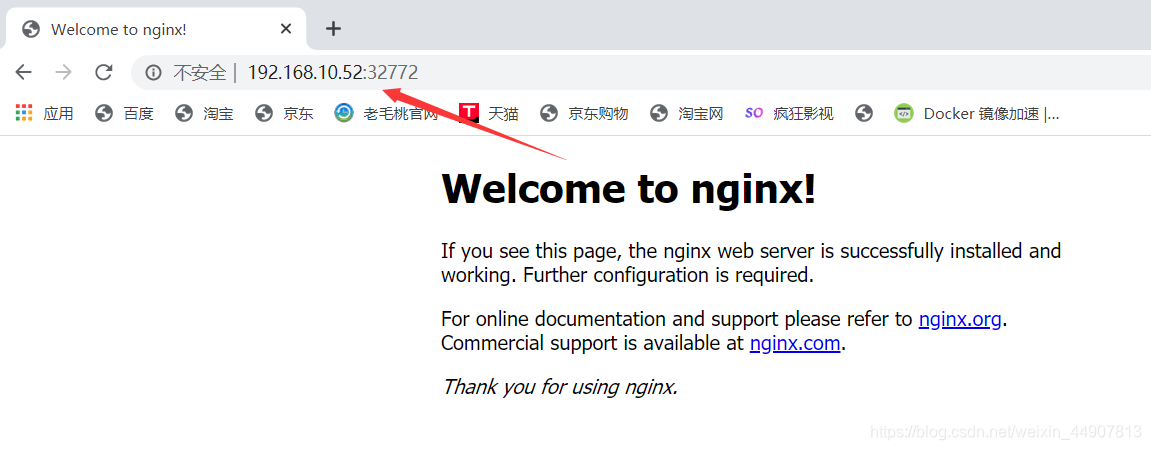
5.构建Tomcat镜像
[root@localhost opt]# mkdir tomcat
[root@localhost opt]# cd tomcat/
[root@localhost tomcat]# rz
[root@localhost tomcat]# ls
jdk-8u211-linux-x64.tar.gz
[root@localhost tomcat]# rz
[root@localhost tomcat]# ls
apache-tomcat-8.5.35.tar.gz jdk-8u211-linux-x64.tar.gz
[root@localhost tomcat]# vim Dockerfile
FROM centos:7
MAINTAINER this is tomcat
ADD jdk-8u211-linux-x64.tar.gz /usr/local
WORKDIR /usr/local
RUN mv jdk1.8.0_211 /usr/local/java
ENV JAVA_HOME /usr/local/java ##设置环境变量
ENV JAVA_BIN /usr/local/java/bin
ENV JRE_HOME /usr/local/java/jre
ENV PATH $PATH:/usr/local/java/bin:/usr/local/java/jre/bin
ENV CLASSPATH /usr/local/java/jre/bin:/usr/local/java/lib:/usr/local/java/jre/lib/charsets.jar
ADD apache-tomcat-8.5.35.tar.gz /usr/local
WORKDIR /usr/local
RUN mv apache-tomcat-8.5.35 /usr/local/tomcat8
EXPOSE 8080
ENTRYPOINT ["/usr/local/tomcat8/bin/catalina.sh","run"]
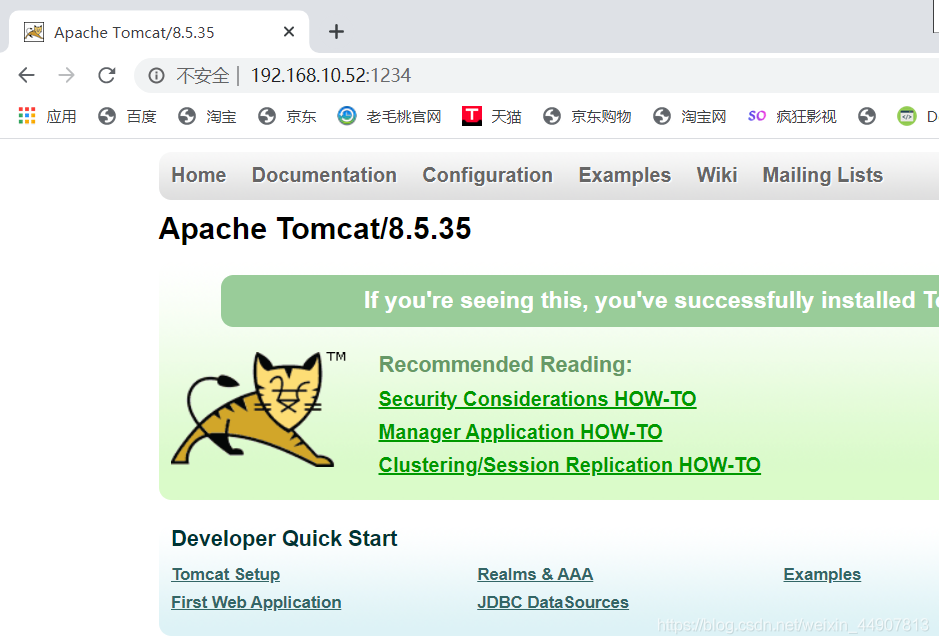
[root@localhost tomcat]# docker build -t tomcat:centos . ##创建镜像
[root@localhost tomcat]# docker run --name tomcat01 -p 1234:8080 -it tomcat:centos /bin/bash
##创建容器
[root@localhost tomcat]# docker ps
CONTAINER ID IMAGE COMMAND CREATED STATUS PORTS NAMES
3f81e707d8b6 tomcat:centos "/usr/local/tomcat8/…" 3 minutes ago Up 3 minutes 0.0.0.0:1234->8080/tcp tomcat01
6.构建MySQL镜像
[root@localhost mysql5.7]# cat Dockerfile

#基于基础镜像
FROM centos:7
#维护该镜像的用户信息
MAINTAINER zjz
#指令集
#下载相关工具
RUN yum -y install \
ncurses \
ncurses-devel \
bison \
cmake \
make \
gcc \
gcc-c++
#创建mysql用户
RUN useradd -s /sbin/nologin mysql
#复制软件包到指定目录(将会自动解压)
ADD mysql-boost-5.7.20.tar.gz /usr/local/src
#指定工作目录
WORKDIR /usr/local/src/mysql-5.7.20/
#cmake配置及编译安装
RUN cmake \
-DCMAKE_INSTALL_PREFIX=/usr/local/mysql \
-DMYSQL_UNIX_ADDR=/usr/local/mysql/mysql.sock \
-DSYSCONFDIR=/etc \
-DSYSTEMD_PID_DIR=/usr/local/mysql \
-DDEFAULT_CHARSET=utf8 \
-DDEFAULT_COLLATION=utf8_general_ci \
-DWITH_INNOBASE_STORAGE_ENGINE=1 \
-DWITH_ARCHIVE_STORAGE_ENGINE=1 \
-DWITH_BLACKHOLE_STORAGE_ENGINE=1 \
-DWITH_PERFSCHEMA_STORAGE_ENGINE=1 \
-DMYSQL_DATADIR=/usr/local/mysql/data \
-DWITH_BOOST=boost \
-DWITH_SYSTEMD=1 && make && make install
#更改mysql目录属主属组
RUN chown -R mysql:mysql /usr/local/mysql/
#删除默认安装的my.cnf文件
RUN rm -rf /etc/my.cnf
#复制一份my.cnf到etc目录下
ADD my.cnf /etc
#更改该文件权限
RUN chown mysql:mysql /etc/my.cnf
#设置环境变量,命令目录及库文件目录
ENV PATH=/usr/local/mysql/bin:/usr/local/mysql/lib:$PATH
#指定工作目录
WORKDIR /usr/local/mysql/
#初始化设置
RUN bin/mysqld \
--initialize-insecure \
--user=mysql \
--basedir=/usr/local/mysql \
--datadir=/usr/local/mysql/data
#优化启动方式
RUN cp /usr/local/mysql/usr/lib/systemd/system/mysqld.service /usr/lib/systemd/system/
EXPOSE 3306
#直接设置运行启动脚本
RUN echo -e "#!/bin/sh \nsystemctl enable mysqld" > /run.sh
RUN chmod 755 /run.sh
RUN sh /run.sh
#启动容器时执行
CMD ["init"]
my.cnf文件
[client]
port = 3306
default-character-set=utf8
socket = /usr/local/mysql/mysql.sock

[mysql]
port = 3306
default-character-set=utf8
socket = /usr/local/mysql/mysql.sock

[mysqld]
user = mysql
basedir = /usr/local/mysql
datadir = /usr/local/mysql/data
port = 3306
character_set_server=utf8
pid-file = /usr/local/mysql/mysqld.pid
socket = /usr/local/mysql/mysql.sock
server-id = 1

sql_mode=NO_ENGINE_SUBSTITUTION,STRICT_TRANS_TABLES,NO_AUTO_CREATE_USER,NO_AUTO_VALUE_ON_ZERO,NO_ZERO_IN_DATE,NO_ZERO_DATE,ERROR_FOR_DIVISION_BY_ZERO,PIPES_AS_CONCAT,ANSI_QUOTES
构建及运行
[root@localhost mysql5.7]# docker build -t mysql:latest .
...//友情提示MySQL5.7时间比较长
[root@localhost mysql5.7]# docker run --name mysql_new -d -P --privileged mysql:latest
e9c9f93766d149a3387aed4cb5e04425269a884fccf06256b087d00e4c262222
[root@localhost mysql5.7]# docker ps -a
CONTAINER ID        IMAGE               COMMAND                  CREATED             STATUS              PORTS                                           NAMES
e9c9f93766d1        mysql:latest        "init"                   6 seconds ago       Up 5 seconds        0.0.0.0:32774->3306/tcp
进入MySQL服务的容器中进行提权操作
[root@localhost mysql5.7]# docker exec -it mysql_new /bin/bash
[root@e9c9f93766d1 mysql]# mysql
Welcome to the MySQL monitor.  Commands end with ; or \g.
Your MySQL connection id is 3
Server version: 5.7.20 Source distribution

Copyright (c) 2000, 2017, Oracle and/or its affiliates. All rights reserved.

Oracle is a registered trademark of Oracle Corporation and/or its
affiliates. Other names may be trademarks of their respective
owners.

Type 'help;' or '\h' for help. Type '\c' to clear the current input statement.

mysql> grant all privileges on *.* to 'root'@'%' identified by '123456';
Query OK, 0 rows affected, 1 warning (0.00 sec)

mysql>  flush privileges;
Query OK, 0 rows affected (0.01 sec)

mysql> exit
Bye
[root@e9c9f93766d1 mysql]# exit
exit
宿主机系统安装mariadb服务来测试
[root@localhost mysql5.7]# yum install mariadb -y
[root@localhost mysql5.7]# mysql -h 20.0.0.149 -P 32774 -uroot -p123456
Welcome to the MariaDB monitor.  Commands end with ; or \g.
Your MySQL connection id is 4
Server version: 5.7.20 Source distribution

Copyright (c) 2000, 2018, Oracle, MariaDB Corporation Ab and others.

Type 'help;' or '\h' for help. Type '\c' to clear the current input statement.

MySQL [(none)]> show databases;
+--------------------+
| Database           |
+--------------------+
| information_schema |
| mysql              |
| performance_schema |
| sys                |
+--------------------+
4 rows in set (0.01 sec)
#创建一个数据库,退出后再次然后进入容器查看
MySQL [(none)]> create database mydb;
Query OK, 1 row affected (0.00 sec)

MySQL [(none)]> exit
Bye

[root@localhost mysql5.7]# docker exec -it mysql_new /bin/bash
[root@e9c9f93766d1 mysql]# mysql
Welcome to the MySQL monitor.  Commands end with ; or \g.
Your MySQL connection id is 5
Server version: 5.7.20 Source distribution

Copyright (c) 2000, 2017, Oracle and/or its affiliates. All rights reserved.

Oracle is a registered trademark of Oracle Corporation and/or its
affiliates. Other names may be trademarks of their respective
owners.

Type 'help;' or '\h' for help. Type '\c' to clear the current input statement.

mysql> show databases;
+--------------------+
| Database           |
+--------------------+
| information_schema |
| mydb               |
| mysql              |
| performance_schema |
| sys                |
+--------------------+
5 rows in set (0.00 sec)

mysql> exit
Bye
[root@e9c9f93766d1 mysql]# exit
exit
[root@localhost mysql5.7]#
工程中一般不会将MySQL服务放在容器中运行,而是会单独使用服务器部署提供服务(搭建高可用集群架构)