在前后端分离项目中,项目的交互都是通过 JSON 来进行,无论登录成功还是失败,后端只需返回是否成功的JSON给前端,由前端决定页面的跳转问题,和后端没有关系了。
前面两章我们已经简单的使用了Spring Security做表单跳转,前后端分离需要用到successHandler来配置登录成功的回调。
前两章传送门
Spring Security初使用
Spring Security自定义表单登录详解
successHandler 的功能十分强大,甚至已经囊括了 defaultSuccessUrl 和 successForwardUrl 的功能。我们来看一下:
.successHandler((req, resp, authentication) -> {
    Object principal = authentication.getPrincipal();
    resp.setContentType("application/json;charset=utf-8");
    PrintWriter out = resp.getWriter();
    out.write(new ObjectMapper().writeValueAsString(principal));
    out.flush();
    out.close();
})
successHandler 方法的参数是一个 AuthenticationSuccessHandler 对象,这个对象中我们要实现的方法是 onAuthenticationSuccess。
onAuthenticationSuccess 方法有三个参数,分别是:
- HttpServletRequest
- HttpServletResponse
- Authentication
利用 HttpServletRequest 我们可以做服务端跳转,利用 HttpServletResponse 我们可以做客户端跳转,当然,也可以返回 JSON 数据。
第三个 Authentication 参数则保存了我们刚刚登录成功的用户信息。
@Override
protected void configure(HttpSecurity http) throws Exception {
    http.authorizeRequests()
            .anyRequest().authenticated()
            .and()//结束当前标签,上下文回到HttpSecurity,开启新一轮的配置。
            .formLogin()
            .loginPage("/login.html")//登录页
            .loginProcessingUrl("/doLogin")
            .successHandler((req, resp, authentication) -> {
                Object principal = authentication.getPrincipal();
                resp.setContentType("application/json;charset=utf-8");
                PrintWriter out = resp.getWriter();
                out.write(new ObjectMapper().writeValueAsString(principal));
                out.flush();
                out.close();
            })
            .permitAll()//登录相关的页面/接口不拦截。
            .and()
            .csrf().disable();
}
配置如上信息,查看全部配置请看我前两章Spring Security文章
启动项目,请求登录接口
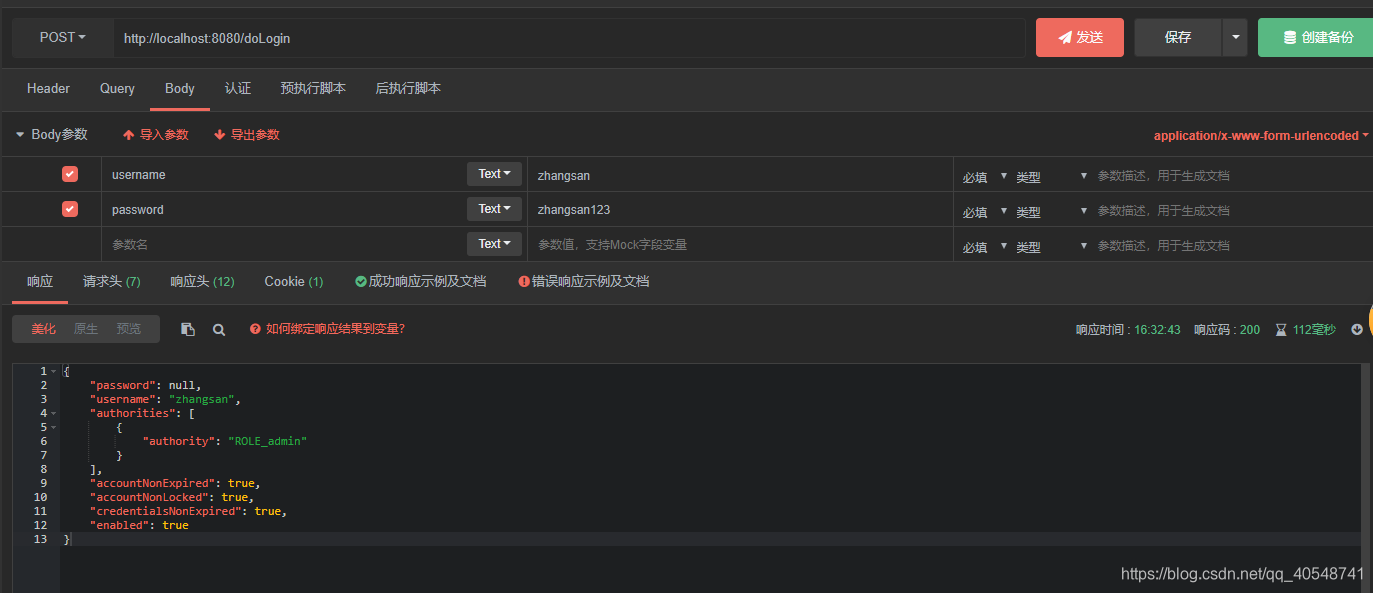
登录失败也有一个类似的回调,如下:
.failureHandler((req, resp, e) -> {
    resp.setContentType("application/json;charset=utf-8");
    PrintWriter out = resp.getWriter();
    out.write(e.getMessage());
    out.flush();
    out.close();
})
失败的回调也是三个参数,第三个是一个 Exception保存了登录失败的原因,我们可以将之通过 JSON 返回到前端。也可以去识别异常的类型,根据不同的异常类型,返回对应的错误信息。
未认证访问一个需要认证后才能访问的页面,系统默认重定向到登录页面,但是在前后端分离中,应该给用户一个尚未登录的提示,前端收到提示之后,再自行决定页面跳转。
具体配置如下:
.csrf().disable().exceptionHandling()
.authenticationEntryPoint((req, resp, authException) -> {
            resp.setContentType("application/json;charset=utf-8");
            PrintWriter out = resp.getWriter();
            out.write("尚未登录,请先登录");
            out.flush();
            out.close();
        }
);
重启项目,访问http://localhost:8080/hello

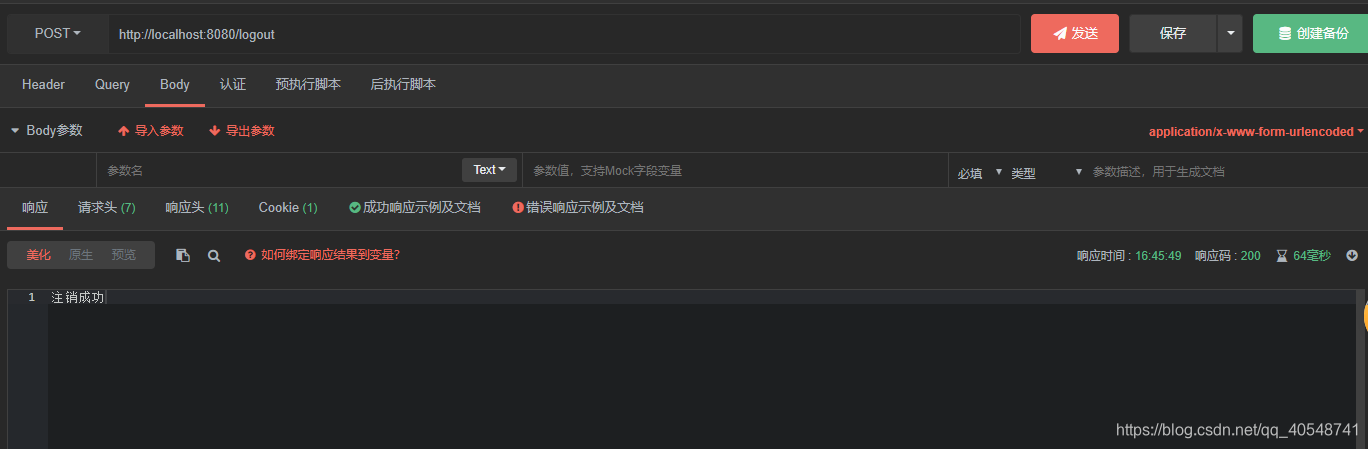
最后还有注销登录,前后端分离项目,注销登录成功后返回 JSON 即可,配置如下:
.and()
.logout()
.logoutUrl("/logout")
.logoutSuccessHandler((req, resp, authentication) -> {
    resp.setContentType("application/json;charset=utf-8");
    PrintWriter out = resp.getWriter();
    out.write("注销成功");
    out.flush();
    out.close();
})
.permitAll()
.and()
最后附上configure完整的配置
@Override
protected void configure(HttpSecurity http) throws Exception {
    http.authorizeRequests()
            .anyRequest().authenticated()
            .and()//结束当前标签,上下文回到HttpSecurity,开启新一轮的配置。
            .formLogin()
            .loginPage("/login.html")//登录页
            .loginProcessingUrl("/doLogin")
            .successHandler((req, resp, authentication) -> {
                Object principal = authentication.getPrincipal();
                resp.setContentType("application/json;charset=utf-8");
                PrintWriter out = resp.getWriter();
                out.write(new ObjectMapper().writeValueAsString(principal));
                out.flush();
                out.close();
            })
            .failureHandler((req, resp, e) -> {
                resp.setContentType("application/json;charset=utf-8");
                PrintWriter out = resp.getWriter();
                out.write(e.getMessage());
                out.flush();
                out.close();
            })
            .and()
            .logout()
            .logoutUrl("/logout")
            .logoutSuccessHandler((req, resp, authentication) -> {
                resp.setContentType("application/json;charset=utf-8");
                PrintWriter out = resp.getWriter();
                out.write("注销成功");
                out.flush();
                out.close();
            })
            .permitAll()//登录相关的页面/接口不拦截。
            .and()
            .csrf().disable().exceptionHandling()
            .authenticationEntryPoint((req, resp, authException) -> {
                        resp.setContentType("application/json;charset=utf-8");
                        PrintWriter out = resp.getWriter();
                        out.write("尚未登录,请先登录");
                        out.flush();
                        out.close();
                    }
            );
}
好了,本文就介绍下前后端分离中常见的 JSON 交互问题。