目录
- 01Mybatis的连接池技术
- 02Mybatis 的事务控制
- 2.1什么是事务?
- 2.2为什么要使用事务?
- 2.3事务的四个特性(ACID)
- 2.4Mybatis中事务提交方式
- 2.4.1创建一个maven工程(名字为mybatis)
- 2.4.2创建数据库和表
- 2.4.3在包中创建dao接口(IUserDao)
- 2.4.4在包domain中创建User.java和QueryVo.java
- 2.4.5在Resource文件夹下创建数据库链接信息配置文件(db.properties)
- 2.4.6在Resource文件夹下创建主配置文件(SqlMapConfig.xml)
- 2.4.7在Resource文件夹下添加配置(log4j.properties)
- 2.4.8在Resource文件加下创建与dao接口相同的包,然后在包中添加IUserDao.xml文件(映射配置文件)
- 2.4.9在包中编写测试类(mybatisTest.java)
- 03mybatis的动态SQL
- 04mybatis多表查询之一对多
- 4.1环境搭建
- 4.1.1新建项目(mybatis)
- 4.1.2在myMybatis数据库中添加account表
- 4.1.3在包中创建实体类(User和Account)
- 4.1.4在包中创建接口(IUserDao和IAccountDao)
- 4.1.5在Resource文件夹下导入配置文件
- 4.1.6在包下添加映射配置文件(IUserDao.xml和IAccountDao.xml)
- 4.1.7编写测试类(UserTest和AccountTest)
- 4.2 如何进行多对一的查询?
- 4.3如何进行一对多的查询?
- 05mybatis多表查询之多对多
01Mybatis的连接池技术
- 在 Mybatis 的主配置文件中( SqlMapConfig.xml ), 通过
<dataSource type=”pooled”>来实现 Mybatis 中连接池的配置。 - 通过type属性来指定使用哪种数据源
- mybatis的数据源分为三类:
UNPOOLED:不使用连接池的数据源
POOLED :使用连接池的数据源
JNDI :使用 JNDI 实现的数据源
- 在这三种数据源中,我们一般采用的是 POOLED 数据源(很多时候我们所说的数据源就是为了更好的管理数据库连接,也就是我们所说的连接池技术)
1.1mybatis中的连接池配置
- 连接池配置就是在主配置文件(SqlMapConfig.xml )中, 具体配置如下:
<!-- 配置数据源(连接池)信息 -->
<dataSource type="POOLED">
	<property name="driver" value="${driver}"/>
	<property name="url" value="${url}"/>
	<property name="username" value="${username}"/>
	<property name="password" value="${password}"/>
</dataSource>
- MyBatis 在初始化时, 根据
<dataSource>的 type 属性来创建相应类型的的数据源 DataSource,即:
type=”POOLED”: 采用传统的javax.sql.DataSource规范中的连接池,使用完不关闭,归还到连接池中,mybatis中有针对规范的实现
type=”UNPOOLED”: 采用传统的获取连接的方式,虽然也实现Javax.sql.DataSource接口,但是并没有使用池的思想,随时使用随时创建,使用完就关闭
type=”JNDI”: MyBatis 会从 JNDI 服务上查找 DataSource 实例,然后返回使用 - 数据库连接是我们最为宝贵的资源,只有在要用到的时候,才去获取并打开连接,当我们用完了就再立即将数据库连接归还到连接池中
02Mybatis 的事务控制
- 在 JDBC 中我们可以通过手动方式将事务的提交改为手动方式,即通过
setAutoCommit()方法就可以调整,参数为True则为自动提交,参数为False则为手动提交。 - Mybatis 框架是对 JDBC 的封装,所以 Mybatis 框架的事务控制方式,本身也是用 JDBC 的setAutoCommit()方法来设置事务提交方式的
JDBC事务:
- 1.在JDBC中处理事务,都是通过Connection完成的。同一事务中所有的操作,都在使用同一个Connection对象。JDBC事务默认是开启的,并且是默认提交。
- 2.JDBC Connection 接口提供了两种事务模式:自动提交和手工提交
- 3.JDBC中的事务java.sql.Connection 的三个方法与事务有关:
setAutoCommit(boolean):设置是否为自动提交事务,每条执行的SQL语句都是一个单独的事务,如果设置为false,需要手动提交事务。
commit():提交结束事务。
rollback():回滚结束事务。
Mybatis中的事务是通过SqlSession对象的commit方法和rollback方法实现事务的提交和回滚
2.1什么是事务?
事务指逻辑上的一组操作,组成这组操作的各个单元,要不全部成功,要不全部不成功
2.2为什么要使用事务?
- 事务是为解决数据安全操作提出的,
例如:银行转帐业务,账户A向账户B转1元钱,A账户首先要减去1元钱,然后B账户再增加1元。假如在中间网络出现了问题,A账户减去1元已经结束,B因为网络中断而操作失败,那么整个业务失败,必须做出控制,要求A账户转帐业务撤销。这才能保证业务的正确性,完成这个操走就需要事务,将A账户资金减少和B账户资金增加放到同一个事务里,要么全部执行成功,要么全部撤销,这样就保证了数据的安全性
2.3事务的四个特性(ACID)
- 原子性(atomicity):事务是数据库的逻辑工作单位,而且是必须是原子工作单位,对于其数据修改,要么全部执行,要么全部不执行。
- 一致性(consistency):事务在完成时,必须是所有的数据都保持一致状态。在相关数据库中,所有规则都必须应用于事务的修改,以保持所有数据的完整性。(实例:转账,两个账户余额相加,值不变。)
- 隔离性(isolation):一个事务的执行不能被其他事务所影响。
- 持久性(durability):一个事务一旦提交,事物的操作便永久性的保存在DB中。即便是在数据库系统遇到故障的情况下也不会丢失提交事务的操作。
2.4Mybatis中事务提交方式
- mybatis中更改事务提交方式使用
public SqlSession openSession(boolean autoCommit),默认为自动提交方式,设置为false则为手动提交 - 为了复习,再把流程走一遍
- 只做一个根据QueryVo条件进行查询的操作

2.4.1创建一个maven工程(名字为mybatis)
2.4.2创建数据库和表
1.创建数据库语句(myMybatis)
create database myMybatis;

2.创建表语句
CREATE TABLE `user` (
  `id` int(11) NOT NULL auto_increment,
  `username` varchar(32) NOT NULL COMMENT '用户名称',
  `birthday` datetime default NULL COMMENT '生日',
  `sex` char(1) default NULL COMMENT '性别',
  `address` varchar(256) default NULL COMMENT '地址',
  PRIMARY KEY  (`id`)
) ENGINE=InnoDB DEFAULT CHARSET=utf8;

3.在表中添加几条记录
insert  into `user`(`id`,`username`,`birthday`,`sex`,`address`) values
(41,'老王','2018-02-27 17:47:08','男','北京'),
(42,'小王','2018-03-02 15:09:37','女','北京金燕龙'),
(43,'隔壁老王','2018-03-04 11:34:34','女','北京金燕龙'),
(45,'隔壁小王','2018-03-04 12:04:06','男','北京金燕龙'),
(46,'老王','2018-03-07 17:37:26','男','北京'),
(48,'老张','2018-03-08 11:44:00','女','北京修正');
2.4.3在包中创建dao接口(IUserDao)
/*持久层接口*/
public interface IUserDao(){
	/* 根据queryVo中的条件查询用户*/
    List<User> findUserByVo(QueryVo vo);
}
2.4.4在包domain中创建User.java和QueryVo.java
- QueryVo.java
public class QueryVo(){
	private User user;
	public void setUser(User user){
		this.user=user;
		}
	public User getUser(){
		return user;
	}
}
- User.java
public class User(){
	//定义私有属性
	private Integer userId;
	private String userName;
	private String userAddress;
	private String userSex;
	private Date userBirthday;

	public Integer getUserId() {
        return userId;
    }
    public void setUserId(Integer userId) {
        this.userId = userId;
    }

    public String getUserName() {
        return userName;
    }
    public void setUserName(String userName) {
        this.userName = userName;
    }

    public String getUserAddress() {
        return userAddress;
    }
    public void setUserAddress(String userAddress) {
        this.userAddress = userAddress;
    }

    public String getUserSex() {
        return userSex;
    }
    public void setUserSex(String userSex) {
        this.userSex = userSex;
    }

    public Date getUserBirthday() {
        return userBirthday;
    }
    public void setUserBirthday(Date userBirthday) {
        this.userBirthday = userBirthday;
    }

    @Override
    public String toString() {
        return "User{" +
                "userId=" + userId +
                ", userName='" + userName + '\'' +
                ", userAddress='" + userAddress + '\'' +
                ", userSex='" + userSex + '\'' +
                ", userBirthday=" + userBirthday +
                '}';
    }

}
2.4.5在Resource文件夹下创建数据库链接信息配置文件(db.properties)
jdbc.driver=com.mysql.jdbc.Driver
jdbc.url=jdbc:mysql://localhost:3306/myMybatis
jdbc.user=root
jdbc.password=12345678
2.4.6在Resource文件夹下创建主配置文件(SqlMapConfig.xml)
<?xml version="1.0" encoding="UTF-8"?>
<!DOCTYPE configuration
        PUBLIC "-//mybatis.org//DTD Config 3.0//EN"
        "http://mybatis.org/dtd/mybatis-3-config.dtd">
<configuration>
    <!-- 配置properties,读取数据库链接信息-->
    <properties resource="db.properties"></properties>

    <!--使用typeAliases配置别名,它只能配置domain中类的别名 -->
    <!--配置过之后就可以直接使用类名了,不区分大小写-->
    <typeAliases>
        <package name="com.aismall.domain"></package>
    </typeAliases>

    <!--配置环境-->
    <environments default="mysql">
        <!-- 配置mysql的环境-->
        <environment id="mysql">
            <!-- 配置事务:类型为jdbc类型 -->
            <transactionManager type="JDBC"></transactionManager>
            <!--配置连接池-->
            <!--只有在通过properties标签读取数据库链接信息后才能这样写-->
            <dataSource type="POOLED">
                <property name="driver" value="${jdbc.driver}"></property>
                <property name="url" value="${jdbc.url}"></property>
                <property name="username" value="${jdbc.username}"></property>
                <property name="password" value="${jdbc.password}"></property>
            </dataSource>
        </environment>
    </environments>

    <!-- 配置映射文件的位置 -->
    <!--注意此处使用的是package标签-->
    <mappers>
        <package name="com.aismall.dao"></package>
    </mappers>
</configuration>
2.4.7在Resource文件夹下添加配置(log4j.properties)
# Set root category priority to INFO and its only appender to CONSOLE.
#log4j.rootCategory=INFO, CONSOLE            debug   info   warn error fatal
log4j.rootCategory=debug, CONSOLE, LOGFILE

# Set the enterprise logger category to FATAL and its only appender to CONSOLE.
log4j.logger.org.apache.axis.enterprise=FATAL, CONSOLE

# CONSOLE is set to be a ConsoleAppender using a PatternLayout.
log4j.appender.CONSOLE=org.apache.log4j.ConsoleAppender
log4j.appender.CONSOLE.layout=org.apache.log4j.PatternLayout
log4j.appender.CONSOLE.layout.ConversionPattern=%d{ISO8601} %-6r [%15.15t] %-5p %30.30c %x - %m\n

# LOGFILE is set to be a File appender using a PatternLayout.
log4j.appender.LOGFILE=org.apache.log4j.FileAppender
log4j.appender.LOGFILE.File=d:\axis.log
log4j.appender.LOGFILE.Append=true
log4j.appender.LOGFILE.layout=org.apache.log4j.PatternLayout
log4j.appender.LOGFILE.layout.ConversionPattern=%d{ISO8601} %-6r [%15.15t] %-5p %30.30c %x - %m\n
2.4.8在Resource文件加下创建与dao接口相同的包,然后在包中添加IUserDao.xml文件(映射配置文件)
- 我们只做根据queryVo的条件查询用户
<?xml version="1.0" encoding="UTF-8"?>
<!DOCTYPE mapper
        PUBLIC "-//mybatis.org//DTD Mapper 3.0//EN"
        "http://mybatis.org/dtd/mybatis-3-mapper.dtd">

<mapper namespace="com.aismall.dao.IUserDao">
    <!-- 配置 查询结果的列名和实体类的属性名的对应关系 -->
    <resultMap id="userMap" type="uSeR">
        <!-- 主键字段的对应 -->
        <id property="userId" column="id"></id>
        <!--非主键字段的对应-->
        <result property="userName" column="username"></result>
        <result property="userAddress" column="address"></result>
        <result property="userSex" column="sex"></result>
        <result property="userBirthday" column="birthday"></result>
    </resultMap>

    <!-- 根据queryVo的条件查询用户 -->
    <select id="findUserByVo" parameterType="QueryVo" resultMap="userMap">
        select * from user where username like #{user.userName}
    </select>
</mapper>
2.4.9在包中编写测试类(mybatisTest.java)
public class mybatisTest {

    private InputStream in;
    private SqlSession sqlSession;
    private IUserDao userDao;

    @Before//用于在测试方法执行之前执行
    public void init()throws Exception{
        //1.读取配置文件,生成字节输入流
        in = Resources.getResourceAsStream("SqlMapConfig.xml");
        //2.获取SqlSessionFactory
        SqlSessionFactory factory = new SqlSessionFactoryBuilder().build(in);
        //3.获取SqlSession对象
        sqlSession = factory.openSession(true);
        //4.获取dao的代理对象
        userDao = sqlSession.getMapper(IUserDao.class);
    }

    @After//用于在测试方法执行之后执行
    public void destroy()throws Exception{
        //提交事务
       // sqlSession.commit();
        //6.释放资源
        sqlSession.close();
        in.close();
    }

    /**
     * 测试使用QueryVo作为查询条件
     */
    @Test
    public void testFindByVo(){
        QueryVo vo = new QueryVo();
        User user = new User();
        user.setUserName("%王%");
        vo.setUser(user);
        //5.执行查询一个方法
        List<User> users = userDao.findUserByVo(vo);
        for(User u : users){
            System.out.println(u);
        }
    }
}
注意
- 前面铺垫了那么多就为了设置事务的提交方式,在第三步,如果openSession方法中不传参数或者参数为true,则为自动提交方式,在destory方法中就不再需要手动提交事务(调用commit方法),如果参数为false,则需要手动提交参数(调用commit方法)
03mybatis的动态SQL
- 除了之前我们使用的简单的SQL 查询之外,有些时候业务逻辑复杂时,我们的 SQL 是动态变化的,这时候简单的SQL查询将不能那么足要求,我们就需要使用下面介绍的方法来进行SQL语句的动态设置
- 我们在刚才创建的项目上进行改写
3.1动态 SQL 之 if 标签
-
需求:动态查询名称为老王并且性别为男的用户
-
在IUserDao接口中添加方法
	/*根据传入的参数条件进行查询
    * user为查询的条件,可能有用户名,性别,地址,也可能没有
    * */
    List<User> findUserByCondition(User user);
- 在IUSerDao.xml映射配置文件中添加配置
<select id="findUserByCondition" resultMap="userMap" parameterType="user">
	select * from user where 1=1
	 /*两个判断条件*/
	<if test="userName!=null">
		username=#{userName}
	</if>
	<if test="userSex!=null">
		and sex=#{userSex}
	</if>
</select>
注意:
<if>标签的 test 属性中写的是对象的属性名,
如果是包装类的对象要使用 OGNL 表达式的写法。

 where 1=1的作用就是在SQL动态查询中,无论出现什么因素,
 都能保证有一条语句能正确执行(也就是防止where子句中内容为空时出现报错)
- 在测试类中添加
@Test
    public void testFindUserByCondition(){
        User user=new User();
        user.setUserName("老王");
        user.setUserSex("男");
        List<User> users=userDao.findUserByCondition(user);
        for (User u:users) {
            System.out.println(u);
        }
    }
3.2动态 SQL 之where标签
- 刚才使用了if标签进行数据的查询,如果不使用
where 1=1,当出现所有设定的判断语句都不成立时,就会因为where子句为空而出错 - 我们可以把上面的查询语句进行改写,使用where标签,这样就不会出现上面的问题了,改写之后的映射配置如下:
 <!--根据条件查询-->
    <select id="findUserByCondition" resultMap="userMap" parameterType="user">
        select * from user
        /*两个判断条件都放在where标签中*/
        <where>
            <if test="userName!=null">
                and username=#{userName}
            </if>
            <if test="userSex!=null">
                and sex=#{userSex}
            </if>
        </where>
    </select>
3.3动态标签之foreach标签
- 需求:传入多个 id 查询用户信息,进行范围查询
- 进行范围查询时,就要将一个集合中的值,作为参数动态添加进来
- 对应的sql 语句可以是以下两种:
SELECT * FROM USERS WHERE (id =10 OR id =89 OR id=16)
SELECT * FROM USERS WHERE  id IN (10,89,16)
- 我们继续在上面的代码中进行改写
- 在QueryVo.java 中添加一个ids属性,并生成该属性的set和get方法
private List<Integer> ids;
- 在IUserDao接口中添加方法
/*根据QueryVo中提供的id集合,查询用户信息*/
    List<User> findUserByIds(QueryVo vo);
- 在映射配置文件IUserDao.xml中进行配置(重点)
<!--根据QueryVo中提供的id集合,查询用户信息-->
    <select id="findUserByIds" parameterType="QueryVo" resultMap="userMap">
        select * from user
        <where>
            <if test="ids!=null and ids.size>0">
                <foreach collection="ids" open="id in (" close=")"  item="id" separator=",">
                    #{id}
                </foreach>
            </if>
        </where>
    </select>
- 分析映射配置:
<foreach>标签用于遍历集合,它的属性:
collection:代表要遍历的集合元素,注意编写时不要写#{}
open:代表语句的开始部分
close:代表结束部分
item:代表遍历集合的每个元素,生成的变量名
sperator:代表分隔符
遍历之后结果如下:
select * from user where id in (id1,id2,di3,,,,)
- 在测试类中添加
@Test
    public void testFindUserByIds(){
        QueryVo vo=new QueryVo();
        List<Integer> list=new ArrayList<Integer>();
        list.add(41);
        list.add(42);
        list.add(43);
        vo.setIds(list);
        List<User> users=userDao.findUserByIds(vo);
        for (User u:users) {
            System.out.println(u);
        }
    }
3.4相同SQL代码的抽取
- Sql 中可将重复的 sql 提取出来,使用时用 include 引用即可,最终达到 sql 重用的目的
- sql标签抽取重复代码
- include标签引入抽取的代码
	<!--抽取重复Sql代码-->
    <sql id="defaultSql">
        select * from user
    </sql>
    <!--根据QueryVo中提供的id集合,查询用户信息-->
    <select id="findUserByIds" parameterType="QueryVo" resultMap="userMap">
        /*引入抽取的代码*/
        <include refid="defaultSql"></include>
        <where>
            <if test="ids!=null and ids.size>0">
                <foreach collection="ids" open="id in (" close=")"  item="id" separator=",">
                    #{id}
                </foreach>
            </if>
        </where>
    </select>
04mybatis多表查询之一对多
- 表之间的关系有
一对多
多对一
一对一
多对多
演示一对多的示例:用户和账户
- 一个用户可以有多个账户
- 一个账户只能属于一个用户(多个账户也可以属于同一个用户)
步骤:
- 1,建立两张表:用户表,账户表
- 2,让用户表和账户表之间具备一对多的关系:需要使用外键在账户表中添加
- 3、建立两个实体类:用户实体类和账户实体类,让用户和账户的实体类能体现出来一对多的关系
- 4、建立两个配置文件
用户的配置文件
账户的配置文件 - 5、实现配置:
当我们查询用户时,可以同时得到用户下所包含的账户信息
当我们查询账户时,可以同时得到账户的所属用户信息
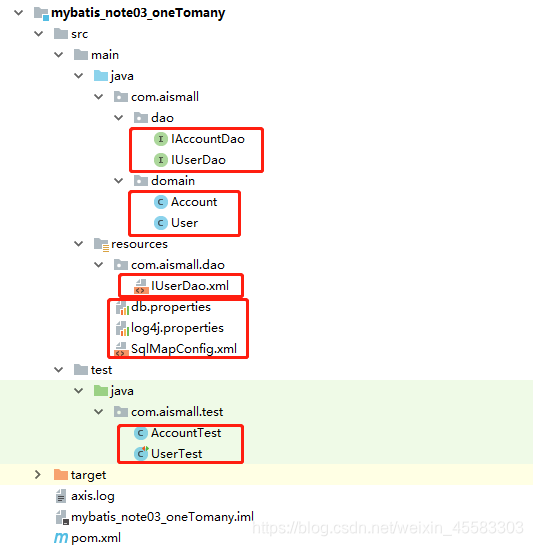
4.1环境搭建
- 目录结构
4.1.1新建项目(mybatis)
- 引入坐标
 <dependencies>
        <dependency>
            <groupId>org.mybatis</groupId>
            <artifactId>mybatis</artifactId>
            <version>3.4.5</version>
        </dependency>

        <dependency>
            <groupId>mysql</groupId>
            <artifactId>mysql-connector-java</artifactId>
            <version>5.1.6</version>
        </dependency>

        <dependency>
            <groupId>log4j</groupId>
            <artifactId>log4j</artifactId>
            <version>1.2.12</version>
        </dependency>

        <dependency>
            <groupId>junit</groupId>
            <artifactId>junit</artifactId>
            <version>4.10</version>
        </dependency>
    </dependencies>
4.1.2在myMybatis数据库中添加account表
1.创建account表
CREATE TABLE `account` (
  `ID` int(11) NOT NULL COMMENT '编号',
  `UID` int(11) default NULL COMMENT '用户编号',
  `MONEY` double default NULL COMMENT '金额',
  PRIMARY KEY  (`ID`),
  KEY `FK_Reference_8` (`UID`),
  CONSTRAINT `FK_Reference_8` FOREIGN KEY (`UID`) REFERENCES `user` (`id`)
) ENGINE=InnoDB DEFAULT CHARSET=utf8;

2.添加数据
insert  into `account`(`ID`,`UID`,`MONEY`) values
(1,46,1000),
(2,45,1000),
(3,46,2000);
4.1.3在包中创建实体类(User和Account)
- User.java中的属性
private Integer id;
private String username;
private String address;
private String sex;
private Date birthday;
- Account.java中的属性
 private Integer id;
 private Integer uid;
 private Double money;
4.1.4在包中创建接口(IUserDao和IAccountDao)
- IUserDao接口添加方法
 /*查询所有用户*/
    List<User> findAll();
- IAccountDao接口添加方法
  /*查询所有账户*/
    List<Account> findAll();
4.1.5在Resource文件夹下导入配置文件
- SqlMapConfig.xml
<?xml version="1.0" encoding="UTF-8"?>
<!DOCTYPE configuration
        PUBLIC "-//mybatis.org//DTD Config 3.0//EN"
        "http://mybatis.org/dtd/mybatis-3-config.dtd">
<configuration>
    <!-- 配置properties-->
    <properties resource="db.properties"></properties>

    <!--使用typeAliases配置别名,它只能配置domain中类的别名 -->
    <typeAliases>
        <package name="com.aismall.domain"></package>
    </typeAliases>

    <!--配置环境-->
    <environments default="mysql">
        <!-- 配置mysql的环境-->
        <environment id="mysql">
            <!-- 配置事务 -->
            <transactionManager type="JDBC"></transactionManager>

            <!--配置连接池-->
            <dataSource type="POOLED">
                <property name="driver" value="${jdbc.driver}"></property>
                <property name="url" value="${jdbc.url}"></property>
                <property name="username" value="${jdbc.username}"></property>
                <property name="password" value="${jdbc.password}"></property>
            </dataSource>
        </environment>
    </environments>
    <!-- 配置映射文件的位置 -->
    <mappers>
        <package name="com.aismall.dao"></package>
    </mappers>
</configuration>
- db.properties
jdbc.driver=com.mysql.jdbc.Driver
jdbc.url=jdbc:mysql://localhost:3306/myMybatis
jdbc.username=root
jdbc.password=12345678
- log4j.properties
# Set root category priority to INFO and its only appender to CONSOLE.
#log4j.rootCategory=INFO, CONSOLE            debug   info   warn error fatal
log4j.rootCategory=debug, CONSOLE, LOGFILE

# Set the enterprise logger category to FATAL and its only appender to CONSOLE.
log4j.logger.org.apache.axis.enterprise=FATAL, CONSOLE

# CONSOLE is set to be a ConsoleAppender using a PatternLayout.
log4j.appender.CONSOLE=org.apache.log4j.ConsoleAppender
log4j.appender.CONSOLE.layout=org.apache.log4j.PatternLayout
log4j.appender.CONSOLE.layout.ConversionPattern=%d{ISO8601} %-6r [%15.15t] %-5p %30.30c %x - %m\n

# LOGFILE is set to be a File appender using a PatternLayout.
log4j.appender.LOGFILE=org.apache.log4j.FileAppender
log4j.appender.LOGFILE.File=d:\axis.log
log4j.appender.LOGFILE.Append=true
log4j.appender.LOGFILE.layout=org.apache.log4j.PatternLayout
log4j.appender.LOGFILE.layout.ConversionPattern=%d{ISO8601} %-6r [%15.15t] %-5p %30.30c %x - %m\n
4.1.6在包下添加映射配置文件(IUserDao.xml和IAccountDao.xml)
- IUserDao.xml
<?xml version="1.0" encoding="UTF-8"?>
<!DOCTYPE mapper
        PUBLIC "-//mybatis.org//DTD Mapper 3.0//EN"
        "http://mybatis.org/dtd/mybatis-3-mapper.dtd">
<mapper namespace="com.aismall.dao.IUserDao">
    <!-- 查询所有 -->
    <select id="findAll" resultType="User" >
        select * from user;
    </select>
</mapper>
- IAccountDao.xml
<?xml version="1.0" encoding="UTF-8"?>
<!DOCTYPE mapper
        PUBLIC "-//mybatis.org//DTD Mapper 3.0//EN"
        "http://mybatis.org/dtd/mybatis-3-mapper.dtd">
<mapper namespace="com.aismall.dao.IAccountDao">
    <!--查询所有-->
    <select id="findAll" resultType="account">
        select * from account;
    </select>
</mapper>
4.1.7编写测试类(UserTest和AccountTest)
- AccountTest
public class AccountTest {
    private InputStream in;
    private SqlSession sqlSession;
    private IAccountDao accountDao;

    @Before//用于在测试方法执行之前执行
    public void init()throws Exception{
        //1.读取配置文件,生成字节输入流
        in = Resources.getResourceAsStream("SqlMapConfig.xml");
        //2.获取SqlSessionFactory
        SqlSessionFactory factory = new SqlSessionFactoryBuilder().build(in);
        //3.获取SqlSession对象
        sqlSession = factory.openSession(true);
        //4.获取dao的代理对象
        accountDao = sqlSession.getMapper(IAccountDao.class);
    }

    @After//用于在测试方法执行之后执行
    public void destroy()throws Exception{
        //提交事务
        // sqlSession.commit();
        //6.释放资源
        sqlSession.close();
        in.close();
    }

    @Test
    public void testFindAll(){
        List<Account> accounts=accountDao.findAll();
        for(Account account:accounts){
            System.out.println(account);
        }
    }
}
- UserTest
public class UserTest {

    private InputStream in;
    private SqlSession sqlSession;
    private IUserDao userDao;

    @Before//用于在测试方法执行之前执行
    public void init()throws Exception{
        //1.读取配置文件,生成字节输入流
        in = Resources.getResourceAsStream("SqlMapConfig.xml");
        //2.获取SqlSessionFactory
        SqlSessionFactory factory = new SqlSessionFactoryBuilder().build(in);
        //3.获取SqlSession对象
        sqlSession = factory.openSession(true);
        //4.获取dao的代理对象
        userDao = sqlSession.getMapper(IUserDao.class);
    }

    @After//用于在测试方法执行之后执行
    public void destroy()throws Exception{
        //提交事务
       // sqlSession.commit();
        //6.释放资源
        sqlSession.close();
        in.close();
    }

    /**
     * 测试查询所有
     */
    @Test
    public void testFindAll(){
        //5.执行查询所有方法
        List<User> users = userDao.findAll();
        for(User user : users){
            System.out.println(user);
        }

    }
}
4.2 如何进行多对一的查询?
- 查询条件为,查询所有账户,同时还要获取当前账户所对应的用户信息(用户的名称和地址)
4.2.1使用Account子类的方式(不常用)
- 1,在domain包中添加(AccountUser.java),此类继承Account类,目的是为了将获取的信息一部分封装到父类中(id,uid,money),一部分封装到本类中(属性:username,address)真棒!!!!!
package com.aismall.domain;

public class AccountUser extends Account{
    private String username;
    private String address;

    public String getUsername() {
        return username;
    }

    public void setUsername(String username) {
        this.username = username;
    }

    public String getAddress() {
        return address;
    }

    public void setAddress(String address) {
        this.address = address;
    }

    @Override
    public String toString() {
        return super.toString()+"      AccountUser{" +
                "username='" + username + '\'' +
                ", address='" + address + '\'' +
                '}';
    }
}
- 2,在IAccountDao接口中添加方法
 /*查询所有账户,同时还要获取当前账户所对应的用户信息(用户的名称和地址)*/
    List<AccountUser> findByAccount();
- 3,在映射配置文件中添加配置(IAccountDao.xml)
  <!--查询所有账户,同时还要获取当前账户所对应的用户信息(用户的名称和地址)-->
    <select id="findByAccount" resultType="accountUser">
        select a.*,u.username,u.address from account a,user u where u.id=a.id;
    </select>
- 4,在测试类中添加测试方法(AccountTest)
/*查询所有账户,同时还要获取当前账户所对应的用户信息(用户的名称和地址)*/
    @Test
    public void testFindByAccount(){
        List<AccountUser> accountUsers=accountDao.findByAccount();
        for (AccountUser accountUser:accountUsers){
            System.out.println(accountUser);
        }

    }
4.2.2从表实体(Account)包含主表实体(User)的引用方式(常用)
- 1,在Account.java中添加属性,并提供该属性的get和set方法
private User user;
- 2,在IAccountDao接口中添加方法
 /*查询用户*/
    List<Account> findAccountUserAll();
- 3,在映射配置文件中添加配置(IAccountDao.xml)
<!--定义封装account和user的resultMap-->
    <resultMap id="accountUserMap" type="account">
        <!--account字段的封装-->
        <!--将account的id重名名为aid-->
        <id property="id" column="aid"></id>
        <result property="uid" column="uid"></result>
        <result property="money" column="money"></result>
        <!--一对一映射关系,配置封装user内容-->
        <association property="user" column="uid" javaType="user">
            <!--user表中的id还是id-->
            <id property="id" column="id"></id>
            <result property="username" column="username"></result>
            <result property="address" column="address"></result>
            <result property="sex" column="sex"></result>
            <result property="birthday" column="birthday"></result>
        </association>
    </resultMap>
    <!--查询所有-->
    <select id="findAccountUserAll" resultMap="accountUserMap">
        select a.*,u.username,u.address from account a,user u where u.id=a.id;
    </select>
- 4,在测试类中使用添加测试方法(AccountTest.java)
 Test
public void testFindAccountUserAll(){
    List<Account> accounts=accountDao.findAccountUserAll();
    for(Account account:accounts){
        System.out.println("-----------------");
        System.out.println(account);
        System.out.println(account.getUser());
    }
}
4.3如何进行一对多的查询?
- 需求:查询所有用户信息及用户关联的账户信息
- 分析:
用户信息和他的账户信息为一对多关系,并且查询过程中如果用户没有账户信息,此时也要将用户信息查询出来,我们想到了左外连接查询比较合适。
4.3.1主表实体(User)包含从表实体(Account)的集合引用
- 1,在User.java中添加属性并生成相应的set和get方法
/*一对多关系映射,主表实体应该包含从表实体的集合引用*/
private List<Account> accounts;
- 2.在IUserDao接口中添加方法
/*一对多查询所有用户*/
    List<User> findUserAccountAll();
- 3,在映射配置文件中添加配置(IUserDao.xml)
 <!--定义user的resultMap-->
    <resultMap id="UserAccountMap" type="user">
        <id property="id" column="id"></id>
        <result property="username" column="username"></result>
        <result property="sex" column="sex"></result>
        <result property="birthday" column="birthday"></result>
        <result property="address" column="address"></result>
        <!--配置user对象中的account集合映射-->
        <collection property="accounts" ofType="account">
            <id property="id" column="aid"></id>
            <result property="uid" column="uid"></result>
            <result property="money" column="money"></result>
        </collection>
    </resultMap>

    <!--*一对多查询所有用户-->
    <select id="findUserAccountAll" resultMap="UserAccountMap">
        select * from user u left outer join account a on u.id=a.uid;
    </select>
- 4,在测试类中使用添加测试方法(UserTest.java)
  /**一对多查询所有用户*/
    @Test
    public void testUserAccountAll(){
        List<User> users=userDao.findUserAccountAll();
        for(User u:users){
            System.out.println("----------------");
            System.out.println(u);
            System.out.println(u.getAccounts());
        }
    }
05mybatis多表查询之多对多
- 多对多可以拆分为两个一对多
演示示例:用户和角色
- 一个用户可以有多个角色
- 一个角色可以赋予多个用户
步骤: - 1、建立两张表:用户表,角色表,让用户表和角色表具有多对多的关系。需要使用中间表,中间表中包含各自的主键,在中间表中是外键。
- 2、建立两个实体类:用户实体类和角色实体类,让用户和角色的实体类能体现出来多对多的关系,各自包含对方一个集合引用
- 3、建立两个配置文件
用户的配置文件
角色的配置文件 - 4、实现配置:
当我们查询用户时,可以同时得到用户所包含的角色信息
当我们查询角色时,可以同时得到角色的所赋予的用户信息
5.1实现从Role到User的多对多
- 我们继续在上面那个工程的代码中进行改进
5.1.1 在数据库(myMybatis)中添加表
- 多表查询会涉及到中间表,用户表之前已经创建了,我们只需要在之前的数据库中在加入两张表(角色表和角色用户中间表即可)
1.创建角色表(role)
CREATE TABLE `role` (
  `ID` int(11) NOT NULL COMMENT '编号',
  `ROLE_NAME` varchar(30) default NULL COMMENT '角色名称',
  `ROLE_DESC` varchar(60) default NULL COMMENT '角色描述',
  PRIMARY KEY  (`ID`)
) ENGINE=InnoDB DEFAULT CHARSET=utf8;

insert  into `role`(`ID`,`ROLE_NAME`,`ROLE_DESC`) values (1,'院长','管理整个学院'),(2,'总裁','管理整个公司'),(3,'校长','管理整个学校');

2.创建角色和用户的中间表
CREATE TABLE `user_role` (
  `UID` int(11) NOT NULL COMMENT '用户编号',
  `RID` int(11) NOT NULL COMMENT '角色编号',
  PRIMARY KEY  (`UID`,`RID`),
  KEY `FK_Reference_10` (`RID`),
  CONSTRAINT `FK_Reference_10` FOREIGN KEY (`RID`) REFERENCES `role` (`ID`),
  CONSTRAINT `FK_Reference_9` FOREIGN KEY (`UID`) REFERENCES `user` (`id`)
) ENGINE=InnoDB DEFAULT CHARSET=utf8;

insert  into `user_role`(`UID`,`RID`) values (41,1),(45,1),(41,2);
5.1.2在包(domain)中创建实体类(Role.java)
- 1,让此类实现Serializable 接口
- 2,在类中添加以下属性,并生成get和set方法
- 3,从Role到User的查询,Role实体类中要包含User属性
因为是多对多的关系,所以是一个集合。 - 注意:在生成toString方法时,不要包含users属性
 private  Integer roleId;
 private  String roleName;
 private  String roleDesc;
 //多对多的关系映射:一个角色可以赋予多个用户
 private List<User> users;
5.1.3在包(dao)中添加一个接口(IRoleDao)
- 在接口中添加一个查询方法
public interface IRoleDao {
    /*查询所有方法*/
    List<Role> findAll();
}
5.1.4在包中添加映射配置文件(IRoleDao.xml)
<?xml version="1.0" encoding="UTF-8"?>
<!DOCTYPE mapper
        PUBLIC "-//mybatis.org//DTD Mapper 3.0//EN"
        "http://mybatis.org/dtd/mybatis-3-mapper.dtd">
<mapper namespace="com.aismall.dao.IRoleDao">
    <!--定义 role 表的 ResultMap-->
    <resultMap id="roleMap" type="role">
        <id property="roleId" column="rid"></id>
        <result property="roleName" column="role_name"></result>
        <result property="roleDesc" column="role_desc"></result>
        <collection property="users" ofType="user">
            <id column="id" property="id"></id>
            <result column="username" property="username"></result>
            <result column="address" property="address"></result>
            <result column="sex" property="sex"></result>
            <result column="birthday" property="birthday"></result>
        </collection>
    </resultMap>
    <!--查询所有-->
    <select id="findAll" resultMap="roleMap">
        select u.*,r.id as rid,r.role_name,r.role_desc from role r
        left outer join user_role ur on r.id = ur.rid
        left outer join user u on u.id = ur.uid
    </select>
</mapper>
5.1.5编写测试类(RoleTest.java)
public class RoleTest {
        private InputStream in;
        private SqlSession sqlSession;
        private IRoleDao roleDao;
        @Before//用于在测试方法执行之前执行
        public void init()throws Exception{
            //1.读取配置文件,生成字节输入流
            in = Resources.getResourceAsStream("SqlMapConfig.xml");
            //2.获取 SqlSessionFactory
            SqlSessionFactory factory = new SqlSessionFactoryBuilder().build(in);
            //3.获取 SqlSession 对象
            sqlSession = factory.openSession(true);
            //4.获取 dao 的代理对象
            roleDao = sqlSession.getMapper(IRoleDao.class);
        }
        @After//用于在测试方法执行之后执行
        public void destroy()throws Exception{
            //提交事务
            // sqlSession.commit();
            //6.释放资源
            sqlSession.close();
            in.close();
        }
        /**
         * 测试查询所有
         */
        @Test
        public void testFindAll(){
            List<Role> roles = roleDao.findAll();
            for(Role role : roles){
                System.out.println("---每个角色的信息----");
                System.out.println(role);
                System.out.println(role.getUsers());
            }
        }
    }
5.2实现从User到Role的多对多
- 从 User 出发我们也可以发现一个用户可以具有多个角色,这样用户到角色的关系也还是一对多关系。
- 这样我们就可以认为 User 与 Role 的多对多关系,可以被拆解成两个一对多关系来实现
5.2.1在主表(User)中添加从表(Role)属性
- 添加属性并生成set和get方法
private List<Role> roles;
5.2.2在IUserDao接口中添加方法
/*查询所有*/
     List<User> findUserRoleAll();
5.2.3添加映射配置(IUserDao.xml)
 <!--定义user的resultMap-->
    <resultMap id="UserRoleMap" type="user">
        <id property="id" column="id"></id>
        <result property="username" column="username"></result>
        <result property="sex" column="sex"></result>
        <result property="birthday" column="birthday"></result>
        <result property="address" column="address"></result>
        <!--配置user对象中的role集合映射-->
        <collection property="roles" ofType="role">
            <id property="roleId" column="rid"></id>
            <result property="roleName" column="role_name"></result>
            <result property="roleDesc" column="role_desc"></result>
        </collection>
    </resultMap>

    <!--查询所有-->
    <select id="findUserRoleAll" resultMap="UserRoleMap">
        select u.*,r.id as rid,r.role_name,r.role_desc from user u
        left outer join user_role ur on u.id = ur.uid
        left outer join role r on r.id = ur.rid
    </select>
5.2.4在测试类(UserTest)中添加测试方法
@Test
    public void testFindUserRoleAll(){
        List<User> users=userDao.findUserRoleAll();
        for(User u:users){
            System.out.println("----------------");
            System.out.println(u);
            System.out.println(u.getRoles());
        }
    }