上篇:mybatis框架--学习笔记(上):https://blog.csdn.net/a745233700/article/details/81034021
8、高级映射:
(1)一对一查询:
①使用resultType:
<!-- 一对一查询:resultType -->
<select id="findOrdersUser" resultType="com.zwp.po.OrdersCustom">
	select orders.*,
		user.username,
		user.sex,
		user.address
 	from orders,user
	where orders.user_id=user.id
</select>
//Orders的扩展类
public class OrdersCustom extends Orders{
//添加用属性
private String username;
private String sex;
private String address;
//下面省略get和set方法..
}②使用resultMap:(association)
使用resultMap将查询结果中的订单信息映射到Orders对象中,在orders类中添加User属性,将关联查询出来的用户信息映射到orders对象中的user属性中。
public class Orders {
    private Integer id;
    private Integer userId;
    private String number;
    private Date createtime;
    private String note;

    private User user;//在Orders中添加User属性,一对一

    //下面省略get和set方法
}
<!-- 一对一查询:resultMap
使用resultMap将查询结果中的订单信息映射到Orders对象中,在orders类中添加User属性,
将关联查询出来的用户信息添加到orders对象的user属性中-->
<resultMap type="com.zwp.po.Orders" id="OrdersUserResultMap">
<!-- 配置订单信息的映射 -->
<!-- id:指定查询列中的唯一标识,即订单信息的唯一标识,如果有多个列组成唯一标识,则配置多个id
column:查询出来的列名; property:映射到Orders的哪个属性
-->
<id column="id" property="id" />
<result column="user_id" property="userId" />
<result column="number" property="number" />
<result column="createtime" property="createtime" />
<result column="note" property="note" />
<!-- 配置映射的关联的用户信息 -->
<!-- association:用于映射关联查询的单个对象信息
property:要将关联查询的用户信息映射到Orders中的哪个属性 -->
<association property="user" javaType="com.zwp.po.User">
<!-- id:关联查询的唯一标识,column:指定唯一标识的用户的列 -->
<id column="user_id" property="id" />
<result column="username" property="username" />
<result column="sex" property="sex" />
<result column="address" property="address" />
</association>
</resultMap> <select id="findOrdersUserResultMap" resultMap="OrdersUserResultMap">
select orders.*,
user.username,
user.sex,
user.address
from orders,user
where orders.user_id=user.id
</select>小结:实现一对一查询:
resultyType:使用resultType实现较为简单,如果pojo中没有包括查询出来的列名,需要增加列名对应的属性,即可完成映射。如果没有查询结果的特殊要求,建议使用resultyType。
resultMap:需要 单独定义resultMap,实现有点麻烦,如果有对查询结果有特殊要求,使用resultMap可以完成将关联查询映射到pojo的属性中。
resultMap可以实现延时加载,resultyType无法实现延时加载。
(2)一对多查询:(collection)
要求:对orders映射不能出现重复记录。
思路:在order.java类中添加List<OrderDetail>orderDetails属性,最终会将订单信息映射到orders中,订单所对应的订单明细映射到orders中的orderDetails属性中。
public class Orders {
    private Integer id;
    private Integer userId;
    private String number;
    private Date createtime;
    private String note;

    private User user;//用户信息,一对一

    //订单明细:一对多
    private List<Orderdetail> orderdetail;

    //省略get和set方法
}
<!-- 一对多查询: -->
<resultMap type="com.zwp.po.Orders" id="OrdersAndOrderdetailResultMap" extends="OrdersUserResultMap">
<!-- 订单信息 -->
<!-- 用户信息 -->
<!-- extends继承:可以不用再配置订单信息和用户信息的映射 -->
<!-- 订单明细信息:
一个订单关联查询出了多条明细,要使用collection进行映射
collection:对关联查询多条映射到集合对象中;
property:将关联查询多条映射到pojo的哪个属性中;
ofType:指定映射到list集合属性中pojo的类型。
-->
<collection property="orderdetail" ofType="com.zwp.po.Orderdetail">
<id column="orderdetail_id" property="id"/>
<result column="items_id" property="itemsId"/>
<result column="items_num" property="itemsNum"/>
<result column="orders_id" property="ordersId"/>
</collection>
</resultMap>
<select id="findOrdersAndOrderdetailResultMap" resultMap="OrdersAndOrderdetailResultMap">
select orders.*,
user.username,
user.sex,
user.address,
orderdetail.id orderdetail_id,
orderdetail.items_id,
orderdetail.items_num,
orderdetail.orders_id
from orders,user,orderdetail
where orders.user_id=user.id and orderdetail.orders_id=orders.id
</select>小结:mybatis使用resultMap的collection对关联查询的多条记录映射到一个list集合属性中。
如果使用resultType实现:将订单明细映射到orders中的ordertails中,需要自己处理,使用双重循环遍历,去掉重复记录,将订单明细放在ordertails中。
(3)多对多查询:
映射思路:将用户信息映射到user中。
在user类中添加订单列表属性List<Orders>orderslist,将用户创建的订单映射到orderlist;
在Orders中添加订单明细列表属性List<OrderDetail>orderdetails,将订单的明细映射到orderdetails;
在OrderDetail中添加items属性,将订单明细所对应的商品映射到items。
	 <!-- 多对多查询 -->
	 <resultMap type="com.zwp.po.User" id="UserAndItemsResultMap">
	 	<!-- 配置用户信息 -->
	 	<id column="user_id" property="id"/>
	 	<result column="username" property="username"/>
	 	<result column="sex" property="sex"/>
	 	<result column="address" property="address"/>
	 	<!-- 配置订单信息:用户对订单:一对多关系:collection -->
	 	<collection property="orders" ofType="com.zwp.po.Orders">
	 		<id column="id" property="id" />
		 	<result column="user_id" property="userId" />
		 	<result column="number" property="number" />
		 	<result column="createtime" property="createtime" />
		 	<result column="note" property="note" />
		 	<!-- 配置订单详情信息:订单对订单详情:一对多关系:collection -->
		 	<collection property="orderdetail" ofType="com.zwp.po.Orderdetail">
				<id column="orderdetail_id" property="id"/>
		 		<result column="items_id" property="itemsId"/>
		 		<result column="items_num" property="itemsNum"/>
		 		<result column="orders_id" property="ordersId"/>
		 		<!-- 配置商品信息:订单详情对商品:一对一:association -->
		 		<association property="items" javaType="com.zwp.po.Items">
		 			<id column="itemsid" property="id"/>
			 		<result column="name" property="name"/>
			 		<result column="price" property="price"/>
			 		<result column="detail" property="detail"/>
			 		<result column="items_creatime" property="creatime"/>
		 		</association>
		 	</collection>
	 	</collection>
	 </resultMap>

	 <select id="findUserAndItemsResultMap" resultMap="UserAndItemsResultMap">
		select orders.*,
			user.username,
			user.sex,
			user.address,
			orderdetail.id orderdetail_id,
			orderdetail.items_id,
			orderdetail.items_num,
			orderdetail.orders_id,
			items.id itemsid,
			items.name,
			items.price,
			items.detail,
			items.creatime items_creatime
		from orders,user,orderdetail,items
		where orders.user_id=user.id and orderdetail.orders_id=orders.id and items_id=items.id
	 </select>
public class User {
private Integer id;
private String username;
private String birthday;
private String sex;
private String address;
private List<Orders> orders;
}public class Orders {
private Integer id;
private Integer userId;
private String number;
private Date createtime;
private String note;
private User user;
private List<Orderdetail> orderdetail;
}public class Orderdetail {
private Integer id;
private Integer ordersId;
private Integer itemsId;
private Integer itemsNum;
private Items items;
}public class Items {
private Integer id;
private String name;
private Float price;
private String pic;
private Date creatime;
private String detail;
}(4)总结:
①resultMap:使用association和collection完成一对一和一对多高级映射,用于对结果有特殊的映射要求。
②association:
作用:将关联查询信息映射到一个pojo对象中。
场合:为了方便查询关联信息,可以使用association将关联订单信息映射为用户对象的pojo属性中,比如:查询订单及关联用户信息。
使用resultType无法将查询结果映射到pojo对象的pojo属性中,根据对结果集查询遍历的需要选择使用resultType还是resultMap。
③collection:
作用:将关联查询信息映射到一个list集合中。
场合:为了方便查询遍历关联信息可以使用collection,将关联信息映射到list集合中,比如:查询用户权限范围模块下及模块下的菜单,可以使用collection将其权限模块映射到权限模块list中,将菜单列表映射到权限模块对象的菜单list属性中,这样做的目的也是方便对查询结果进行遍历查询。
如果使用resultType无法将查询结果映射到List集合中。
9、延时加载:
resultMap的association和collection具备延时加载功能。
延时加载:先从单表查询,需要时再从关联表去关联查询,大大提高数据库性能,因为查询单表要比关联查询多表速度要快。
(1)使用association中的select指定延迟加载去执行的statement的id
	<!-- 延迟加载:
		查询用户订单信息:用户信息要求延迟加载 -->
	<resultMap type="com.zwp.po.Orders" id="OrderUserLazyLoading">
		<id column="id" property="id" />
	 	<result column="user_id" property="userId" />
	 	<result column="number" property="number" />
	 	<result column="createtime" property="createtime" />
	 	<result column="note" property="note" />

	 	<!-- select:表示需要延时加载的statement的id,如果不在同一个namespace,需要加上namespace
	 		column:表示关联的字段-->
	 	<association property="user" javaType="com.zwp.po.User" select="findUserById" column="user_id">
	 		<id column="user_id" property="id" />
		 	<result column="username" property="username" />
		 	<result column="sex" property="sex" />
		 	<result column="address" property="address" />
		 	<result column="birthday" property="birthday" />
	 	</association>
	</resultMap>

	<!-- 不可以使用resultType,因为resultType没有延迟加载功能 -->
	<select id="findOrderUserLazyLoading" resultMap="OrderUserLazyLoading">
		select * from orders
	</select>

	<!-- 查询订单关联查询用户,用户信息需要延时加载 -->
	<select id="findUserById" parameterType="int" resultType="com.zwp.po.User">
		SELECT * FROM USER WHERE id=#{id}
	</select>
(2)延迟加载配置:
Mybatis默认没有开启延时加载,需要在SqlMapperConfig.xml中的setting配置。
	<!-- settings:配置全局变量 -->
	<settings>
		<!-- 开启延迟加载开关 -->
		<setting name="lazyLoadingEnabled" value="true"/>
		<!-- 将积极加载改为消极加载,即按需加载 -->
		<setting name="aggressiveLazyLoading" value="false"/>
	</settings>
(3)总结:
使用延时加载方法,先去查询简单的sql(最好是单表,也可以关联查询),再去按需要加载关联查询的其他信息。
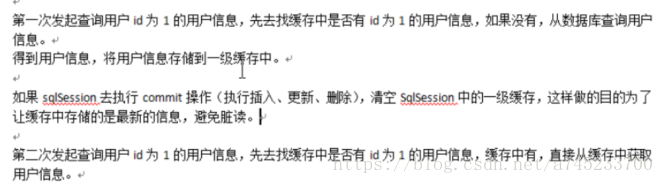
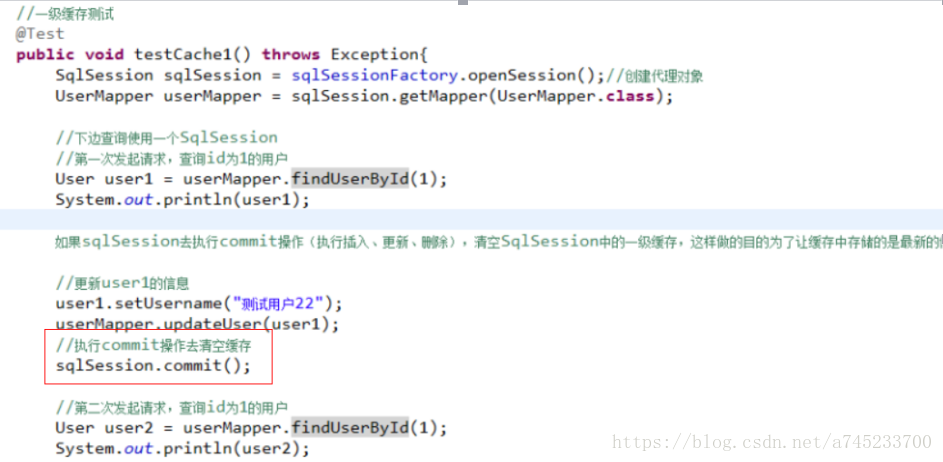
10、一级缓存:(mybatis默认支持一级缓存)
缓存:提高系统的性能,减少数据库的压力。
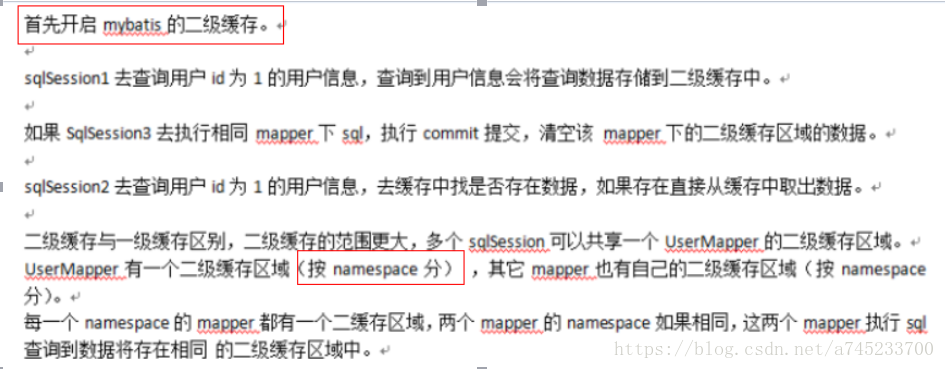
11、二级缓存:(默认不开启)
(1)开启二级缓存:
①在核心配置文件SqlMapConfig.xml中加入:
	<!-- settings:配置全局变量 -->
	<settings>
		<!-- 开启二级缓存 -->
		<setting name="cacheEnabled" value="true"/>
	</settings>
②在xxxMapper.xml文件中开启二级缓存,xxxMapper.xml下的sql执行完会存储到他的缓存区域(HashMap)
<mapper namespace="com.zwp.mapper.OrdersMapperCustom">
	<!-- 开启本mapper下的二级缓存
	<cache/>
</mapper>
(2)useCache配置:禁用二级缓存:
在statement中设置useCache=false可以禁用当前select语句的二级缓存,即每次查询都会发出sql去查询,默认是true,即改sql使用二级缓存。
<select id="findOrderListResultMap" resultMap="ordersUserMap" useCache="false">场景:针对每次查询都需要更新的数据sql,要设置成useCache=false,禁用二级缓存。
(3)刷新缓存(清空缓存):
设置statement配置中的flushCache="true"属性,默认情况下为true即刷新缓存,如果改成false则不会刷新。
<insert id="insertUser" parameterType="com.zwp.domain.User" flushCache="true">场景:一般情况下执行完commit操作都需要刷新缓存,flushCache=true表示刷新缓存,这样可以避免数据库脏读。
12、分布缓存:mybatis整合ehcache:
分布缓存:可以实现对缓存数据进行集中管理。
(1)Mybatis无法实现分布式缓存,需要和其他分布式缓存框架进行整合。
(2)整合方法:
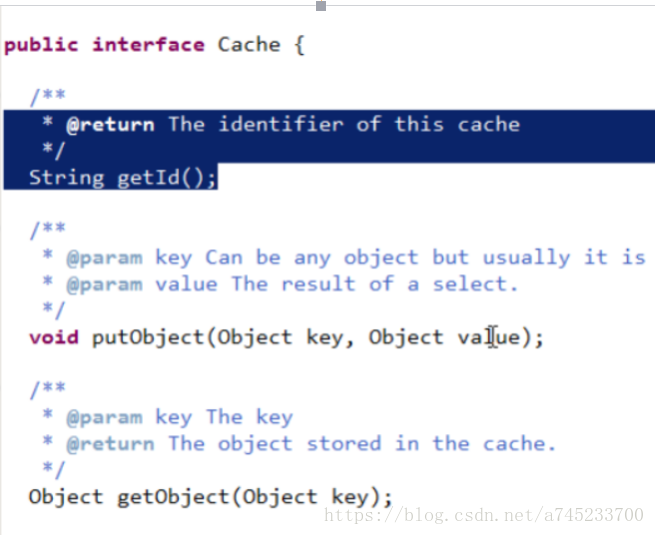
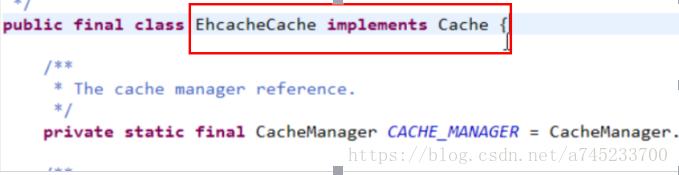
mybatis提供了一个cache接口,如果要实现自己的缓存逻辑,实现cache接口开发即可。
mybatis和ehcache整合,mybatis和ehcache整合包中提供了一个Cache接口的实现类。
(3)加入jar包依赖:

(4)整合ehcache:
<mapper namespace="com.zwp.mapper.OrdersMapperCustom">
<!-- 开启本mapper下的二级缓存
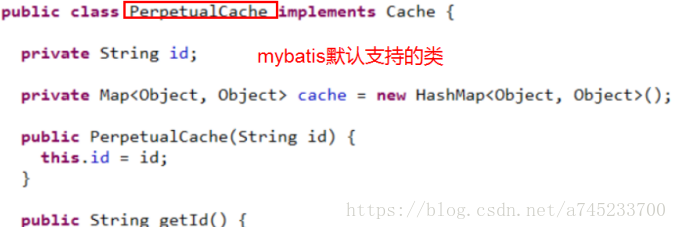
type:指定cache接口的实现的类型,mybatis默认使用PerpetualCache-->
<cache type="org.mybatis.caches.ehcache.EhcacheCache"/>(5)加入ehcache的配置文件:
<ehcache xmlns:xsi="http://www.w3.org/2001/XMLSchema-instance"
xsi:noNamespaceSchemaLocation="../config/ehcache.xsd">
<diskStore path="D:\develop\ehcache" />
<defaultCache
maxElementsInMemory="1000"
maxElementsOnDisk="10000000"
eternal="false"
overflowToDisk="false"
timeToIdleSeconds="120"
timeToLiveSeconds="120"
diskExpiryThreadIntervalSeconds="120"
memoryStoreEvictionPolicy="LRU">
</defaultCache>
</ehcache>
13、mybatis和spring整合开发:
需要spring通过单例方式管理SqlSessionFactory。
spring和mybatis整合生成代理对象,使用SqlSessionFactory创建SqlSession,持久层的mapper都需要由spring进行管理。
步骤:
(1)导入jar包依赖:
(2)sqlSessionFactory配置:
在applicationContext.xml配置sqlSessionFatory,sqlSessionFatory在mybatis和spring的整合包下。
<?xml version="1.0" encoding="utf-8"?>
<beans xmlns="http://www.springframework.org/schema/beans"
	xmlns:xsi="http://www.w3.org/2001/XMLSchema-instance"
	xmlns:context="http://www.springframework.org/schema/context"
	xmlns:aop="http://www.springframework.org/schema/aop"
	xmlns:tx="http://www.springframework.org/schema/tx"
	xsi:schemaLocation="http://www.springframework.org/schema/beans
		http://www.springframework.org/schema/beans/spring-beans.xsd
		http://www.springframework.org/schema/context
		http://www.springframework.org/schema/context/spring-context.xsd
		http://www.springframework.org/schema/aop
		http://www.springframework.org/schema/aop/spring-aop.xsd
		http://www.springframework.org/schema/tx
		http://www.springframework.org/schema/tx/spring-tx.xsd">

	<!-- 1.加载数据库配置文件 -->
	<context:property-placeholder location="classpath:db.properties"/>

	<!-- 2.配置连接池 -->
	<bean id="dataSource" class="com.mchange.v2.c3p0.ComboPooledDataSource" destroy-method="close">
		<property name="driverClass" value="${jdbc.driver}"></property>
		<property name="jdbcUrl" value="${jdbc.url}"></property>
		<property name="user" value="${jdbc.username}"></property>
		<property name="password" value="${jdbc.password}"></property>
	</bean>

	<!-- 3.创建会话工厂sqlSessionFactory -->
	<bean id="sqlSessionFactory" class="org.mybatis.spring.SqlSessionFactoryBean">
		<!-- 加载mybatis的配置文件 -->
		<property name="configLocation" value="mybatis/SqlMapConfig.xml"></property>
		<!-- 配置数据源 -->
		<property name="dataSource" ref="dataSource"></property>
	</bean>
</beans>
(3)①原始dao开发:
--User.xml文件:
<mapper namespace="test">
	<select id="findUserById" parameterType="int" resultType="com.zwp.ssm.po.User">
		SELECT * FROM USER WHERE id=#{id}
	</select>
</mapper>
在SqlMapConfig.xml文件中加载映射文件:
<?xml version="1.0" encoding="UTF-8" ?>
<!DOCTYPE configuration
	PUBLIC "-//mybatis.org//DTD Config 3.0//EN"
	"http://mybatis.org/dtd/mybatis-3-config.dtd">
<configuration>
	<!-- 加载映射文件 -->
	<mappers>
		<!-- 通过resource加载单个映射文件 -->
		<mapper resource="sqlmap/User.xml"></mapper>
	</mappers>
</configuration>public interface UserDao {
//根据id查询用户
public User findUserById(int id) throws Exception;
}
DaoImpl接口实现类需要注入sqlSessionFactory,通过spring进行注入:
public class UserDaoImpl extends SqlSessionDaoSupport implements UserDao{
	//继承SqlSessionDaoSupport
	//父类已经定义SqlSessionFactory对象和set方法,不需要重新写
	@Override
	public User findUserById(int id) throws Exception{

		SqlSession sqlSession=this.getSqlSession();//不需要手动关闭sqlSession
		System.out.println(sqlSession);
		User user=sqlSession.selectOne("test.findUserById",id);
		return user;
	}
}
通过spring创建接口的bean对象:
	<!--原始dao接口 -->
	<bean id="userDao" class="com.zwp.Dao.UserDaoImpl">
		<!-- sqlSessionFactory不能写错 -->
		<property name="sqlSessionFactory" ref="sqlSessionFactory"></property>
</bean>--mapper.xml和mapper.java:
public interface UserMapper {
	/*
	(1)mapper.java接口中方法名和mapper.xml中的statement的id一致
	(2)mapper.java接口中方法的输入参数类型和mapper.xml中statement的parameterType指定的类型一致
	(3)mapper.java接口中方法的返回值类型和mapper.xml中statement的resultment中resultType指定类型一致。
	 */

	//根据id查询用户
	public User findUserById(int id) throws IOException;
}
<?xml version="1.0" encoding="UTF-8" ?>
<!DOCTYPE mapper
PUBLIC "-//mybatis.org//DTD Mapper 3.0//EN"
"http://mybatis.org/dtd/mybatis-3-mapper.dtd">
<mapper namespace="com.zwp.ssm.mapper.UserMapper">
<select id="findUserById" parameterType="int" resultType="com.zwp.ssm.po.User">
SELECT * FROM USER WHERE id=#{id}
</select>
</mapper>----通过mapperFactoryBean创建代理对象(此方法存在问题):
<!-- mapper接口 -->
	<!-- MapperFactoryBean:根据mapper接口生成代理对象 -->
	<bean id="userMapper" class="org.mybatis.spring.mapper.MapperFactoryBean">
		<!-- mapperInterface指定mapper接口 -->
		<property name="mapperInterface" value="com.zwp.ssm.mapper.UserMapper"></property>
		<property name="sqlSessionFactory" ref="sqlSessionFactory"></property>
	</bean>
此方法的问题:如果有很多个mapper,需要针对每个mapper进行单独配置。
解决方法:通过MapperScannerConfigure进行mapper批量扫描。
	<!-- mapper批量扫描,从mapper包中扫描出mapper,自动创建代理对象并且在spring容器中注册
	遵循规范:需要mapper接口类名和mapper.xml映射文件名称一致,且在同一目录下
	自动扫描出来的mapper的bean的id为类名(首字母小写)-->
	<bean class="org.mybatis.spring.mapper.MapperScannerConfigurer">
		<!-- 指定扫描的包名 -->
		<!-- 如果扫描多个包,每个包中间使用半角逗号隔开 -->
		<property name="basePackage" value="com.zwp.ssm.mapper"></property>
		<!-- sqlSessionFactoryBeanName不能写成sqlSessionFactory,不然会导致连接不上数据库 -->
		<property name="sqlSessionFactoryBeanName" value="sqlSessionFactory"></property>
	</bean>