在爬虫过程中,我们可能会遇到需要输入验证码的情况,因此验证码也是爬虫的一个壁垒。下面我将介绍如何利用pytesseract模块来进行简单图形验证码的识别。
一.验证码图片说明
首先,我在某高校爬取了若干的图形验证码(提取码:4jw0)并“手工”先给图片“打标签”(这样主要是为了后面测试识别准确率),标记结果如下图所示:

二.pytesseract模块的安装
要安装该模块首先要安装tesseract-ocr(安装教程请点我),在该模块安装好后下一步再安装pytesseract模块,可以直接使用pip命令,即pip install pytesseract,之后就可以直接使用该模块了。
说明:
- Tesseract是Google开源的OCR(光学字符识别,即指将图片中的文字信息进行识别并转换成能被常规文本编辑器编辑的文本),对于OCR你可以去官网自行扩展语言包,详情请自行Google
- pytesseract是基于Tesseract-OCR的独立封装包,它的功能是识别图片文件中的文字,并返回识别结果
三.pytesseract模块的使用
对于pytesseract模块的使用,可以看这篇文章——pytesseract模块使用总结,这里只介绍其中最常用的一个函数image_to_string的用法:
- 函数声明:
image_to_string(image, lang=None, config='', nice=0, output_type=Output.STRING, timeout=0) - 功能:识别图片中的文本并返回为一个字符串
- 常用参数:
image即待识别的图片,lang即语言类型
该模块虽然使用简便,但是可能识别的准确率并不是特别高,要想提升识别的准确率可以从两个方向入手:
- 利用jTessBoxEditor进行字库训练,要使用这种方法需要注意自己的Java环境中必须要有JavaFX包,否则无法运行jTessBoxEditor
- 对图片进行预处理(官方教程,下一节介绍其中的一些常用方法)
四.图像预处理的常用方法
图像在进行识别之前的预处理流畅如下图所示,限于篇幅这里只给出了一些很常用的预处理方法,若需要了解其他的请自行查阅其他资料,在经过这些步骤处理之后,就可以调用image_to_string进行文本识别了。

4.1 调整图片的尺寸大小
官方文档说tesseract对于DPI 300的图片有更好的识别效果,因此可以对图片进行resize操作来提升识别效果,通过 cv2.resize(image, new_size)函数可以用来进行该操作,示例代码如下:
import cv2
import matplotlib.pyplot as plt

img_org = cv2.imread('./yzm/BDGY.jpg')
h,w = img_org.shape[:2]
h,w = h*2,w*2#按比例放大两倍
img_l = cv2.resize(img_org,(w,h))
4.2 图像灰度化
通过cv2.cvtColor(img,cv2.COLOR_BGR2GRAY)都可以实现图像的灰度化,示例代码如下:
import cv2
import matplotlib.pyplot as plt

img_org = cv2.imread('./yzm/BDGY.jpg')
img_gray = cv2.cvtColor(img_org,cv2.COLOR_BGR2GRAY)
plt.subplot(121),plt.imshow(cv2.cvtColor(img_org, cv2.COLOR_BGR2RGB))
plt.subplot(122),plt.imshow(cv2.cvtColor(img_gray, cv2.COLOR_BGR2RGB))
plt.show()
对应结果从左到右依次为:原图,灰度图

4.3 图像二值化
二值化会将图片转换为黑白图像,二值化可以通过cv2.threshold()方法,该函数会返回两个参数第一个为得到的阈值,另一个为阈值化后的图像,该函数的声明如下:
threshold(src, thresh, maxval, type, dst=None)
#scr:原图像
#thresh:进行分类的阈值
#maxval:高于(低于)阈值时赋予的新值
#dst:二值化处理方法选择参数
dst常用取值如下:
| 参数值 | 处理逻辑 |
|---|---|
| cv2.THRESH_BINARY | |
| cv2.THRESH_TRUNC | |
| cv2.THRESH_TOZERO |
二值化示例代码如下:
import cv2
import matplotlib.pyplot as plt

img_org = cv2.imread('./yzm/BDGY.jpg')
img_gray = cv2.cvtColor(img_org,cv2.COLOR_BGR2GRAY)#灰度化
_,img_bin = cv2.threshold(img_gray,127,255,cv2.THRESH_BINARY)#二值化
plt.subplot(131),plt.imshow(cv2.cvtColor(img_org, cv2.COLOR_BGR2RGB))
plt.subplot(132),plt.imshow(cv2.cvtColor(img_gray, cv2.COLOR_BGR2RGB))
plt.subplot(133),plt.imshow(cv2.cvtColor(img_bin, cv2.COLOR_BGR2RGB))
plt.show()
结果展示如下,从左到右依次是原图,灰度图,二值图:

4.4 去除边框
只有当存在验证码图片存在边框时才会考虑去除边框,由于去除边框的效果展示不明显,这里只给出一段示例代码:
def ClearBorder(img):
    """
    功能:去除边框
    """
    h, w = img.shape[:2]
    for y in range(0, w):
        for x in range(0, h):
            if y < 2 or y > w - 2:
                img[x, y] = 255
            if x < 2 or x > h -2:
                img[x, y] = 255
    return img
4.5 降噪
噪声是图像中亮度或颜色的随机变化,对于Tesseract降低噪声会利于识别准确率的提升,噪声去除的方法有很多,这里给出线降噪的示例代码:
import numpy as np
def interference_line(img):
    """
    功能:线降噪
    """
    h, w = img.shape[:2]
    for y in range(1, w - 1):
        for x in range(1, h - 1):
            count = 0
            if np.all(img[x, y - 1] > 245):
                count = count + 1
            if np.all(img[x, y + 1] > 245):
                count = count + 1
            if np.all(img[x - 1, y] > 245):
                count = count + 1
            if np.all(img[x + 1, y] > 245):
                count = count + 1
            if count > 2:
                img[x, y] = 255
    return img
五.验证码识别完整程序
这里将上述操作都封装成一个个的函数,并进行爬取的验证码集的识别,示例代码如下:
import pytesseract
import cv2
import numpy as np
import matplotlib.pyplot as plt
import os

def GrayImage(img):
    """
    功能对图像进行灰度化
    """
    img = cv2.cvtColor(img,cv2.COLOR_BGR2GRAY)#转化为灰度图
    return img

def ResizeImage(img,ratio):
    """
    功能:重置图片大小
    image_path:图片路径
    ratio:图片的缩放比例
    """
    h, w = img.shape[:2]
    nw,nh = int(ratio*w),int(ratio*h)
    img = cv2.resize(img,(nw,nh))
    return img

def Binarisation(img):
    """
    将图片二值化
    img:待处理的图像
    """
    _,img = cv2.threshold(img,127,255,cv2.THRESH_BINARY)
    return img

def ClearBorder(img):
    """
    功能:去除边框
    """
    h, w = img.shape[:2]
    for y in range(0, w):
        for x in range(0, h):
            if y < 2 or y > w - 2:
                img[x, y] = 255
            if x < 2 or x > h -2:
                img[x, y] = 255
    return img

def interference_line(img):
    """
    功能:线降噪
    """
    h, w = img.shape[:2]
    for y in range(1, w - 1):
        for x in range(1, h - 1):
            count = 0
            if np.all(img[x, y - 1] > 245):
                count = count + 1
            if np.all(img[x, y + 1] > 245):
                count = count + 1
            if np.all(img[x - 1, y] > 245):
                count = count + 1
            if np.all(img[x + 1, y] > 245):
                count = count + 1
            if count > 2:
                img[x, y] = 255
    return img


def FilePaths(file_path = './yzm/'):
    """
    功能:获取图片路径名及真实标签
    """
    for filename in os.listdir(file_path):
        yield filename[:-4],file_path + filename

def Recognition():
    total,true_num = 0,0
    for tab,file_path in FilePaths():
        total += 1
        img = cv2.imread(file_path)
        img = ResizeImage(img,2)
        img = GrayImage(img)
        img = Binarisation(img)
        img = ClearBorder(img)
        img1 = interference_line(img)
        text = pytesseract.image_to_string(img,lang='eng')
        if (text == tab):
            true_num += 1
        print(text,tab,text == tab)
    print("识别准确率为{}".format(true_num/total))

if __name__ == "__main__":
    Recognition()
最后100张验证码识别的准确率在0.8以上,下面是部分运行结果展示:
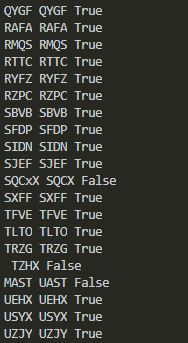
之后,我又尝试去掉其中的某些预处理步骤,发现验证码识别的准确率都会下降,因此上面的各个步骤都是有用的!!!
六.结语
说明:对于去除边框和线降噪的代码都参考了文章——python验证码识别
当然上述的示例代码的泛化能力可能不是很强,在遇到具体问题时仍然需要具体分析,以上便是本文的全部内容,要是觉得不错就支持一下吧,你们的支持是博主码文的不竭动力!!!