本文主要记录使用sklearn库对数据集进行特征提取的相关操作,通过了解相关知识,运行已有的代码来进行新内容的学习
-
pipeline
pipeline主要用于连接多个estimators使之成为一个estimator,方便我们的构建更复杂的模型。
一般数据处理的流程如下:
feature selection–normalization–classification
除了最后的classification可以是任意类型(聚类器,分类器等)外,其余各部分必须是变换器transformer,即必须有transform操作,而pipeline的性质取决于classification,即classification是聚类器则pipeline合成的estimator便是聚类器。
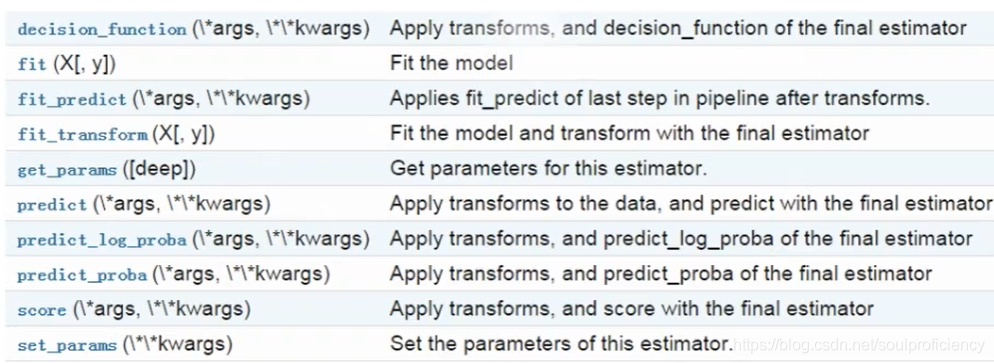
pipeline提供了两个基本操作:- convenience:仅用一次fit或者predict就可在数据集上训练一组estimator(从第一个一至训练到组后一个)
- joint parameter selection:可以把grid search用在pipeline中所有的estimators的参数组合
pipeline使用(key,value)列表来创建estimator
常用方法举例:
#以下程序在python的控制台下运行
from sklearn.pipeline import Pipeline
from sklearn.svm import SVC
from sklearn.decomposition import PCA
estimators=[('reduce_dim',PCA()),('clf',SVC())]#创建两个estimator
pipe=Pipeline(estimators)#调用pipeline指令创建pipe
pipe
Out[8]:
Pipeline(memory=None,
     steps=[('reduce_dim', PCA(copy=True, iterated_power='auto', n_components=None, random_state=None,
  svd_solver='auto', tol=0.0, whiten=False)), ('clf', SVC(C=1.0, cache_size=200, class_weight=None, coef0=0.0,
  decision_function_shape='ovr', degree=3, gamma='auto_deprecated',
  kernel='rbf', max_iter=-1, probability=False, random_state=None,
  shrinking=True, tol=0.001, verbose=False))])


pipe.steps[1]#调用pipe里面的第二个estimator
Out[9]:
('clf', SVC(C=1.0, cache_size=200, class_weight=None, coef0=0.0,
   decision_function_shape='ovr', degree=3, gamma='auto_deprecated',
   kernel='rbf', max_iter=-1, probability=False, random_state=None,
   shrinking=True, tol=0.001, verbose=False))

pipe.named_steps['reduce_dim']#也可以通过我们赋予estimator的名字来调用
Out[10]:
PCA(copy=True, iterated_power='auto', n_components=None, random_state=None,
  svd_solver='auto', tol=0.0, whiten=False)


#Pipeline中estimators的参数通过<estimator>__<parameter>语法来获取
pipe.set_params(clf__C=10)
#注意此处——为2个下划线,字母C为大写!!!
Out[10]:
Pipeline(memory=None,
     steps=[('reduce_dim', PCA(copy=True, iterated_power='auto', n_components=None, random_state=None,
  svd_solver='auto', tol=0.0, whiten=False)), ('clf', SVC(C=10, cache_size=200, class_weight=None, coef0=0.0,
  decision_function_shape='ovr', degree=3, gamma='auto_deprecated',
  kernel='rbf', max_iter=-1, probability=False, random_state=None,
  shrinking=True, tol=0.001, verbose=False))])
可以使用grid search来进行操作
from sklearn.model_selection import GridSearchCV
params = dict(reduce_dim__n_components=[2, 5, 10],
              clf__C=[0.1, 10, 100])
grid_search = GridSearchCV(pipe, param_grid=params)
Out[15]:
GridSearchCV(cv='warn', error_score='raise-deprecating',
       estimator=Pipeline(memory=None,
     steps=[('reduce_dim', PCA(copy=True, iterated_power='auto', n_components=None, random_state=None,
  svd_solver='auto', tol=0.0, whiten=False)), ('clf', SVC(C=10, cache_size=200, class_weight=None, coef0=0.0,
  decision_function_shape='ovr', degree=3, gamma='auto_deprecated',
  kernel='rbf', max_iter=-1, probability=False, random_state=None,
  shrinking=True, tol=0.001, verbose=False))]),
       fit_params=None, iid='warn', n_jobs=None,
       param_grid={

    'reduce_dim__n_components': [2, 5, 10], 'clf__C': [0.1, 10, 100]},
       pre_dispatch='2*n_jobs', refit=True, return_train_score='warn',
       scoring=None, verbose=0)


#通过对单个的estimator进行参数变化来达到整体参数优化的目的
#为了更直观我将这部分完整代码重新展示一下
from sklearn.pipeline import Pipeline
from sklearn.svm import SVC
from sklearn.decomposition import PCA
from sklearn.model_selection import GridSearchCV
from sklearn.linear_model import LogisticRegression

estimators = [('reduce_dim', PCA()), ('clf', SVC())]
pipe = Pipeline(estimators)
params = dict(reduce_dim=[None, PCA(5), PCA(10)],
              clf=[SVC(), LogisticRegression()],
              clf__C=[0.1, 10, 100])
grid_search = GridSearchCV(pipe, param_grid=params)
pipe
Out[3]:
Pipeline(memory=None,
     steps=[('reduce_dim', PCA(copy=True, iterated_power='auto', n_components=None, random_state=None,
  svd_solver='auto', tol=0.0, whiten=False)), ('clf', SVC(C=1.0, cache_size=200, class_weight=None, coef0=0.0,
  decision_function_shape='ovr', degree=3, gamma='auto_deprecated',
  kernel='rbf', max_iter=-1, probability=False, random_state=None,
  shrinking=True, tol=0.001, verbose=False))])
使用make_pipeline指令
from sklearn.pipeline import make_pipeline
from sklearn.naive_bayes import MultinomialNB
from sklearn.preprocessing import Binarizer

make_pipeline(Binarizer(), MultinomialNB())
#运行后将主动给每个estimator赋予一个key关键字
Out[4]:
Pipeline(memory=None,
     steps=[('binarizer', Binarizer(copy=True, threshold=0.0)), ('multinomialnb', MultinomialNB(alpha=1.0, class_prior=None, fit_prior=True))])
2.FeatureUnion:用于整合特征空间
可以将多个transformer object组合成为新的transformer,其接受一个transformer的(key,value)列表。
提供两个方法:
- convenience:同PIPELINE
- joint parameter selection:可把grid search用在feature union所有的estimator的参数组合上。
常用操作如下
from sklearn.pipeline import FeatureUnion
from sklearn.decomposition import PCA
from sklearn.decomposition import KernelPCA
estimators = [('linear_pca', PCA()), ('kernel_pca', KernelPCA())]
combined = FeatureUnion(estimators)
combined
Out[5]:
FeatureUnion(n_jobs=None,
       transformer_list=[('linear_pca', PCA(copy=True, iterated_power='auto', n_components=None, random_state=None,
  svd_solver='auto', tol=0.0, whiten=False)), ('kernel_pca', KernelPCA(alpha=1.0, coef0=1, copy_X=True, degree=3, eigen_solver='auto',
     fit_inverse_transform=False, gamma=None, kernel='linear',
     kernel_params=None, max_iter=None, n_components=None, n_jobs=None,
     random_state=None, remove_zero_eig=False, tol=0))],
       transformer_weights=None)
#也可以如同pipeline一样,使用make_union来创建feature union
#参数的更改设置也如同pipeline
combined.set_params(kernel_pca=None)
Out[7]:
FeatureUnion(n_jobs=None,
       transformer_list=[('linear_pca', PCA(copy=True, iterated_power='auto', n_components=None, random_state=None,
  svd_solver='auto', tol=0.0, whiten=False)), ('kernel_pca', None)],
       transformer_weights=None)
       #参数基本全部设为None
3.特征抽取(feature extraction)
基本语句形式:sklearn.feature_extraction.
可从原始数据集提取机器可以学习或者直接处理的特征向量。
与feature selection不用,selection是在特征向量中再次进行变换,最终形成特征空间。
- loading feature from dict
DictVectorizer可以把标准的字典 表示的特征数组转换成numpy/scipy的表示形式以便于estimator使用,变换后形成one-hot编码形式。
举例如下
weather = [{

    'city': 'xuzhou', "temperature": 20},
           {

    'city': 'guangzhou', 'temperature': 36}]
from sklearn.feature_extraction import DictVectorizer

vec = DictVectorizer()
table = vec.fit_transform(weather).toarray()
print(table)
[[ 0.  1. 20.]
 [ 1.  0. 36.]]
 #第一行0表示非徐州,1表示徐州,气温为20°,第二行1表示广州,0表示非广州,气温为36°
-
features hashing
特征哈希变换接受的数据类型有mapping类似于dict,list,string

不能做单词的切分,主要用于构建哈希表,为了防止特征之间的冲突,我们经常用有符号哈希函数(signed hash function),符号决定了被存储到输出矩阵中值的符号。
FeatureHasher支持三种输入形式:1."dict"表示输入数据是字典形式的[{feature_name: value}, …],
2."pair"表示输入数据是pair形式的[[(feature_name1, value1), (feature_name2, value2)], …]
3."string"表示数据是字符串形式的[[feature_name1, feature_name1]],其中有个value1个feature_name1,value2个feature_name2
其中feature_name必须是字符串,value必须是数字。在"string"的情况下,每个feature_name隐含value是1。特征名称会进行hash处理,来计算该特征名称对应的hash列。value的符号在输出的数据中可能会发生反转。
from sklearn.feature_extraction import FeatureHasher

h = FeatureHasher(n_features=10, input_type='string', dtype=int, alternate_sign=True)#sign表示是否启用符号,可以减少特征冲突
d = [{

    'dog': 1, 'cat': 2, 'elephant': 4}, {

    'dog': 2, 'run': 5}]
f = h.transform(d)
print(f.toarray())
print(h.get_params())
[[ 0  0 -1 -1  0  0  0  0  0  1]
 [ 0  0  0 -1 -1  0  0  0  0  0]]
{

    'alternate_sign': True, 'dtype': <class 'int'>, 'input_type': 'string', 'n_features': 10, 'non_negative': False}


d = [['dog', 'cat', 'cat', 'elephant', 'elephant', 'elephant', 'elephant', ],
["dog", "dog", "run", 'run', 'run', 'run', 'run'],
["run", "run"]]
f = h.transform(d)
print(f.toarray())
print(h.get_params())
[[ 0  0 -4 -1  0  0  0  0  0  2]
 [ 0  0  0 -2 -5  0  0  0  0  0]
 [ 0  0  0  0 -2  0  0  0  0  0]]
{

    'alternate_sign': True, 'dtype': <class 'int'>, 'input_type': 'string', 'n_features': 10, 'non_negative': False}
-
text feature extraction
文本分析是机器学习的重要领域,文本是由一系列符号构成,无法直接被计算机学习,所以我们在数值型特征空间上,建立实当的特征向量,便于机器去学习。
文本分析的一般步骤:
1.tokenizing划分
将文本按照一定的规则划分成数个独立的部分
2.counting统计
统计每个部分出现的次数
3.normalizing归一化加权
赋予每个部分不同的权值,弱化a,the等介词的权重。The Bag of Words representation(字袋模型)
一个语料库(corpus)中的所有文档可以用一个特征向量矩阵来建模:每一行文档代表一行特征向量,特征向量的每一个分量是Token在文档中出现的次数/频率。但字袋模型缺少分析词语前后的关联性的能力。
由于文本的词汇集合会很大,但是每次使用的仅有一部分,所以特征向量大部分位置为0,面对这种稀疏数据而不影响矩阵的运算速度,特征向量矩阵通常会用系数矩阵来存储。
常用方法如下:
from sklearn.feature_extraction.text import CountVectorizer
vec=CountVectorizer(min_df=1)
#展示vec的内部结构
CountVectorizer(analyzer='word', binary=False, decode_error='strict',
        dtype=<class 'numpy.int64'>, encoding='utf-8', input='content',
        lowercase=True, max_df=1.0, max_features=None, min_df=1,
        ngram_range=(1, 1), preprocessor=None, stop_words=None,
        strip_accents=None, token_pattern='(?u)\\b\\w\\w+\\b',
        tokenizer=None, vocabulary=None)


from sklearn.feature_extraction.text import CountVectorizer

vec = CountVectorizer(min_df=1)
cropus = [
    'zzh is a diligent boy',
    'zzh goes to library everyday',
    'zzh makes to_do list and finishes it on purpose'
]  # 创建语料库
x = vec.fit_transform(cropus)
print(x.toarray())
#结果的最后一列均为1,表示每一行的特征向量的最后一个数值代表单词zzh
[[0 1 1 0 0 0 1 0 0 0 0 0 0 0 0 1]
 [0 0 0 1 0 1 0 0 1 0 0 0 0 1 0 1]
 [1 0 0 0 1 0 0 1 0 1 1 1 1 0 1 1]]

#但是字袋模型只支持2个字符以上的单词为一体
analyze = vec.build_analyzer()
print(analyze('zzh is a diligent boy') == (['zzh', 'is', 'diligent', 'boy']))
True
#次处不用单词a也显示True


print(vec.get_feature_names())#显示特征名称
['and', 'boy', 'diligent', 'everyday', 'finishes', 'goes', 'is', 'it', 'library', 'list', 'makes', 'on', 'purpose', 'to', 'to_do', 'zzh']


print(vec.vocabulary_.get('zzh'))#告知特征所在特征向量的位置
15#通过上一条指令我们发现特征zzh在第16个,即是正确的

#如果语料库内不包含一些新的单词那么这些新单词会被置零,表示单词不在语料库中
print(vec.transform(['zzh wants to relax today']).toarray())
[[0 0 0 0 0 0 0 0 0 0 0 0 0 1 0 1]]
#to和zzh在语料库中,所以对应的特征位置为1
为了解决上述提到的问题,即字袋模型无法区分单词之间的联系,比如 go to和to go,在字袋模型里面表示的是相同的特征,即这两个单词所在的位置,对应的数均为1,无法体现出区别,现在会采用2-grams of words 即两个词为一组,这样就可以区分了。
vec1=CountVectorizer(ngram_range=(1,2))
analyze1=vec1.build_analyzer()
print(analyze1('zzh are cool')==['zzh','are','cool','zzh are','are cool'])#唯一的区别就是我们的分组规格不再是(1,1)而是(1,2)即1行2列为一组
True
#这样既可以单字符区分,也可以按多字符区分,提高了词语的相关性。
以上代码有一个核心点我们在创建特征向量的时候必须要赋予对应的语料库,如果不按照这个要求先创建特征向量的话,许多功能是无法直接进行的。
考虑到词频可以使用TfidfVectorizer()
用法同CountVectorizer一致,只不过这个语句是通过词出现的次数,反应词频量(logn,n为出现次数)
- image feature extraction