LNMP架构搭建全过程
1.安装nginx1.15.9
1.1安装环境
yum -y install \
pcre-devel \ #支持正则表达式
zlib-devel \ #函数库
gcc gcc-c++ \ #二进制翻译工具
make \ #二进制翻译工具
expat-devel \ #解析xml格式文件
perl #支持Perl语言
1.2解压缩软件包并编译安装
tar zxf nginx-1.15.9.tar.gz
cd nginx-1.15.9
./configure \
–prefix=/usr/local/nginx \ #安装路径
–user=nginx \ #用户
–group=nginx \ #组
–with-http_stub_status_module #支持状态统计模块
make && make install #编译和安装
1.3优化程序命令、启动脚本及配置文件
nginx -t #检查配置语法命令
此时会提示无次命令,需优化
ln -s /usr/local/nginx/sbin/nginx /usr/local/sbin
#路径优化,便于系统直接识别,可以直接打nginx命令了,不用加绝对路径了
[root@localhost ~]# nginx -t
nginx: the configuration file /usr/local/nginx/conf/nginx.conf syntax is ok
nginx: configuration file /usr/local/nginx/conf/nginx.conf test is successful
[root@localhost ~]# nginx #启动nginx
[root@localhost ~]# netstat -anutp | grep nginx
tcp 0 0 0.0.0.0:80 0.0.0.0:* LISTEN 37613/nginx: master
#查看服务端口启动成功
systemctl stop firewalld
setenforce 0
此时可以用浏览器访问此主机ip地址,会发现nginx的web服务已经可以使用了
优化管理命令
[root@localhost ~]# pkill -9 nginx #优化前先停止进程
编写启动脚本文件,直接放在/lib/systemd/system/目录下,以便能用systemctl命令来直接管理
vim /lib/systemd/system/nginx.service
[Unit]
Description=nginx
After=network.target
[Service]
Type=forking
PIDFile=/usr/local/nginx/logs/nginx.pid
ExecStart=/usr/local/nginx/sbin/nginx
ExecReload=/usr/bin/kill -s HUP $MAINPID
ExecStop=/usr/bin/kill -s QUIT $MAINPID
Private Tmp=true
[Install]
WantedBy=multi-user.target
[root@localhost ~]# chmod 754 /lib/systemd/system/nginx.service #赋予脚本文件权限
接下来就可以用systemctl来管理nginx了
[root@localhost ~]# systemctl enable nginx.service
[root@localhost ~]# systemctl start nginx
[root@localhost ~]# netstat -anutp | grep nginx
tcp 0 0 0.0.0.0:80 0.0.0.0:* LISTEN 37656/nginx: master
2.安装mysql数据库mysql-5.7.20
2.1安装环境
yum -y install \
ncurses \ #字符终端处理库
ncurses-devel \
bison \ #语法分析工具
cmake #类似configure的工具
2.2编译安装
useradd -s /sbin/nologin mysql #先创建用户
tar xf mysql-boost-5.7.20.tar.gz
cd mysql-5.7.20/
cmake
-DCMAKE_INSTALL_PREFIX=/usr/local/mysql \ #安装路径
-DMYSQL_UNIX_ADDR=/usr/local/mysql/mysql.sock \ #连接数据库需要此文件提供支持
-DSYSCONFDIR=/etc \ #指定初始化参数文件目录,即配置文件目录
-DSYSTEMD_PID_DIR=/usr/local/mysql \ #PID文件,存放PID进程号的
-DDEFAULT_CHARSET=utf8 \ #指定默认使用的字符集编码
-DDEFAULT_COLLATION=utf8_general_ci \ #字符集校对规则
-DWITH_INNOBASE_STORAGE_ENGINE=1 \ #开启存储引擎功能
-DWITH_ARCHIVE_STORAGE_ENGINE=1
-DWITH_BLACKHOLE_STORAGE_ENGINE=1
-DWITH_PERFSCHEMA_STORAGE_ENGINE=1
-DMYSQL_DATADIR=/usr/local/mysql/data \ #数据文件存放位置
-DWITH_BOOST=boost \ #c++库
-DWITH_SYSTEMD=1 #做主从复制时,需要用到id序列号
make && make install
2.3优化及初始化
chown -R mysql:mysql /usr/local/mysql/
vi /etc/my.cnf #编辑配置文件
[client] #客户端配置
port = 3306
default-character-set=utf8
socket = /usr/local/mysql/mysql.sock
[mysql] #程序配置
port = 3306
default-character-set=utf8
socket = /usr/local/mysql/mysql.sock
[mysqld] #服务端配置
user = mysql
basedir = /usr/local/mysql
datadir = /usr/local/mysql/data
port = 3306
character_set_server=utf8
pid-file = /usr/local/mysql/mysqld.pid
socket = /usr/local/mysql/mysql.sock
server-id = 1
sql_mode=NO_ENGINE_SUBSTITUTION,STRICT_TRANS_TABLES,NO_AUTO_CREATE_USER,NO_AUTO_VALUE_ON_ZERO,NO_ZERO_IN_DATE,NO_ZERO_DATE,ERROR_FOR_DIVISION_BY_ZERO,PIPES_AS_CONCAT,ANSI_QUOTES
chown mysql:mysql /etc/my.cnf #更改配置文件属主,让mysql能完全控制其配置文件
echo ‘PATH=/usr/local/mysql/bin:/usr/local/mysql/lib:$PATH’ >> /etc/profile
#更改环境变量,让mysql的命令能直接运行,不需要敲绝对路径
echo ‘export PATH’ >> /etc/profile
source /etc/profile #刷新配置文件
/usr/local/mysql/bin/mysqld \ #指向数据库初始化脚本
–initialize-insecure \ #初始化命令
–user=mysql \ #指定用户
–basedir=/usr/local/mysql \ #指定路径
–datadir=/usr/local/mysql/data #指定数据文件存放目录
cp /usr/local/mysql/usr/lib/systemd/system/mysqld.service /usr/lib/systemd/system/
#将启动脚本直接复制到usr/lib/systemd/system/目录下,让systemctl命令直接管理
systemctl enable mysqld
systemctl start mysqld
systemctl status mysqld
netstat -anpt | grep 3306
2.4修改密码及登录mysql
mysqladmin -u root -p password “123123”
改密码为123123,记住初始密码为空,提示输入密码时直接回车即可,下次在此登录时就用123123了
mysql -u root -p
这里登录mysql就要输入123123密码了
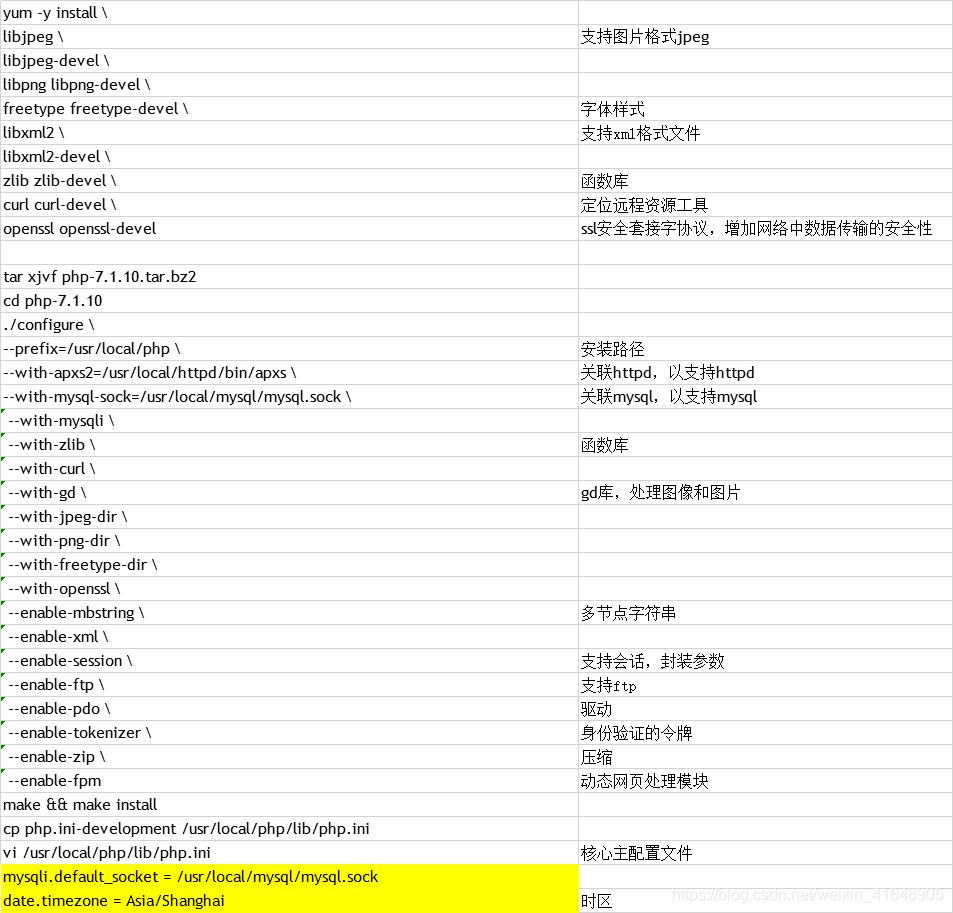
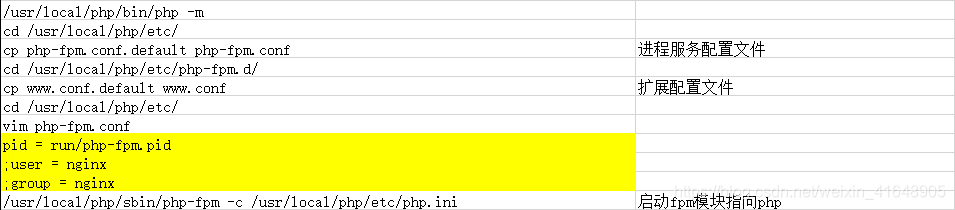
3.安装PHP
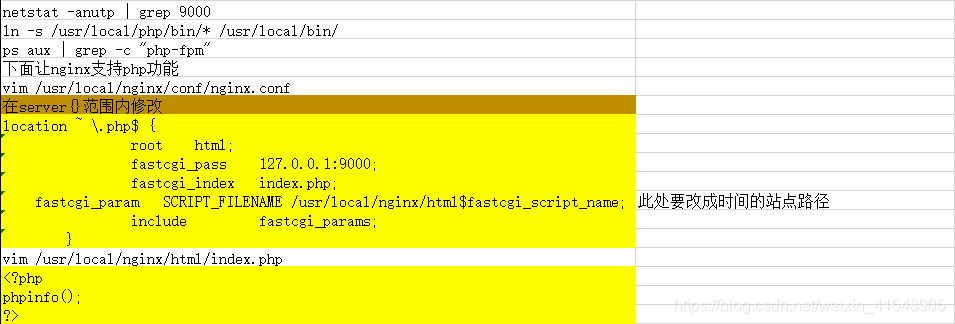
最后,重新启动下nginx服务,就可以浏览器访问192.168.100.100/index.php即可测试php是否成功了
192.168.100.100为主机ip地址