0.点击事件
js:
clickImage:function(event){

    }
//点击事件里所带参数是事件对象,打印出来能查看这次事件的属性
1.响应的数据绑定
wxml:
<view style="background-color:{

    {

    bgcolor}};width:400rpx;height:300rpx;"></view>
<button bindtap="redTap">让背景变红</button>
<button bindtap="yellowTap">让背景变黄</button>
js:
redTap:function(){


    this.setData({


      bgcolor:"#cd584a"
    })
  },
  yellowTap:function(){


    this.setData({


      bgcolor:"#f8ce5f"
    })
  }
//利用button按钮触发setData函数,也侧面反映出
对data里的数据进行修改,视图层也会做相应的更新,称之为响应的数据绑定
2.匿名函数
js:
let square = function(number){


  return number * number;
};
console.log(square(4));
//输出14,匿名函数的用法
3.箭头函数
js:
const sum = (x, y) => x + y;
const sum = function(x, y){


return x + y;
}
function sum(x, y) {


  return x + y;
}
//三个函数一样
4.currentTarget事件1
wxml:
<view class="weui-navbar">
  <block wx:for="{

    {

    tabs}}" wx:key="index">
    <view id="{

    {

    index}}" class="weui-navbar__item {

    {

    activeIndex == index ? 'weui-bar__item_on' : ''}}" bindtap="tabClick">
      <view class="weui-navbar__title">{

    {

    item}}</view>
    </view>
  </block>
</view>
<view class="weui-tab__panel">
  <view hidden="{

    {

    activeIndex != 0}}">帝都</view>
  <view hidden="{

    {

    activeIndex != 1}}">魔都</view>
  <view hidden="{

    {

    activeIndex != 2}}">妖都</view>
  <view hidden="{

    {

    activeIndex != 3}}">渔村</view>
</view>
js:
tabClick: function(e){


    console.log(e);
    this.setData({


      activeIndex: e.currentTarget.id
    });
  },
//通过currentTarget函数改变data里面的activeIndex对象实现响应的数据绑定
即以一种触发的方式实现响应的数据绑定,与上面讲述的响应的数据绑定不同的是这种方式能
根据点击的链接的不同,渲染相应的数据,方便使用模板
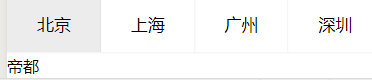
效果:点击北京呈现帝都,点击广州呈现妖都…
5.currentTarget事件2
wxml:
<view id="viewclick" style="background-color: red;padding:20px;" data-sku="100000177760" data-spu="100000177756" data-pid="100000177756" data-toggle="Apple iPhone XR" data-jd-color="Red" data-productBrand="Apple" bindtap="clickView">
  <image id="imageclick" src="https://img13.360buyimg.com/n7/jfs/t1/842/9/3723/77573/5b997bedE4f438e5b/ccd1077b985c7150.jpg" mode="widthFix" style="width:200rpx" bindtap="clickImage">点击button</image>
</view>
js:
  clickImage:function(e){


    console.log('我是image', e);
    wx.navigateTo({


      url: '/pages/home/detail/detail?id=imageclick&uid=tcb&key=tap&ENV=weapp&frompage=lifecycle',
    })
  },
  clickView:function(event){


    console.log('我是view', event);
    wx.navigateTo({


      url: '/pages/home/detail/detail?id=viewclick&uid=tcb&key=tap&ENV=weapp&frompage=lifecycle',
    })
  },
//点击图片时,就会触发两个事件处理函数,称为事件的冒泡
此时打印出来的两组事件对象中只有在clickView事件对象的currentTarget里看到dataset获取到
了view组件的自定义数据,而clickImage事件对象的currentTarget里面没有数据
//也就是说我们点击组件,从事件对象的dataset里,我们可以通过event.currentTarget.dataset来获取组件的自定义数据。
//顺带一提,此时detail页面接收的数据 id是 imageclick
6.链接携带数据
url="./../home/detail/detail?id=lesson&uid=tcb&key=tap&ENV=weapp&frompage=lifecycle"
//?前是页面目录,?后是链接所带数据,就是转跳的同时给了页面一些数据
url="./../home/detail/detail?id={

    {

    index}}&name={

    {

    movies.name}}&img={

    {

    movies.img}}&desc={

    {

    movies.desc}}"
//所带数据可以是data里面的对象
顺带一提的是,onLoda周期函数所带参数options即为链接所携带数据,是一个对象,可以用setData的方式用来给data里的对象赋值,通过这种方法可以把一个页面里的data转移到另一个页面
7.括号表示法
js:
wx.getSetting({


      success(res){


        console.log('wx.getSetting得到的数据',res)
        if (res.authSetting["scope.userInfo"]){


          wx.getUserInfo({


            success(res){


              console.log("wx.getUserInfo得到的数据",res)
            }
          })
        }
      }
    })
   //由于res.authSetting对象下面有一个名字是scope.userInfo的对象,无法用res.authSetting.scope.userInfo来表示,
   系统会误认为是authSetting属性下的scope属性的usrInfo属性值
8.that与this
js:
wx.getUserInfo({


  success(res){


    console.log('this是啥',this)
    this.globalData.userInfo = res.userInfo
  }
})
//结果:this是什么 undefined ,报错Cannot read property 'globalData' of undefined
//更改代码:
let that=this
wx.getUserInfo({


  success(res){


    console.log('that是啥',that)
    that.globalData.userInfo = res.userInfo
  }
})
//结果:that是什么 pe {

    onLaunch: ƒ, onShow: ƒ, onHide: ƒ, onUnlaunch: ƒ, globalData: {

    …}}
globalData: {

    userInfo: {

    …}}
//哪个对象调用函数,函数里面的this就指向哪个对象,在this还指向页面的情况下用that表示指向页面的this,that就指向页面
9.页面与全局
将用户信息写进app.js:
app.js:
  globalData:{


    userInfo:null,
  },
xxx.html:
<button open-type="getUserInfo" bindgetuserinfo="getUserInfomation"> 点击获取用户信息 </button>
<!--规定格式,不可更改-->
xxx.js:
let app = getApp();//Page()前
  getUserInfomation: function (event) {


    app.globalData.userInfo = event.detail.userInfo;
    this.setData({


      userInfo: event.detail.userInfo,
      })
  },
//将用户信息写进app.js(全局)后其他页面也能够调用app.js里面的数据
举例:
yyy.js:
let app = getApp();//Page()前
console.log("我来证明全局数据可以使用", app.globalData.userInfo);
//打印成功
10.表单基本介绍
wxml:
<form bindsubmit="setNaivgationBarTitle">
   <input type="text" placeholder="请输入页面标题并点击设置即可" name="navtitle"></input>
    <button type="primary" form-type="submit">设置</button>
</form>
//表单由form input button组件构成,缺一不可,输入框组件input和button组件要在<form></form>内
//绑定事件处理函数的是form组件而不是button组件.form的bindsubmit与button的 formType="submit"是一对,点击button,
就会执行bindsubmit的事件处理函数
js:
setNaivgationBarTitle(e) {


    console.log(e)
    const navtitle = e.detail.value.navtitle
    wx.setNavigationBarTitle({


      title:navtitle
    })
  },//点击button,修改导航栏标题
11.input组件介绍
  <input type="text" name="username" placeholder="请输入用户名"></input>
  <input password type="text" name="password" maxlength="6" placeholder="请输入6位密码" confirm-type="next"></input>
  <input type="idcard" name="idcard" placeholder="请输入身份证号"></input>
  <input type="number" name="age" placeholder="请输入年龄"></input>
  <input type="digit" name="height" placeholder="输入身高多少米"></input>
  //以上5种键盘格式都不一样,与type属性相关
  <input type="text" confirm-type="send" placeholder="展示1"></input>
  <input type="text" confirm-type="search" placeholder="展示2"></input>
  <input type="text" confirm-type="go" placeholder="展示3"></input>
  <input type="text" confirm-type="done" placeholder="展示4"></input>
  //以上4中键盘样式一样,最右下角按键分别是发送,搜索,开始,回车,与confirm-type有关
12.表单里的其它组件
wxml:
<form bindsubmit="formSubmit" bindrest="formReset">
    <view>开关选择器按钮</view>
    <switch name="switch"/>
    <view>滑动选择器按钮slider</view>
    <slider name="process" show-value ></slider>
    <view>单选按钮radio</view>
    <radio-group name="sex">
      <label><radio value="male"/>男</label>
      <label><radio value="female"/>女</label>
    </radio-group>
    <view>多选按钮checkbox</view>
    <checkbox-group name="gamecheck">
      <label><checkbox value="game1"/>王者荣耀</label>
      <label><checkbox value="game2"/>欢乐斗地主</label>
      <label><checkbox value="game3"/>连连看</label>
      <label><checkbox value="game4"/>刺激战场</label>
      <label><checkbox value="game5"/>穿越火线</label>
      <label><checkbox value="game6"/>天天酷跑</label>
    </checkbox-group>
    <button form-type="submit">提交</button>
    <button form-type="reset">重置</button> //清空表单数据
</form>
js:
  formSubmit:function(e){


    console.log('表单携带的数据为:', e.detail.value);
  },
//点击button提交,将表单组件中的 value 值进行提交,需要在表单组件中加上 name 来作为 key,否则提交数据中
无此组件(没有name属性)的数据
//打印出来的数据格式  name:value
13.扩展运算符
数组的扩展运算符
gamecheck是一个数组
直接打印的gamecheck : ["game1", "game2", "game6"]
拓展运算符打印的gamecheck: game1 game2 game6
//类似于遍历

对象的扩展运算符:
js:
  submitContact:function(e) {


    const formData = e.detail.value
    console.log('打印formData对象',formData)
    console.log('扩展运算符打印', {

     ...formData })
  },
//两个打印结果相同
//{

     ...formData }本身就是一个对象,相当于把formData对象里的属性和值给拷贝到了新的对象里面。
14.bindinput响应式数据渲染
wxml:
<view>你输入的是:{

    {

    inputValue}}</view>
<input  bindinput="bindKeyInput" placeholder="输入的内容会同步到view中"/>
js:
  data: {


    inputValue: '你还没输入内容呢'
  },
  bindKeyInput: function (e) {


    const inputValue = e.detail.value
    this.setData({


      inputValue
    })
  },
//input输入框每输入一个字符,函数就执行一次,wxml页面改变
15.剪贴板
wxml:
<input type="text" name="copytext" place="{

    {

    initvalue}}" bindinput="valueChanged"></input>
<button type="primary" bindtap="copyText">复制</button>
js:
  data: {


    initvalue: '填写内容复制',
  },
  valueChanged(e) {


    this.setData({


      initvalue: e.detail.value
    })
  },
  copyText() {


    wx.setClipboardData({


      data: this.data.initvalue,
    })
  },
//点击复制按钮把输入文本复制进手机或电脑剪贴板
16 “,”的使用
各个数据之间由英文字符逗号隔开,这里的数据包括对象、数据、单条属性与值,平级数据的最后一条数据不要加逗号,,也就是只有数据之间才有逗号。