Android 点击换头像(拍照和从相册选择)


首先是layout里的代码,但这之前需要在build.gradle里加两行代码,主要是圆形图片和别的按钮啥的,你也可以改成自己的,不加圆形图片用系统原来的图片也是可以的。
 implementation 'com.leon:lsettingviewlibrary:1.3.0'
 implementation 'de.hdodenhof:circleimageview:2.1.0'
- my.xml
<?xml version="1.0" encoding="utf-8"?>
<androidx.constraintlayout.widget.ConstraintLayout
    xmlns:android="http://schemas.android.com/apk/res/android"
    xmlns:leon="http://schemas.android.com/apk/res-auto"
    xmlns:tools="http://schemas.android.com/tools"
    android:layout_width="match_parent"
    android:layout_height="match_parent">

    <LinearLayout
        android:layout_width="match_parent"
        android:layout_height="match_parent"
        android:orientation="vertical"
       >

        <LinearLayout
            android:layout_width="match_parent"
            android:layout_height="150dp"
            android:layout_marginBottom="16dp"
            android:background="#fff"
            android:gravity="center"
            android:orientation="vertical">

            <de.hdodenhof.circleimageview.CircleImageView
                android:id="@+id/profile_image"
                android:layout_width="96dp"
                android:layout_height="96dp"
                android:src="@drawable/picc"
                leon:civ_border_color="#FFFFFF"
                leon:civ_border_width="2dp" />

            <TextView
                android:layout_width="match_parent"
                android:layout_height="wrap_content"
                android:gravity="center"
                android:padding="10dp"
                android:text="小飞象"
                android:textSize="16sp" />
        </LinearLayout>


        <com.leon.lib.settingview.LSettingItem
            android:id="@+id/item_one"
            android:layout_width="match_parent"
            android:layout_height="wrap_content"
            leon:leftIcon="@drawable/picc"
            leon:leftText="钱包" />

        <com.leon.lib.settingview.LSettingItem
            android:layout_width="match_parent"
            android:layout_height="wrap_content"
            leon:leftIcon="@drawable/picc"
            leon:leftText="收藏" />

        <com.leon.lib.settingview.LSettingItem
            android:layout_width="match_parent"
            android:layout_height="wrap_content"
            leon:leftIcon="@drawable/picc"
            leon:leftText="相册"
            leon:rightStyle="iconHide"/>

        <com.leon.lib.settingview.LSettingItem
            android:id="@+id/item_four"
            android:layout_width="match_parent"
            android:layout_height="wrap_content"

            leon:leftIcon="@drawable/picc"
            leon:leftText="卡包"
            leon:rightStyle="iconCheck"/>

        <com.leon.lib.settingview.LSettingItem
            android:id="@+id/item_five"
            android:layout_width="match_parent"
            android:layout_height="wrap_content"
            leon:leftIcon="@drawable/picc"
            leon:leftText="表情" />

        <com.leon.lib.settingview.LSettingItem
            android:id="@+id/item_six"
            android:layout_width="match_parent"
            android:layout_height="wrap_content"

            leon:leftIcon="@drawable/picc"
            leon:leftText="设置"
            leon:rightStyle="iconSwitch" />

        <com.leon.lib.settingview.LSettingItem
            android:layout_width="match_parent"
            android:layout_height="wrap_content"
            leon:isShowUnderLine="false"
            leon:leftIcon="@drawable/picc"
            leon:leftText="我的位置"
            leon:rightStyle="iconSwitch" />


    </LinearLayout>
</androidx.constraintlayout.widget.ConstraintLayout>
下面的xml文件是弹出的小框的layout文件
2.layout_bottom_dialog.xml
<?xml version="1.0" encoding="utf-8"?>
<LinearLayout xmlns:android="http://schemas.android.com/apk/res/android"
    android:layout_width="match_parent"
    android:layout_height="wrap_content"
    android:orientation="vertical">

    <LinearLayout
        android:layout_width="match_parent"
        android:layout_height="wrap_content"
        android:layout_margin="10dp"
        android:orientation="vertical">

        <TextView
            android:id="@+id/tv_album"
            android:layout_width="match_parent"
            android:layout_height="wrap_content"
            android:background="@drawable/shape_album"
            android:gravity="center"
            android:padding="15dp"
            android:text="相册"
            android:textSize="16sp"/>

        <View
            android:layout_width="match_parent"
            android:layout_height="1dp"
            android:background="#f5f5f5"/>

        <TextView
            android:id="@+id/tv_camera"
            android:layout_width="match_parent"
            android:layout_height="wrap_content"
            android:background="@drawable/shape_camera"
            android:gravity="center"
            android:padding="15dp"
            android:text="拍照"
            android:textSize="16sp"/>

        <TextView
            android:id="@+id/tv_cancel"
            android:layout_width="match_parent"
            android:layout_height="wrap_content"
            android:layout_marginTop="10dp"
            android:background="@drawable/shape_cancel"
            android:gravity="center"
            android:padding="15dp"
            android:text="取消"
            android:textSize="16sp"/>

    </LinearLayout>

</LinearLayout>
还有一个需要注意到的是因为需要用到摄像头和相册的图,需要在AndroidManifest.xml加一下下面的代码:
<uses-permission android:name="android.permission.READ_EXTERNAL_STORAGE" />
<uses-permission android:name="android.permission.WRITE_EXTERNAL_STORAGE"/>
AndroidManifest.xml里面里面:

 <provider
            android:authorities="com.example.cameraalbumtest.fileprovider"
            android:name="androidx.core.content.FileProvider"
            android:exported="false"
            android:grantUriPermissions="true">
            <meta-data
                android:name="android.support.FILE_PROVIDER_PATHS"
                android:resource="@xml/file_paths"/>
 </provider>
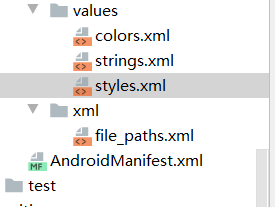
layout 里建一个xml文件夹然后建一个文件,如下图

代码:
<?xml version="1.0" encoding="utf-8" ?>
<paths xmlns:android="http://schemas.android.com/apk/res/android">
    <external-path name="my_images" path="" />
</paths>
3.fragment 里的代码:
package com.example.myapplication.fragment;

import android.Manifest;
import android.annotation.TargetApi;
import android.content.ContentUris;
import android.content.Intent;
import android.content.pm.PackageManager;
import android.database.Cursor;
import android.graphics.Bitmap;
import android.graphics.BitmapFactory;
import android.graphics.Color;
import android.graphics.drawable.ColorDrawable;
import android.net.Uri;
import android.os.Build;
import android.os.Bundle;
import android.provider.DocumentsContract;
import android.provider.MediaStore;
import android.view.Gravity;
import android.view.LayoutInflater;
import android.view.View;
import android.view.ViewGroup;
import android.view.WindowManager;
import android.widget.ImageView;
import android.widget.PopupWindow;
import android.widget.TextView;
import android.widget.Toast;

import androidx.core.app.ActivityCompat;
import androidx.core.content.ContextCompat;
import androidx.core.content.FileProvider;
import androidx.fragment.app.Fragment;

import com.example.myapplication.FirstActivity;
import com.example.myapplication.R;
import com.example.myapplication.SecondActivity;

import java.io.File;
import java.io.FileNotFoundException;
import java.io.IOException;

import static android.app.Activity.RESULT_OK;

/**
 * A simple {@link Fragment} subclass.
 */
public class ThreeFragment extends Fragment{


    public static final int TAKE_PHOTO = 1;
    private ImageView picture;
    private Uri imageUri;
    public static final int CHOOSE_PHOTO = 2;
    private PopupWindow pop;
    public View onCreateView(LayoutInflater inflater, ViewGroup container, Bundle savedInstanceState) {


        super.onCreateView(inflater, container, savedInstanceState);
        // 使用布局加载器加载
        View view = inflater.inflate(R.layout.my, null);
        return view;
    }
    public void onViewCreated(View view, Bundle savedInstanceState) {


        picture = (ImageView) view.findViewById(R.id.profile_image);


        picture.setOnClickListener(new View.OnClickListener() {


            @Override
            public void onClick(View v) {


                showPop();
            }
        });
    }
    private void showPop() {


        View bottomView = View.inflate(getActivity(), R.layout.layout_bottom_dialog, null);
        TextView mAlbum = bottomView.findViewById(R.id.tv_album);
        TextView mCamera = bottomView.findViewById(R.id.tv_camera);
        TextView mCancel = bottomView.findViewById(R.id.tv_cancel);

        pop = new PopupWindow(bottomView, -1, -2);
        pop.setBackgroundDrawable(new ColorDrawable(Color.TRANSPARENT));
        pop.setOutsideTouchable(true);
        pop.setFocusable(true);
        WindowManager.LayoutParams lp = getActivity().getWindow().getAttributes();
        lp.alpha = 0.5f;
        getActivity().getWindow().setAttributes(lp);
        pop.setOnDismissListener(new PopupWindow.OnDismissListener() {


            @Override
            public void onDismiss() {


                WindowManager.LayoutParams lp = getActivity().getWindow().getAttributes();
                lp.alpha = 1f;
                getActivity().getWindow().setAttributes(lp);
            }
        });
        pop.setAnimationStyle(R.style.main_menu_photo_anim);
        pop.showAtLocation(getActivity().getWindow().getDecorView(), Gravity.BOTTOM, 0, 0);

        View.OnClickListener clickListener = new View.OnClickListener() {


            @Override
            public void onClick(View view) {


                switch (view.getId()) {


                    case R.id.tv_album:
                        //相册
                        if (ContextCompat.checkSelfPermission(getActivity(), Manifest.permission.WRITE_EXTERNAL_STORAGE) != PackageManager.PERMISSION_GRANTED){


                            //相册中的照片都是存储在SD卡上的,需要申请运行时权限,WRITE_EXTERNAL_STORAGE是危险权限,表示同时授予程序对SD卡的读和写的能力
                            ActivityCompat.requestPermissions(getActivity(), new String[]{

    Manifest.permission.WRITE_EXTERNAL_STORAGE}, 1);
                        }else {


                            openAlbum();

                        }
                        break;
                    case R.id.tv_camera:
                        //拍照
                        File outputImage = new File(getActivity().getExternalCacheDir(),"output_image.jpg");
                        try{


                            if(outputImage.exists())
                                outputImage.delete();
                            outputImage.createNewFile();
                        }catch (IOException e){


                            e.printStackTrace();
                        }
                        if(Build.VERSION.SDK_INT >=24){


                            imageUri = FileProvider.getUriForFile(getActivity(),
                                    "com.example.cameraalbumtest.fileprovider",outputImage);
                        }else{


                            imageUri = Uri.fromFile(outputImage);
                        }

                        Intent intent = new Intent("android.media.action.IMAGE_CAPTURE");
                        intent.putExtra(MediaStore.EXTRA_OUTPUT,imageUri);
                        startActivityForResult(intent,TAKE_PHOTO);
                        break;
                    case R.id.tv_cancel:
                        //取消
                        closePopupWindow();
                        break;
                }
                closePopupWindow();
            }
        };
        mCamera.setOnClickListener(clickListener);
        mAlbum.setOnClickListener(clickListener);

        mCancel.setOnClickListener(clickListener);
    }

    public void closePopupWindow() {


        if (pop != null && pop.isShowing()) {


            pop.dismiss();
            pop = null;
        }
    }

    private void openAlbum(){


        Intent intent = new Intent("android.intent.action.GET_CONTENT");
        intent.setType("image/*");
        startActivityForResult(intent,CHOOSE_PHOTO);//打开相册
    }


    @Override
    public void onActivityResult(int requestCode, int resultCode, Intent data) {


        super.onActivityResult(requestCode, resultCode, data);
        switch (requestCode) {


            case TAKE_PHOTO:
                if (resultCode == RESULT_OK) {


                    try {


                        Bitmap bitmap = BitmapFactory.decodeStream(getActivity().getContentResolver().openInputStream(imageUri));
                        picture.setImageBitmap(bitmap);
                    } catch (FileNotFoundException e) {


                        e.printStackTrace();
                    }
                }
                break;

            case CHOOSE_PHOTO:
                if(resultCode == RESULT_OK) {


                    //因为sdk19以后返回的数据不同,所以要根据手机系统版本进行不同的操作
                    //判断手机系统版本
                    if(Build.VERSION.SDK_INT >= 19) {


                        handleImageOnKiKai(data);
                    }else {


                        handleImageBeforeKiKai(data);
                    }
                }
                break;
            default:
                break;
        }
    }
    //>=19的操作
    @TargetApi(19)
    private void handleImageOnKiKai(Intent data) {


        String imagePath = null;
        Uri uri = data.getData();
        if(DocumentsContract.isDocumentUri(getActivity(), uri)) {


            //如果是Document类型的Uri,则通过document id 处理
            String docId = DocumentsContract.getDocumentId(uri);
            if("com.android.providers.media.documents".equals(uri.getAuthority())) {


                String id = docId.split(":")[1];
                String selection = MediaStore.Images.Media._ID + "=" + id;
                imagePath = getImagePath(
                        MediaStore.Images.Media.EXTERNAL_CONTENT_URI, selection);
            }else if("com.android.providers.downloads.documents".equals(uri.getAuthority())) {


                Uri contentUri = ContentUris.withAppendedId(
                        Uri.parse("content://downloads/public_downloads"), Long.valueOf(docId));
                imagePath = getImagePath(contentUri, null);
            }else if("content".equalsIgnoreCase(uri.getScheme())) {


                //不是document类型的Uri,普通方法处理
                imagePath = getImagePath(uri, null);
            }
            displayImage(imagePath);
        }
    }

    //<19的操作
    private void handleImageBeforeKiKai(Intent data) {


        Uri uri = data.getData();
        String imagePath = getImagePath(uri, null);
        displayImage(imagePath);
    }

    private String getImagePath(Uri uri, String selection) {


        String path = null;
        //通过Uri 和selection获取真正的图片路径
        Cursor cursor = getActivity().getContentResolver().query(
                uri, null, selection, null, null);
        if(cursor != null) {


            if(cursor.moveToFirst()) {


                path = cursor.getString(
                        cursor.getColumnIndex(MediaStore.Images.Media.DATA));
            }
            cursor.close();
        }
        return path;
    }

    private void displayImage(String path) {


        if(path != null) {


            Bitmap bitmap = BitmapFactory.decodeFile(path);
            picture.setImageBitmap(bitmap);
        }else {


            Toast.makeText(getActivity(), "Load Failed", Toast.LENGTH_LONG).show();
        }
    }
}
还有就是在values的styles里面加代码:
<!--  选择图片上传时,向上滑动特效  -->
    <style name="main_menu_photo_anim">
        <item name="android:windowEnterAnimation">@anim/deliver_dialog_in_anim</item>
        <item name="android:windowExitAnimation">@anim/deliver_dialog_out_anim</item>
    </style>
新建文件夹anim

deliver_dialog_in_anim.xml:
<?xml version="1.0" encoding="utf-8"?>
<set xmlns:android="http://schemas.android.com/apk/res/android" >

    <translate
        android:duration="200"
        android:fromXDelta="0"
        android:fromYDelta="1000"
        android:toXDelta="0"
        android:toYDelta="0" />

</set>
deliver_dialog_in_anim.xml:
<?xml version="1.0" encoding="utf-8"?>
<set xmlns:android="http://schemas.android.com/apk/res/android" >

    <translate
        android:duration="300"
        android:fromXDelta="0"
        android:fromYDelta="0"
        android:toXDelta="0"
        android:toYDelta="1000" />

</set>
Android 点击换头像(拍照和从相册选择)