文章目录
gcc使用简介 & 简易Makefile编写
一、gcc使用简介
1.gcc简介
- GCC (the GNU Compiler Collection)的初衷是为GNU操作系统专门编写的一款编译器,现已被大多数类Unix操作系统采纳为标准编译器
- GCC原名GNU C语言编译器(GNU C Compiler),最初只能处理C语言,很快扩展的可以支持更多的语言,如Go 、C++、Java等
2.gcc的编译过程

- 预处理(pre-processing)-E:①头文件展开 ②宏替换 ③产生后缀名为[ .i ]的文本文件
gcc -E test.c -o test.i
- 编译(Compiling)-S:①语法分析、词法分析、语义分析 ③翻译成汇编语言 ④产生后缀名为[ .s ]的汇编文本文件
gcc -S test.i -o test.s
- 汇编(Assembling)-c:①将汇编语言代码翻译成机器指令 ②产生后缀名为[ .o ]的二进制目标文件
gcc -c test.s -o test.o
- 链接(Linking):①进行动态链接或静态链接 ②产生可二进制执行文件
一次性编译:一次性将后缀名为[ .c ]的源文件编译链接生成可执行文件
gcc test.c -o test
带头文件编译:test.h为头文件 test.c为c文件
gcc test.h test.c -o test_func
3.gcc常用操作选项
仅列出常用的选项
| 选项名 | 作用 |
|---|---|
| -o file | 指定输出文件为 file |
| c | 取消链接步骤,编译源码并生成目标文件 |
| E | 预处理 后立即停止,不进行编译 |
| S | 编译 后立刻停止,输出文件是汇编语言文件 |
| g | 嵌入调试信息,方便gdb调试 |
二、简易Makefile编写
makefile模板
target: dependencies
    command
- target:目标文件,你要编译成什么东西
- dependencies:依赖文件,目标文件编译所需要的文件
- command:编译代码
1.单文件依赖makefile编写
test: test.c
  gcc test.c -o test
test文件的生成依赖于test.c,要想从test.c文件编译成test文件需要执行gcc test.c -o test这句命令
2.多文件依赖makefile编写

此时我们用三个文件模拟一下上图的逻辑来学习一下多文件的Makefile如何编写
- main.c
#include <stdio.h>
#include "test.h"

int main()
{


  printf("Call function P().\n");
  P();

  return 0;
}
- test.h
void P();
- test.c
#include <stdio.h>

void P()
{


  printf("Hello World!\n");
}
模拟编写多依赖文件makefile
#main依赖main.c和test.o两个文件
main: main.c test.o
  gcc main.c test.o -o main

#test.o依赖test.c文件
test.o: test.c
  gcc -c test.c -o test.o
想要产生目标文件main,则需要依赖文件main.c和test.o
想要产生目标文件tetst.o则需要依赖文件test.c
[gongruiyang@localhost TestLib]$ ls
main.c  makefile  test.c  test.h
[gongruiyang@localhost TestLib]$ make
gcc -c test.c -o test.o
gcc main.c test.o -o main
[gongruiyang@localhost TestLib]$ ls
main  main.c  makefile  test.c  test.h  test.o
这时产生了两个中间文件,即可执行文件main和test.o,这里的main就是我们想要的最终文件哦
3.多目标文件makefile编写
假设我们想产生两个目标文件
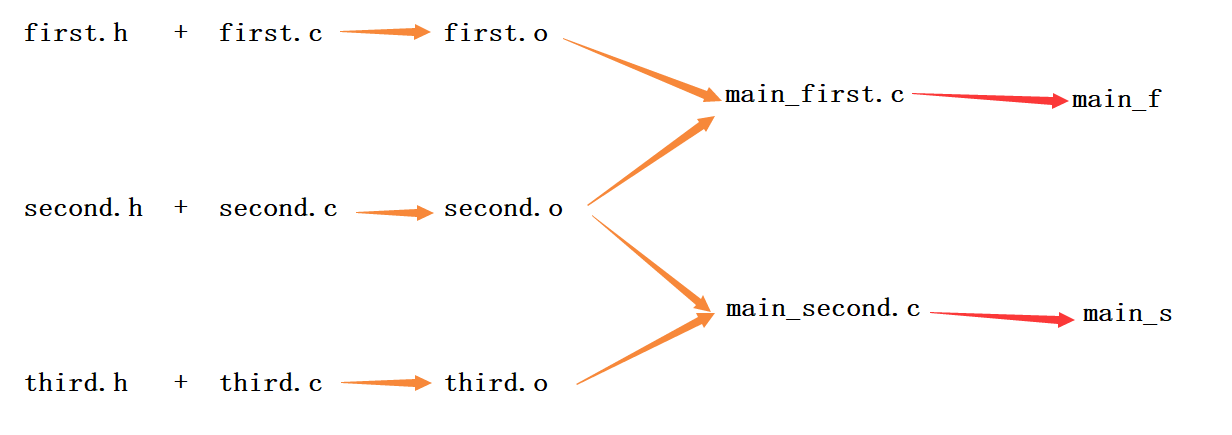
你可能会想到以下的写法:但是该写法是错误的!
原因:makefile默认只会执行第一个目标文件并寻找其依赖,直到最后一个依赖满足条件后便执行结束了,第二个目标文件压根不会执行
main_f: main_first.c first.o second.o
  gcc main_first first.o second.o -o main_f
 main_s: main_second.c second.o third.o
  gcc main_second.c second.o third.o -o main_s

first.o: first.c
  gcc -c first.c -o first.o
second.o: second.c
  gcc -c second.c -o second.o
third.o: third.c
  gcc -c third.c -o third.o
正确写法:使用all
all: main_f main_s


main_f: main_first.c first.o second.o
  gcc main_first first.o second.o -o main_f
 main_s: main_second.c second.o third.o
  gcc main_second.c second.o third.o -o main_s

first.o: first.c
  gcc -c first.c -o first.o
second.o: second.c
  gcc -c second.c -o second.o
third.o: third.c
  gcc -c third.c -o third.o
4.make clean的编写
make clean 是用来删除中间文件的
clean:
  rm *.o main
这里的[ * ]是通配符,代表所有以[ .o ]结尾的文件都删除
[gongruiyang@localhost TestLib]$ make clean
rm *.o main
[gongruiyang@localhost TestLib]$ ls
main.c  makefile  test.c  test.h
此时就将中间文件全部删除,回到最初的状态
5.复杂的makefile编写优化方法
例如我们实现上面图中的复杂逻辑,需要编写如下的makefile
main: main.c first.o second.o third.o
  gcc main.c first.o second.o third.o -o main
first.o: first.c
  gcc -c first.c -o first.o
second.o: second.c
  gcc -c second.c -o second.o
third.o: third.c
  gcc -c third.c -o third.o

clean:
  rm *.o main
如果依赖文件千千万万个,那可不得累死个人哦!机智的程序猿可不会像这样做哦!
- 来!我们学一学普通优化方法!
Makefile中的预定义变量:预定义变量通常是在命令中使用
- $@:表示目标对象
- $^:表示所有依赖对象
- $<:表示所有依赖对象中的第一个依赖对象
main: main.c first.o second.o third.o
  gcc $^ -o $@

first.o: first.c
  gcc -c $^ -o $@
second.o: second.c
  gcc -c $^ -o $@
third.o: third.c
  gcc -c $^ -o $@

clean:
  rm *.o main
- 较强大的优化方法
使用通配符[ % ],它可以替代任意字符串
main: main.c first.o second.o third.o
  gcc $^ -o $@
%.o: %.c
    gcc -c $< -o $@

clean:
  rm *.o main
解释:如果产生main的后缀名为[ .o ]依赖文件都不存在,则需要生成这三个文件,分别都执行下面的依赖文件生成命令,相当于将3句gcc命令使用[ % ]通配符写成了一句