(一) JAVA整合RabbitMQ
下载启动RabbitMQ
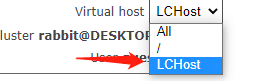
1,新建一个虚拟主机(也可不建立)

添加完后后可在host下拉列表看到新添加的host名称
2,pom文件中引入GA坐标
<?xml version="1.0" encoding="UTF-8"?>
<project xmlns="http://maven.apache.org/POM/4.0.0" xmlns:xsi="http://www.w3.org/2001/XMLSchema-instance"
         xsi:schemaLocation="http://maven.apache.org/POM/4.0.0 https://maven.apache.org/xsd/maven-4.0.0.xsd">
    <modelVersion>4.0.0</modelVersion>
    <parent>
        <groupId>org.springframework.boot</groupId>
        <artifactId>spring-boot-starter-parent</artifactId>
        <version>2.4.1</version>
        <relativePath/> <!-- lookup parent from repository -->
    </parent>
    <groupId>com.mq</groupId>
    <artifactId>rabbitmq-provider</artifactId>
    <version>0.0.1-SNAPSHOT</version>
    <name>rabbitmq-provider</name>
    <description>Demo project for Spring Boot</description>

    <properties>
        <java.version>1.8</java.version>
    </properties>

    <dependencies>
<!--        RabbitMQ-->
        <dependency>
            <groupId>org.springframework.boot</groupId>
            <artifactId>spring-boot-starter-amqp</artifactId>
        </dependency>
        <dependency>
            <groupId>org.springframework.boot</groupId>
            <artifactId>spring-boot-starter-web</artifactId>
        </dependency>

        <dependency>
            <groupId>org.springframework.boot</groupId>
            <artifactId>spring-boot-devtools</artifactId>
            <scope>runtime</scope>
            <optional>true</optional>
        </dependency>
        <dependency>
            <groupId>org.projectlombok</groupId>
            <artifactId>lombok</artifactId>
            <optional>true</optional>
        </dependency>
        <dependency>
            <groupId>org.springframework.boot</groupId>
            <artifactId>spring-boot-starter-test</artifactId>
            <scope>test</scope>
        </dependency>
        <dependency>
            <groupId>org.springframework.amqp</groupId>
            <artifactId>spring-rabbit-test</artifactId>
            <scope>test</scope>
        </dependency>
<!--        糊涂工具包-->
        <dependency>
            <groupId>cn.hutool</groupId>
            <artifactId>hutool-all</artifactId>
            <version>5.5.2</version>
        </dependency>
    </dependencies>

    <build>
        <plugins>
            <plugin>
                <groupId>org.springframework.boot</groupId>
                <artifactId>spring-boot-maven-plugin</artifactId>
                <configuration>
                    <excludes>
                        <exclude>
                            <groupId>org.projectlombok</groupId>
                            <artifactId>lombok</artifactId>
                        </exclude>
                    </excludes>
                </configuration>
            </plugin>
        </plugins>
    </build>

</project>
**3,编写测试类
生产者:
**
 @Test
    void providerTest() throws IOException, TimeoutException {


        // 创建连接工厂
        ConnectionFactory factory = new ConnectionFactory();

//        factory.setUsername("guest");
//        factory.setPassword("guest");
        // 设置RabbitMQ地址
//        factory.setHost("localhost");
        // 设置自定义host名
        factory.setVirtualHost("LCHost");
        // 建立到代理服务器
        Connection connection = factory.newConnection();
        // 获得信道
        Channel channel = connection.createChannel();
        // 声明交换机
        String exchangeName="myExchange";
        // 参数 (交换机名称,交换机类型,是否持久化)
        channel.exchangeDeclare(exchangeName,"direct",true);
        // 创建队列
        String queueName="myQueue1";
        channel.queueDeclare(queueName,true,false,false,null);

        // 路由键
        String routingKey="myRoutingKey";
        // 队列绑定交换机
        channel.queueBind(queueName,exchangeName,routingKey);
        // 发送的消息
        String message="hello world";
        byte[] sendMessage=message.getBytes();
        channel.basicPublish(exchangeName,routingKey,null,sendMessage);
        // 关闭信道
        channel.close();
        // 关闭连接
        connection.close();
    }
说明:用户名、密码、host未设置值,是应为源码有默认值,如果需要设置自定义的信息,可以自行设置

启动测试可以看到队列中含一条信息

消费者
/**
* 消费者消费消息
*/
@Test
public void consumerTest() throws IOException, TimeoutException {
ConnectionFactory factory = new ConnectionFactory();
factory.setVirtualHost("LCHost");
Connection connection = factory.newConnection();
// 获得信道
Channel channel = connection.createChannel();
// 声明交换机
String exchangeName="myExchange";
// 参数 (交换机名称,交换机类型,是否持久化)
// channel.exchangeDeclare(exchangeName,"direct",true);
// 路由键
String routingKey="myRoutingKey";
// 声明队列
String queueName="myQueue1";
channel.queueDeclare(queueName,true,false,false,null);
// 绑定队列,通过路由键将队列和交换机绑定
channel.queueBind(queueName,exchangeName,routingKey);
boolean autoAck=false;
String consumerTag="";
channel.basicConsume(queueName,autoAck,(var1,delivery)->{
System.out.println(var1);
Envelope envelope = delivery.getEnvelope();
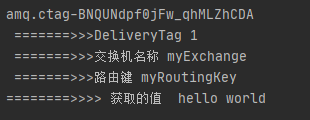
System.out.println(" =======>>>DeliveryTag "+envelope.getDeliveryTag());
System.out.println(" =======>>>交换机名称 "+envelope.getExchange());
System.out.println(" =======>>>路由键 "+envelope.getRoutingKey());
byte[] body = delivery.getBody();
String s = new String(body, "UTF-8");
System.out.println("========>>>> 获取的值 "+s);
channel.basicAck(envelope.getDeliveryTag(),true);
},(var)->{
System.out.println("======>>>失败策略 " +var);
});
}
执行后,队列中的信息已消费

控制台输出
java使用的直连交换,其他类型的可以自行测试,不在赘述,下面整个springBoot三种类型的交换机
(二)SpringBoot整合RabbitMQ
分四种交换机类型:直连交换机(direct),主题交换机topic(),扇出交换机(fanout),头部交换机(header,和direct类似此处不做案例)
概念会下下面代码之前详细写出
两个服务,一个提供者,一个消费者
1,pom文件引入GA坐标
<?xml version="1.0" encoding="UTF-8"?>
<project xmlns="http://maven.apache.org/POM/4.0.0" xmlns:xsi="http://www.w3.org/2001/XMLSchema-instance"
         xsi:schemaLocation="http://maven.apache.org/POM/4.0.0 https://maven.apache.org/xsd/maven-4.0.0.xsd">
    <modelVersion>4.0.0</modelVersion>
    <parent>
        <groupId>org.springframework.boot</groupId>
        <artifactId>spring-boot-starter-parent</artifactId>
        <version>2.4.1</version>
        <relativePath/> <!-- lookup parent from repository -->
    </parent>
    <groupId>com.mq</groupId>
    <artifactId>rabbitmq-provider</artifactId>
    <version>0.0.1-SNAPSHOT</version>
    <name>rabbitmq-provider</name>
    <description>Demo project for Spring Boot</description>

    <properties>
        <java.version>1.8</java.version>
    </properties>

    <dependencies>
<!--        RabbitMQ-->
        <dependency>
            <groupId>org.springframework.boot</groupId>
            <artifactId>spring-boot-starter-amqp</artifactId>
        </dependency>
        <dependency>
            <groupId>org.springframework.boot</groupId>
            <artifactId>spring-boot-starter-web</artifactId>
        </dependency>

        <dependency>
            <groupId>org.springframework.boot</groupId>
            <artifactId>spring-boot-devtools</artifactId>
            <scope>runtime</scope>
            <optional>true</optional>
        </dependency>
        <dependency>
            <groupId>org.projectlombok</groupId>
            <artifactId>lombok</artifactId>
            <optional>true</optional>
        </dependency>
        <dependency>
            <groupId>org.springframework.boot</groupId>
            <artifactId>spring-boot-starter-test</artifactId>
            <scope>test</scope>
        </dependency>
        <dependency>
            <groupId>org.springframework.amqp</groupId>
            <artifactId>spring-rabbit-test</artifactId>
            <scope>test</scope>
        </dependency>
<!--        糊涂工具包-->
        <dependency>
            <groupId>cn.hutool</groupId>
            <artifactId>hutool-all</artifactId>
            <version>5.5.2</version>
        </dependency>
    </dependencies>

    <build>
        <plugins>
            <plugin>
                <groupId>org.springframework.boot</groupId>
                <artifactId>spring-boot-maven-plugin</artifactId>
                <configuration>
                    <excludes>
                        <exclude>
                            <groupId>org.projectlombok</groupId>
                            <artifactId>lombok</artifactId>
                        </exclude>
                    </excludes>
                </configuration>
            </plugin>
        </plugins>
    </build>

</project>
2,提供者修改yml配置
server:
  port: 8001
spring:
  application:
    name: rabbitma-provider
    #rabbitmq配置
  rabbitmq:
    host: localhost
    port: 5672
    username: guest
    password: guest
    virtual-host: LCHost #虚拟host 可以不设置,使用server默认host
3,消费者修改yml配置
server:
  port: 8002
spring:
  application:
    name: rabbitmq-consumer
  rabbitmq:
    host: localhost
    port: 5672
    username: guest
    password: guest
    virtual-host: LCHost
一,直连交换机
消息中的路由键(routing key)如果和 Binding 中的 binding key 一致, 交换器就将消息发到对应的队列中。路由键与队列名完全匹配,如果一个队列绑定到交换机要求路由键为“dog”,则只转发 routing key 标记为“dog”的消息,不会转发“dog.puppy”,也不会转发“dog.guard”等等。它是完全匹配、单播的模式

一,提供者
新建一个config类,初始化连接rabbitmq
package com.mq.rabbitmqprovider.config;

import org.springframework.amqp.core.Binding;
import org.springframework.amqp.core.BindingBuilder;
import org.springframework.amqp.core.DirectExchange;
import org.springframework.amqp.core.Queue;
import org.springframework.context.annotation.Bean;
import org.springframework.context.annotation.Configuration;


/**
 * direct exchnage 直连型交换机
 *
 * @author LiuCheng
 * @data 2020/12/23 14:50
 */
@Configuration
public class DirectRabbitMQConfig {


    /**
     * 队列 起名 testDirectQueue
     *
     * @return
     */
    @Bean
    public Queue testDirectQueue() {


        // durable 是否持久化
        return new Queue("testDirectQueue",true);
    }

    /**
     * Direct交换机  testDirectExchange
     *
     * @return
     */
    @Bean
    public DirectExchange testDirectExchange() {


        return new DirectExchange("testDirectExchange");
    }

    /**
     * 交换机未绑定队列
     * @return
     */
    @Bean
    public DirectExchange testDirectExchange2() {


        return new DirectExchange("testDirectExchangeNoQueue");
    }

    /**
     * 绑定 将队列和交换机绑定,并设置用于匹配键 testDirectRouting
     *
     * @return
     */
    @Bean
    public Binding bindingDirect() {


        return BindingBuilder.bind(testDirectQueue()).to(testDirectExchange()).with("testDirectRouting");
    }

}
2,测试提供者
@Autowired
    private RabbitTemplate rabbitTemplate;
 	@GetMapping("/sendDirectMessage")
    public String sendDirectMessage(){


        String messageId= String.valueOf(UUID.randomUUID());
        String messgageName="hello world!";
        String creatTime= DateUtil.now();
        Map<String,Object> map = new HashMap<>();
        map.put("messageId",messageId);
        map.put("messgageName",messgageName);
        map.put("creatTime",creatTime);
        rabbitTemplate.convertAndSend("testDirectExchange","testDirectRouting",map);
        return "send sendDirectMessage ok";
    }
二,消费者
1,编写消费类,消费队列的信息
@Component
@RabbitListener(queues = "testDirectQueue")// 监听队列的名称
public class DirectReceiver {


    @RabbitHandler
    public void process(Map map){


        System.out.println("DirectReceiver 订阅者获取的消息是 " + map.toString());
    }
}
测试,先启动rabbitmq服务,再启动消费者和提供者
使用postman给提供者发送一条请求,消费者可以接收得到


二,扇形交换机
每个发到 fanout 类型交换器的消息都会分到所有绑定的队列上去。fanout 交换器不处理路由键,只是简单的将队列绑定到交换器上,每个发送到交换器的消息都会被转发到与该交换器绑定的所有队列上。很像子网广播,每台子网内的主机都获得了一份复制的消息。fanout 类型转发消息是最快的。

一,提供者
1,创建三个队列绑定到交换机上,无需指定路由键,三个队列都可以消费提供者的消息
confi类
package com.mq.rabbitmqprovider.config;

import org.springframework.amqp.core.Binding;
import org.springframework.amqp.core.BindingBuilder;
import org.springframework.amqp.core.FanoutExchange;
import org.springframework.amqp.core.Queue;
import org.springframework.context.annotation.Bean;
import org.springframework.context.annotation.Configuration;

/**
 * 扇形交换机 创建三个队列 绑定在交换机上
 * @author LiuCheng
 * @data 2020/12/24 14:29
 */
@Configuration
public class FanoutRabbitMQConfig {


    @Bean
    public Queue queueA(){


        return new Queue("fanoutA");
    }
    @Bean
    public Queue queueB(){


        return new Queue("fanoutB");
    }
    @Bean
    public Queue queueC(){


        return new Queue("fanoutC");
    }
    @Bean
    public FanoutExchange fanoutExchange(){


        return new FanoutExchange("fanoutExchange");
    }
    @Bean
    public Binding bindingToA(){


        return BindingBuilder.bind(queueA()).to(fanoutExchange());
    }
    @Bean
    public Binding bindingToB(){


        return BindingBuilder.bind(queueB()).to(fanoutExchange());
    }
    @Bean
    public Binding bindingToC(){


        return BindingBuilder.bind(queueC()).to(fanoutExchange());
    }
}
控制层
 @GetMapping("/sendFanoutMessage")
    public String sendFanoutMessage(){


        String messageId= String.valueOf(UUID.randomUUID());
        String messgageName="woman say: hello world!";
        String creatTime= DateUtil.now();
        Map<String,Object> map = new HashMap<>();
        map.put("messageId",messageId);
        map.put("messgageName",messgageName);
        map.put("creatTime",creatTime);
        System.out.println("sendFanoutMessage");
        rabbitTemplate.convertAndSend("fanoutExchange",null,map);
        return "send sendFanoutMessage ok";
    }
二,消费者
创建队列的消费者
队列A的消费者
package com.mq.rabbitmqconsumer.rabbimqConsumer;

import org.springframework.amqp.rabbit.annotation.RabbitHandler;
import org.springframework.amqp.rabbit.annotation.RabbitListener;
import org.springframework.stereotype.Component;

import java.util.Map;

/**
 * @author LiuCheng
 * @data 2020/12/24 14:38
 */
@Component
@RabbitListener(queues = "fanoutA")
public class FanoutReceiverA {


    @RabbitHandler
    public void process(Map map){


        System.out.println("FanoutReceiverA 订阅者获取的消息是 " + map.toString());
    }
}
队列B的消费者
package com.mq.rabbitmqconsumer.rabbimqConsumer;

import org.springframework.amqp.rabbit.annotation.RabbitHandler;
import org.springframework.amqp.rabbit.annotation.RabbitListener;
import org.springframework.stereotype.Component;

import java.util.Map;

/**
 * @author LiuCheng
 * @data 2020/12/24 14:38
 */
@Component
@RabbitListener(queues = "fanoutB")
public class FanoutReceiverB {


    @RabbitHandler
    public void process(Map map){


        System.out.println("FanoutReceiverB 订阅者获取的消息是 " + map.toString());
    }
}
队列三的消费者
package com.mq.rabbitmqconsumer.rabbimqConsumer;

import org.springframework.amqp.rabbit.annotation.RabbitHandler;
import org.springframework.amqp.rabbit.annotation.RabbitListener;
import org.springframework.stereotype.Component;

import java.util.Map;

/**
 * @author LiuCheng
 * @data 2020/12/24 14:38
 */
@Component
@RabbitListener(queues = "fanoutC")
public class FanoutReceiverC {


    @RabbitHandler
    public void process(Map map){


        System.out.println("FanoutReceiverC 订阅者获取的消息是 " + map.toString());
    }
}
测试,发送请求到扇形提供者的接口,看消费者消费情况
,发现三个消费者都输出信息


三,主题交换机
topic 交换器通过模式匹配分配消息的路由键属性,将路由键和某个模式进行匹配,此时队列需要绑定到一个模式上。它将路由键和绑定键的字符串切分成单词,这些单词之间用点隔开。它同样也会识别两个通配符:符号“#”和符号“”。#匹配0个或多个单词,匹配不多不少一个单词

一,提供者
1,创建主题交换机config类
package com.mq.rabbitmqprovider.config;

import org.springframework.amqp.core.Binding;
import org.springframework.amqp.core.BindingBuilder;
import org.springframework.amqp.core.Queue;
import org.springframework.amqp.core.TopicExchange;
import org.springframework.beans.factory.annotation.Value;
import org.springframework.context.annotation.Bean;
import org.springframework.context.annotation.Configuration;

/**
 * 主体交换机
 *
 * @author LiuCheng
 * @data 2020/12/23 16:40
 */
@Configuration
public class TopicRabbitMQConfig {


    private  final static String man="topic.man";
    private final static String woman="topic.woman";


    /**
     * 第一个队列man
     *
     * @return
     */
    @Bean
    public Queue firstQueue() {


        return new Queue(TopicRabbitMQConfig.man,true);
    }

    /**
     * 第二个队列 woman
     *
     * @return
     */

    @Bean
    public Queue secondQueue() {


        return new Queue(TopicRabbitMQConfig.woman,true);
    }
    /**
     * 主体交换机
     *
     * @return
     */
    @Bean
    public TopicExchange exchange() {


        return new TopicExchange("topicExchange");
    }

    /**
     * 将队列man绑定到交换机中 绑定的键值为topic.man
     * 这样只有消息是携带路由键是topic.man的才会分发到改队列
     *
     * @return
     */
    @Bean
    public Binding bindingMan() {


        return BindingBuilder.bind(firstQueue()).to(exchange()).with("topic.man");
    }

    /**
     * 将队列woman绑定到交换机中 绑定的键值为topic.woman
     * 这样只有消息是携带路由键是topic.woman的才会分发到该队列
     *
     * @return
     */
    @Bean
    public Binding bindingWoman() {


        return BindingBuilder.bind(secondQueue()).to(exchange()).with("topic.#");
    }


}
2,编写controller
此时有两个接口,用于测试不同情况
@GetMapping("/sendTopicMessageMan")
    public String sendTopicMessageMan(){


        String messageId= String.valueOf(UUID.randomUUID());
        String messgageName=" man say :hello world!";
        String creatTime= DateUtil.now();
        Map<String,Object> map = new HashMap<>();
        map.put("messageId",messageId);
        map.put("messgageName",messgageName);
        map.put("creatTime",creatTime);
        System.out.println("sendTopicMessageMan");
        rabbitTemplate.convertAndSend("topicExchange","topic.man",map);
        return "send sendTopicMessageMan ok";
    }
    @GetMapping("/sendTopicMessageWoman")
    public String sendTopicMessageWoman(){


        String messageId= String.valueOf(UUID.randomUUID());
        String messgageName="woman say: hello world!";
        String creatTime= DateUtil.now();
        Map<String,Object> map = new HashMap<>();
        map.put("messageId",messageId);
        map.put("messgageName",messgageName);
        map.put("creatTime",creatTime);
        System.out.println("sendTopicMessageMan");
        rabbitTemplate.convertAndSend("topicExchange","topic.woman",map);
        return "send sendTopicMessageWoman ok";
    }
二,消费者
队列man消费者
package com.mq.rabbitmqconsumer.rabbimqConsumer;

import org.springframework.amqp.rabbit.annotation.RabbitHandler;
import org.springframework.amqp.rabbit.annotation.RabbitListener;
import org.springframework.stereotype.Component;

import java.util.Map;

/**
 * 主题交换机 man队列订阅者
 * @author LiuCheng
 * @data 2020/12/23 17:02
 */
@Component
@RabbitListener(queues = "topic.man")
public class TopicManReceiver {


    @RabbitHandler
    public void process(Map map){


        System.out.println("TopicManReceiver 订阅者接受到的消息 " +map.toString());
    }
}
队列woman消费者
package com.mq.rabbitmqconsumer.rabbimqConsumer;

import org.springframework.amqp.rabbit.annotation.RabbitHandler;
import org.springframework.amqp.rabbit.annotation.RabbitListener;
import org.springframework.stereotype.Component;

import java.util.Map;

/**
 * 主题交换机 woman 队列消费
 * @author LiuCheng
 * @data 2020/12/23 17:05
 */
@Component
@RabbitListener(queues = "topic.woman")
public class TopicWomanReceiver {


    @RabbitHandler
    public void process(Map map){


        System.out.println("TopicWomanReceiver订阅者接受到的消息  "+map.toString() );

    }
}
测试,先向man接口发送请求

查看消费者消费情况,消费者man和woman也消费了

测试,再向woman接口发送请求

查看消费者情况

对比下:细心的可以发现man消费者 mmessgageName= man say :hello world!,因为,man的主题是topic.man会去匹配到tpoic.#,所以会出现两次消费情况
woman的主题是topic.#,当去匹配的时候无法匹配到man所以只有一条信息
以上就是rabbitmq三种交换机类型