原新浪博客(http://blog.sina.com.cn/billsona)搬迁至此。
文章目录
前言
这两天在AWS上做Kubernetes升级的时候,踩了不少坑,现总结一下。引用的话请注明出处,尊重原创,欢迎交流。
因工作语言是英语,这篇文章主要写在内部博客上供team member参考,还没来得及翻译,英语水平有限,望海涵。
Important: Before reading this wiki, please read the document of AWS first.
https://docs.aws.amazon.com/eks/latest/userguide/update-cluster.html
The following picture is the add-on versions of the kubernetes
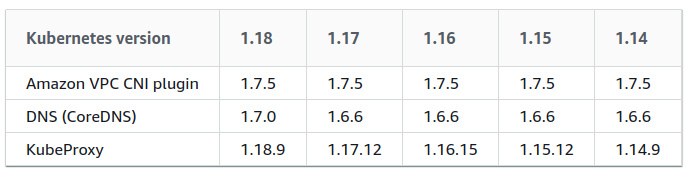
提示:以下是本篇文章正文内容,下面案例仅供参考
1. Update/Install eksctl
Run the following 3 commands to install or update the eksctl on your PC.
$ curl --silent --location "https://github.com/weaveworks/eksctl/releases/latest/download/eksctl_$(uname -s)_amd64.tar.gz" | tar xz -C /tmp
$ sudo mv /tmp/eksctl /usr/local/bin
$ eksctl version
2. Check CoreDNS
Run the following command to check if the cluster running CoreDNS
$ kubectl get pod -n kube-system -l k8s-app=kube-dns
Run the folloeing command to check core DNS version
$ kubectl describe deployment coredns --namespace kube-system | grep Image | cut -d "/" -f 3
Check if coreDNS manifest has the upstream
$ kubectl get configmap coredns -n kube-system -o yaml |grep upstream
If no output is returned, your manifest doesn’t have the line and you can skip to the next step to update your cluster. If output is returned, then you need to remove the line. If there is a line “proxy . /etc/resolv.conf”, change this line with “forward . /etc/resolv.conf”.
$ kubectl edit configmap coredns -n kube-system

3. Update EKS Cluster
Running one of the following 2 commands to update your cluster
$ eksctl upgrade cluster --name YourClusterName --version=YourVersion --approve
$ eksctl upgrade cluster --name YourClusterName --approve
4. Check & Update Kube-proxy
Run the following command to check the kube-proxy image.
$ kubectl get daemonset kube-proxy --namespace kube-system -o=jsonpath='{$.spec.template.spec.containers[:1].image}'
Run the follwoing command to upgrade kube-proxy
$ kubectl set image daemonset.apps/kube-proxy \
-n kube-system \
kube-proxy=602401143452.dkr.ecr.YourRegionID.amazonaws.com/eks/kube-proxy:vYourVersion-eksbuild.1
5. Check & Update CoreDNS
Run the following command to check CoreDNS version
$ kubectl describe deployment coredns --namespace kube-system | grep Image | cut -d "/" -f 3
Run the following command to retrieve current image
$kubectl get deployment coredns --namespace kube-system -o=jsonpath='{$.spec.template.spec.containers[:1].image}'
Run the following command to update CoreDNS
$ kubectl set image --namespace kube-system deployment.apps/coredns \
coredns=602401143452.dkr.ecr.YourRegionID.amazonaws.com/eks/coredns:vYourVersion-eksbuild.1
6. Check & Update Amazon VPC CNI
Run the following command to check the version of Amazon VPC CNI
$ kubectl describe daemonset aws-node --namespace kube-system | grep Image | cut -d "/" -f 2
Run the following commands to upgrade your Amazon VPC CNI
$ curl -o aws-k8s-cni.yaml https://raw.githubusercontent.com/aws/amazon-vpc-cni-k8s/vYourVersion/config/vYourVersion/aws-k8s-cni.yaml
$ sed -i -e 's/us-west-2/YourRegionID/' aws-k8s-cni.yaml
$ kubectl apply -f aws-k8s-cni.yaml
7. Update Autoscaler
If you deployed the Kubernetes Cluster Autoscaler to your cluster prior to upgrading the cluster, update the Cluster Autoscaler to the latest version that matches the Kubernetes major and minor version that you upgraded to.
b.Open the Cluster Autoscaler releases (https://github.com/kubernetes/autoscaler/releases ) page in a web browser and find the latest Cluster Autoscaler version that matches your cluster’s Kubernetes major and minor version. For example, if your cluster’s Kubernetes version is 1.18 find the latest Cluster Autoscaler release that begins with 1.18. Record the semantic version number (<1.18.n>) for that release to use in the next step.
a.Set the Cluster Autoscaler image tag to the version that you recorded in the previous step with the following command. Replace <1.18.n> with your own value. You can replace us with or .
Run the following command to update autoscaler
$ kubectl -n kube-system set image deployment.apps/cluster-autoscaler cluster-autoscaler=us.gcr.io/k8s-artifacts-prod/autoscaling/cluster-autoscaler:vYourVersion
8. Check the Old Nodegroup & Create a New One
Run the following command to check the cluster existed node group.
$ eksctl get nodegroups --cluster=YourClusterName
Run the following command to create a new node group (you should change the parameters before you run the following command).
$ eksctl create nodegroup \
--cluster YourClusterName \
--version 1.18 \
--name YourNewNodeGroupName \
--node-type t3.xlarge \
--nodes 8 \
--nodes-min 5 \
--nodes-max 50 \
- -node-ami default \
--node-labels "role=workers" \
--node-volume-size 100 \
--node-volume-type gp2 \
--node-private-networking \
--asg-access \
--external-dns-access \
--alb-ingress-access \
--appmesh-access \
--ssh-access \
--ssh-public-key YourKeyPairName \
--tags "k8s.io/cluster-autoscaler/enabled=true,k8s.io/cluster-autoscaler/YourClusterName=owned"
Run the following command to check if all the new nodes are ready
$ kubectl get nodes
9. Drain the Old Nodes
Run the following command to drain all the old nodes
$ kubectl drain YourNodeName --force --ignore-daemonsets --delete-local-data
You may meet the following errors.
error when evicting pod "YourPodName" (will retry after 5s): Cannot evict pod as it would violate the pod's disruption budget.
If you meet the errors, do the followding steps
$ kubectl get pdb -A
The command will return the following information
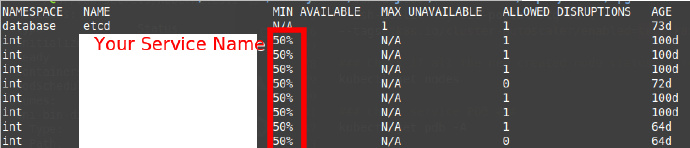
Run the following command
$ kubectl edit pdb -n YourNameSpace YourServiceName
Change the value of minAvailable to 50%, then save and drain the node again
If still has the error, run the following command to change the replica number to more than 1
$ kubectl scale deploy YourServiceName--replicas=YourReplicaNumber -n YourNameSpace
Wait about 1 minute, then drain the node again.
下面这段内容是写这篇文章的时候添加上的:
我简单理解了一下drain失败的原因,不一定准确。在drain的时候过程中,相当于将运行在旧node上的pod删除,然后在新node上拉起一个新的pod,当旧的node上的pod没有被正常删除的时候,新节点上的pod就不会起来,这样一来旧的node上的pod就一直处于terminating状态。
进一步解释一下,为什么旧node上的pod没法被正常删除呢?是因为PDB (Pod Disruption Budget),字面理解为pod的干扰预算,我觉得这一篇文章中讲的挺到位的 (https://kubernetes.io/zh/docs/tasks/run-application/configure-pdb/)。言归正传,我们项目主要用到了minAvailable。
比如举个例子,如果某个service的replica是2,minAvailable的值是70%,当前这个service正常运行的pod只有1个,已经小于2*70%,这个时候执行drain的话,旧node上的这个pod肯定无法正常删除,因为相当于被抗干扰保护了。所以这个时候,如果修改minAvailable的值为1或者50% (这个值可以是整数,可以是百分比),就可以被正常删除。
再举例,有时候设置的这个值可能本身也不科学,replica为1,minAvailable为60%,这个时候无论如何修改minAvailable的值都没法正常删除旧node上的pod,这时候需要扩大一下这个service的replica,然后再执行drain。
10. Delete the Old Nodegroup
After draining all the old nodes, run the following command to delete the old node group
$ eksctl delete nodegroup --cluster=YourClusterName --name=YourOldNodeGroupName
11. Re-Edit PDB
If you edited your PDB in step 9, then running the following command to change the minAvailable value back to the original one.
$ kubectl edit pdb -n YourNameSpace YourServiceName
If you changed the service replica value in step 9, then run the following command to change the replica to the original value.
$ kubectl scale deploy YourServiceName --replicas=YourReplicaNumber -n YourNameSpace