编程式导航
- 声明式导航是通过a链接的herf属性进行跳转,在vue中使用
<router-link>进行跳转 - 而编程式导航是通过js进行跳转,在vue中是
this.$router进行跳转
在开发中有一种情况是从列表到详情, 这之间需要传递数据, 这时就可使用编程式导航
创建一个列表页的组件Comingsoon.vue和详情页的组件Detail.vue
Detail.vue中用来接收列表页的传过来的数据
方式一: 路径传参–动态路由
- Comingsoon.vue 列表组件
<template>
  <div>
    Comingsoon
    <ul>            <!-- 通过点击触发 -->
      <li v-for="data in datalist" :key="data.id" @click="handleClick(data.id)">
        {

   { data.title }}
      </li>
    </ul>
  </div>
</template>

<script>
export default {


  data () {


    return {


      datalist: [{


        id: 1001,
        title: '姜子牙'
      }, {


        id: 1002,
        title: '一朵小红花'
      }]
    }
  },
  methods: {


    handleClick (id) {


      console.log(id)
      // 使用this.$router 进行跳转, push是向浏览器压进去一个记录// 编程式导航
      // this.$router.push('/detail')
      // 方式一: 路径传参------------------
      // 使用字符串模板语法进行传值, 吧id传进去
      this.$router.push(`/detail/${

       id}`)
    }
  }
}
</script>
- Detail.vue 详情页组件-----接收列表页传的数据
<template>
<div>
detail详情
</div>
</template>
<script>
export default {
mounted () {
// 在详情的组件中利用mounted生命周期获取传过来的数据
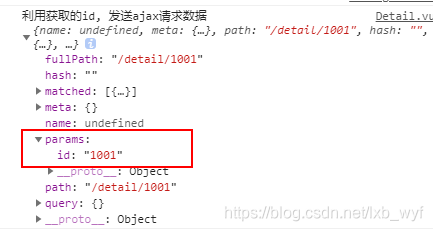
console.log('利用获取的id, 发送ajax请求数据', this.$route) // this.$route内包含整router对象
console.log('通过params获得的id数据:', this.$route.params.id)
}
}
</script>
记得要配路由
控制台打印的 route 对象
动态路由
在router文件夹下的index.js中进行配置detail路由
import Detail from '../views/Detail.vue' // 详情

// 路由数组 coutes
const coutes = [
  {

       // 一级路由   方式一, 这种方式路由的格式就是,http://localhost:8080/#/detail/1001/, 当访问/detail时就会访问不到
    path: '/detail/:id', // 动态路由,:是占位符不是绑定
    component: Detail
  }
]
方式二: 路由名字
在Detail.vue中的methods生命周期 :
 methods: {


    handleClick (id) {


      console.log(id)
        // 使用this.$router 进行跳转, push是向浏览器压进去一个记录// 编程式导航
        // 方式二: 路由名字--------------------
        this.$router.push({


        name: 'ABCDetail', // 通过名字进行传参, 名字是自定义需要在router中配置
        params: {


          id: id
        }
      })
      // 方式三: query方式
      this.$router.push(`/detail?id=${

      id}`)
    }
  }
配置路由
在router文件夹下的index.js中进行配置detail路由
const coutes = [
  {

       //    方式二,
    path: '/detail',
    component: Detail,
    name: 'ABCDetail'   // 自定义了一个路由名字
  }
]
值就在 route 对象里面找就行
方式三: query方式
在Detail.vue中的methods生命周期 :
 methods: {


    handleClick (id) {


      console.log(id)
        // 使用this.$router 进行跳转, push是向浏览器压进去一个记录// 编程式导航
        // 方式三: query方式
        this.$router.push(`/detail?id=${

      id}`)
    }
  }
配置路由
在router文件夹下的index.js中进行配置detail路由
const coutes = [
  {

       //    方式三,  有点惊讶吧, 这个就好像一个普通的一级路由, 但是在路径上显示为 /detail?xxx=xxx
    path: '/detail',
    component: Detail,
  }
]
值就在 route 对象里面的query找就行
路由模式
在vue中有两种路径
一种是路径中带有#的: http://localhost:8080/#/detail/1001/, 这种模式是默认的为hash
还有一种是不带#http://localhost:8080/detail/1001/, 这一种模式是需要配置一下的history
在router文件夹下的index.js中进行配置
const router = new VueRouter({


  // 路由命名, 就是在路径上显示#(hash 默认是这种)和不显示(history)#
  mode: 'history', // 配置为 history 时路径上面不显示`#`, 但是如果URL匹配不到任何静态资源, 则应该返回`index.html` 页面, 在生产环境运行时这里需要结合后端进行配置,
  routes: routes //  上面的数组名字与routes一致,可以简写为 routes ,
})