- 第六阶段模块一 Mybatis
- 任务一:基本应用
- 任务二:复杂映射&配置文件深入
- 任务三:加载策略及注解开发
- 第六阶段模块二Spring
- 任务一:IOC控制反转
- 任务二:AOP
- 任务三:Spring JDBCTemplate & 声明式事务
- 第六阶段模块三 SpringMVC
- 任务一: SpringMVC基本应用
- 任务二:springmvc进阶
- 任务三:SSM整合
第六阶段模块一 Mybatis
任务一:基本应用
课程任务主要内容:
* 框架介绍
* Mybatis:ORM
* 快速入门
* 映射文件简单概述
* 实现CRUD
* 核心配置文件介绍
* api介绍
* mybatis的dao层开发使用(接口代理方式)
SSM = springmvc + spring + mybatis
mybatis: Dao层JDBC的改进
一 框架简介
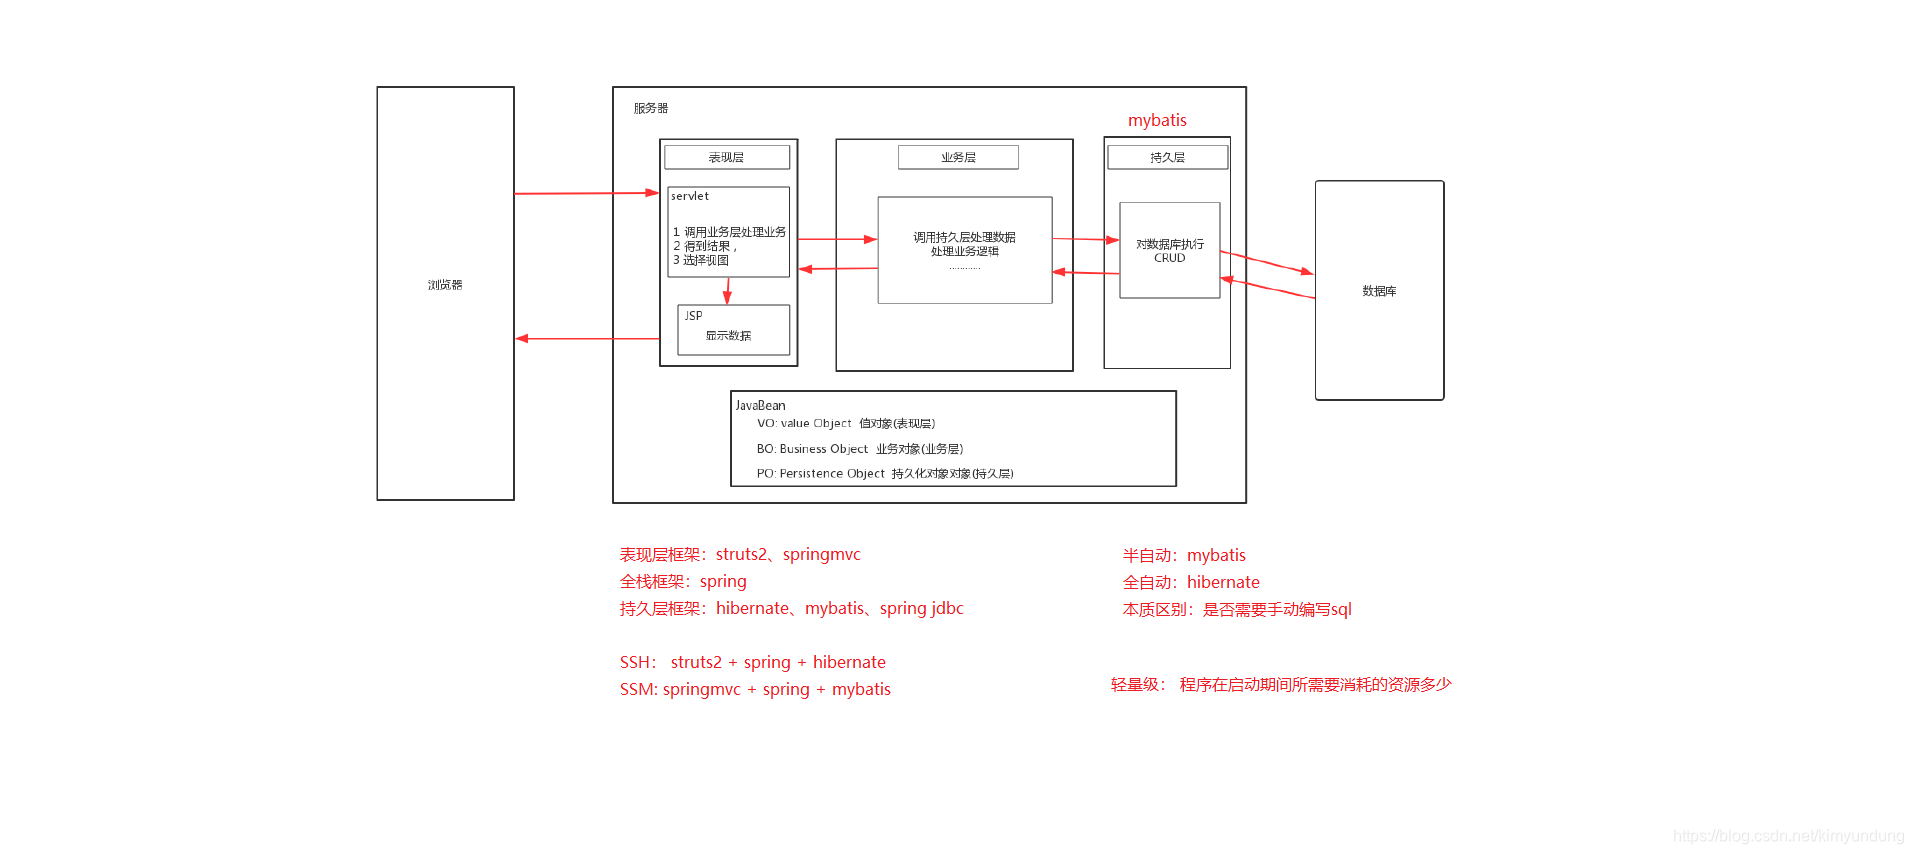
1.1 三层架构
软件开发常用的架构是三层架构,之所以流行是因为有着清晰的任务划分。一般包括以下三层:
- 持久层:主要完成与数据库相关的操作,即对数据库的增删改查。
因为数据库访问的对象一般称为Data Access Object(简称DAO),所以有人把持久层叫做DAO层。 - 业务层:主要根据功能需求完成业务逻辑的定义和实现。
因为它主要是为上层提供服务的,所以有人把业务层叫做Service层或Business层。 - 表现层:主要完成与最终软件使用用户的交互,需要有交互界面(UI)。
因此,有人把表现层称之为web层或View层。
三层架构之间调用关系为:表现层调用业务层,业务层调用持久层。
各层之间必然要进行数据交互,我们一般使用java实体对象来传递数据。
1.2 框架
1.2.1 什么是框架?
框架就是一套规范,既然是规范,你使用这个框架就要遵守这个框架所规定的约束。
框架可以理解为半成品软件,框架做好以后,接下来在它基础上进行开发。
1.2.2 为什么使用框架?
框架为我们封装好了一些冗余,且重用率低的代码。并且使用反射与动态代理机制,将代码实现了通用性,让 开发人员把精力专注在核心的业务代码实现上。
比如在使用servlet进行开发时,需要在servlet获取表单的参数,每次都要获取很麻烦,而框架底层就使用反射机制和拦截器机制帮助我们获取表单的值,使用jdbc每次做专一些简单的crud的时候都必须写sql,但使用框架就不需要这么麻烦了,直接调用方法就可以。当然,既然是使用框架,那么还是要遵循其一些规范进行配置
1.2.3 常见的框架
Java世界中的框架非常的多,每一个框架都是为了解决某一部分或某些问题而存在的。下面列出在目前企业中
流行的几种框架(一定要注意他们是用来解决哪一层问题的):
- 持久层框架:专注于解决数据持久化的框架。常用的有mybatis、hibernate、spring jdbc等等。
- 表现层框架:专注于解决与用户交互的框架。常见的有struts2、spring mvc等等。
- 全栈框架: 能在各层都给出解决方案的框架。比较著名的就是spring。
这么多框架,我们怎么选择呢?
我们以企业中最常用的组合为准来学习Spring + Spring MVC + mybatis(SSM)
二 Mybatis简介
1.1 原始jdbc操作(查询数据)

1.2 原始jdbc操作的分析
原始jdbc开发存在的问题如下:
① 数据库连接创建、释放频繁造成系统资源浪费从而影响系统性能
② sql 语句在代码中硬编码,造成代码不易维护,实际应用 sql 变化的可能较大,sql 变动需要改变java代码。
③ 查询操作时,需要手动将结果集中的数据手动封装到实体中。
应对上述问题给出的解决方案:
① 使用数据库连接池初始化连接资源
② 将sql语句抽取到xml配置文件中
③ 使用反射、内省等底层技术,自动将实体与表进行属性与字段的自动映射
1.3 Mybatis简介
MyBatis是一个优秀的基于ORM的半自动轻量级持久层框架,它对jdbc的操作数据库的过程进行封装,使开发者只需要关注 SQL 本身,而不需要花费精力去处理例如注册驱动、创建connection、创建statement、手动设置参数、结果集检索等jdbc繁杂的过程代码
mybatis 历史
MyBatis 本是apache的一个开源项目iBatis, 2010年6月这个项目由apache software foundation 迁移到了google code,随着开发团队转投到Google Code旗下,iBatis正式改名为MyBatis ,代码于2013年11月迁移到Github
Github地址:https://github.com/mybatis/mybatis-3/
官方文档地址: https://mybatis.org/mybatis-3/

1.4 ORM思想
ORM(Object Relational Mapping)对象关系映射
O(对象模型):实体对象,即我们在程序中根据数据库表结构建立的一个个实体javaBean
R(关系型数据库的数据结构):关系数据库领域的Relational(建立的数据库表)
M(映射):从R(数据库)到O(对象模型)的映射,可通过XML文件映射

实现:
- 让实体类和数据库表进行一一对应关系
先让实体类和数据库表对应
再让实体类属性和表里面字段对应 - 不需要直接操作数据库表,直接操作表对应的实体类对象

ORM作为是一种思想
帮助我们跟踪实体的变化,并将实体的变化翻译成sql脚本,执行到数据库中去,也就是将实体的变化映射到了表的变化。
mybatis采用ORM思想解决了实体和数据库映射的问题,对jdbc 进行了封装,屏蔽了jdbc api 底层访问细节,使我们不用与jdbc api 打交道,就可以完成对数据库的持久化操作
三 Mybatis快速入门
3.1 MyBatis开发步骤
MyBatis官网地址:http://www.mybatis.org/mybatis-3/

案例需求:通过mybatis查询数据库user表的所有记录,封装到User对象中,打印到控制台上
步骤分析:
1. 创建数据库及user表
2. 创建maven工程,导入依赖(MySQL驱动、mybatis、junit)
3. 编写User实体类
4. 编写UserMapper.xml映射配置文件(ORM思想)
5. 编写SqlMapConfig.xml核心配置文件
	数据库环境配置
	映射关系配置的引入(引入映射配置文件的路径)
6. 编写测试代码
	// 1.加载核心配置文件
	// 2.获取sqlSessionFactory工厂对象
	// 3.获取sqlSession会话对象
	// 4.执行sql
	// 5.打印结果
	// 6.释放资源
3.2 代码实现
1) 创建user数据表
CREATE DATABASE `mybatis_db`;
USE `mybatis_db`;
CREATE TABLE `user` (
	`id` int(11) NOT NULL auto_increment,
	`username` varchar(32) NOT NULL COMMENT '用户名称',
	`birthday` datetime default NULL COMMENT '生日',
	`sex` char(1) default NULL COMMENT '性别',
	`address` varchar(256) default NULL COMMENT '地址',
	PRIMARY KEY (`id`)
) ENGINE=InnoDB DEFAULT CHARSET=utf8;

-- insert....
insert into `user`(`id`,`username`,`birthday`,`sex`,`address`) values (1,'子慕','2020-11-11 00:00:00','男','北京海淀'),(2,'应颠','2020-12-12 00:00:00','男','北京海淀');
2) 导入MyBatis的坐标和其他相关坐标
<!--指定编码和版本-->
<properties>
	<project.build.sourceEncoding>UTF-8</project.build.sourceEncoding>
	<maven.compiler.encoding>UTF-8</maven.compiler.encoding>
	<java.version>1.11</java.version>
	<maven.compiler.source>1.11</maven.compiler.source>
	<maven.compiler.target>1.11</maven.compiler.target>
</properties>
<!--mybatis坐标-->
<dependency>
	<groupId>org.mybatis</groupId>
	<artifactId>mybatis</artifactId>
	<version>3.5.4</version>
</dependency>
<!--mysql驱动坐标-->
<dependency>
	<groupId>mysql</groupId>
	<artifactId>mysql-connector-java</artifactId>
	<version>5.1.6</version>
	<scope>runtime</scope>
</dependency>
<!--单元测试坐标-->
<dependency>
	<groupId>junit</groupId>
	<artifactId>junit</artifactId>
	<version>4.12</version>
	<scope>test</scope>
</dependency>
3) 编写User实体
public class User {


	private Integer id;
	private String username;
	private Date birthday;
	private String sex;
	private String address;
	// getter/setter 略
}
4) 编写UserMapper映射文件
<?xml version="1.0" encoding="UTF-8" ?>
<!DOCTYPE mapper
PUBLIC "-//mybatis.org//DTD Mapper 3.0//EN"
"http://mybatis.org/dtd/mybatis-3-mapper.dtd">
<mapper namespace="UserMapper">
	<!--查询所有-->
	<select id="findAll" resultType="com.lagou.domain.User">
		select * from user
	</select>
</mapper>
5) 编写MyBatis核心文件
<?xml version="1.0" encoding="UTF-8" ?>
<!DOCTYPE configuration
PUBLIC "-//mybatis.org//DTD Config 3.0//EN"
"http://mybatis.org/dtd/mybatis-3-config.dtd">
<configuration>
	<!--环境配置-->
	<environments default="mysql">
		<!--使用MySQL环境-->
		<environment id="mysql">
			<!--使用JDBC类型事务管理器-->
			<transactionManager type="JDBC"></transactionManager>
			<!--使用连接池-->
			<dataSource type="POOLED">
				<property name="driver" value="com.mysql.jdbc.Driver"></property>
				<property name="url" value="jdbc:mysql:///mybatis_db?characterEncoding=UTF-8"></property>
				<property name="username" value="root"></property>
				<property name="password" value="root"></property>
			</dataSource>
		</environment>
	</environments>
	<!--加载映射配置-->
	<mappers>
		<mapper resource="com/lagou/mapper/UserMapper.xml"></mapper>
	</mappers>
</configuration>
6) 编写测试类
@Test
public void testFindAll() throws Exception {


	// 加载核心配置文件
	InputStream is = Resources.getResourceAsStream("SqlMapConfig.xml");
	// 获取SqlSessionFactory工厂对象
	SqlSessionFactory sqlSessionFactory = newSqlSessionFactoryBuilder().build(is);
	// 获取SqlSession会话对象
	SqlSession sqlSession = sqlSessionFactory.openSession();
	// 执行sql
	List<User> list = sqlSession.selectList("UserMapper.findAll");
	for (User user : list) {


		System.out.println(user);
	}
	// 释放资源
	sqlSession.close();
}
3.3 知识小结
1. 创建mybatis_db数据库和user表
2. 创建项目,导入依赖
3. 创建User实体类
4. 编写映射文件UserMapper.xml
5. 编写核心文件SqlMapConfig.xml
6. 编写测试类
四 Mybatis映射文件概述

五 Mybatis增删改查
5.1 新增
1)编写映射文件UserMapper.xml
<!--新增-->
<insert id="save" parameterType="com.lagou.domain.User">
	insert into user(username,birthday,sex,address)
	values(#{username},#{birthday},#{sex},#{address})
</insert>
2)编写测试类
@Test
public void testSave() throws Exception {


	// 加载核心配置文件
	InputStream is = Resources.getResourceAsStream("SqlMapConfig.xml");
	// 获取SqlSessionFactory工厂对象
	SqlSessionFactory sqlSessionFactory = new
	SqlSessionFactoryBuilder().build(is);
	// 获取SqlSession会话对象
	SqlSession sqlSession = sqlSessionFactory.openSession();
	// 执行sql
	User user = new User();
	user.setUsername("jack");
	user.setBirthday(new Date());
	user.setSex("男");
	user.setAddress("北京海淀");
	sqlSession.insert("UserMapper.save", user);
	// DML语句,手动提交事务
	sqlSession.commit();
	// 释放资源
	sqlSession.close();
}
3)新增注意事项
- 插入语句使用insert标签
- 在映射文件中使用parameterType属性指定要插入的数据类型
- Sql语句中使用#{实体属性名}方式引用实体中的属性值
- 插入操作使用的API是sqlSession.insert(“命名空间.id”,实体对象);
- 插入操作涉及数据库数据变化,所以要使用sqlSession对象显示的提交事务,即sqlSession.commit()
5.2 修改
1)编写映射文件UserMapper.xml
<!--修改-->
<update id="update" parameterType="com.lagou.domain.User">
	update user set username = #{username},birthday = #{birthday},
	sex = #{sex},address = #{address} where id = #{id}
</update>
2)编写测试类
@Test
public void testUpdate() throws Exception {


	// 加载核心配置文件
	InputStream is = Resources.getResourceAsStream("SqlMapConfig.xml");
	// 获取SqlSessionFactory工厂对象
	SqlSessionFactory sqlSessionFactory = new SqlSessionFactoryBuilder().build(is);
	// 获取SqlSession会话对象
	SqlSession sqlSession = sqlSessionFactory.openSession();
	// 执行sql
	User user = new User();
	user.setId(4);
	user.setUsername("lucy");
	user.setBirthday(new Date());
	user.setSex("女");
	user.setAddress("北京朝阳");
	sqlSession.update("UserMapper.update", user);
	// DML语句,手动提交事务
	sqlSession.commit();
	// 释放资源
	sqlSession.close();
}
3)修改注意事项
- 修改语句使用update标签
- 修改操作使用的API是sqlSession.update(“命名空间.id”,实体对象);
5.3 删除
1)编写映射文件UserMapper.xml
<!--删除-->
<delete id="delete" parameterType="java.lang.Integer">
delete from user where id = #{id}
</delete>
2)编写测试类
@Test
public void testDelete() throws Exception {


	// 加载核心配置文件
	InputStream is = Resources.getResourceAsStream("SqlMapConfig.xml");
	// 获取SqlSessionFactory工厂对象
	SqlSessionFactory sqlSessionFactory = new SqlSessionFactoryBuilder().build(is);
	// 获取SqlSession会话对象
	SqlSession sqlSession = sqlSessionFactory.openSession();
	// 执行sql
	sqlSession.delete("UserMapper.delete", 50);
	// DML语句,手动提交事务
	sqlSession.commit();
	// 释放资源
	sqlSession.close();
}
3)删除注意事项
- 删除语句使用delete标签
- Sql语句中使用#{任意字符串}方式引用传递的单个参数
- 删除操作使用的API是sqlSession.delete(“命名空间.id”,Object);
5.4 知识小结
* 查询
	代码:
		List<User> list = sqlSession.selectList("UserMapper.findAll");
	映射文件:
	<select id="findAll" resultType="com.lagou.domain.User">
		select * from user
	</select>
* 新增
	代码:
		sqlSession.insert("UserMapper.save", user);
	映射文件:
	<insert id="save" parameterType="com.lagou.domain.User">
		insert into user(username,birthday,sex,address)
		values(#{username},#{birthday},#{sex},#{address})
	</insert>
* 修改
	代码:
		sqlSession.update("UserMapper.update", user);
	映射文件:
	<update id="update" parameterType="com.lagou.domain.User">
		update user set username = #{username},birthday = #{birthday},
		sex = #{sex},address = #{address} where id = #{id}
	</update>
* 删除
	代码:
		sqlSession.delete("UserMapper.delete", 4);
	映射文件:
	<delete id="delete" parameterType="java.lang.Integer">
		delete from user where id = #{id}
	</delete>
六 Mybatis核心文件概述
6.1 MyBatis核心配置文件层级关系
MyBatis 的配置文件包含了会深深影响 MyBatis 行为的设置和属性信息。
配置文档的顶层结构如下:

6.2 MyBatis常用配置解析
1) environments标签
数据库环境的配置,支持多环境配置
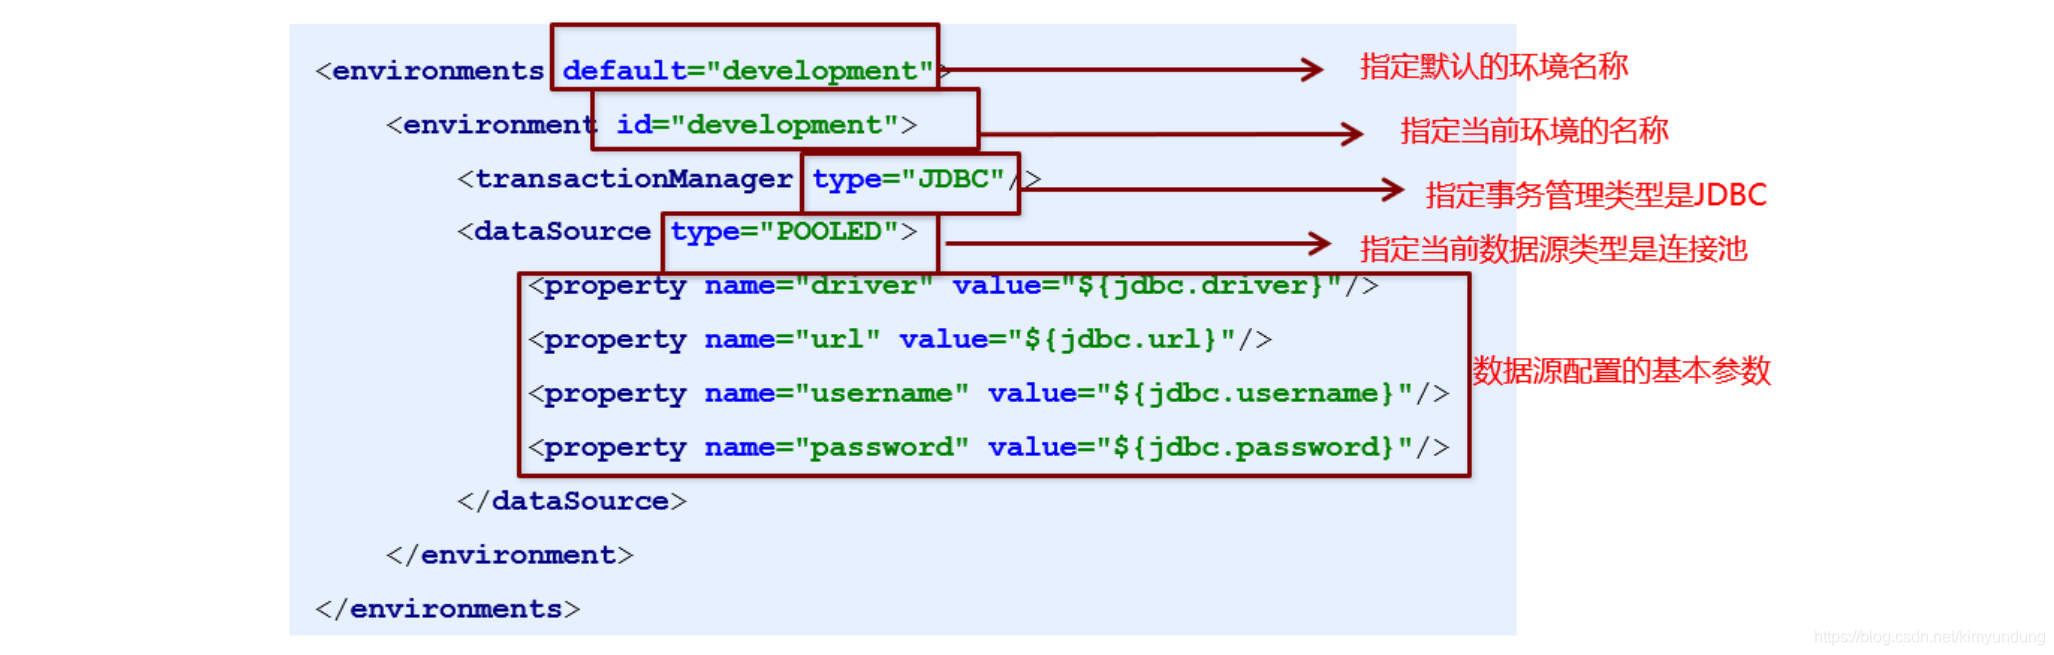
1. 其中,事务管理器(transactionManager)类型有两种:
	- JDBC:
	这个配置就是直接使用了JDBC 的提交和回滚设置,它依赖于从数据源得到的连接来管理事务作用域。

	- MANAGED:
	这个配置几乎没做什么。它从来不提交或回滚一个连接,而是让容器来管理事务的整个生命周期。
	例如:mybatis与spring整合后,事务交给spring容器管理。

2. 其中,数据源(dataSource)常用类型有三种:
	- UNPOOLED:
	这个数据源的实现只是每次被请求时打开和关闭连接。

	- POOLED:
	这种数据源的实现利用“池”的概念将 JDBC 连接对象组织起来。

	- JNDI :
	这个数据源实现是为了能在如 EJB 或应用服务器这类容器中使用,容器可以集中或在外部配置数据源,然后放置一个 JNDI 上下文的数据源引用
2)properties标签
实际开发中,习惯将数据源的配置信息单独抽取成一个properties文件,该标签可以加载额外配置的properties:
jdbc.driver=com.mysql.jdbc.Driver
jdbc.url=jdbc:mysql:///mybatis_db?characterEncoding=UTF-8
jdbc.username=root
jdbc.password=root

3)typeAliases标签
类型别名是为 Java 类型设置一个短的名字。
为了简化映射文件 Java 类型设置,mybatis框架为我们设置好的一些常用的类型的别名:
| 名称 | 数据类型 |
|---|---|
| string | String |
| long | Long |
| int | Integer |
| double | Double |
| boolean | Boolean |
| … | … |
原来的类型名称配置如下:

配置typeAliases,为com.lagou.domain.User定义别名为user:
4)mappers标签
该标签的作用是加载映射的,加载方式有如下几种:
1. 使用相对于类路径的资源引用,例如:
<mapper resource="org/mybatis/builder/userMapper.xml"/>

2. 使用完全限定资源定位符(URL),例如:
<mapper url="file:///var/mappers/userMapper.xml"/>

《下面两种mapper代理开发中使用:暂时了解》
3. 使用映射器接口实现类的完全限定类名,例如:
<mapper class="org.mybatis.builder.userMapper"/>
4. 将包内的映射器接口实现全部注册为映射器,例如:
<package name="org.mybatis.builder"/>
6.3 知识小结
核心配置文件常用配置:
properties标签:该标签可以加载外部的properties文件
<properties resource="jdbc.properties"></properties>
typeAliases标签:设置类型别名
<typeAlias type="com.lagou.domain.User" alias="user"></typeAlias>
mappers标签:加载映射配置
<mapper resource="com/lagou/mapper/UserMapping.xml"></mapper>
environments标签:数据源环境配置
<environments default="development">
	<environment id="development">
		<transactionManager type="JDBC"/>
		<dataSource type="POOLED">
			<property name="driver" value="${jdbc.driver}"/>
			<property name="url" value="${jdbc.url}"/>
			<property name="username" value="${jdbc.username}"/>
			<property name="password" value="${jdbc.password}"/>
		</dataSource>
	</environment>
</environments>
七 Mybatis的API概述
7.1 API介绍
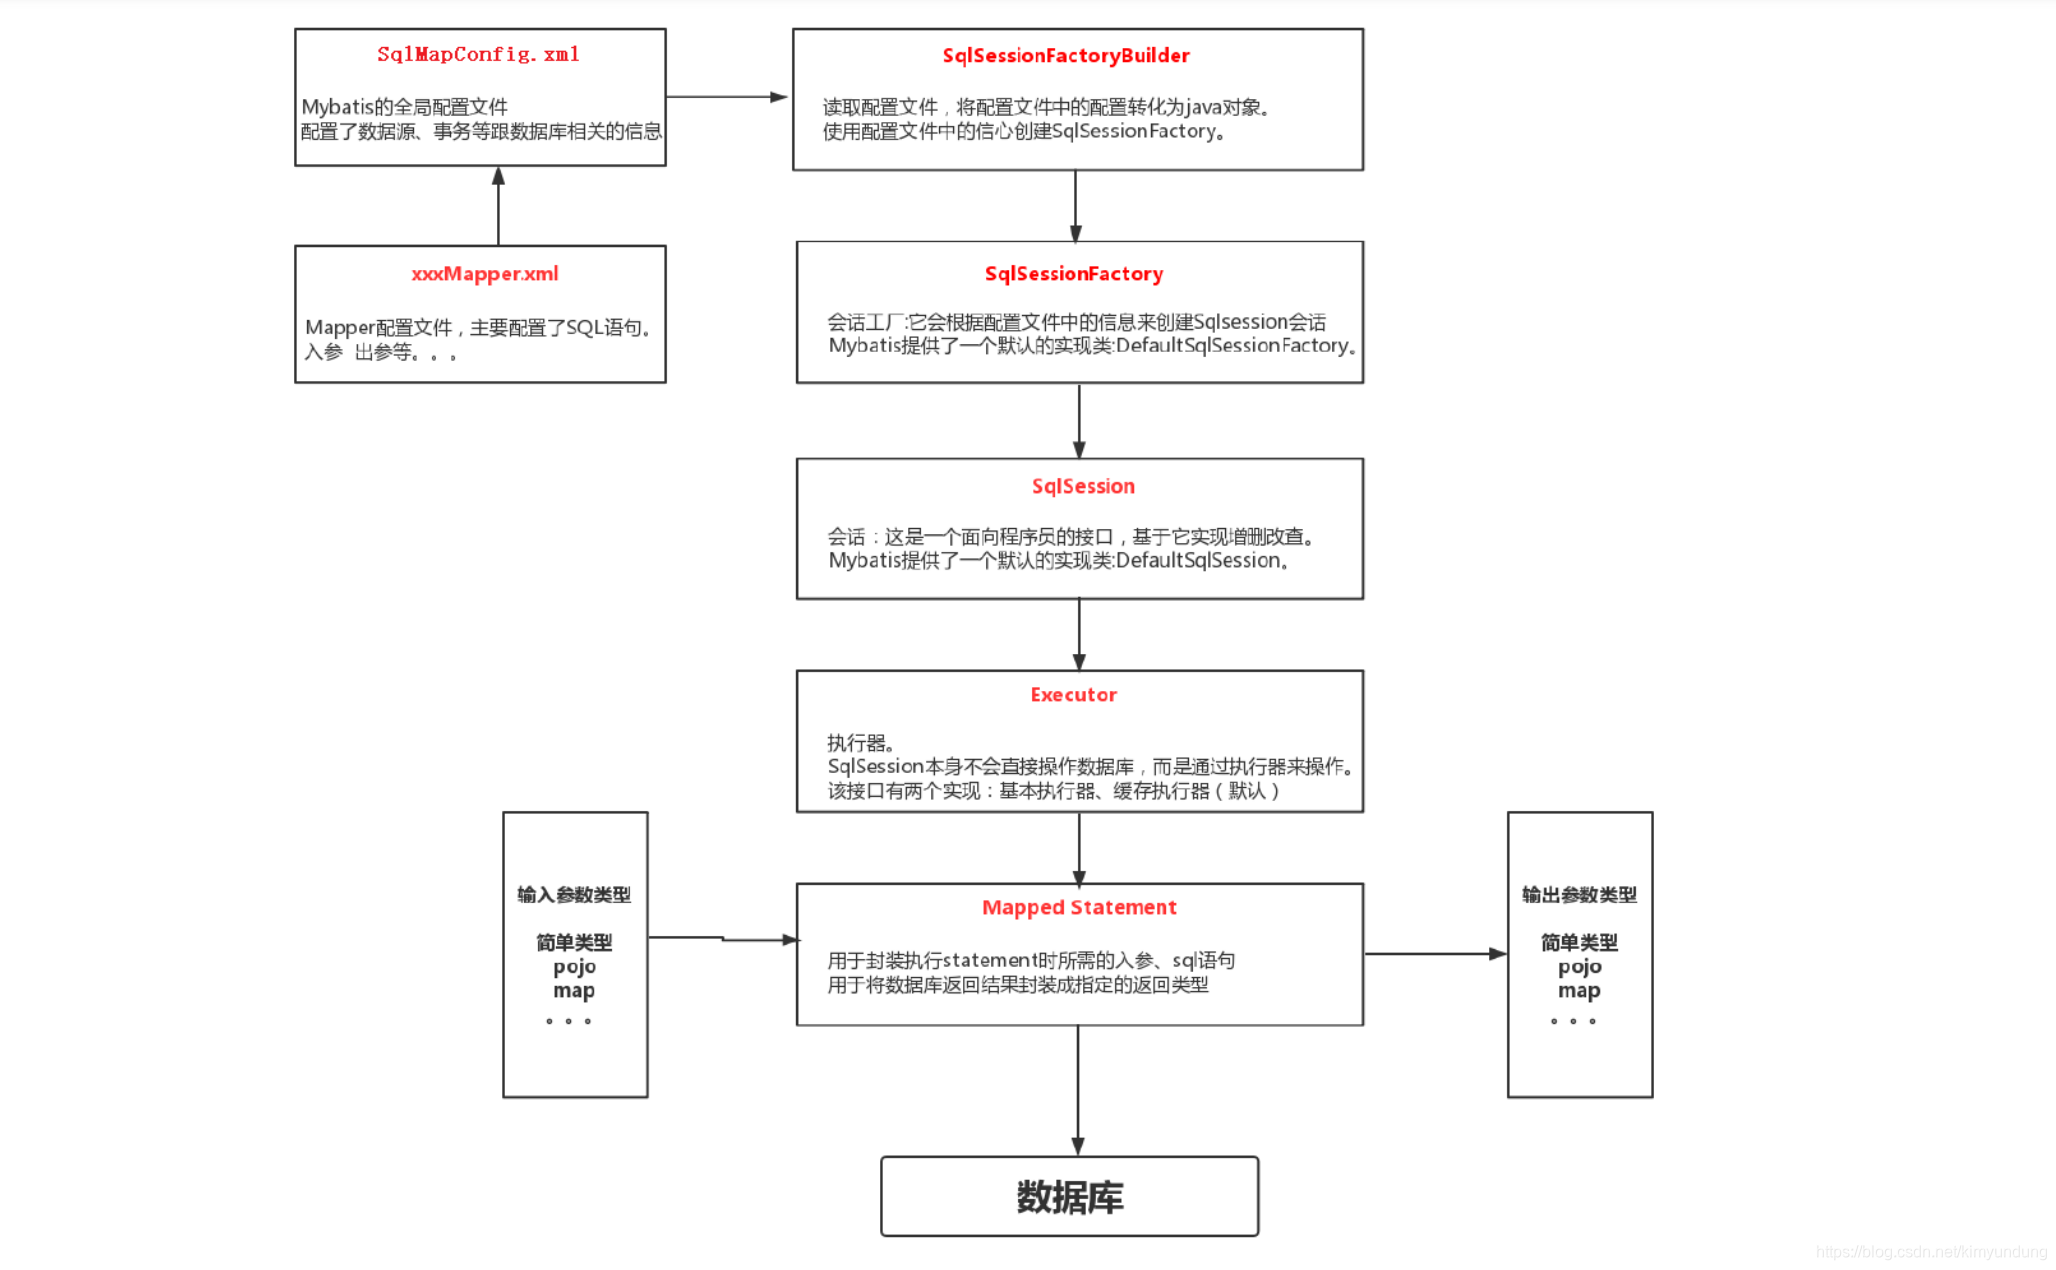
7.1.1 SqlSession工厂构建器SqlSessionFactoryBuilder
常用API:SqlSessionFactory build(InputStream inputStream)
通过加载mybatis的核心文件的输入流的形式构建一个SqlSessionFactory对象
String resource = "org/mybatis/builder/mybatis-config.xml";
InputStream inputStream = Resources.getResourceAsStream(resource);
SqlSessionFactoryBuilder builder = new SqlSessionFactoryBuilder();
SqlSessionFactory factory = builder.build(inputStream);
其中, Resources 工具类,这个类在 org.apache.ibatis.io 包中。Resources 类帮助你从类路径下、文件系统或一个 web URL 中加载资源文件。
7.1.2 SqlSession工厂对象SqlSessionFactory
SqlSessionFactory 有多个个方法创建SqlSession 实例。常用的有如下两个:
| 方法 | 解释 |
|---|---|
| openSession() | 会默认开启一个事务, 但事务不会自动提交, 也就意味着需要手动提交该事务, 更新操作数据才会持久到数据库中 |
| openSession(boolean autoCommit) | 参数为是否自动提交, 如果设置为true, 那么不需要手动提交事务 |
7.1.3 SqlSession会话对象
SqlSession 实例在 MyBatis 中是非常强大的一个类。在这里你会看到所有执行语句、提交或回滚事务和获取映射器实例的方法。
执行语句的方法主要有:
<T> T selectOne(String statement, Object parameter)
<E> List<E> selectList(String statement, Object parameter)
int insert(String statement, Object parameter)
int update(String statement, Object parameter)
int delete(String statement, Object parameter)
操作事务的方法主要有:
void commit()
void rollback()
7.2 Mybatis基本原理介绍

八 Mybatis的dao层开发使用
8.1 传统开发方式
1)编写UserMapper接口
public interface UserMapper {


	public List<User> findAll() throws Exception;
}
2)编写UserMapper实现
public class UserMapperImpl implements UserMapper {


	@Override
	public List<User> findAll() throws Exception {


		// 加载配置文件
		InputStream is = Resources.getResourceAsStream("SqlMapConfig.xml");
		// 获取SqlSessionFactory工厂对象
		SqlSessionFactory sqlSessionFactory = new SqlSessionFactoryBuilder().build(is);
		// 获取SqlSe会话对象
		SqlSession sqlSession = sqlSessionFactory.openSession();
		// 执行sql
		List<User> list = sqlSession.selectList("UserMapper.findAll");
		// 释放资源
		sqlSession.close();
		return list;
	}
}
3)编写UserMapper.xml
<?xml version="1.0" encoding="UTF-8" ?>
<!DOCTYPE mapper
PUBLIC "-//mybatis.org//DTD Mapper 3.0//EN"
"http://mybatis.org/dtd/mybatis-3-mapper.dtd">
<mapper namespace="UserMapper">
	<!--查询所有-->
	<select id="findAll" resultType="user">
		select * from user
	</select>
</mapper>
4)测试
@Test
public void testFindAll() throws Exception {


	// 创建UserMapper 实现类
	UserMapper userMapper = new UserMapperImpl();
	// 执行查询
	List<User> list = userMapper.findAll();
	for (User user : list) {


		System.out.println(user);
	}
}
5)知识小结
传统开发方式
1. 编写UserMapper接口
3. 编写UserMapper.xml
传统方式问题思考:
1.实现类中,存在mybatis模板代码重复
2.实现类调用方法时,xml中的sql statement 硬编码到java代码中
思考:能否只写接口,不写实现类。只编写接口和Mapper.xml即可?
因为在dao(mapper)的实现类中对sqlsession的使用方式很类似。因此mybatis提供了接口的动态代理。
8.2 代理开发方式
1)介绍
采用 Mybatis 的基于接口代理方式实现 持久层 的开发,这种方式是我们后面进入企业的主流。
基于接口代理方式的开发只需要程序员编写 Mapper 接口,Mybatis 框架会为我们动态生成实现类的对象。
这种开发方式要求我们遵循一定的规范:

- Mapper.xml映射文件中的namespace与mapper接口的全限定名相同
- Mapper接口方法名和Mapper.xml映射文件中定义的每个statement的id相同
- Mapper接口方法的输入参数类型和mapper.xml映射文件中定义的每个sql的parameterType的类型相同
- Mapper接口方法的输出参数类型和mapper.xml映射文件中定义的每个sql的resultType的类型相同
Mapper 接口开发方法只需要程序员编写Mapper 接口(相当于Dao 接口),由Mybatis 框架根据接口定义创建接口的动态代理对象,代理对象的方法体同上边Dao接口实现类方法。
2)编写UserMapper接口
public interface UserMapper {


public List<User> findAll() throws Exception;
}
3)编写UserMapper.xml
<?xml version="1.0" encoding="UTF-8" ?>
<!DOCTYPE mapper
PUBLIC "-//mybatis.org//DTD Mapper 3.0//EN"
"http://mybatis.org/dtd/mybatis-3-mapper.dtd">
<mapper namespace="com.lagou.mapper.UserMapper">
<!--查询所有-->
<select id="findAll" resultType="user">
select * from user
</select>
</mapper>
4)测试
@Test
public void testFindAll() throws Exception {


	// 加载核心配置文件
	InputStream is = Resources.getResourceAsStream("SqlMapConfig.xml");
	// 获得SqlSessionFactory工厂对象
	SqlSessionFactory sqlSessionFactory = new
	SqlSessionFactoryBuilder().build(is);
	// 获得SqlSession会话对象
	SqlSession sqlSession = sqlSessionFactory.openSession();
	// 获得Mapper代理对象
	UserMapper userMapper = sqlSession.getMapper(UserMapper.class);
	// 执行查询
	List<User> list = userMapper.findAll();
	for (User user : list) {


		System.out.println(user);
	}
	// 释放资源
	sqlSession.close();
}
5)Mybatis基于接口代理方式的内部执行原理
我们的持久层现在只有一个接口,而接口是不实际干活的,那么是谁在做查询的实际工作呢?
下面通过追踪源码看一下:
1、通过追踪源码我们会发现,我们使用的mapper实际上是一个代理对象,是由MapperProxy代理产生的。
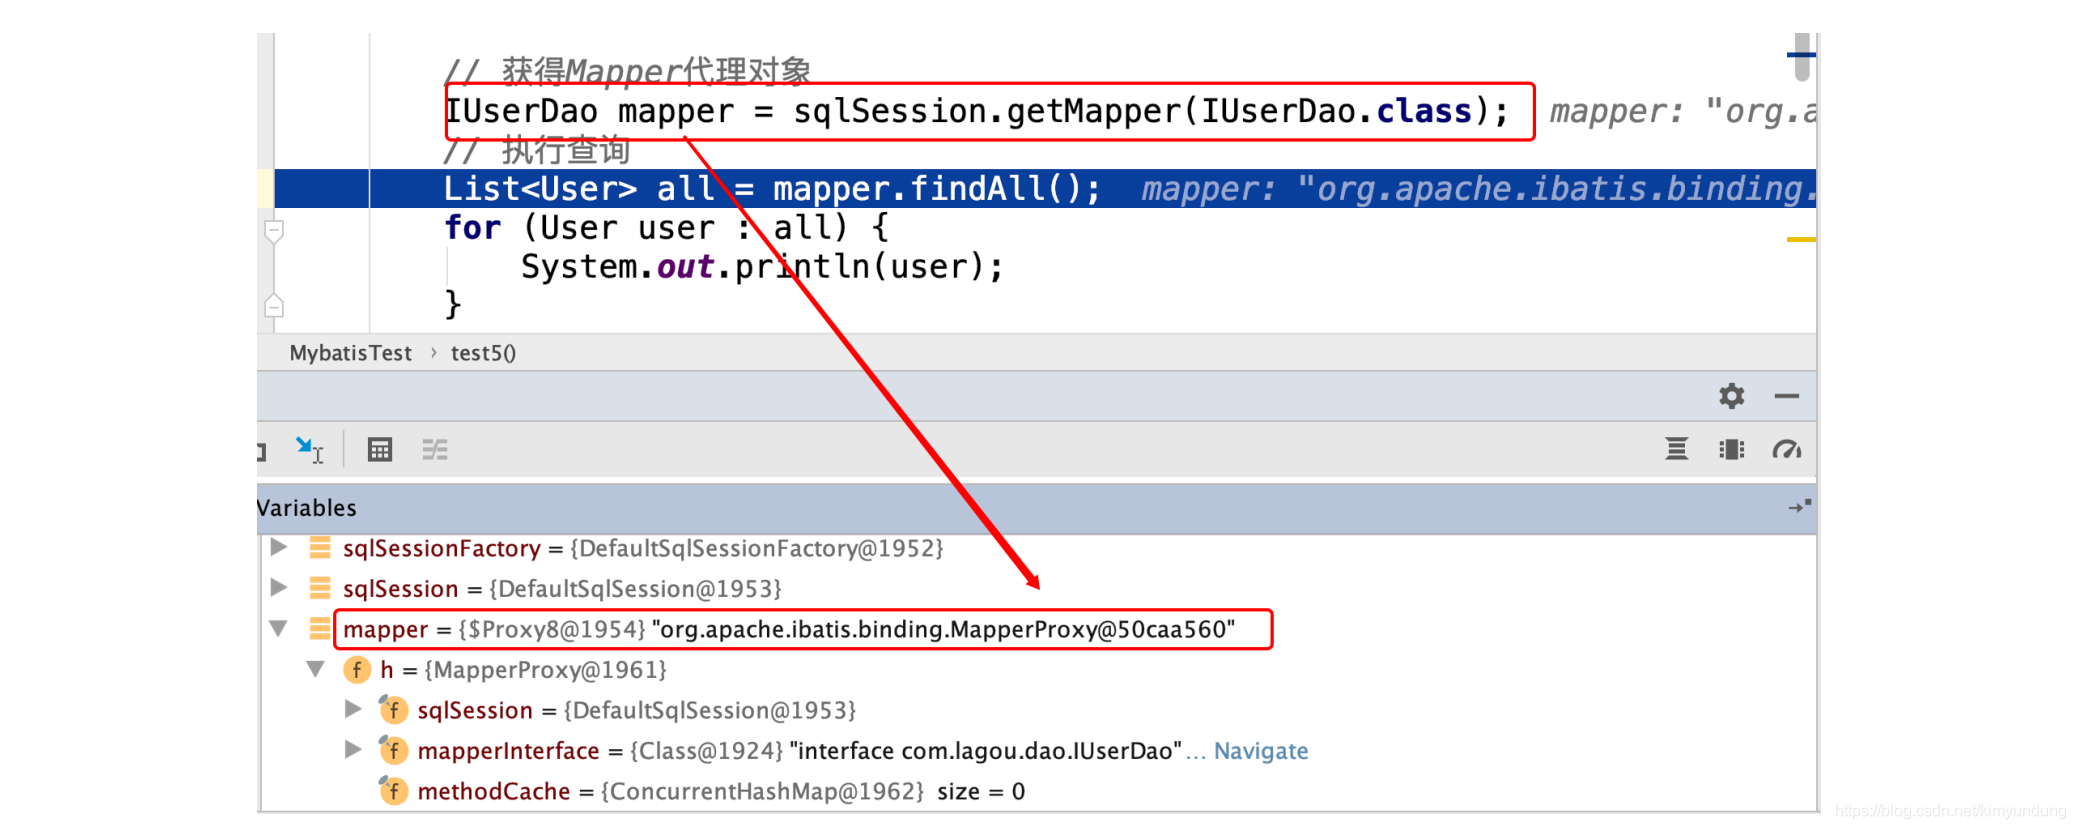
2、追踪MapperProxy的invoke方法会发现,其最终调用了mapperMethod.execute(sqlSession, args)
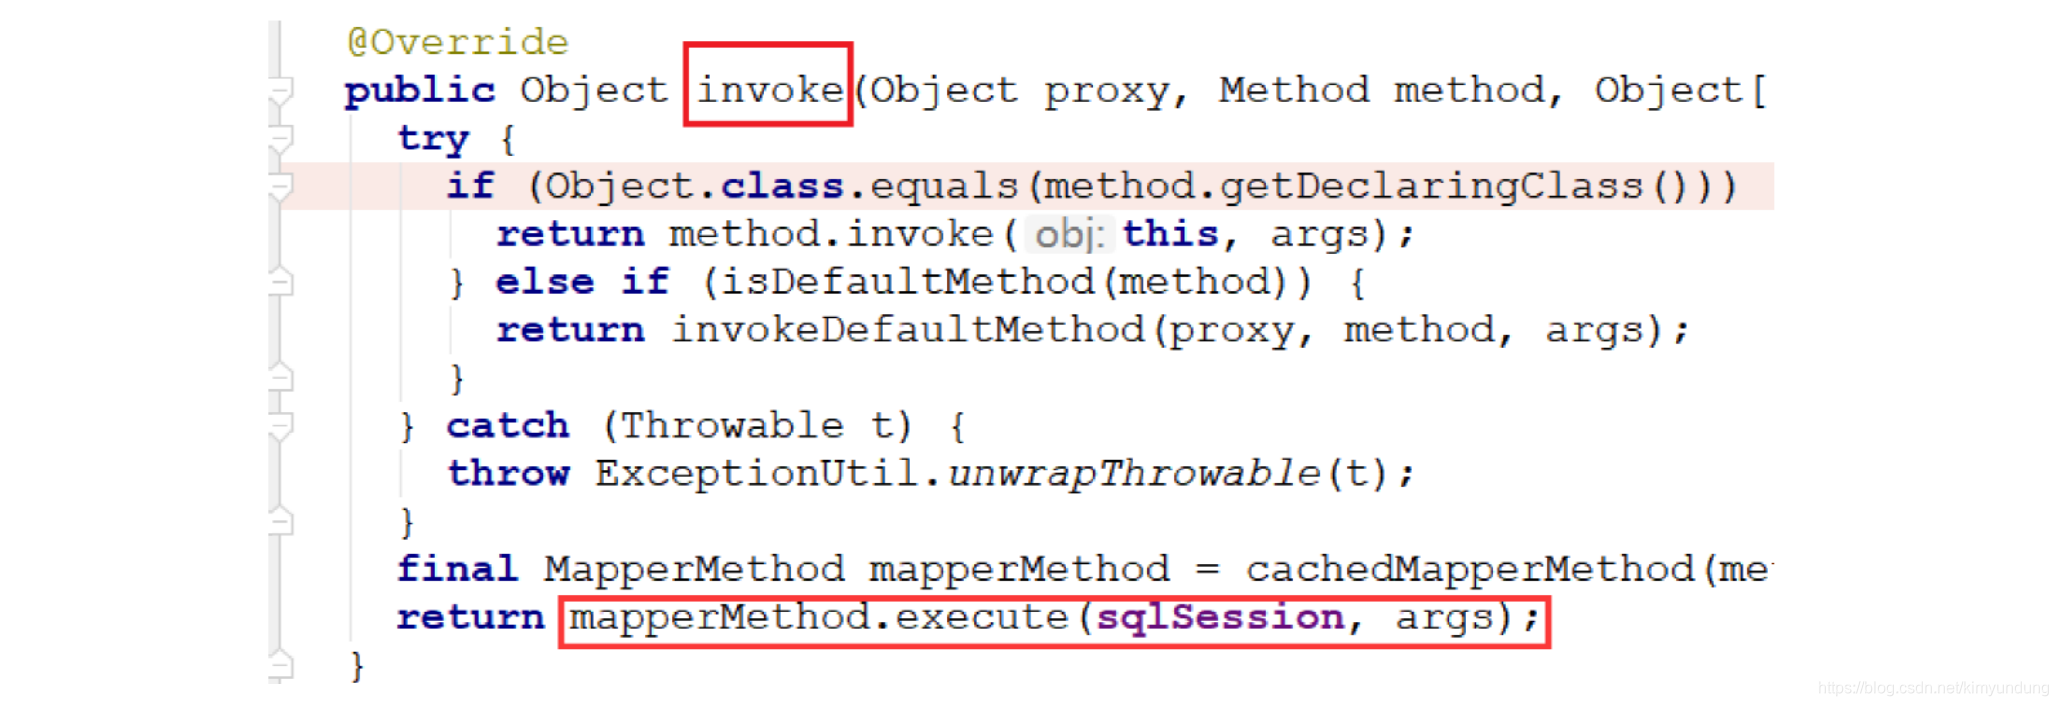
3、进入execute方法会发现,最终工作的还是sqlSession


任务二:复杂映射&配置文件深入
一 Mybatis高级查询
课程任务主要内容:
* Mybatis高级查询
* 映射配置文件深入
* 核心配置文件深入
* Mybatis多表查询
* Mybatis嵌套查询
1.1 ResutlMap属性
建立对象关系映射(手动配置)
* resultType
	如果实体的属性名与表中字段名一致,将查询结果自动封装到实体类中

* ResutlMap
	如果实体的属性名与表中字段名不一致,可以使用ResutlMap实现手动封装到实体类中
1) 编写UserMapper接口
public interface UserMapper {


public List<User> findAllResultMap();
}
2) 编写UserMapper.xml
<!--
实现手动映射封装
resultMap
id="userResultMap" 此标签唯一标识
type="user" 封装后的实体类型
<id column="uid" property="id"></id> 表中主键字段封装
column="uid" 表中的字段名
property="id" user实体的属性名
<result column="NAME" property="username"></result> 表中普通字段封装
column="NAME" 表中的字段名
property="username" user实体的属性名
补充:如果有查询结果有 字段与属性是对应的,可以省略手动封装 【了解】
-->
<resultMap id="userResultMap" type="user">
	<id column="uid" property="id"></id>
	<result column="NAME" property="username"></result>
	<result column="PASSWORD" property="username"></result>
</resultMap>
<select id="findAllResultMap" resultMap="userResultMap">
	SELECT id AS uid,username AS NAME,password AS PASSWORD FROM USER
</select>
3) 代码测试
@Test
public void testFindAllResultMap() throws Exception {


	UserMapper userMapper = sqlSession.getMapper(UserMapper.class);
	List<User> list = userMapper.findAllResultMap();
	for (User user : list) {


		System.out.println(user);
	}
}
1.2 多条件查询(三种)
需求
根据id和username查询user表
1)方式一
使用 #{arg0}-#{argn} 或者 #{param1}-#{paramn} 获取参数
UserMapper接口
public interface UserMapper {


public List<User> findByIdAndUsername1(Integer id, String username);
}
UserMapper.xml
<mapper namespace="com.lagou.mapper.UserMapper">
	<select id="findByIdAndUsername1" resultType="user">
		<!-- select * from user where id = #{arg0} and username = #{arg1} -->
		select * from user where id = #{param1} and username = #{param2}
	</select>
</mapper>
测试
@Test
public void testFindByIdAndUsername() throws Exception {


	UserMapper userMapper = sqlSession.getMapper(UserMapper.class);
	List<User> list = userMapper.findByIdAndUsername1(1 , "子慕");
	System.out.println(list);
}
2)方式二
使用注解,引入 @Param() 注解获取参数
UserMapper接口
public interface UserMapper {


public List<User> findByIdAndUsername2(@Param("id") Integer id,@Param("username") String username);
}
UserMapper.xml
<mapper namespace="com.lagou.mapper.UserMapper">
<select id="findByIdAndUsername2" resultType="user">
select * from user where id = #{id} and username = #{username}
</select>
</mapper>
测试
@Test
public void testFindByIdAndUsername() throws Exception {


	UserMapper userMapper = sqlSession.getMapper(UserMapper.class);
	List<User> list = userMapper.findByIdAndUsername2(1, "子慕");
	System.out.println(list);
}
3)方式三(推荐)
使用pojo对象传递参数(实体对象)
UserMapper接口
public interface UserMapper {


public List<User> findByIdAndUsername3(User user);
}
UserMapper.xml
<mapper namespace="com.lagou.mapper.UserMapper">
	<select id="findByIdAndUsername3" parameterType="com.lagou.domain.User" resultType="com.lagou.domain.User">
		select * from user where id = #{id} and username = #{username}
	</select>
</mapper>
测试
@Test
public void testFindByIdAndUsername() throws Exception {


	UserMapper userMapper = sqlSession.getMapper(UserMapper.class);
	User param = new User();
	param.setId(1);
	param.setUsername("子慕");
	List<User> list = userMapper.findByIdAndUsername3(param);
	System.out.println(list);
}
1.3 模糊查询
需求
根据username模糊查询user表
1)方式一
UserMapper接口
public interface UserMapper {


	public List<User> findByUsername1(String username);
}
UserMapper.xml
<mapper namespace="com.lagou.mapper.UserMapper">
	<select id="findByUsername1" parameterType="string" resultType="user">
		select * from user where username like #{username}
	</select>
</mapper>
测试
@Test
public void testFindByUsername() throws Exception {


	UserMapper userMapper = sqlSession.getMapper(UserMapper.class);
	List<User> list = userMapper.findByUsername1("%王%");
	for (User user : list) {


		System.out.println(user);
	}
}
2)方式二
UserMapper接口
public interface UserMapper {


public List<User> findByUsername2(String username);
}
UserMapper.xml
<mapper namespace="com.lagou.mapper.UserMapper">
	<!--不推荐使用,因为会出现sql注入问题-->
	<select id="findByUsername2" parameterType="string" resultType="user">
		select * from user where username like '${value}'
	</select>
</mapper>
测试
@Test
public void testFindByUsername() throws Exception {


	UserMapper userMapper = sqlSession.getMapper(UserMapper.class);
	List<User> list = userMapper.findByUsername2("%王%");
	for (User user : list) {


		System.out.println(user);
	}
}
3) ${} 与 #{} 区别【笔试题】
#{} :表示一个占位符号
- 通过 #{} 可以实现preparedStatement向占位符中设置值,自动进行java类型和jdbc类型转换,#{}可以有效防止sql注入。
- #{} 可以接收简单类型值或pojo属性值。
- 如果parameterType传输单个简单类型值, #{} 括号中名称随便写。
${} :表示拼接sql串
- 通过 ${} 可以将parameterType 传入的内容拼接在sql中且不进行jdbc类型转换,会出现sql注入问题。
- ${} 可以接收简单类型值或pojo属性值。
- 如果parameterType传输单个简单类型值, ${} 括号中只能是value。
○ 补充:TextSqlNode.java 源码可以证明
二 Mybatis映射文件深入
2.1 返回主键
应用场景
我们很多时候有这种需求,向数据库插入一条记录后,希望能立即拿到这条记录在数据库中的主键值。
2.1.1 useGeneratedKeys
public interface UserMapper {


// 返回主键
public void save(User user);
}
<!--
useGeneratedKeys="true" 声明返回主键
keyProperty="id" 把返回主键的值,封装到实体的id属性中
注意:只适用于主键自增的数据库,mysql和sqlserver支持,oracle不支持
-->
<insert id="save" parameterType="user" useGeneratedKeys="true" keyProperty="id">
INSERT INTO `user`(username,birthday,sex,address)
values(#{username},#{birthday},#{sex},#{address})
</insert>
注意:只适用于主键自增的数据库,mysql和sqlserver支持,oracle不行。
2.1.2 selectKey(推荐)
public interface UserMapper {


// 返回主键
public void save(User user);
}
<!--
selectKey 适用范围广,支持所有类型数据库
keyColumn="id" 指定主键列名
keyProperty="id" 指定主键封装到实体的id属性中
resultType="int" 指定主键类型
order="AFTER" 设置在sql语句执行前(后),执行此语句
-->
<insert id="save" parameterType="user">
	<selectKey keyColumn="id" keyProperty="id" resultType="int" order="AFTER">
	SELECT LAST_INSERT_ID();
	</selectKey>
	INSERT INTO `user`(username,birthday,sex,address)
	values(#{username},#{birthday},#{sex},#{address})
</insert>
2.1.3 测试代码
@Test
public void testSave() throws Exception {


	UserMapper userMapper = sqlSession.getMapper(UserMapper.class);
	User user = new User();
	user.setUsername("子慕");
	user.setAddress("北京");
	user.setBirthday(new Date());
	user.setSex("男");
	userMapper.save(user);
	System.out.println("返回主键:" + user.getId());
}
2.2 动态SQL
应用场景
当我们要根据不同的条件,来执行不同的sql语句的时候,需要用到动态sql。
2.2.1 动态 SQL 之<if>
需求
根据id和username查询,但是不确定两个都有值。
a)UserMapper接口
public List<User> findByIdAndUsernameIf(User user);
b)UserMapper.xml映射
<!--
where标签相当于 where 1=1,但是如果没有条件,就不会拼接where关键字
-->
<select id="findByIdAndUsernameIf" parameterType="user" resultType="user">
	SELECT * FROM `user`
	<where>
		<if test="id != null">
		AND id = #{id}
		</if>
		<if test="username != null">
		AND username = #{username}
		</if>
	</where>
</select>
c)测试代码
// if标签 where标签
@Test
public void testFindByIdAndUsernameIf() throws Exception {


	UserMapper userMapper = sqlSession.getMapper(UserMapper.class);
	User param = new User();
	// param.setId(42);
	// param.setUsername("王小二");
	List<User> list = userMapper.findByIdAndUsernameIf(param);
	System.out.println(list);
}
2.2.2 动态 SQL 之<set>
需求
动态更新user表数据,如果该属性有值就更新,没有值不做处理。
a)UserMapper接口
public void updateIf(User user);
b)UserMapper.xml映射
<!--
set标签在更新的时候,自动加上set关键字,然后去掉最后一个条件的逗号
-->
<update id="updateIf" parameterType="user">
	UPDATE `user`
	<set>
		<if test="username != null">
		username = #{username},
		</if>
		<if test="birthday != null">
		birthday = #{birthday},
		</if>
		<if test="sex !=null">
		sex = #{sex},
		</if>
		<if test="address !=null">
		address = #{address},
		</if>
	</set>
	WHERE id = #{id}
</update>
c)测试代码
// set标签
@Test
public void testUpdateIf()throws Exception{


	UserMapper userMapper = sqlSession.getMapper(UserMapper.class);
	User user = new User();
	user.setId(1);
	user.setUsername("小二王");
	user.setSex("女");
	userMapper.updateIf(user);
}
2.2.3 动态 SQL 之<foreach>
foreach主要是用来做数据的循环遍历
例如: select * from user where id in (1,2,3) 在这样的语句中,传入的参数部分必须依靠foreach遍历才能实现。
* <foreach>标签用于遍历集合,它的属性:
• collection:代表要遍历的集合元素
• open:代表语句的开始部分
• close:代表结束部分
• item:代表遍历集合的每个元素,生成的变量名
• sperator:代表分隔符
a)集合
UserMapper接口
public List<User> findByList(List<Integer> ids);
UserMaper.xml映射
<!--
如果查询条件为普通类型 List集合,collection属性值为:collection 或者 list
-->
<select id="findByList" parameterType="list" resultType="user" >
	SELECT * FROM `user`
	<where>
		<foreach collection="collection" open="id in(" close=")" item="id" separator=",">
			#{id}
		</foreach>
	</where>
</select>
测试代码
// foreach标签 list
@Test
public void testFindByList() throws Exception {


	UserMapper userMapper = sqlSession.getMapper(UserMapper.class);
	List<Integer> ids = new ArrayList<>();
	ids.add(46);
	ids.add(48);
	ids.add(51);
	List<User> list = userMapper.findByList(ids);
	System.out.println(list);
}
b)数组
UserMapper接口
public List<User> findByArray(Integer[] ids);
UserMaper.xml映射
<!--
如果查询条件为普通类型 Array数组,collection属性值为:array
-->
<select id="findByArray" parameterType="int" resultType="user">
	SELECT * FROM `user`
	<where>
		<foreach collection="array" open="id in(" close=")" item="id" separator=",">
		#{id}
		</foreach>
	</where>
</select>
测试代码
// foreach标签 array
@Test
public void testFindByArray() throws Exception {


	UserMapper userMapper = sqlSession.getMapper(UserMapper.class);
	Integer[] ids = {

    46, 48, 51};
	List<User> list = userMapper.findByArray(ids);
	System.out.println(list);
}
2.3 SQL片段
应用场景
映射文件中可将重复的 sql 提取出来,使用时用 include 引用即可,最终达到 sql 重用的目的
<!--抽取的sql片段-->
<sql id="selectUser">
	SELECT * FROM `user`
</sql>
<select id="findByList" parameterType="list" resultType="user" >
	<!--引入sql片段-->
	<include refid="selectUser"></include>
	<where>
		<foreach collection="collection" open="id in(" close=")" item="id" separator=",">
			#{id}
		</foreach>
	</where>
</select>
<select id="findByArray" parameterType="integer[]" resultType="user">
	<!--引入sql片段-->
	<include refid="selectUser"></include>
	<where>
		<foreach collection="array" open="id in(" close=")" item="id" separator=",">
			#{id}
		</foreach>
	</where>
</select>
2.4 知识小结
MyBatis映射文件配置
<select>:查询
<insert>:插入
<update>:修改
<delete>:删除
<selectKey>:返回主键
<where>:where条件
<if>:if判断
<foreach>:for循环
<set>:set设置
<sql>:sql片段抽取
三 Mybatis核心配置文件深入
3.1 plugins标签
(配置第三方插件)
MyBatis可以使用第三方的插件来对功能进行扩展,分页助手PageHelper是将分页的复杂操作进行封装,使用简单的方式即可获得分页的相关数据
开发步骤:
①导入通用PageHelper的坐标
②在mybatis核心配置文件中配置PageHelper插件
③测试分页数据获取
①导入通用PageHelper坐标
<!-- 分页助手 -->
<dependency>
	<groupId>com.github.pagehelper</groupId>
	<artifactId>pagehelper</artifactId>
	<version>3.7.5</version>
</dependency>
<dependency>
	<groupId>com.github.jsqlparser</groupId>
	<artifactId>jsqlparser</artifactId>
	<version>0.9.1</version>
</dependency>
②在mybatis核心配置文件中配置PageHelper插件
<!-- 分页助手的插件 -->
<plugin interceptor="com.github.pagehelper.PageHelper">
<!-- 指定方言 -->
<property name="dialect" value="mysql"/>
</plugin>
③测试分页代码实现
@Test
public void testPageHelper(){


	//设置分页参数
	PageHelper.startPage(1,2);
	List<User> select = userMapper2.select(null);
	for(User user : select){


		System.out.println(user);
	}
}
获得分页相关的其他参数
//其他分页的数据
PageInfo<User> pageInfo = new PageInfo<User>(select);
System.out.println("总条数:"+pageInfo.getTotal());
System.out.println("总页数:"+pageInfo.getPages());
System.out.println("当前页:"+pageInfo.getPageNum());
System.out.println("每页显示长度:"+pageInfo.getPageSize());
System.out.println("是否第一页:"+pageInfo.isIsFirstPage());
System.out.println("是否最后一页:"+pageInfo.isIsLastPage());
3.2 知识小结
MyBatis核心配置文件常用标签:
1、properties标签:该标签可以加载外部的properties文件
2、typeAliases标签:设置类型别名
3、environments标签:数据源环境配置标签
4、plugins标签:配置MyBatis的插件
四 Mybatis多表查询
4.1 数据库表关系介绍
关系型数据库表关系分为
* 一对一
* 一对多
* 多对多
举例
* 人和身份证号就是一对一
	一个人只能有一个身份证号
	一个身份证号只能属于一个人

* 用户和订单就是一对多,订单和用户就是多对一
	一个用户可以下多个订单
	多个订单属于同一个用户

* 学生和课程就是多对多
	一个学生可以选修多门课程
	一个课程可以被多个学生选修

* 特例
一个订单只从属于一个用户,所以mybatis将多对一看成了一对一
案例环境准备
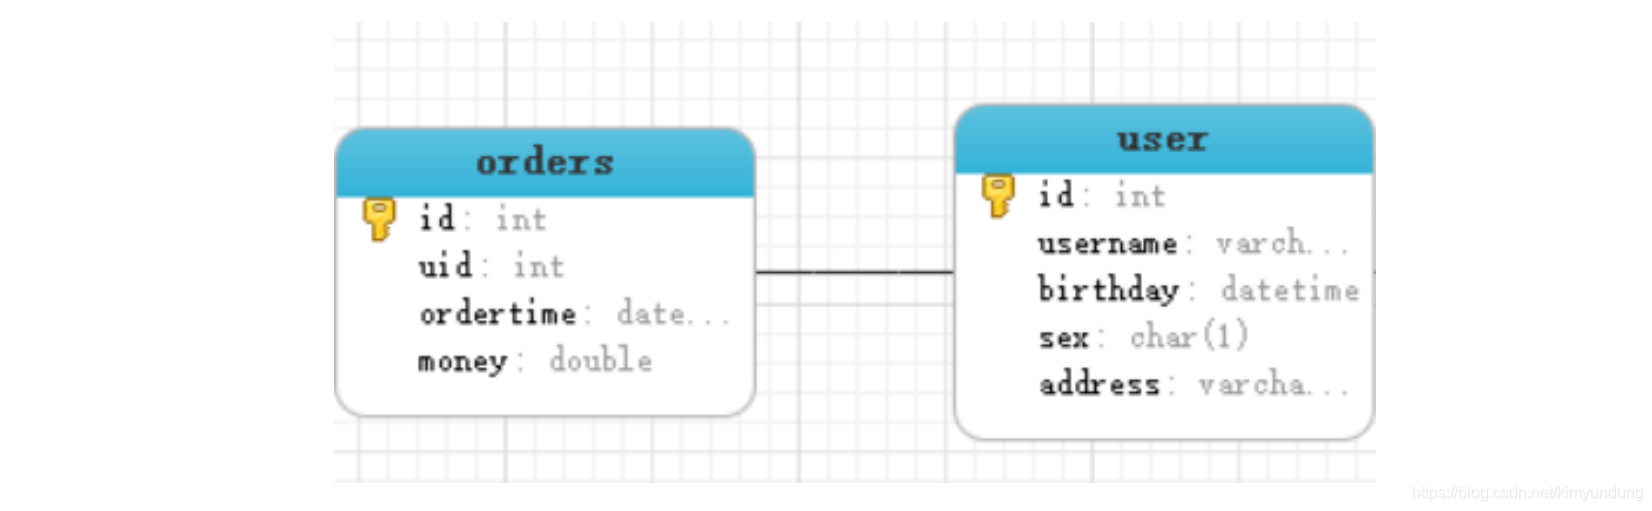
DROP TABLE IF EXISTS `orders`;
CREATE TABLE `orders` (
	`id` INT(11) NOT NULL AUTO_INCREMENT,
	`ordertime` VARCHAR(255) DEFAULT NULL,
	`total` DOUBLE DEFAULT NULL,
	`uid` INT(11) DEFAULT NULL,
	PRIMARY KEY (`id`),
	KEY `uid` (`uid`),
	CONSTRAINT `orders_ibfk_1` FOREIGN KEY (`uid`) REFERENCES `user` (`id`)
) ENGINE=INNODB AUTO_INCREMENT=4 DEFAULT CHARSET=utf8;
-- ----------------------------
-- Records of orders
-- ----------------------------
INSERT INTO `orders` VALUES ('1', '2020-12-12', '3000', '1');
INSERT INTO `orders` VALUES ('2', '2020-12-12', '4000', '1');
INSERT INTO `orders` VALUES ('3', '2020-12-12', '5000', '2');
-- ----------------------------
-- Table structure for sys_role
-- ----------------------------
DROP TABLE IF EXISTS `sys_role`;
CREATE TABLE `sys_role` (
	`id` INT(11) NOT NULL AUTO_INCREMENT,
	`rolename` VARCHAR(255) DEFAULT NULL,
	`roleDesc` VARCHAR(255) DEFAULT NULL,
	PRIMARY KEY (`id`)
) ENGINE=INNODB AUTO_INCREMENT=3 DEFAULT CHARSET=utf8;
-- ----------------------------
-- Records of sys_role
-- ----------------------------
INSERT INTO `sys_role` VALUES ('1', 'CTO', 'CTO');
INSERT INTO `sys_role` VALUES ('2', 'CEO', 'CEO');
-- ----------------------------
-- Table structure for sys_user_role
-- ----------------------------
DROP TABLE IF EXISTS `sys_user_role`;
CREATE TABLE `sys_user_role` (
	`userid` INT(11) NOT NULL,
	`roleid` INT(11) NOT NULL,
	PRIMARY KEY (`userid`,`roleid`),
	KEY `roleid` (`roleid`),
	CONSTRAINT `sys_user_role_ibfk_1` FOREIGN KEY (`userid`) REFERENCES `sys_role`
	(`id`),
	CONSTRAINT `sys_user_role_ibfk_2` FOREIGN KEY (`roleid`) REFERENCES `user`
	(`id`)
) ENGINE=INNODB DEFAULT CHARSET=utf8;
-- ----------------------------
-- Records of sys_user_role
-- ----------------------------
INSERT INTO `sys_user_role` VALUES ('1', '1');
INSERT INTO `sys_user_role` VALUES ('2', '1');
INSERT INTO `sys_user_role` VALUES ('1', '2');
INSERT INTO `sys_user_role` VALUES ('2', '2');
4.2 一对一(多对一)
4.2.1 介绍
一对一查询模型
用户表和订单表的关系为,一个用户有多个订单,一个订单只从属于一个用户
一对一查询的需求:查询所有订单,与此同时查询出每个订单所属的用户


一对一查询语句
SELECT * FROM orders o LEFT JOIN USER u ON o.`uid`=u.`id`;
4.2.2 代码实现
1 )Order实体
public class Order {


	private Integer id;
	private Date ordertime;
	private double money;
	// 表示当前订单属于哪个用户
	private User user;
}
2 )OrderMapper接口
public interface OrderMapper {


	public List<Order> findAllWithUser();
}
3 )OrderMapper.xml映射
<resultMap id="orderMap" type="com.lagou.domain.Order">
	<id column="id" property="id"></id>
	<result column="ordertime" property="ordertime"></result>
	<result column="money" property="money"></result>
	<!--
	一对一(多对一)使用association标签关联
	property="user" 封装实体的属性名
	javaType="user" 封装实体的属性类型
	-->
	<association property="user" javaType="com.lagou.domain.User">
		<id column="uid" property="id"></id>
		<result column="username" property="username"></result>
		<result column="birthday" property="birthday"></result>
		<result column="sex" property="sex"></result>
		<result column="address" property="address"></result>
	</association>
</resultMap>
<select id="findAllWithUser" resultMap="orderMap">
        SELECT * FROM orders o LEFT JOIN USER u ON o.uid=u.id
</select>
4 )测试代码
@Test
public void testOrderWithUser() throws Exception {


	OrderMapper orderMapper = sqlSession.getMapper(OrderMapper.class);
	List<Order> list = orderMapper.findAllWithUser();
	for (Order order : list) {


		System.out.println(order);
	}
}
4.3 一对多
4.3.1 介绍
一对多查询模型
用户表和订单表的关系为,一个用户有多个订单,一个订单只从属于一个用户
一对多查询的需求:查询所有用户,与此同时查询出该用户具有的订单
一对多查询语句
SELECT *,o.id oid FROM USER u LEFT JOIN orders o ON u.`id` = o.`uid`;
4.3.2 代码实现
1 )User实体
public class User {


	private Integer id;
	private String username;
	private Date birthday;
	private String sex;
	private String address;
	// 代表当前用户具备的订单列表
	private List<Order> orderList;
}
2 )UserMapper接口
public interface UserMapper {


	public List<User> findAllWithOrder();
}
3 )UserMapper.xml映射
<resultMap id="userMap" type="com.lagou.domain.User">
	<id column="id" property="id"></id>
	<result column="username" property="username"></result>
	<result column="birthday" property="birthday"></result>
	<result column="sex" property="sex"></result>
	<result column="address" property="address"></result>
	<!--
	一对多使用collection标签关联
	property="orderList" 封装到集合的属性名
	ofType="order" 封装集合的泛型类型
	-->
	<collection property="orderList" ofType="com.lagou.domain.Order">
		<id column="oid" property="id"></id>
		<result column="ordertime" property="ordertime"></result>
		<result column="money" property="money"></result>
	</collection>
</resultMap>
<select id="findAllWithOrder" resultMap="userMap">
	SELECT *,o.id oid FROM USER u LEFT JOIN orders o ON u.`id`=o.`uid`;
</select>
4 )测试代码
@Test
public void testUserWithOrder() throws Exception {


	UserMapper userMapper = sqlSession.getMapper(UserMapper.class);
	List<User> list = userMapper.findAllWithOrder();
	for (User user : list) {


		System.out.println(user);
	}
}
4.4 多对多
4.4.1 介绍
多对多查询的模型
用户表和角色表的关系为,一个用户有多个角色,一个角色被多个用户使用
多对多查询的需求:查询所有用户同时查询出该用户的所有角色

多对多查询语句
SELECT
	*
FROM
	USER u -- 用户表
	LEFT JOIN user_role ur -- 左外连接中间表
	ON u.`id` = ur.`uid`
	LEFT JOIN role r -- 左外连接中间表
	ON ur.`rid` = r.`id` ;
4.4.2 代码实现
1 )User和Role 实体
public class User {


private Integer id;
private String username;
private Date birthday;
private String sex;
private String address;
// 代表当前用户关联的角色列表
private List<Role> roleList;
}
public class Role {


private Integer id;
private String roleName;
private String roleDesc;
}
2 )UserMapper接口
public interface UserMapper {


public List<User> findAllWithRole();
}
3 )UserMapper.xml映射
<resultMap id="userAndRoleMap" type="com.lagou.domain.User">
	<id column="id" property="id"></id>
	<result column="username" property="username"></result>
	<result column="birthday" property="birthday"></result>
	<result column="sex" property="sex"></result>
	<result column="address" property="address"></result>
	<collection property="orderList" ofType="com.lagou.domain.Role">
		<id column="rid" property="id"></id>
		<result column="role_name" property="roleName"></result>
		<result column="role_desc" property="roleDesc"></result>
	</collection>
</resultMap>
<select id="findAllWithRole" resultMap="userAndRoleMap">
	SELECT * FROM USER u LEFT JOIN user_role ur ON u.`id`=ur.`uid` INNER JOIN
	role r ON ur.`rid` = r.`id`;
</select>
4 )测试代码
@Test
public void testUserWithRole() throws Exception {


	UserMapper userMapper = sqlSession.getMapper(UserMapper.class);
	List<User> list = userMapper.findAllWithRole();
	for (User user : list) {


		System.out.println(user);
	}
}
4.5 小结
MyBatis多表配置方式
* 多对一(一对一)配置:使用<resultMap>+<association>做配置
* 一对多配置:使用<resultMap>+<collection>做配置
* 多对多配置:使用<resultMap>+<collection>做配置
* 多对多的配置跟一对多很相似,难度在于SQL语句的编写。
五 MyBatis嵌套查询
5.1 什么是嵌套查询
嵌套查询就是将原来多表查询中的联合查询语句拆成单个表的查询,再使用mybatis的语法嵌套在一起。
举个栗子
* 需求:查询一个订单,与此同时查询出该订单所属的用户
1. 联合查询
	SELECT * FROM orders o LEFT JOIN USER u ON o.`uid`=u.`id`;
2. 嵌套查询
	2.1 先查询订单
		SELECT * FROM orders
	2.2 再根据订单uid外键,查询用户
		SELECT * FROM `user` WHERE id = #{根据订单查询的uid}
	2.3 最后使用mybatis,将以上二步嵌套起来
		...
5.2 一对一嵌套查询
5.2.1 介绍
需求:查询一个订单,与此同时查询出该订单所属的用户
一对一查询语句
-- 先查询订单
SELECT * FROM orders;

-- 再根据订单uid外键,查询用户
SELECT * FROM `user` WHERE id = #{订单的uid};
5.2.2 代码实现
1)OrderMapper接口
public interface OrderMapper {


	public List<Order> findAllWithUser();
}
2)OrderMapper.xml映射
<!--一对一嵌套查询-->
<resultMap id="orderMap" type="order">
	<id column="id" property="id"></id>
	<result column="ordertime" property="ordertime"></result>
	<result column="money" property="money"></result>
	<!--根据订单中uid外键,查询用户表-->
	<association property="user" javaType="user" column="uid"
	select="com.lagou.mapper.UserMapper.findById"></association>
</resultMap>
<select id="findAllWithUser" resultMap="orderMap" >
	SELECT * FROM orders
</select>
3)UserMapper接口
public interface UserMapper {


	public User findById(Integer id);
}
4)UserMapper.xml映射
<select id="findById" parameterType="int" resultType="user">
	SELECT * FROM `user` where id = #{uid}
</select>
5)测试代码
@Test
public void testOrderWithUser() throws Exception {


	OrderMapper orderMapper = sqlSession.getMapper(OrderMapper.class);
	List<Order> list = orderMapper.findAllWithUser();
	for (Order order : list) {


		System.out.println(order);
	}
}

5.3 一对多嵌套查询
5.3.1 介绍
需求:查询所有用户,与此同时查询出该用户具有的订单
一对多查询语句
-- 先查询用户
SELECT * FROM `user`;
-- 再根据用户id主键,查询订单列表
SELECT * FROM orders where uid = #{用户id};
5.3.2 代码实现
a)UserMapper接口
public interface UserMapper {


public List<User> findAllWithOrder();
}
b)UserMapper.xml映射
<!--一对多嵌套查询-->
<resultMap id="userMap" type="user">
	<id column="id" property="id"></id>
	<result column="username" property="username"></result>
	<result column="birthday" property="birthday"></result>
	<result column="sex" property="sex"></result>
	<result column="address" property="address"></result>
	<!--根据用户id,查询订单表-->
	<collection property="orderList" column="id" ofType="order"
	select="com.lagou.mapper.OrderMapper.findByUid"></collection>
</resultMap>
<select id="findAllWithOrder" resultMap="userMap">
	SELECT * FROM `user`
</select>
c)OrderMapper接口
public interface OrderMapper {


	public List<Order> findByUid(Integer uid);
}
d)OrderMapper.xml映射
<select id="findByUid" parameterType="int" resultType="order">
	SELECT * FROM orders where uid = #{uid}
</select>
e)测试代码
@Test
public void testUserWithOrder() throws Exception {


	UserMapper userMapper = sqlSession.getMapper(UserMapper.class);
	List<User> list = userMapper.findAllWithOrder();
	for (User user : list) {


		System.out.println(user);
	}
}
5.4 多对多嵌套查询
5.4.1 介绍
需求:查询用户 同时查询出该用户的所有角色
多对多查询语句
-- 先查询用户
SELECT * FROM `user`;
-- 再根据用户id主键,查询角色列表
SELECT * FROM role r INNER JOIN user_role ur ON r.`id` = ur.`rid`
WHERE ur.`uid` = #{用户id};
5.4.2 代码实现
a)UserMapper接口
public interface UserMapper {


	public List<User> findAllWithRole();
}
b)UserMapper.xml映射
<!--多对多嵌套查询-->
<resultMap id="userAndRoleMap" type="user">
	<id column="id" property="id"></id>
	<result column="username" property="username"></result>
	<result column="birthday" property="birthday"></result>
	<result column="sex" property="sex"></result>
	<result column="adress" property="address"></result>
	<!--根据用户id,查询角色列表-->
	<collection property="roleList" column="id" ofType="role"
	select="com.lagou.mapper.RoleMapper.findByUid"></collection>
</resultMap>
<select id="findAllWithRole" resultMap="userAndRoleMap">
	SELECT * FROM `user`
</select>
c)RoleMapper接口
public interface RoleMapper {


	public List<Role> findByUid(Integer uid);
}
d)RoleMapper.xml映射
<select id="findByUid" parameterType="int" resultType="role">
	SELECT r.id,r.`role_name` roleName,r.`role_desc` roleDesc FROM role r
	INNER JOIN user_role ur ON r.`id` = ur.`rid` WHERE ur.`uid` = #{uid}
</select>
e)测试代码
@Test
public void testUserWithRole() throws Exception {


	UserMapper userMapper = sqlSession.getMapper(UserMapper.class);
	List<User> list = userMapper.findAllWithRole();
	for (User user : list) {


		System.out.println(user);
	}
}
5.5 小结
一对一配置:使用<resultMap>+<association>做配置,通过column条件,执行select查询
一对多配置:使用<resultMap>+<collection>做配置,通过column条件,执行select查询
多对多配置:使用<resultMap>+<collection>做配置,通过column条件,执行select查询
优点:简化多表查询操作
缺点:执行多次sql语句,浪费数据库性能
任务三:加载策略及注解开发
一 MyBatis加载策略
1.1 什么是延迟加载?
问题
通过前面的学习,我们已经掌握了Mybatis中一对一,一对多,多对多关系的配置及实现,可以实现对象的关联查询。实际开发过程中很多时候我们并不需要总是在加载用户信息时就一定要加载他的订单信息。此时就是我们所说的延迟加载。
举个栗子
* 在一对多中,当我们有一个用户,它有个100个订单
	在查询用户的时候,要不要把关联的订单查出来?
	在查询订单的时候,要不要把关联的用户查出来?
* 回答
	在查询用户时,用户下的订单应该是,什么时候用,什么时候查询。
	在查询订单时,订单所属的用户信息应该是随着订单一起查询出来。
延迟加载
就是在需要用到数据时才进行加载,不需要用到数据时就不加载数据。延迟加载也称懒加载。
* 优点:
	先从单表查询,需要时再从关联表去关联查询,大大提高数据库性能,
	因为查询单表要比关联查询多张表速度要快。
* 缺点:
	因为只有当需要用到数据时,才会进行数据库查询,这样在大批量数据查询时,
	因为查询工作也要消耗时间,所以可能造成用户等待时间变长,造成用户体验下降。
* 在多表中:
	一对多,多对多:通常情况下采用延迟加载
	一对一(多对一):通常情况下采用立即加载
* 注意:
	延迟加载是基于嵌套查询来实现的
1.2 实现
1.2.1 局部延迟加载
在association和collection标签中都有一个fetchType属性,通过修改它的值,可以修改局部的加载策略。
<!-- 开启一对多 延迟加载 -->
<resultMap id="userMap" type="user">
	<id column="id" property="id"></id>
	<result column="username" property="username"></result>
	<result column="password" property="password"></result>
	<result column="birthday" property="birthday"></result>
	<!--
	fetchType="lazy" 懒加载策略
	fetchType="eager" 立即加载策略
	-->
	<collection property="orderList" ofType="order" column="id"
	select="com.lagou.dao.OrderMapper.findByUid" fetchType="lazy">
	</collection>
</resultMap>
<select id="findAll" resultMap="userMap">
	SELECT * FROM `user`
</select>
error 解决
https://blog.csdn.net/weixin_45097732/article/details/105670443
1.2.2 设置触发延迟加载的方法
大家在配置了延迟加载策略后,发现即使没有调用关联对象的任何方法,但是在你调用当前对象的equals、clone、hashCode、toString方法时也会触发关联对象的查询。
我们可以在配置文件中使用lazyLoadTriggerMethods配置项覆盖掉上面四个方法。
<settings>
<!--所有方法都会延迟加载-->
<setting name="lazyLoadTriggerMethods" value="toString()"/>
</settings>
1.2.3 全局延迟加载
在Mybatis的核心配置文件中可以使用setting标签修改全局的加载策略。
<settings>
<!--开启全局延迟加载功能-->
<setting name="lazyLoadingEnabled" value="true"/>
</settings>
注意
局部的加载策略优先级高于全局的加载策略。
<!-- 关闭一对一 延迟加载 -->
<resultMap id="orderMap" type="order">
	<id column="id" property="id"></id>
	<result column="ordertime" property="ordertime"></result>
	<result column="total" property="total"></result>
	<!--
	fetchType="lazy" 懒加载策略
	fetchType="eager" 立即加载策略
	-->
	<association property="user" column="uid" javaType="user"
	select="com.lagou.dao.UserMapper.findById" fetchType="eager">
	</association>
</resultMap>
<select id="findAll" resultMap="orderMap">
	SELECT * from orders
</select>
二 MyBatis缓存
2.1 为什么使用缓存?
当用户频繁查询某些固定的数据时,第一次将这些数据从数据库中查询出来,保存在缓存中。当用户再次查询这些数据时,不用再通过数据库查询,而是去缓存里面查询。减少网络连接和数据库查询带来的损耗,从而提高我们的查询效率,减少高并发访问带来的系统性能问题。
一句话概括:经常查询一些不经常发生变化的数据,使用缓存来提高查询效率。
像大多数的持久化框架一样,Mybatis也提供了缓存策略,通过缓存策略来减少数据库的查询次数,从而提高性能。 Mybatis中缓存分为一级缓存,二级缓存。
2.2 一级缓存
2.2.1 介绍
一级缓存是SqlSession级别的缓存,是默认开启的
所以在参数和SQL完全一样的情况下,我们使用同一个SqlSession对象调用一个Mapper方法,往往只执行一次SQL,因为使用SelSession第一次查询后,MyBatis会将其放在缓存中,以后再查询的时候,如果没有声明需要刷新,并且缓存没有超时的情况下,SqlSession都会取出当前缓存的数据,而不会再次发送SQL到数据库。

2.2.2 验证
@Test
public void testOneCache() throws Exception {


	SqlSession sqlSession = MyBatisUtils.openSession();
	UserMapper userMapper = sqlSession.getMapper(UserMapper.class);
	User user1 = userMapper.findById(1);
	System.out.println("第一次查询的用户:" + user1);
	User user2 = userMapper.findById(1);
	System.out.println("第二次查询的用户:" + user2);
	sqlSession.close();
}
我们可以发现,虽然在上面的代码中我们查询了两次,但最后只执行了一次数据库操作,这就是Mybatis提供给我们的一级缓存在起作用了。因为一级缓存的存在,导致第二次查询id为1的记录时,并没有发出sql语句从数据库中查询数据,而是从一级缓存中查询。

2.2.3 分析
一级缓存是SqlSession范围的缓存,执行SqlSession的C(增加)U(更新)D(删除)操作,或者调用clearCache()、commit()、close()方法,都会清空缓存。

1. 第一次发起查询用户id为41的用户信息,先去找缓存中是否有id为41的用户信息,如果没有,从数据库查询用户信息。
2. 得到用户信息,将用户信息存储到一级缓存中。
3. 如果sqlSession去执行commit操作(执行插入、更新、删除),清空SqlSession中的一级缓存,这样做的目的为了让缓存中存储的是最新的信息,避免脏读。
4. 第二次发起查询用户id为41的用户信息,先去找缓存中是否有id为41的用户信息,缓存中有,直接从缓存中获取用户信息。
2.2.4 清除
@Test
public void testClearOneCache() throws Exception {


	SqlSession sqlSession = MybatisUtils.openSession();
	UserMapper userMapper = sqlSession.getMapper(UserMapper.class);
	User user1 = userMapper.findById(41);
	System.out.println("第一次查询的用户:" + user1);
	//调用sqlSession清除缓存的方法
	sqlSession.clearCache();
	User user2 = userMapper.findById(41);
	System.out.println("第二次查询的用户:" + user2);
}
<!-- 每次查询时,都会清除缓存 -->
< select flushCache="true"></select>
2.3 二级缓存
2.3.1 介绍
二级缓存是namspace级别(跨sqlSession)的缓存,是默认不开启的
二级缓存的开启需要进行配置,实现二级缓存的时候,MyBatis要求返回的POJO必须是可序列化的。也就是要求实现Serializable接口,配置方法很简单,只需要在映射XML文件配置 就可以开启二级缓存了。

2.3.2 验证
a)配置核心配置文件
<settings>
<!--
因为cacheEnabled的取值默认就为true,所以这一步可以省略不配置。
为true代表开启二级缓存;为false代表不开启二级缓存。
-->
<setting name="cacheEnabled" value="true"/>
</settings>
b)配置UserMapper.xml映射
<mapper namespace="com.lagou.dao.UserMapper">
<!--当前映射文件开启二级缓存-->
<cache></cache>
<!--
<select>标签中设置useCache=”true”代表当前这个statement要使用二级缓存。
如果不使用二级缓存可以设置为false
注意:
针对每次查询都需要最新的数据sql,要设置成useCache="false",禁用二级缓存。
-->
<select id="findById" parameterType="int" resultType="user" useCache="true">
	SELECT * FROM `user` where id = #{id}
</select>
</mapper>
c)修改User实体
public class User implements Serializable {


	private Integer id;
	private String username;
	private Date birthday;
	private String sex;
	private String address;
	private List<Role> roleList;
	private List<Order> orderList;
}
d)测试结果
@Test
public void testTwoCache() throws Exception {


	SqlSession sqlSession = MyBatisUtils.openSession();
	UserMapper userMapper = sqlSession.getMapper(UserMapper.class);
	User user = userMapper.findById(41);
	System.out.println("第一次查询的用户:" + user);
	sqlSession.close();
	SqlSession sqlSession1 = MyBatisUtils.openSession();
	UserMapper userMapper1 = sqlSession1.getMapper(UserMapper.class);
	User user1 = userMapper1.findById(41);
	System.out.println("第二次查询的用户:"+user1);
	sqlSession1.close();
}
2.3.3 分析
二级缓存是mapper映射级别的缓存,多个SqlSession去操作同一个Mapper映射的sql语句,多个SqlSession可以共用二级缓存,二级缓存是跨SqlSession的。

1. 映射语句文件中的所有select语句将会被缓存。
2. 映射语句文件中的所有insert、update和delete语句会刷新缓存。
2.3.4 注意问题(脏读)
mybatis的二级缓存因为是namespace级别,所以在进行多表查询时会产生脏读问题

2.4 小结
1. mybatis的缓存,都不需要我们手动存储和获取数据。mybatis自动维护的。
2. mybatis开启了二级缓存后,那么查询顺序:二级缓存--》一级缓存--》数据库
2. 注意:mybatis的二级缓存会存在脏读问题,需要使用第三方的缓存技术解决问题。
三 MyBatis注解
3.1 MyBatis常用注解
这几年来注解开发越来越流行,Mybatis也可以使用注解开发方式,这样我们就可以减少编写Mapper映射文件了。我们先围绕一些基本的CRUD来学习,再学习复杂映射多表操作。
* @Insert:实现新增,代替了<insert></insert>
* @Delete:实现删除,代替了<delete></delete>
* @Update:实现更新,代替了<update></update>
* @Select:实现查询,代替了<select></select>

* @Result:实现结果集封装,代替了<result></result>
* @Results:可以与@Result 一起使用,封装多个结果集,代替了<resultMap></resultMap>
* @One:实现一对一结果集封装,代替了<association></association>
* @Many:实现一对多结果集封装,代替了<collection></collection>
3.2 MyBatis注解的增删改查【重点】
3.2.1 创建UserMapper接口
public interface UserMapper {


	@Select("SELECT * FROM `user`")
	public List<User> findAll();

	@Insert("INSERT INTO `user`(username,birthday,sex,address) VALUES(# {username},#{birthday},#{sex},#{address})")
	public void save(User user);

	@Update("UPDATE `user` SET username = #{username},birthday = #{birthday},sex= #{sex},address = #{address} WHERE id = #{id}")
	public void update(User user);

	@Delete("DELETE FROM `user` where id = #{id}")
	public void delete(Integer id);
}
3.2.2 编写核心配置文件
<!--我们使用了注解替代的映射文件,所以我们只需要加载使用了注解的Mapper接口即可-->
<mappers>
<!--扫描使用注解的Mapper类-->
<mapper class="com.lagou.mapper.UserMapper"></mapper>
</mappers>
<!--或者指定扫描包含映射关系的接口所在的包也可以-->
<mappers>
<!--扫描使用注解的Mapper类所在的包-->
<package name="com.lagou.mapper"></package>
</mappers>
3.2.3 测试代码
public class TestUser extends TestBaseMapper {


	// 查询
	@Test
	public void testFindAll() throws Exception {


		UserMapper userMapper = sqlSession.getMapper(UserMapper.class);
		List<User> list = userMapper.findAll();
		for (User user : list) {


			System.out.println(user);
		}
	}
	// 添加
	@Test
	public void testSave() throws Exception {


		UserMapper userMapper = sqlSession.getMapper(UserMapper.class);
		User user = new User();
		user.setUsername("于谦");
		user.setBirthday(new Date());
		user.setSex("男");
		user.setAddress("北京德云社");
		userMapper.save(user);
	}
	// 更新
	@Test
	public void testUpdate() throws Exception {


		UserMapper userMapper = sqlSession.getMapper(UserMapper.class);
		User user = new User();
		user.setId(49);
		user.setUsername("郭德纲");
		user.setBirthday(new Date());
		user.setSex("男");
		user.setAddress("北京德云社");
		userMapper.update(user);
	}
	// 删除
	@Test
	public void testDelete() throws Exception {


		UserMapper userMapper = sqlSession.getMapper(UserMapper.class);
		userMapper.delete(49);
	}
}
3.3 使用注解实现复杂映射开发
之前我们在映射文件中通过配置 、、 来实现复杂关系映射。
使用注解开发后,我们可以使用 @Results、@Result,@One、@Many 注解组合完成复杂关系的配置。
| 注解 | 说明 |
|---|---|
| @Results | 代替的是标签该注解中可以使用单个@Result注解,也可以使用@Result集合,使用格式:@Result({@Result(),@Result()}) 或@Result(@Result()) |
| @Resut | 代替了标签和标签 @Result中属性介绍: column:数据库的列名 property:需要装配的属性名 one:需要使用的@One注解(@Result(one=@One)()) many:需要使用的@Many注解(@Result(many=@many)()) |
| @One(一对一) | 代替了标签,是多表查询的关键,在注解中用来指定子查询返回单一对象. @One注解属性介绍: select:指定用来多表查询的 sqlmapper 使用格式:@Result(column="",property="",one=@One(select="")) |
| @Many(一对多) | 代替了标签,是多表查询的关键,在注解中用来指定子查询返回对象集合. 使用格式:@Result(property="",column="",many=@Many(select="")) |
3.4 一对一查询
3.4.1 介绍
需求:查询一个订单,与此同时查询出该订单所属的用户
一对一查询语句
SELECT * FROM orders;
SELECT * FROM `user` WHERE id = #{订单的uid};
3.4.2 代码实现
a)OrderMapper接口
public interface OrderMapper {


	@Select("SELECT * FROM orders")
	@Results({


	@Result(id = true, column = "id", property = "id"),
	@Result(column = "ordertime", property = "ordertime"),
	@Result(column = "money", property = "money"),
	@Result(property = "user", javaType = User.class, column = "uid", one = @One(select = "com.lagou.mapper.UserMapper.findById", fetchType = FetchType.EAGER)) })
	public List<Order> findAllWithUser();
}
b)UserMapper接口
public interface UserMapper {


	@Select("SELECT * FROM `user` WHERE id = #{id}")
	public User findById(Integer id);
}
c)测试代码
@Test
public void testOrderWithUser() throws Exception {


	OrderMapper orderMapper = sqlSession.getMapper(OrderMapper.class);
	List<Order> list = orderMapper.findAllWithUser();
	for (Order order : list) {


		System.out.println(order);
	}
}
3.5 一对多查询
3.5.1 介绍
需求:查询一个用户,与此同时查询出该用户具有的订单
一对多查询语句
SELECT * FROM `user`;
SELECT * FROM orders where uid = #{用户id};
3.5.2 代码实现
a)UserMapper接口
public interface UserMapper {


	@Select("SELECT * FROM `user`")
	@Results({


	@Result(id = true, column = "id", property = "id"),
	@Result(column = "brithday", property = "brithday"),
	@Result(column = "sex", property = "sex"),
	@Result(column = "address", property = "address"),
	@Result(property = "orderList", javaType = List.class, column = "id" , many = @Many(select = "com.lagou.mapper.OrderMapper.findByUid")) })
	public List<User> findAllWithOrder();
}
b)OrderMapper接口
public interface OrderMapper {


	@Select("SELECT * FROM orders WHERE uid = #{uid}")
	public List<Order> findByUid(Integer uid);
}
c)测试代码
@Test
public void testUserWithOrder() throws Exception {


	UserMapper userMapper = sqlSession.getMapper(UserMapper.class);
	List<User> list = userMapper.findAllWithOrder();
	for (User user : list) {


		System.out.println(user);
	}
}

3.6 多对多查询
3.6.1 介绍
需求:查询所有用户,同时查询出该用户的所有角色
多对多查询语句
SELECT * FROM `user`;
SELECT * FROM role r INNER JOIN user_role ur ON r.`id` = ur.`rid`
WHERE ur.`uid` = #{用户id};
3.6.2 代码实现
a)UserMapper接口
public interface UserMapper {


	@Select("SELECT * FROM `user`")
	@Results({


	@Result(id = true, column = "id", property = "id"),
	@Result(column = "brithday", property = "brithday"),
	@Result(column = "sex", property = "sex"),
	@Result(column = "address", property = "address"),
	@Result(property = "roleList", javaType = List.class,column = "id" , many = @Many(select = "com.lagou.mapper.RoleMapper.findByUid")) })
	public List<User> findAllWithRole();
}
b)RoleMapper接口
public interface RoleMapper {


	@Select("SELECT * FROM role r INNER JOIN user_role ur ON r.`id` = ur.`rid`
	WHERE ur.`uid` = #{

    uid}")
	public List<Role> findByUid(Integer uid);
}
c)测试代码
@Test
public void testUserWithRole() throws Exception {


	UserMapper userMapper = sqlSession.getMapper(UserMapper.class);
	List<User> list = userMapper.findAllWithRole();
	for (User user : list) {


		System.out.println(user);
	}
}
3.7 基于注解的二级缓存
3.7.1 配置SqlMapConfig.xml文件开启二级缓存的支持
<settings>
<!--
因为cacheEnabled的取值默认就为true,所以这一步可以省略不配置。
为true代表开启二级缓存;为false代表不开启二级缓存。
-->
<setting name="cacheEnabled" value="true"/>
</settings>
3.7.2 在Mapper接口中使用注解配置二级缓存
@CacheNamespace
public interface UserMapper {

    ...}
3.8 注解延迟加载
不管是一对一还是一对多 ,在注解配置中都有fetchType的属性
* fetchType = FetchType.LAZY 表示懒加载
* fetchType = FetchType.EAGER 表示立即加载
* fetchType = FetchType.DEFAULT 表示使用全局配置
3.9 小结
* 注解开发和xml配置优劣分析
1.注解开发和xml配置相比,从开发效率来说,注解编写更简单,效率更高。
2.从可维护性来说,注解如果要修改,必须修改源码,会导致维护成本增加。xml维护性更强。
第六阶段模块二Spring
任务一:IOC控制反转
任务一课程主要内容:
* spring概念介绍
* IOC
* spring快速入门
* spring相关API介绍
* Spring配置文件
* DBUtils
* spring注解开发
* spring整合Junit
一 Spring概述
1.1 Spring是什么
Spring是分层的 Java SE/EE应用 full-stack(全栈式) 轻量级开源框架。
提供了表现层 SpringMVC和持久层 Spring JDBC Template以及 业务层 事务管理等众多的企业级应用技术,还能整合开源世界众多著名的第三方框架和类库,逐渐成为使用最多的Java EE 企业应用开源框架。
两大核心:以 IOC(Inverse Of Control:控制反转)和 AOP(Aspect Oriented Programming:面向切面编程)为内核。

1.2 Spring发展历程
* EJB
	1997 年,IBM提出了EJB 的思想
	1998 年,SUN制定开发标准规范 EJB1.0
	1999 年,EJB1.1 发布
	2001 年,EJB2.0 发布
	2003 年,EJB2.1 发布
	2006 年,EJB3.0 发布

* Spring
	Rod Johnson( Spring 之父)
		改变Java世界的大师级人物

	2002年编著《Expert one on one J2EE design and development》
		指出了JavaEE和EJB组件框架中的存在的一些主要缺陷;提出普通java类依赖注入更为简单的解决方案。

	2004年编著《Expert one-on-one J2EE Development without EJB》
		阐述了JavaEE开发时不使用EJB的解决方式(Spring 雏形)
		同年4月spring1.0诞生

	2006年10月,发布 Spring2.0
	2009年12月,发布 Spring3.0
	2013年12月,发布 Spring4.0
	2017年9月, 发布最新 Spring5.0 通用版(GA)
1.3 Spring优势
1)方便解耦,简化开发
	Spring就是一个容器,可以将所有对象创建和关系维护交给Spring管理
	什么是耦合度?对象之间的关系,通常说当一个模块(对象)更改时也需要更改其他模块(对象),这就是耦合,耦合度过高会使代码的维护成本增加。要尽量解耦

2)AOP编程的支持
	Spring提供面向切面编程,方便实现程序进行权限拦截,运行监控等功能。

3)声明式事务的支持
	通过配置完成事务的管理,无需手动编程

4)方便测试,降低JavaEE API的使用
	Spring对Junit4支持,可以使用注解测试

5)方便集成各种优秀框架
	不排除各种优秀的开源框架,内部提供了对各种优秀框架的直接支持

1.4 Spring体系结构

二 初识IOC
2.1 概述
控制反转(Inverse Of Control)不是什么技术,而是一种设计思想。它的目的是指导我们设计出更加松耦合的程序。
控制:在java中指的是对象的控制权限(创建、销毁)
反转:指的是对象控制权由原来 由开发者在类中手动控制 反转到 由Spring容器控制
举个栗子
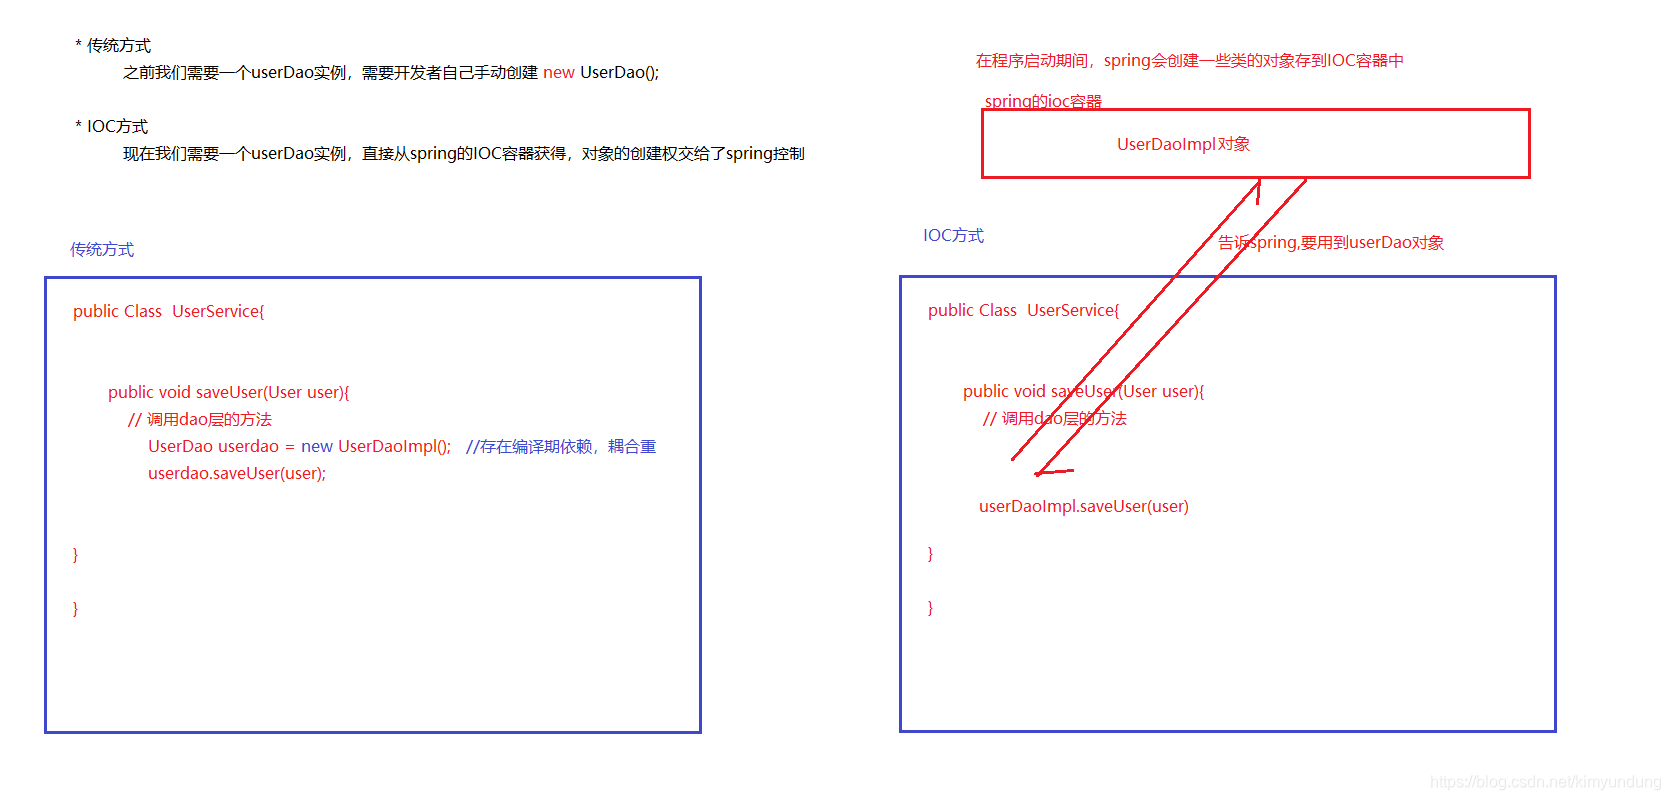
* 传统方式
之前我们需要一个userDao实例,需要开发者自己手动创建 new UserDao();
* IOC方式
现在我们需要一个userDao实例,直接从spring的IOC容器获得,对象的创建权交给了spring控制
2.2 自定义IOC容器
2.2.1 介绍
需求 : 实现service层与dao层代码解耦合
步骤分析
- 创建java项目,导入自定义IOC相关坐标
- 编写Dao接口和实现类
- 编写Service接口和实现类
- 编写测试代码
2.2.2 实现
1)创建java项目,导入自定义IOC相关坐标
<dependencies>
	<dependency>
		解析xml
		<groupId>dom4j</groupId>
		<artifactId>dom4j</artifactId>
		<version>1.6.1</version>
	</dependency>
	<dependency>
		xpath
		<groupId>jaxen</groupId>
		<artifactId>jaxen</artifactId>
		<version>1.1.6</version>
	</dependency>
	<dependency>
		<groupId>junit</groupId>
		<artifactId>junit</artifactId>
		<version>4.12</version>
	</dependency>
</dependencies>
2)编写Dao接口和实现类
public interface UserDao {


	public void save();
}
public class UserDaoImpl implements UserDao {


	public void save() {


		System.out.println("保存成功了...");
	}
}
3)编写Service接口和实现类
public interface UserService {


	public void save();
}
public class UserServiceImpl implements UserService {


	private UserDao userDao;
	public void save(){


		userDao = new UserDaoImpl();
		userDao.save();
	}
}
4)编写测试代码
public class UserTest {


	@Test
	public void testSave() throws Exception {


		UserService userService = new UserServiceImpl();
		userService.save();
	}
}
5)问题
当前service对象和dao对象耦合度太高,而且每次new的都是一个新的对象,导致服务器压力过大。
解耦合的原则是编译期不依赖,而运行期依赖就行了。

6)编写beans.xml
把所有需要创建对象的信息定义在配置文件中
<?xml version="1.0" encoding="UTF-8" ?>
<beans>
	<bean id="userDao" class="com.lagou.dao.impl.UserDaoImpl"></bean>
</beans>
7)编写BeanFactory工具类
public class BeanFactory {


	private static Map<String, Object> ioc = new HashMap<>();
	// 程序启动时,初始化对象实例
	static {


		try {


			// 1.读取配置文件
			InputStream in = BeanFactory.class.getClassLoader().getResourceAsStream("beans.xml");
			// 2.解析xml
			SAXReader saxReader = new SAXReader();
			Document document = saxReader.read(in);
			// 3.编写xpath表达式
			String xpath = "//bean";
			// 4.获取所有的bean标签
			List<Element> list = document.selectNodes(xpath);
			// 5.遍历并创建对象实例,设置到map集合中
			for (Element element : list) {


				String id = element.attributeValue("id");
				String className = element.attributeValue("class");
				Object object = Class.forName(className).newInstance();
				ioc.put(id, object);
			}
		} catch (Exception e) {


			e.printStackTrace();
		}
	}
	// 获取指定id的对象实例
	public static Object getBean(String beandId) {


		return ioc.get(beandId);
	}
}
8)修改UserServiceImpl实现类
public class UserServiceImpl implements UserService {


	private UserDao userDao;
	public void save() throws Exception
	userDao = (UserDao) BeanFactory.getBean("userDao");
	userDao.save();
	}
}
2.2.3 知识小结
* 其实升级后的BeanFactory就是一个简单的Spring的IOC容器所具备的功能。
* 之前我们需要一个userDao实例,需要开发者自己手动创建 new UserDao();
* 现在我们需要一个userdao实例,直接从spring的IOC容器获得,对象的创建权交给了spring控制
* 最终目标:代码解耦合
三 Spring快速入门
3.1 介绍
需求:借助spring的IOC实现service层与dao层代码解耦合
步骤分析
1. 创建java项目,导入spring开发基本坐标
2. 编写Dao接口和实现类
3. 创建spring核心配置文件
4. 在spring配置文件中配置 UserDaoImpl
5. 使用spring相关API获得Bean实例
3.2 实现
1)创建java项目,导入spring开发基本坐标
<dependencies>
	<dependency>
		<groupId>org.springframework</groupId>
		<artifactId>spring-context</artifactId>
		<version>5.1.5.RELEASE</version>
	</dependency>
	<dependency>
		<groupId>junit</groupId>
		<artifactId>junit</artifactId>
		<version>4.12</version>
	</dependency>
</dependencies>
2)编写Dao接口和实现类
public interface UserDao {


	public void save();
}
public class UserDaoImpl implements UserDao {


	public void save() {


		System.out.println("保存成功了...");
	}
}
3)创建spring核心配置文件
<?xml version="1.0" encoding="UTF-8"?>
<beans xmlns="http://www.springframework.org/schema/beans"
xmlns:xsi="http://www.w3.org/2001/XMLSchema-instance"
xsi:schemaLocation="http://www.springframework.org/schema/beans
http://www.springframework.org/schema/beans/spring-beans.xsd">
</beans>
4)在spring配置文件中配置 UserDaoImpl
<beans ...>
	<bean id="userDao" class="com.lagou.dao.impl.UserDaoImpl"></bean>
</beans>
5)使用spring相关API获得Bean实例
public class UserTest {


	@Test
	public void testSave() throws Exception {


		ApplicationContext applicationContext = new ClassPathXmlApplicationContext("applicationContext.xml");
		UserDao userDao = (UserDao) applicationContext.getBean("userDao");
		userDao.save();
	}
}

3.3 知识小结
Spring的开发步骤
1. 导入坐标
2. 创建Bean
3. 创建applicationContext.xml
4. 在配置文件中进行Bean配置
5. 创建ApplicationContext对象,执行getBean
四 Spring相关API
4.1 API继承体系介绍
Spring的API体系异常庞大,我们现在只关注两个BeanFactory和ApplicationContext

4.2 BeanFactory
BeanFactory是 IOC 容器的核心接口,它定义了IOC的基本功能。
特点:在第一次调用getBean()方法时,创建指定对象的实例
BeanFactory beanFactory = new XmlBeanFactory(new ClassPathResource("applicationContext.xml"));
4.3 ApplicationContext
代表应用上下文对象,可以获得spring中IOC容器的Bean对象。
特点:在spring容器启动时,加载并创建所有对象的实例
常用实现类
1. ClassPathXmlApplicationContext
它是从类的根路径下加载配置文件 推荐使用这种。

2. FileSystemXmlApplicationContext
它是从磁盘路径上加载配置文件,配置文件可以在磁盘的任意位置。

3. AnnotationConfigApplicationContext
当使用注解配置容器对象时,需要使用此类来创建 spring 容器。它用来读取注解。
ApplicationContext app = new ClassPathXmlApplicationContext("applicationContext.xml");
常用方法
1. Object getBean(String name);
根据Bean的id从容器中获得Bean实例,返回是Object,需要强转。

2. <T> T getBean(Class<T> requiredType);
根据类型从容器中匹配Bean实例,当容器中相同类型的Bean有多个时,则此方法会报错。

3. <T> T getBean(String name,Class<T> requiredType);
根据Bean的id和类型获得Bean实例,解决容器中相同类型Bean有多个情况。
4.4 知识小结
ApplicationContext app = new ClasspathXmlApplicationContext("xml文件");
app.getBean("id");
app.getBean(Class);
五 Spring配置文件
5.1 Bean标签基本配置
<bean id="" class=""></bean>
* 用于配置对象交由Spring来创建。
* 基本属性:
id:Bean实例在Spring容器中的唯一标识
class:Bean的全限定名
* 默认情况下它调用的是类中的 无参构造函数,如果没有无参构造函数则不能创建成功。
5.2 Bean标签范围配置
<bean id="" class="" scope=""></bean>
scope属性指对象的作用范围,取值如下:
| 取值范围 | 说明 |
|---|---|
| singleton | 默认值,单例的 |
| prototype | 多例的 |
| request | WEB项目中,Spring创建一个Bean的对象,将对象存入到request域中 |
| session | WEB项目中,Spring创建一个Bean的对象,将对象存入到session域中 |
| global session | WEB项目中,应用在Portlet环境,如果没有Portlet环境那么globalSession 相当于 session |
1. 当scope的取值为singleton时
	Bean的实例化个数:1个
	Bean的实例化时机:当Spring核心文件被加载时,实例化配置的Bean实例
	Bean的生命周期:
		对象创建:当应用加载,创建容器时,对象就被创建了
		对象运行:只要容器在,对象一直活着
		对象销毁:当应用卸载,销毁容器时,对象就被销毁了

2. 当scope的取值为prototype时
	Bean的实例化个数:多个
	Bean的实例化时机:当调用getBean()方法时实例化Bean
	Bean的生命周期:
		对象创建:当使用对象时,创建新的对象实例
		对象运行:只要对象在使用中,就一直活着
		对象销毁:当对象长时间不用时,被 Java 的垃圾回收器回收了
5.3 Bean生命周期配置
<bean id="" class="" scope="" init-method="" destroy-method=""></bean>
* init-method:指定类中的初始化方法名称
* destroy-method:指定类中销毁方法名称
5.4 Bean实例化三种方式
- 无参构造方法实例化
- 工厂静态方法实例化
- 工厂普通方法实例化
5.4.1 无参构造方法实例化
它会根据默认无参构造方法来创建类对象,如果bean中没有默认无参构造函数,将会创建失败
<bean id="userDao" class="com.lagou.dao.impl.UserDaoImpl"/>
5.4.2 工厂静态方法实例化
应用场景
依赖的jar包中有个A类,A类中有个静态方法m1,m1方法的返回值是一个B对象。如果我们频繁使用B对象,此时我们可以将B对象的创建权交给spring的IOC容器,以后我们在使用B对象时,无需调用A类中的m1方法,直接从IOC容器获得。
public class StaticFactoryBean {
	public static UserDao createUserDao(){
		return new UserDaoImpl();
	}
}
<bean id="userDao" class="com.lagou.factory.StaticFactoryBean"
factory-method="createUserDao" />
5.4.3 工厂普通方法实例化
应用场景
依赖的jar包中有个A类,A类中有个普通方法m1,m1方法的返回值是一个B对象。如果我们频繁使用B对象,
此时我们可以将B对象的创建权交给spring的IOC容器,以后我们在使用B对象时,无需调用A类中的m1方法,直接从IOC容器获得。
public class DynamicFactoryBean {


	public UserDao createUserDao(){


		return new UserDaoImpl();
	}
}
<bean id="dynamicFactoryBean" class="com.lagou.factory.DynamicFactoryBean"/>
<bean id="userDao" factory-bean="dynamicFactoryBean" factorymethod="createUserDao"/>
5.5 Bean依赖注入概述
依赖注入 DI(Dependency Injection):它是 Spring 框架核心 IOC 的具体实现。
在编写程序时,通过控制反转,把对象的创建交给了 Spring,但是代码中不可能出现没有依赖的情况。IOC 解耦只是降低他们的依赖关系,但不会消除。例如:业务层仍会调用持久层的方法。
那这种业务层和持久层的依赖关系,在使用 Spring 之后,就让 Spring 来维护了。简单的说,就是通过框架把持久层对象传入业务层,而不用我们自己去获取。
5.6 Bean依赖注入方式
5.6.1 构造方法
在UserServiceImpl中创建有参构造
public class UserServiceImpl implements UserService {


	private UserDao userDao;
	public UserServiceImpl(UserDao userDao) {


		this.userDao = userDao;
	}
	@Override
	public void save() {


		userDao.save();
	}
}
配置Spring容器调用有参构造时进行注入
<bean id="userDao" class="com.lagou.dao.impl.UserDaoImpl"/>
	<bean id="userService" class="com.lagou.service.impl.UserServiceImpl">
	<!--<constructor-arg index="0" type="com.lagou.dao.UserDao" ref="userDao"/>-->
	<constructor-arg name="userDao" ref="userDao"/>
</bean>

5.6.2 set方法
在UserServiceImpl中创建set方法
public class UserServiceImpl implements UserService {


	private UserDao userDao;
	public void setUserDao(UserDao userDao) {


		this.userDao = userDao;
	}
	@Override
	public void save() {


		userDao.save();
	}
}
配置Spring容器调用set方法进行注入
<bean id="userDao" class="com.lagou.dao.impl.UserDaoImpl"/>
	<bean id="userService" class="com.lagou.service.impl.UserServiceImpl">
	<property name="userDao" ref="userDao"/>
</bean>
5.6.3 P命名空间注入
P命名空间注入本质也是set方法注入,但比起上述的set方法注入更加方便,主要体现在配置文件中,如下:
首先,需要引入P命名空间:
xmlns:p="http://www.springframework.org/schema/p"
其次,需要修改注入方式:
<bean id="userDao" class="com.lagou.dao.impl.UserDaoImpl"/>
<bean id="userService" class="com.lagou.service.impl.UserServiceImpl" p:userDao-ref="userDao"/>
5.7 Bean依赖注入的数据类型
上面操作,都是注入Bean对象,除了对象的引用可以注入,普通数据类型和集合都可以在容器中进行注入。
注入数据的三种数据类型
- 普通数据类型
- 引用数据类型
- 集合数据类型
其中引用数据类型,此处就不再赘述了,之前的操作都是对UserDao对象的引用进行注入的。下面将以set方法注入为例,演示普通数据类型和集合数据类型的注入。
5.7.1 注入普通数据类型
public class User {


	private String username;
	private String age;
	public void setUsername(String username) {


		this.username = username;
	}
	public void setAge(String age) {


		this.age = age;
	}
}
<bean id="user" class="com.lagou.domain.User">
	<property name="username" value="jack"/>
	<property name="age" value="18"/>
</bean>
5.7.2 注入集合数据类型
1)List集合注入
public class UserDaoImpl implements UserDao {


	private List<Object> list;
	public void save() {


		System.out.println(list);
		System.out.println("保存成功了...");
	}
}
<bean id="user" class="com.lagou.domain.User">
	<property name="username" value="jack"/>
	<property name="age" value="18"/>
</bean>
<bean id="userDao" class="com.lagou.dao.impl.UserDaoImpl">
	<property name="list">
		<list>
			<value>aaa</value>
			<ref bean="user"></ref>
		</list>
	</property>
</bean>
2)Set集合注入
public class UserDaoImpl implements UserDao {


	private Set<Object> set;
	public void setSet(Set<Object> set) {


		this.set = set;
	}
	public void save() {


		System.out.println(set);
		System.out.println("保存成功了...");
	}
}
<bean id="user" class="com.lagou.domain.User">
	<property name="username" value="jack"/>
	<property name="age" value="18"/>
</bean>
<bean id="userDao" class="com.lagou.dao.impl.UserDaoImpl">
	<property name="set">
		<list>
			<value>bbb</value>
			<ref bean="user"></ref>
		</list>
	</property>
</bean>
3)Array数组注入
public class UserDaoImpl implements UserDao {


	private Object[] array;
	public void setArray(Object[] array) {


		this.array = array;
	}
	public void save() {


		System.out.println(Arrays.toString(array));
		System.out.println("保存成功了...");
	}
}
<bean id="user" class="com.lagou.domain.User">
	<property name="username" value="jack"/>
	<property name="age" value="18"/>
</bean>
<bean id="userDao" class="com.lagou.dao.impl.UserDaoImpl">
	<property name="array">
		<array>
			<value>ccc</value>
			<ref bean="user"></ref>
		</array>
	</property>
</bean>
4)Map集合注入
public class UserDaoImpl implements UserDao {


	private Map<String, Object> map;
	public void setMap(Map<String, Object> map) {


		this.map = map;
	}
	public void save() {


		System.out.println(map);
		System.out.println("保存成功了...");
	}
}
<bean id="user" class="com.lagou.domain.User">
	<property name="username" value="jack"/>
	<property name="age" value="18"/>
</bean>
<bean id="userDao" class="com.lagou.dao.impl.UserDaoImpl">
	<property name="map">
		<map>
			<entry key="k1" value="ddd"/>
			<entry key="k2" value-ref="user"></entry>
		</map>
	</property>
</bean>
5)Properties配置注入
public class UserDaoImpl implements UserDao {


	private Properties properties;
	public void setProperties(Properties properties) {


		this.properties = properties;
	}
	public void save() {


		System.out.println(properties);
		System.out.println("保存成功了...");
	}
}
<bean id="userDao" class="com.lagou.dao.impl.UserDaoImpl">
	<property name="properties">
		<props>
			<prop key="k1">v1</prop>
			<prop key="k2">v2</prop>
			<prop key="k3">v3</prop>
		</props>
	</property>
</bean>
5.8 配置文件模块化
实际开发中,Spring的配置内容非常多,这就导致Spring配置很繁杂且体积很大,所以,可以将部分配置拆解到其他配置文件中,也就是所谓的配置文件模块化。
1)并列的多个配置文件
ApplicationContext act = new ClassPathXmlApplicationContext("beans1.xml","beans2.xml","...");
2)主从配置文件
<import resource="applicationContext-xxx.xml"/
注意:
- 同一个xml中不能出现相同名称的bean,如果出现会报错
- 多个xml如果出现相同名称的bean,不会报错,但是后加载的会覆盖前加载的bean
5.9 知识小结
Spring的重点配置
<bean>标签:创建对象并放到spring的IOC容器
	id属性:在容器中Bean实例的唯一标识,不允许重复
	class属性:要实例化的Bean的全限定名
	scope属性:Bean的作用范围,常用是Singleton(默认)和prototype
<constructor-arg>标签:属性注入
	name属性:属性名称
	value属性:注入的普通属性值
	ref属性:注入的对象引用值
<property>标签:属性注入
	name属性:属性名称
	value属性:注入的普通属性值
	ref属性:注入的对象引用值
<list>
<set>
<array>
<map>
<props>
<import>标签:导入其他的Spring的分文件
六 DbUtils(IOC实战)
6.1 DbUtils是什么?
DbUtils是Apache的一款用于简化Dao代码的工具类,它底层封装了JDBC技术。
核心对象
QueryRunner queryRunner = new QueryRunner(DataSource dataSource);
核心方法
int update(); 执行增、删、改语句
T query(); 执行查询语句
ResultSetHandler<T> 这是一个接口,主要作用是将数据库返回的记录封装到实体对象
举个栗子
查询数据库所有账户信息到Account实体中
public class DbUtilsTest {


	@Test
	public void findAllTest() throws Exception {


		// 创建DBUtils工具类,传入连接池
		QueryRunner queryRunner = new QueryRunner(JdbcUtils.getDataSource());
		// 编写sql
		String sql = "select * from account";
		// 执行sql
		List<Account> list = queryRunner.query(sql, new BeanListHandler<Account> (Account.class));
		// 打印结果
		for (Account account : list) {


			System.out.println(account);
		}
	}
}
6.2 Spring的xml整合DbUtils
6.1 介绍
需求 : 基于Spring的xml配置实现账户的CRUD案例
步骤分析
1. 准备数据库环境
2. 创建java项目,导入坐标
3. 编写Account实体类
4. 编写AccountDao接口和实现类
5. 编写AccountService接口和实现类
6. 编写spring核心配置文件
7. 编写测试代码
6.2 实现
1)准备数据库环境
CREATE DATABASE `spring_db`;
USE `spring_db`;
CREATE TABLE `account` (
`id` int(11) NOT NULL AUTO_INCREMENT,
`name` varchar(32) DEFAULT NULL,
`money` double DEFAULT NULL,
PRIMARY KEY (`id`)
) ;
insert into `account`(`id`,`name`,`money`) values (1,'tom',1000),(2,'jerry',1000);
2)创建java项目,导入坐标
<dependencies>
<dependency>
<groupId>mysql</groupId>
<artifactId>mysql-connector-java</artifactId>
<version>5.1.47</version>
</dependency>
<dependency>
<groupId>com.alibaba</groupId>
<artifactId>druid</artifactId>
<version>1.1.9</version>
</dependency>
<dependency>
<groupId>commons-dbutils</groupId>
<artifactId>commons-dbutils</artifactId>
<version>1.6</version>
</dependency>
<dependency>
<groupId>org.springframework</groupId>
<artifactId>spring-context</artifactId>
<version>5.1.5.RELEASE</version>
</dependency>
<dependency>
<groupId>junit</groupId>
<artifactId>junit</artifactId>
<version>4.12</version>
</dependency>
</dependencies>
3)编写Account实体类
public class Account {
private Integer id;
private String name;
private Double money;
}
4)编写AccountDao接口和实现类
public interface AccountDao {
public List<Account> findAll();
public Account findById(Integer id);
public void save(Account account);
public void update(Account account);
public void delete(Integer id);
}
public class AccountDaoImpl implements AccountDao {
private QueryRunner queryRunner;
public void setQueryRunner(QueryRunner queryRunner) {
this.queryRunner = queryRunner;
}
@Override
public List<Account> findAll() {
List<Account> list = null;
// 编写sql
String sql = "select * from account";
try {
// 执行sql
list = queryRunner.query(sql, new BeanListHandler<Account> (Account.class));
} catch (SQLException e) {
e.printStackTrace();
}
return list;
}
@Override
public Account findById(Integer id) {
Account account = null;
// 编写sql
String sql = "select * from account where id = ?";
try {
// 执行sql
account = queryRunner.query(sql, new BeanHandler<Account> (Account.class), id);
} catch (SQLException e) {
e.printStackTrace();
}
return account;
}
@Override
public void save(Account account) {
// 编写sql
String sql = "insert into account values(null,?,?)";
// 执行sql
try {
queryRunner.update(sql, account.getName(), account.getMoney());
} catch (SQLException e) {
e.printStackTrace();
}
}
@Override
public void update(Account account) {
// 编写sql
String sql = "update account set name = ?,money = ? where id = ?";
// 执行sql
try {
queryRunner.update(sql, account.getName(),
account.getMoney(),account.getId());
} catch (SQLException e) {
catch (SQLException e) {
e.printStackTrace();
}
}
@Override
public void delete(Integer id) {
// 编写sql
String sql = "delete from account where id = ?";
// 执行sql
try {
queryRunner.update(sql, id);
} catch (SQLException e) {
e.printStackTrace();
}
}
}
5)编写AccountService接口和实现类
public interface AccountService {
public List<Account> findAll();
public Account findById(Integer id);
public void save(Account account);
public void update(Account account);
public void delete(Integer id);
}
public class AccountServiceImpl implements AccountService {
private AccountDao accountDao;
public void setAccountDao(AccountDao accountDao) {
this.accountDao = accountDao;
}
@Override
public List<Account> findAll() {
return accountDao.findAll();
}
@Override
public Account findById(Integer id) {
return accountDao.findById(id);
}
@Override
public void save(Account account) {
accountDao.save(account);
}
@Override
public void update(Account account) {
accountDao.update(account);
}
@Override
public void delete(Integer id) {
accountDao.delete(id);
}
}
6)编写spring核心配置文件
applicationContext.xml
<?xml version="1.0" encoding="UTF-8"?>
<beans xmlns="http://www.springframework.org/schema/beans"
xmlns:xsi="http://www.w3.org/2001/XMLSchema-instance"
xsi:schemaLocation="
http://www.springframework.org/schema/beans
http://www.springframework.org/schema/beans/spring-beans.xsd">
<!--把数据库连接池交给IOC容器-->
<bean id="dataSource" class="com.alibaba.druid.pool.DruidDataSource">
<property name="driverClassName" value="com.mysql.jdbc.Driver">
</property>
<property name="url" value="jdbc:mysql://localhost:3306/spring_db">
</property>
<property name="username" value="root"></property>
<property name="password" value="root"></property>
</bean>
<!--把QueryRunner交给IOC容器-->
<bean id="queryRunner" class="org.apache.commons.dbutils.QueryRunner">
<constructor-arg name="ds" ref="dataSource"></constructor-arg>
</bean>
<!--把AccountDao交给IOC容器-->
<bean id="accountDao" class="com.lagou.dao.impl.AccountDaoImpl">
<property name="queryRunner" ref="queryRunner"></property>
</bean>
<!--把AccountService交给IOC容器-->
<bean id="accountService" class="com.lagou.service.impl.AccountServiceImpl">
<property name="accountDao" ref="accountDao"></property>
</bean>
</beans>
7)编写测试代码
public class AccountServiceTest {
ApplicationContext applicationContext = new ClassPathXmlApplicationContext("applicationContext.xml");
AccountService accountService = applicationContext.getBean(AccountService.class);
//测试保存
@Test
public void testSave() {
Account account = new Account();
account.setName("lucy");
account.setMoney(100d);
accountService.save(account);
}
//测试查询
@Test
public void testFindById() {
Account account = accountService.findById(3);
System.out.println(account);
}
//测试查询所有
@Test
public void testFindAll() {
List<Account> accountList = accountService.findAll();
for (Account account : accountList) {
System.out.println(account);
}
}
//测试修改
@Test
public void testUpdate() {
Account account = new Account();
account.setId(3);
account.setName("jack");
account.setMoney(2000d);
accountService.update(account);
}
//测试删除
@Test
public void testDelete() {
accountService.delete(3);
}
}
8)抽取jdbc配置文件
applicationContext.xml加载jdbc.properties配置文件获得连接信息。
首先,需要引入context命名空间和约束路径:
* 命名空间:
xmlns:context="http://www.springframework.org/schema/context"
* 约束路径:
http://www.springframework.org/schema/context
http://www.springframework.org/schema/context/spring-context.xsd
<context:property-placeholder location="classpath:jdbc.properties"/>
<bean id="dataSource" class="com.alibaba.druid.pool.DruidDataSource">
<property name="driverClassName" value="${jdbc.driver}"></property>
<property name="url" value="${jdbc.url}"></property>
<property name="username" value="${jdbc.username}"></property>
<property name="password" value="${jdbc.password}"></property>
</bean>
6.3 知识小结
* DataSource的创建权交由Spring容器去完成
* QueryRunner的创建权交由Spring容器去完成,使用构造方法传递DataSource
* Spring容器加载properties文件
<context:property-placeholder locati
七 Spring注解开发
Spring是轻代码而重配置的框架,配置比较繁重,影响开发效率,所以注解开发是一种趋势,注解代替xml配置文件可以简化配置,提高开发效率。
7.1 Spring常用注解
7.1.1 介绍
Spring常用注解主要是替代 <bean> 的配置
| 注解 | 说明 |
|---|---|
| @Component | 使用在类上用于实例化Bean |
| @Controller | 使用在web层类上用于实例化Bean |
| @Service | 使用在service层类上用于实例化Bean |
| @Repository | 使用在dao层类上用于实例化Bean |
| @Autowired | 使用在字段上用于根据类型依赖注入 |
| @Qualifier | 结合@Autowired一起使用,根据名称进行依赖注入 |
| @Resource | 相当于@Autowired+@Qualifier,按照名称进行注入 |
| @Value | 注入普通属性 |
| @Scope | 标注Bean的作用范围 |
| @PostConstruct | 使用在方法上标注该方法是Bean的初始化方法 |
| @PreDestroy | 使用在方法上标注该方法是Bean的销毁方法 |

说明:
JDK11以后完全移除了javax扩展导致不能使用@resource注解
需要maven引入依赖
<dependency>
<groupId>javax.annotation</groupId>
<artifactId>javax.annotation-api</artifactId>
<version>1.3.2</version>
</dependency>
注意
使用注解进行开发时,需要在applicationContext.xml中配置组件扫描,作用是指定哪个包及其子包下的Bean需要进行扫描以便识别使用注解配置的类、字段和方法。
<!--注解的组件扫描-->
<context:component-scan base-package="com.lagou"></context:component-scan>
7.1.2 实现
1)Bean实例化(IOC)
<bean id="userDao" class="com.lagou.dao.impl.UserDaoImpl"></bean>
使用@Compont或@Repository标识UserDaoImpl需要Spring进行实例化。
// @Component(value = "userDao")
@Repository // 如果没有写value属性值,Bean的id为:类名首字母小写
public class UserDaoImpl implements UserDao {
}
2)属性依赖注入(DI)
<bean id="userService" class="com.lagou.service.impl.UserServiceImpl">
<property name="userDao" ref="userDaoImpl"/>
</bean>
使用@Autowired或者@Autowired+@Qulifier或者@Resource进行userDao的注入
@Service
public class UserServiceImpl implements UserService {
@Autowired
private UserDao userDao;
// <property name="userDao" ref="userDaoImpl"/>
// @Autowired
// @Qualifier("userDaoImpl")
// @Resource(name = "userDaoImpl")
public void setUserDao(UserDao userDao) {
this.userDao = userDao;
}
}
3)@Value
使用@Value进行字符串的注入,结合SPEL表达式获得配置参数
@Service
public class UserServiceImpl implements UserService {
@Value("注入普通数据")
private String str;
@Value("${jdbc.driver}")
private String driver;
}
4)@Scope
<bean scope=""/>
使用@Scope标注Bean的范围
@Service
@Scope("singleton")
public class UserServiceImpl implements UserService {
{
}
5)Bean生命周期
<bean init-method="init" destroy-method="destory" />
使用@PostConstruct标注初始化方法,使用@PreDestroy标注销毁方法
@PostConstruct
public void init(){
System.out.println("初始化方法....");
}
@PreDestroy
public void destroy(){
System.out.println("销毁方法.....");
}
7.2 Spring常用注解整合DbUtils
步骤分析
1. 拷贝xml配置项目,改为注解配置项目
2. 修改AccountDaoImpl实现类
3. 修改AccountServiceImpl实现类
4. 修改spring核心配置文件
5. 编写测试代码
1)拷贝xml配置项目,改为常用注解配置项目
过程略…
2)修改AccountDaoImpl实现类
@Repository
public class AccountDaoImpl implements AccountDao {
@Autowired
private QueryRunner queryRunner;
....
}
3)修改AccountServiceImpl实现类
@Service
public class AccountServiceImpl implements AccountService {
@Autowired
private AccountDao accountDao;
....
}
4)修改spring核心配置文件
<?xml version="1.0" encoding="UTF-8"?>
<beans xmlns="http://www.springframework.org/schema/beans"
xmlns:xsi="http://www.w1.org/2001/XMLSchema-instance"
xmlns:context="http://www.springframework.org/schema/context"
xsi:schemaLocation="
http://www.springframework.org/schema/beans
http://www.springframework.org/schema/beans/spring-beans.xsd
http://www.springframework.org/schema/context
http://www.springframework.org/schema/context/spring-context.xsd">
<!--注解的组件扫描-->
<context:component-scan base-package="com.lagou"></context:component-scan>
<!--加载jdbc配置文件-->
<context:property-placeholder location="classpath:jdbc.properties">
</context:property-placeholder>
<!--把数据库连接池交给IOC容器-->
<bean id="dataSource" class="com.alibaba.druid.pool.DruidDataSource">
<property name="driverClassName" value="${jdbc.driver}"></property>
<property name="url" value="${jdbc.url}"></property>
<property name="username" value="${jdbc.username}"></property>
<property name="password" value="${jdbc.password}"></property>
</bean>
<!--把QueryRunner交给IOC容器-->
<bean id="queryRunner" class="org.apache.commons.dbutils.QueryRunner">
<constructor-arg name="ds" ref="dataSource"></constructor-arg>
</bean>
</beans>
5)编写测试代码
public class AccountServiceTest {
ApplicationContext applicationContext = new lassPathXmlApplicationContext("applicationContext.xml");
AccountService accountService = applicationContext.getBean(AccountService.class);
//测试查询
@Test
public void findByIdTest() {
Account account = accountService.findById(3);
System.out.println(account);
}
}
7.3 Spring新注解
使用上面的注解还不能全部替代xml配置文件,还需要使用注解替代的配置如下:
* 非自定义的Bean的配置:<bean>
* 加载properties文件的配置:<context:property-placeholder>
* 组件扫描的配置:<context:component-scan>
* 引入其他文件:<import>
| 注解 | 说明 |
|---|---|
| @Configuration | 用于指定当前类是一个Spring 配置类,当创建容器时会从该类上加载注解 |
| @Bean | 使用在方法上,标注将该方法的返回值存储到 Spring 容器中 |
| @PropertySource | 用于加载 properties 文件中的配置 |
| @ComponentScan | 用于指定 Spring 在初始化容器时要扫描的包 |
| @Import | 用于导入其他配置类 |

7.4 Spring纯注解整合DbUtils
步骤分析
1. 编写Spring核心配置类
2. 编写数据库配置信息类
3. 编写测试代码
1)编写Spring核心配置类
@Configuration
@ComponentScan("com.lagou")
@Import(DataSourceConfig.class)
public class SpringConfig {
@Bean("queryRunner")
public QueryRunner getQueryRunner(@Autowired DataSource dataSource) {
return new QueryRunner(dataSource);
}
}
2)编写数据库配置信息类
@PropertySource("classpath:jdbc.properties")
public class DataSourceConfig {
@Value("${jdbc.driver}")
private String driver;
@Value("${jdbc.url}")
private String url;
@Value("${jdbc.username}")
private String username;
@Value("${jdbc.password}")
private String password;
@Bean("dataSource")
public DataSource getDataSource() {
DruidDataSource dataSource = new DruidDataSource();
dataSource.setDriverClassName(driver);
dataSource.setUrl(url);
dataSource.setUsername(username);
dataSource.setPassword(password);
return dataSource;
}
}
3)编写测试代码
public class AccountServiceTest {
ApplicationContext applicationContext = new AnnotationConfigApplicationContext(SpringConfig.class);
AccountService accountService = applicationContext.getBean(AccountService.class);
//测试查询
@Test
public void testFindById() {
Account account = accountService.findById(3);
System.out.println(account);
}
}
八 Spring整合Junit
8.1普通Junit测试问题
在普通的测试类中,需要开发者手动加载配置文件并创建Spring容器,然后通过Spring相关API获得Bean实例;如果不这么做,那么无法从容器中获得对象。
ApplicationContext applicationContext = new ClassPathXmlApplicationContext("applicationContext.xml");
AccountService accountService = applicationContext.getBean(AccountService.class);
我们可以让SpringJunit负责创建Spring容器来简化这个操作,开发者可以直接在测试类注入Bean实例;但是需要将配置文件的名称告诉它。
8.2 Spring整合Junit
步骤分析
1. 导入spring集成Junit的坐标
2. 使用@Runwith注解替换原来的运行器
3. 使用@ContextConfiguration指定配置文件或配置类
4. 使用@Autowired注入需要测试的对象
5. 创建测试方法进行测试
1)导入spring集成Junit的坐标
<!--此处需要注意的是,spring5 及以上版本要求 junit 的版本必须是 4.12 及以上-->
<dependency>
<groupId>org.springframework</groupId>
<artifactId>spring-test</artifactId>
<version>5.1.5.RELEASE</version>
</dependency>
<dependency>
<groupId>junit</groupId>
<artifactId>junit</artifactId>
<version>4.12</version>
<scope>test</scope>
</dependency>
2)使用@Runwith注解替换原来的运行器
@RunWith(SpringJUnit4ClassRunner.class)
public class SpringJunitTest {
}
3)使用@ContextConfiguration指定配置文件或配置类
@RunWith(SpringJUnit4ClassRunner.class)
//@ContextConfiguration(value = {"classpath:applicationContext.xml"}) 加载spring
核心配置文件
@ContextConfiguration(classes = {
SpringConfig.class}) // 加载spring核心配置类
public class SpringJunitTest {
}
4)使用@Autowired注入需要测试的对象
@RunWith(SpringJUnit4ClassRunner.class)
@ContextConfiguration(classes = {
SpringConfig.class})
public class SpringJunitTest {
@Autowired
private AccountService accountService;
}
5)创建测试方法进行测试
@RunWith(SpringJUnit4ClassRunner.class)
@ContextConfiguration(classes = {
SpringConfig.class})
public class SpringJunitTest {
@Autowired
private AccountService accountService;
//测试查询
@Test
public void testFindById() {
Account account = accountService.findById(3);
System.out.println(account);
}
}
测试报错: javax.net.ssl.SSLException
jdbc.proterties 里 &useSSL=false
https://www.dazhuanlan.com/2019/10/18/5da908368133a/
任务二:AOP
课程任务主要内容:
* 转账案例
* Proxy优化转账案例
* 初识AOP
* 基于XML的AOP开发
* 基于注解的AOP开发
* AOP优化转账案例
一 转账案例
需求 : 使用spring框架整合DBUtils技术,实现用户转账功能
1.1 基础功能
步骤分析
1. 创建java项目,导入坐标
2. 编写Account实体类
3. 编写AccountDao接口和实现类
4. 编写AccountService接口和实现类
5. 编写spring核心配置文件
6. 编写测试代码
1)创建java项目,导入坐标
<dependencies>
<dependency>
<groupId>mysql</groupId>
<artifactId>mysql-connector-java</artifactId>
<version>5.1.47</version>
</dependency>
<dependency>
<groupId>com.alibaba</groupId>
<artifactId>druid</artifactId>
<version>1.1.15</version>
</dependency>
<dependency>
<groupId>commons-dbutils</groupId>
<artifactId>commons-dbutils</artifactId>
<version>1.6</version>
</dependency>
<dependency>
<groupId>org.springframework</groupId>
<artifactId>spring-context</artifactId>
<version>5.1.5.RELEASE</version>
</dependency>
<dependency>
<groupId>org.springframework</groupId>
<artifactId>spring-test</artifactId>
<version>5.1.5.RELEASE</version>
</dependency>
<dependency>
<groupId>junit</groupId>
<artifactId>junit</artifactId>
<version>4.12</version>
</dependency>
</dependencies>
2) 编写Account实体类
public class Account {
private Integer id;
private String name;
private Double money;
// setter getter....
}
3)编写AccountDao接口和实现类
public interface AccountDao {
// 转出操作
public void out(String outUser, Double money);
// 转入操作
public void in(String inUser, Double money);
}
@Repository
public class AccountDaoImpl implements AccountDao {
@Autowired
private QueryRunner queryRunner;
@Override
public void out(String outUser, Double money) {
try {
queryRunner.update("update account set money=money-? where name=?", money, outUser);
} catch (SQLException e) {
e.printStackTrace();
}
}
@Override
public void in(String inUser, Double money) {
try {
queryRunner.update("update account set money=money+? where name=?", money, inUser);
} catch (SQLException e) {
e.printStackTrace();
}
}
}
4)编写AccountService接口和实现类
public interface AccountService {
public void transfer(String outUser, String inUser, Double money);
}
@Service
public class AccountServiceImpl implements AccountService {
@Autowired
private AccountDao accountDao;
@Override
public void transfer(String outUser, String inUser, Double money) {
accountDao.out(outUser, money);
accountDao.in(inUser, money);
}
}
5)编写spring核心配置文件
<?xml version="1.0" encoding="UTF-8"?>
<beans xmlns="http://www.springframework.org/schema/beans"
xmlns:xsi="http://www.w3.org/2001/XMLSchema-instance"
xmlns:context="http://www.springframework.org/schema/context"
xsi:schemaLocation="
http://www.springframework.org/schema/beans
http://www.springframework.org/schema/beans/spring-beans.xsd
http://www.springframework.org/schema/context
http://www.springframework.org/schema/context/spring-context.xsd">
<!--开启组件扫描-->
<context:component-scan base-package="com.lagou"/>
<!--加载jdbc配置文件-->
<context:property-placeholder location="classpath:jdbc.properties"/>
<!--把数据库连接池交给IOC容器-->
<bean id="dataSource" class="com.alibaba.druid.pool.DruidDataSource">
<property name="driverClassName" value="${jdbc.driver}"></property>
<property name="url" value="${jdbc.url}"></property>
<property name="username" value="${jdbc.username}"></property>
<property name="password" value="${jdbc.password}"></property>
</bean>
<!--把QueryRunner交给IOC容器-->
<bean id="queryRunner" class="org.apache.commons.dbutils.QueryRunner">
<constructor-arg name="ds" ref="dataSource"></constructor-arg>
</bean>
</beans>
6)编写测试代码
@RunWith(SpringJUnit4ClassRunner.class)
@ContextConfiguration("classpath:applicationContext.xml")
public class AccountServiceTest {
@Autowired
private AccountService accountService;
@Test
public void testTransfer() throws Exception {
accountService.transfer("tom", "jerry", 100d);
}
}
7)问题分析
上面的代码事务在dao层,转出转入操作都是一个独立的事务,但实际开发,应该把业务逻辑控制在一个事务中,所以应该将事务挪到service层。
1.2 传统事务
步骤分析
1. 编写线程绑定工具类
2. 编写事务管理器
3. 修改service层代码
4. 修改dao层代码
1)编写线程绑定工具类
/**
* 连接工具类,从数据源中获取一个连接,并将实现和线程的绑定
*/
@Component
public class ConnectionUtils {
private ThreadLocal<Connection> threadLocal = new ThreadLocal<>();
@Autowired
private DataSource dataSource;
/**
* 获取当前线程上的连接
*
* @return Connection
*/
public Connection getThreadConnection() {
// 1.先从ThreadLocal上获取
Connection connection = threadLocal.get();
// 2.判断当前线程是否有连接
if (connection == null) {
try {
// 3.从数据源中获取一个连接,并存入到ThreadLocal中
connection = dataSource.getConnection();
threadLocal.set(connection);
} catch (SQLException e) {
e.printStackTrace();
}
}
return connection;
}
/**
* 解除当前线程的连接绑定
*/
public void removeThreadConnection() {
threadLocal.remove();
}
}
2)编写事务管理器
/**
* 事务管理器工具类,包含:开启事务、提交事务、回滚事务、释放资源
*/
@Component
public class TransactionManager {
@Autowired
private ConnectionUtils connectionUtils;
public void beginTransaction() {
try {
connectionUtils.getThreadConnection().setAutoCommit(false);
} catch (SQLException e) {
e.printStackTrace();
}
}
public void commit() {
try {
connectionUtils.getThreadConnection().commit();
} catch (SQLException e) {
e.printStackTrace();
}
}
public void rollback() {
try {
connectionUtils.getThreadConnection().rollback();
} catch (SQLException e) {
e.printStackTrace();
}
}
public void release() {
try {
connectionUtils.getThreadConnection().setAutoCommit(true); // 改回自
动提交事务
connectionUtils.getThreadConnection().close();// 归还到连接池
connectionUtils.removeThreadConnection();// 解除线程绑定
} catch (SQLException e) {
e.printStackTrace();
}
}
}

3)修改service层代码
@Service
public class AccountServiceImpl implements AccountService {
@Autowired
private AccountDao accountDao;
@Autowired
private TransactionManager transactionManager;
@Override
public void transfer(String outUser, String inUser, Double money) {
try {
// 1.开启事务
transactionManager.beginTransaction();
// 2.业务操作
accountDao.out(outUser, money);
int i = 1 / 0;
accountDao.in(inUser, money);
// 3.提交事务
transactionManager.commit();
} catch (Exception e) {
e.printStackTrace();
// 4.回滚事务
transactionManager.rollback();
} finally {
// 5.释放资源
transactionManager.release();
}
}
}
4)修改dao层代码
@Repository
public class AccountDaoImpl implements AccountDao {
@Autowired
private QueryRunner queryRunner;
@Autowired
private ConnectionUtils connectionUtils;
@Override
public void out(String outUser, Double money) {
try {
queryRunner.update(connectionUtils.getThreadConnection(), "update
account set money=money-? where name=?", money, outUser);
} catch (SQLException e) {
e.printStackTrace();
}
}
@Override
public void in(String inUser, Double money) {
try {
queryRunner.update(connectionUtils.getThreadConnection(), "update
account set money=money+? where name=?", money, inUser);
} catch (SQLException e) {
e.printStackTrace();
}
}
}
5)问题分析
上面代码,通过对业务层改造,已经可以实现事务控制了,但是由于我们添加了事务控制,也产生了一个新的问题: 业务层方法变得臃肿了,里面充斥着很多重复代码。并且业务层方法和事务控制方法耦合了,违背了面向对象的开发思想。
二 Proxy优化转账案例
我们可以将业务代码和事务代码进行拆分,通过动态代理的方式,对业务方法进行事务的增强。这样就不会对业务层产生影响,解决了耦合性的问题啦!
常用的动态代理技术
JDK 代理 : 基于接口的动态代理技术·:利用拦截器(必须实现invocationHandler)加上反射机制生成一个代理接口的匿名类,在调用具体方法前调用InvokeHandler来处理,从而实现方法增强
CGLIB代理:基于父类的动态代理技术:动态生成一个要代理的子类,子类重写要代理的类的所有不是final的方法。在子类中采用方法拦截技术拦截所有的父类方法的调用,顺势织入横切逻辑,对方法进行增强

2.1 JDK动态代理方式
Jdk工厂类
@Component
public class JdkProxyFactory {
@Autowired
private AccountService accountService;
@Autowired
private TransactionManager transactionManager;
public AccountService createAccountServiceJdkProxy() {
AccountService accountServiceProxy = null;
accountServiceProxy = (AccountService) Proxy.newProxyInstance(
accountService.getClass().getClassLoader(),
accountService.getClass().getInterfaces(),
new InvocationHandler() {
@Override
public Object invoke(Object proxy, Method method, Object[] args) throws Throwable {
Object result = null;
try {
// 1.开启事务
transactionManager.beginTransaction();
// 2.业务操作
result = method.invoke(accountService, args);
// 3.提交事务
transactionManager.commit();
} catch (Exception e) {
e.printStackTrace();
// 4.回滚事务
transactionManager.rollback();
} finally {
// 5.释放资源
transactionManager.release();
}
return result;
}
});
return accountServiceProxy;
}
}
测试代码
@RunWith(SpringJUnit4ClassRunner.class)
@ContextConfiguration("classpath:applicationContext.xml")
public class AccountTest {
@Autowired
private JdkProxyFactory jdkProxyFactory;
@Test
public void testTransfer() throws Exception {
AccountService accountServiceJdkProxy =
jdkProxyFactory.createAccountServiceJdkProxy();
accountServiceJdkProxy.transfer("tom", "jerry", 100d);
}
}

2.2 CGLIB动态代理方式
Cglib工厂类
@Component
public class CglibProxyFactory {
@Autowired
private AccountService accountService;
@Autowired
private TransactionManager transactionManager;
public AccountService createAccountServiceCglibProxy() {
AccountService accountServiceProxy = null;
/*
* 参数一:目标对象的字节码对象
* 参数二:动作类,实现增强功能
* */
accountServiceProxy = (AccountService)
Enhancer.create(accountService.getClass(), new MethodInterceptor() {
@Override
public Object intercept(Object o, Method method, Object[] objects,
MethodProxy methodProxy) throws Throwable {
Object result = null;
try {
// 1.开启事务
transactionManager.beginTransaction();
// 2.业务操作
result = method.invoke(accountService, objects);
// 3.提交事务
transactionManager.commit();
} catch (Exception e) {
e.printStackTrace();
// 4.回滚事务
transactionManager.rollback();
} finally {
// 5.释放资源
transactionManager.release();
}
return result;
}
});
return accountServiceProxy;
}
}
测试代码
@RunWith(SpringJUnit4ClassRunner.class)
@ContextConfiguration("classpath:applicationContext.xml")
public class AccountServiceTest {
@Autowired
private CglibProxyFactory cglibProxyFactory;
@Test
public void testTransfer() throws Exception {
AccountService accountServiceCglibProxy = cglibProxyFactory.createAccountServiceCglibProxy();
accountServiceCglibProxy.transfer("tom", "jerry", 100d);
}
}
三 初识AOP
3.1 什么是AOP
AOP 为 Aspect Oriented Programming 的缩写,意思为面向切面编程
AOP 是 OOP(面向对象编程) 的延续,是软件开发中的一个热点,也是Spring框架中的一个重要内容,利用AOP可以对业务逻辑的各个部分进行隔离,从而使得业务逻辑各部分之间的耦合度降低,提高程序的可重用性,同时提高了开发的效率。
这样做的好处是:
- 在程序运行期间,在不修改源码的情况下对方法进行功能增强
- 逻辑清晰,开发核心业务的时候,不必关注增强业务的代码
- 减少重复代码,提高开发效率,便于后期维护
3.2 AOP底层实现
实际上,AOP 的底层是通过 Spring 提供的的动态代理技术实现的。在运行期间,Spring通过动态代理技术动态的生成代理对象,代理对象方法执行时进行增强功能的介入,在去调用目标对象的方法,从而完成功能的增强。
3.3 AOP相关术语
Spring 的 AOP 实现底层就是对上面的动态代理的代码进行了封装,封装后我们只需要对需要关注的部分进行代码编写,并通过配置的方式完成指定目标的方法增强。
在正式讲解 AOP 的操作之前,我们必须理解 AOP 的相关术语,常用的术语如下:
* Target(目标对象):代理的目标对象
* Proxy (代理):一个类被 AOP 织入增强后,就产生一个结果代理类
* Joinpoint(连接点):所谓连接点是指那些可以被拦截到的点。在spring中,这些点指的是方法,因为spring只支持方法类型的连接点
* Pointcut(切入点):所谓切入点是指我们要对哪些 Joinpoint 进行拦截的定义
* Advice(通知/ 增强):所谓通知是指拦截到 Joinpoint 之后所要做的事情就是通知
分类:前置通知、后置通知、异常通知、最终通知、环绕通知
* Aspect(切面):是切入点和通知(引介)的结合
* Weaving(织入):是指把增强应用到目标对象来创建新的代理对象的过程。spring采用动态代理织入,而AspectJ采用编译期织入和类装载期织入

3.4 AOP开发明确事项
3.4.1 开发阶段(我们做的)
- 编写核心业务代码(目标类的目标方法) 切入点
- 把公用代码抽取出来,制作成通知(增强功能方法) 通知
- 在配置文件中,声明切入点与通知间的关系,即切面
3.4.2 运行阶段(Spring框架完成的)
Spring 框架监控切入点方法的执行。一旦监控到切入点方法被运行,使用代理机制,动态创建目标对象的代理对象,根据通知类别,在代理对象的对应位置,将通知对应的功能织入,完成完整的代码逻辑运行。
3.4.3 底层代理实现
在 Spring 中,框架会根据目标类是否实现了接口来决定采用哪种动态代理的方式。
- 当bean实现接口时,会用JDK代理模式
- 当bean没有实现接口,用cglib实现( 可以强制使用cglib(在spring配置中加入aop:aspectjautoproxy proxyt-target-class=”true”/>)
3.5 知识小结
* aop:面向切面编程
* aop底层实现:基于JDK的动态代理 和 基于Cglib的动态代理
* aop的重点概念:
Pointcut(切入点):真正被增强的方法
Advice(通知/ 增强):封装增强业务逻辑的方法
Aspect(切面):切点+通知
Weaving(织入):将切点与通知结合,产生代理对象的过程
四 基于XML的AOP开发
4.1 快速入门
步骤分析
1. 创建java项目,导入AOP相关坐标
2. 创建目标接口和目标实现类(定义切入点)
3. 创建通知类及方法(定义通知)
4. 将目标类和通知类对象创建权交给spring
5. 在核心配置文件中配置织入关系,及切面
6. 编写测试代码
4.1.1 创建java项目,导入AOP相关坐标
<dependencies>
<!--导入spring的context坐标,context依赖aop-->
<dependency>
<groupId>org.springframework</groupId>
<artifactId>spring-context</artifactId>
<version>5.1.5.RELEASE</version>
</dependency>
<!-- aspectj的织入(切点表达式需要用到该jar包) -->
<dependency>
<groupId>org.aspectj</groupId>
<artifactId>aspectjweaver</artifactId>
<version>1.9.6</version>
<scope>runtime</scope>
</dependency>
<dependency>
<groupId>org.aspectj</groupId>
<artifactId>aspectjrt</artifactId>
<version>1.6.10</version>
</dependency>
<!--spring整合junit-->
<dependency>
<groupId>org.springframework</groupId>
<artifactId>spring-test</artifactId>
<version>5.1.5.RELEASE</version>
</dependency>
<dependency>
<groupId>junit</groupId>
<artifactId>junit</artifactId>
<version>4.12</version>
</dependency>
</dependencies>
4.1.2 创建目标接口和目标实现类
public interface AccountService {
public void transfer();
}
public class AccountServiceImpl implements AccountService {
@Override
public void transfer() {
System.out.println("转账业务...");
}
}
4.1.3 创建通知类
public class MyAdvice {
public void before() {
System.out.println("前置通知...");
}
}
4.1.4 将目标类和通知类对象创建权交给spring
<!--目标类交给IOC容器-->
<bean id="accountService" class="com.lagou.service.impl.AccountServiceImpl">
</bean>
<!--通知类交给IOC容器-->
<bean id="myAdvice" class="com.lagou.advice.MyAdvice"></bean>
4.1.5 在核心配置文件中配置织入关系,及切面
导入aop命名空间
xmlns:aop=“http://www.springframework.org/schema/aop”
http://www.springframework.org/schema/aop
http://www.springframework.org/schema/aop/spring-aop.xsd"
<?xml version="1.0" encoding="UTF-8"?>
<beans xmlns="http://www.springframework.org/schema/beans"
xmlns:xsi="http://www.w3.org/2001/XMLSchema-instance"
xmlns:aop="http://www.springframework.org/schema/aop"
xsi:schemaLocation="http://www.springframework.org/schema/beans
http://www.springframework.org/schema/beans/spring-beans.xsd
http://www.springframework.org/schema/aop
http://www.springframework.org/schema/aop/spring-aop.xsd">
<!--目标类交给IOC容器-->
<bean id="accountService" class="com.lagou.service.impl.AccountServiceImpl"></bean>
<!--通知类交给IOC容器-->
<bean id="myAdvice" class="com.lagou.advice.MyAdvice"></bean>
<aop:config>
<!--引入通知类-->
<aop:aspect ref="myAdvice">
<!--配置目标类的transfer方法执行时,使用通知类的before方法进行前置增强-->
<aop:before method="before" pointcut="execution(public void com.lagou.service.impl.AccountServiceImpl.transfer())"></aop:before>
</aop:aspect>
</aop:config>
</beans>
4.1.6 编写测试代码
@RunWith(SpringJUnit4ClassRunner.class)
@ContextConfiguration("classpath:applicationContext.xml")
class AccountServiceTest {
@Autowired
private AccountService accountService;
@Test
public void testTransfer() throws Exception {
accountService.transfer();
}
}
4.2 XML配置AOP详解
4.2.1 切点表达式
表达式语法:
execution([修饰符] 返回值类型 包名.类名.方法名(参数))
- 访问修饰符可以省略
- 返回值类型、包名、类名、方法名可以使用星号 * 代替,代表任意
- 包名与类名之间一个点 . 代表当前包下的类,两个点 … 表示当前包及其子包下的类
- 参数列表可以使用两个点 … 表示任意个数,任意类型的参数列表
例如:
execution(public void com.lagou.service.impl.AccountServiceImpl.transfer())
execution(void com.lagou.service.impl.AccountServiceImpl.*(..))
execution(* com.lagou.service.impl.*.*(..))
execution(* com.lagou.service..*.*(..))
切点表达式抽取
当多个增强的切点表达式相同时,可以将切点表达式进行抽取,在增强中使用 pointcut-ref 属性代替pointcut 属性来引用抽取后的切点表达式。
<aop:config>
<!--抽取的切点表达式-->
<aop:pointcut id="myPointcut" expression="execution(* com.lagou.service..*.*(..))"> </aop:pointcut>
<aop:aspect ref="myAdvice">
<aop:before method="before" pointcut-ref="myPointcut"></aop:before>
</aop:aspect>
</aop:config>
4.2.2 通知类型
通知的配置语法:
<aop:通知类型 method=“通知类中方法名” pointcut=“切点表达式"></aop:通知类型>
| 名称 | 标签 | 说明 |
|---|---|---|
| 前置通知 | <aop:before> | 用于配置前置通知。指定增强的方法在切入点方法之前执行 |
| 后置通知 | <aop:afterReturning> | 用于配置后置通知。指定增强的方法在切入点方法之后执行 |
| 异常通知 | <aop:afterThrowing> | 用于配置异常通知。指定增强的方法出现异常后执行 |
| 最终通知 | <aop:after> | 用于配置最终通知。无论切入点方法执行时是否有异常,都会执行 |
| 环绕通知 | <aop:around> | 用于配置环绕通知。开发者可以手动控制增强代码在什么时候执行 |
注意:通常情况下,环绕通知都是独立使用的
4.3 知识小结
* aop织入的配置
<aop:config>
<aop:aspect ref=“通知类”>
<aop:before method=“通知方法名称” pointcut=“切点表达式"></aop:before>
</aop:aspect>
</aop:config>
* 通知的类型
前置通知、后置通知、异常通知、最终通知
环绕通知
* 切点表达式
execution([修饰符] 返回值类型 包名.类名.方法名(参数))
五 基于注解的AOP开发
5.1 快速入门
步骤分析
1. 创建java项目,导入AOP相关坐标
2. 创建目标接口和目标实现类(定义切入点)
3. 创建通知类(定义通知)
4. 将目标类和通知类对象创建权交给spring
5. 在通知类中使用注解配置织入关系,升级为切面类
6. 在配置文件中开启组件扫描和 AOP 的自动代理
7. 编写测试代码
5.1.1 创建java项目,导入AOP相关坐标
<dependencies>
<!--导入spring的context坐标,context依赖aop-->
<dependency>
<groupId>org.springframework</groupId>
<artifactId>spring-context</artifactId>
<version>5.1.5.RELEASE</version>
</dependency>
<!-- aspectj的织入 -->
<dependency>
<groupId>org.aspectj</groupId>
<artifactId>aspectjweaver</artifactId>
<version>1.9.6</version>
<scope>runtime</scope>
</dependency>
<dependency>
<groupId>org.aspectj</groupId>
<artifactId>aspectjrt</artifactId>
<version>1.6.10</version>
</dependency>
<!--spring整合junit-->
<dependency>
<groupId>org.springframework</groupId>
<artifactId>spring-test</artifactId>
<version>5.1.5.RELEASE</version>
</dependency>
<dependency>
<groupId>junit</groupId>
<artifactId>junit</artifactId>
<version>4.12</version>
</dependency>
</dependencies>
5.1.2 创建目标接口和目标实现类
public interface AccountService {
public void transfer();
}
public class AccountServiceImpl implements AccountService {
@Override
public void transfer() {
System.out.println("转账业务...");
}
}
5.1.3 创建通知类
public class MyAdvice {
public void before() {
System.out.println("前置通知...");
}
}
5.1.4 将目标类和通知类对象创建权交给spring
@Service
public class AccountServiceImpl implements AccountService {
}
@Component
public class MyAdvice {
}
5.1.5 在通知类中使用注解配置织入关系,升级为切面类
@Component
@Aspect
public class MyAdvice {
@Before("execution(* com.lagou..*.*(..))")
public void before() {
System.out.println("前置通知...");
}
}
5.1.6 在配置文件中开启组件扫描和 AOP 的自动代理
<!--组件扫描-->
<context:component-scan base-package="com.lagou"/>
<!--aop的自动代理-->
<aop:aspectj-autoproxy></aop:aspectj-autoproxy>
5.1.7 编写测试代码
@RunWith(SpringJUnit4ClassRunner.class)
@ContextConfiguration("classpath:applicationContext.xml")
class AccountServiceTest {
@Autowired
private AccountService accountService;
@Test
public void testTransfer() throws Exception {
accountService.transfer();
}
}
5.2 注解配置AOP详解
5.2.1 切点表达式
切点表达式的抽取
@Component
@Aspect
public class MyAdvice {
@Pointcut("execution(* com.lagou..*.*(..))")
public void myPoint(){
}
@Before("MyAdvice.myPoint()")
public void before() {
System.out.println("前置通知...");
}
}
5.2.2 通知类型
通知的配置语法:@通知注解(“切点表达式")
| 名称 | 标签 | 说明 |
|---|---|---|
| 前置通知 | @Before | 用于配置前置通知。指定增强的方法在切入点方法之前执行 |
| 后置通知 | @AfterReturning | 用于配置后置通知。指定增强的方法在切入点方法之后执行 |
| 异常通知 | @AfterThrowing | 用于配置异常通知。指定增强的方法出现异常后执行 |
| 最终通知 | @After | 用于配置最终通知。无论切入点方法执行时是否有异常,都会执行 |
| 环绕通知 | @Around | 用于配置环绕通知。开发者可以手动控制增强代码在什么时候执行 |
注意:
当前四个通知组合在一起时,执行顺序如下:
@Before -> @After -> @AfterReturning(如果有异常:@AfterThrowing)
5.2.3 纯注解配置
@Configuration
@ComponentScan("com.lagou")
@EnableAspectJAutoProxy //替代 <aop:aspectj-autoproxy />
public class SpringConfig {
}
5.3 知识小结
* 使用@Aspect注解,标注切面类
* 使用@Before等注解,标注通知方法
* 使用@Pointcut注解,抽取切点表达式
* 配置aop自动代理 <aop:aspectj-autoproxy/> 或 @EnableAspectJAutoProxy
六 AOP优化转账案例
依然使用前面的转账案例,将两个代理工厂对象直接删除!改为spring的aop思想来实现
6.1 xml配置实现
1)配置文件
<?xml version="1.0" encoding="UTF-8"?>
<beans xmlns="http://www.springframework.org/schema/beans"
xmlns:xsi="http://www.w3.org/2001/XMLSchema-instance"
xmlns:aop="http://www.springframework.org/schema/aop"
xmlns:context="http://www.springframework.org/schema/context"
xsi:schemaLocation="
http://www.springframework.org/schema/beans
http://www.springframework.org/schema/beans/spring-beans.xsd
http://www.springframework.org/schema/aop
http://www.springframework.org/schema/aop/spring-aop.xsd
http://www.springframework.org/schema/context
http://www.springframework.org/schema/context/spring-context.xsd">
<!--开启组件扫描-->
<context:component-scan base-package="com.lagou"/>
<!--加载jdbc配置文件-->
<context:property-placeholder location="classpath:jdbc.properties"/>
<!--把数据库连接池交给IOC容器-->
<bean id="dataSource" class="com.alibaba.druid.pool.DruidDataSource">
<property name="driverClassName" value="${jdbc.driver}"></property>
<property name="url" value="${jdbc.url}"></property>
<property name="username" value="${jdbc.username}"></property>
<property name="password" value="${jdbc.password}"></property>
</bean>
<!--把QueryRunner交给IOC容器-->
<bean id="queryRunner" class="org.apache.commons.dbutils.QueryRunner">
<constructor-arg name="ds" ref="dataSource"></constructor-arg>
</bean>
<!--AOP配置-->
<aop:config>
<!--切点表达式-->
<aop:pointcut id="myPointcut" expression="execution(*com.lagou.service..*.*(..))"/>
<!-- 切面配置 -->
<aop:aspect ref="transactionManager">
<aop:before method="beginTransaction" pointcut-ref="myPointcut"/>
<aop:after-returning method="commit" pointcut-ref="myPointcut"/>
<aop:after-throwing method="rollback" pointcut-ref="myPointcut"/>
<aop:after method="release" pointcut-ref="myPointcut"/>
</aop:aspect>
</aop:config>
</beans>
2)事务管理器(通知)
// 事务管理器工具类,包括:开启事务、提交事务、回滚事务、释放资源
@Component
public class TransactionManager {
@Autowired
ConnectionUtils connectionUtils;
public void begin(){
try {
connectionUtils.getThreadConnection().setAutoCommit(false);
} catch (SQLException e) {
e.printStackTrace();
}
}
public void commit(){
try {
connectionUtils.getThreadConnection().commit();
} catch (SQLException e) {
e.printStackTrace();
}
}
public void rollback(){
try {
connectionUtils.getThreadConnection().rollback();
} catch (SQLException e) {
e.printStackTrace();
}
}
public void release(){
try {
connectionUtils.getThreadConnection().setAutoCommit(true);
connectionUtils.getThreadConnection().close();
connectionUtils.removeThreadConnection();
} catch (SQLException e) {
e.printStackTrace();
}
}
}
6.2 注解配置实现
1)配置文件
<?xml version="1.0" encoding="UTF-8"?>
<beans xmlns="http://www.springframework.org/schema/beans"
xmlns:xsi="http://www.w3.org/2001/XMLSchema-instance"
xmlns:aop="http://www.springframework.org/schema/aop"
xmlns:context="http://www.springframework.org/schema/context"
xsi:schemaLocation="
http://www.springframework.org/schema/beans
http://www.springframework.org/schema/beans/spring-beans.xsd
http://www.springframework.org/schema/aop
http://www.springframework.org/schema/aop/spring-aop.xsd
http://www.springframework.org/schema/context
http://www.springframework.org/schema/context/spring-context.xsd">
<!--开启组件扫描-->
<context:component-scan base-package="com.lagou"/>
<!--开启AOP注解支持-->
<aop:aspectj-autoproxy/>
<!--加载jdbc配置文件-->
<context:property-placeholder location="classpath:jdbc.properties"/>
<!--把数据库连接池交给IOC容器-->
<bean id="dataSource" class="com.alibaba.druid.pool.DruidDataSource">
<property name="driverClassName" value="${jdbc.driver}"></property>
<property name="url" value="${jdbc.url}"></property>
<property name="username" value="${jdbc.username}"></property>
<property name="password" value="${jdbc.password}"></property>
</bean>
<!--把QueryRunner交给IOC容器-->
<bean id="queryRunner" class="org.apache.commons.dbutils.QueryRunner">
<constructor-arg name="ds" ref="dataSource"></constructor-arg>
</bean>
</beans>
2)事务管理器(通知)
@Component
@Aspect
public class TransactionManager {
@Autowired
ConnectionUtils connectionUtils;
@Around("execution(* com.lagou.serivce..*.*(..))")
public Object around(ProceedingJoinPoint pjp) {
Object object = null;
try {
// 开启事务
connectionUtils.getThreadConnection().setAutoCommit(false);
// 业务逻辑
pjp.proceed();
// 提交事务
connectionUtils.getThreadConnection().commit();
} catch (Throwable throwable) {
throwable.printStackTrace();
// 回滚事务
try {
connectionUtils.getThreadConnection().rollback();
} catch (SQLException e) {
e.printStackTrace();
}
} finally {
try {
connectionUtils.getThreadConnection().setAutoCommit(true);
connectionUtils.getThreadConnection().close();
connectionUtils.removeThreadConnection();
} catch (SQLException e) {
e.printStackTrace();
}
}
return object;
}
}
任务三:Spring JDBCTemplate & 声明式事务
课程任务主要内容:
* Spring的JdbcTemplate
* Spring的事务
* Spring集成web环境
一 Spring的JdbcTemplate
1.1 JdbcTemplate是什么?
JdbcTemplate是spring框架中提供的一个模板对象,是对原始繁琐的Jdbc API对象的简单封装。
核心对象
JdbcTemplate jdbcTemplate = new JdbcTemplate(DataSource dataSource);
核心方法
int update(); 执行增、删、改语句
List<T> query(); 查询多个
T queryForObject(); 查询一个
new BeanPropertyRowMapper<>(); 实现ORM映射封装
举个栗子
查询数据库所有账户信息到Account实体中
public class JdbcTemplateTest {
@Test
public void testFindAll() throws Exception {
// 创建核心对象
JdbcTemplate jdbcTemplate = new JdbcTemplate(JdbcUtils.getDataSource());
// 编写sql
String sql = "select * from account";
// 执行sql
List<Account> list = jdbcTemplate.query(sql, new BeanPropertyRowMapper<>(Account.class));
}
}
1.2 Spring整合JdbcTemplate
需求 : 基于Spring的xml配置实现账户的CRUD案例
步骤分析
1. 创建java项目,导入坐标
2. 编写Account实体类
3. 编写AccountDao接口和实现类
4. 编写AccountService接口和实现类
5. 编写spring核心配置文件
6. 编写测试代码
1)创建java项目,导入坐标
<dependencies>
<dependency>
<groupId>mysql</groupId>
<artifactId>mysql-connector-java</artifactId>
<version>5.1.47</version>
</dependency>
<dependency>
<groupId>com.alibaba</groupId>
<artifactId>druid</artifactId>
<version>1.1.15</version>
</dependency>
<dependency>
<groupId>org.springframework</groupId>
<artifactId>spring-context</artifactId>
<version>5.1.5.RELEASE</version>
</dependency>
<dependency>
<groupId>org.aspectj</groupId>
<artifactId>aspectjweaver</artifactId>
<version>1.9.6</version>
<scope>runtime</scope>
</dependency>
<dependency>
<groupId>org.aspectj</groupId>
<artifactId>aspectjrt</artifactId>
<version>1.6.10</version>
<scope>compile</scope>
</dependency>
<dependency>
<groupId>org.springframework</groupId>
<artifactId>spring-jdbc</artifactId>
<version>5.1.5.RELEASE</version>
</dependency>
<dependency>
<groupId>org.springframework</groupId>
<artifactId>spring-tx</artifactId>
<version>5.1.5.RELEASE</version>
</dependency>
<dependency>
<groupId>junit</groupId>
<artifactId>junit</artifactId>
<version>4.12</version>
</dependency>
<dependency>
<groupId>org.springframework</groupId>
<artifactId>spring-test</artifactId>
<version>5.1.5.RELEASE</version>
</dependency>
</dependencies>
2)编写Account实体类
public class Account {
private Integer id;
private String name;
private Double money;
}
3)编写AccountDao接口和实现类
public interface AccountDao {
public List<Account> findAll();
public Account findById(Integer id);
public void save(Account account);
public void update(Account account);
public void delete(Integer id);
}
@Repository
public class AccountDaoImpl implements AccountDao {
@Autowired
private JdbcTemplate jdbcTemplate;
@Override
public List<Account> findAll() {
// 编写sql
String sql = "select * from account";
// 执行sql
return jdbcTemplate.query(sql, new BeanPropertyRowMapper<>(Account.class));
}
@Override
public Account findById(Integer id) {
// 编写sql
String sql = "select * from account where id = ?";
// 执行sql
return jdbcTemplate.queryForObject(sql, new BeanPropertyRowMapper<>(Account.class),id);
}
@Override
public void save(Account account) {
// 编写sql
String sql = "insert into account values(null,?,?)";
// 执行sql
jdbcTemplate.update(sql, account.getName(), account.getMoney());
}
@Override
public void update(Account account) {
// 编写sql
String sql = "update account set name = ?,money = ? where id = ?";
// 执行sql
jdbcTemplate.update(sql, account.getName(),
account.getMoney(),account.getId());
}
@Override
public void delete(Integer id) {
// 编写sql
String sql = "delete from account where id = ?";
// 执行sql
jdbcTemplate.update(sql, id);
}
}
4)编写AccountService接口和实现类
public interface AccountService {
public List<Account> findAll();
public Account findById(Integer id);
public void save(Account account);
public void update(Account account);
public void delete(Integer id);
}
@Service
public class AccountServiceImpl implements AccountService {
@Autowired
private AccountDao accountDao;
@Override
public List<Account> findAll() {
return accountDao.findAll();
}
@Override
public Account findById(Integer id) {
return accountDao.findById(id);
}
@Override
public void save(Account account) {
accountDao.save(account);
}
@Override
public void update(Account account) {
accountDao.update(account);
}
@Override
public void delete(Integer id) {
accountDao.delete(id);
}
}
5)编写spring核心配置文件
<?xml version="1.0" encoding="UTF-8"?>
<beans xmlns="http://www.springframework.org/schema/beans"
xmlns:xsi="http://www.w3.org/2001/XMLSchema-instance"
xmlns:context="http://www.springframework.org/schema/context"
xsi:schemaLocation="
http://www.springframework.org/schema/beans
http://www.springframework.org/schema/beans/spring-beans.xsd
http://www.springframework.org/schema/context
http://www.springframework.org/schema/context/spring-context.xsd">
<context:component-scan base-package="com.lagou"/>
<context:property-placeholder location="classpath:jdbc.properties"/>
<bean id="dataSource" class="com.alibaba.druid.pool.DruidDataSource">
<property name="driverClassName" value="${jdbc.driver}"></property>
<property name="url" value="${jdbc.url}"></property>
<property name="username" value="${jdbc.username}"></property>
<property name="password" value="${jdbc.password}"></property>
</bean>
<bean id="jdbcTemplate" class="org.springframework.jdbc.core.JdbcTemplate">
<constructor-arg name="dataSource" ref="dataSource"></constructor-arg>
</bean>
</beans>
6)编写测试代码
@RunWith(SpringJUnit4ClassRunner.class)
@ContextConfiguration("classpath:applicationContext.xml")
public class AccountServiceTest {
@Autowired
private AccountService accountService;
//测试保存
@Test
public void testSave() {
Account account = new Account();
account.setName("lucy");
account.setMoney(100d);
accountService.save(account);
}
//测试查询
@Test
public void testFindById() {
Account account = accountService.findById(3);
System.out.println(account);
}
//测试查询所有
@Test
public void testFindAll() {
List<Account> accountList = accountService.findAll();
for (Account account : accountList) {
System.out.println(account);
}
}
//测试修改
@Test
public void testUpdate() {
Account account = new Account();
account.setId(3);
account.setName("rose");
account.setMoney(2000d);
accountService.update(account);
}
//测试删除
@Test
public void testDelete() {
accountService.delete(3);
}
}
1.3 实现转账案例
步骤分析
1. 创建java项目,导入坐标
2. 编写Account实体类
3. 编写AccountDao接口和实现类
4. 编写AccountService接口和实现类
5. 编写spring核心配置文件
6. 编写测试代码
1)创建java项目,导入坐标
<dependencies>
<dependency>
<groupId>mysql</groupId>
<artifactId>mysql-connector-java</artifactId>
<version>5.1.47</version>
</dependency>
<dependency>
<groupId>com.alibaba</groupId>
<artifactId>druid</artifactId>
<version>1.1.15</version>
</dependency>
<dependency>
<groupId>org.springframework</groupId>
<artifactId>spring-context</artifactId>
<version>5.1.5.RELEASE</version>
</dependency>
<dependency>
<groupId>org.aspectj</groupId>
<artifactId>aspectjweaver</artifactId>
<version>1.9.6</version>
<scope>runtime</scope>
</dependency>
<dependency>
<groupId>org.aspectj</groupId>
<artifactId>aspectjrt</artifactId>
<version>1.6.10</version>
<scope>compile</scope>
</dependency>
<dependency>
<groupId>org.springframework</groupId>
<artifactId>spring-jdbc</artifactId>
<version>5.1.5.RELEASE</version>
</dependency>
<dependency>
<groupId>org.springframework</groupId>
<artifactId>spring-tx</artifactId>
<version>5.1.5.RELEASE</version>
</dependency>
<dependency>
<groupId>junit</groupId>
<artifactId>junit</artifactId>
<version>4.12</version>
</dependency>
<dependency>
<groupId>org.springframework</groupId>
<artifactId>spring-test</artifactId>
<version>5.1.5.RELEASE</version>
</dependency>
</dependencies>
2)编写Account实体类
public class Account {
private Integer id;
private String name;
private Double money;
// setter getter....
}
3)编写AccountDao接口和实现类
public interface AccountDao {
public void out(String outUser, Double money);
public void in(String inUser, Double money);
}
@Repository
public class AccountDaoImpl implements AccountDao {
@Autowired
private JdbcTemplate jdbcTemplate;
@Override
public void out(String outUser, Double money) {
jdbcTemplate.update("update account set money = money - ? where name = ?", money, outUser);
}
@Override
public void in(String inUser, Double money) {
jdbcTemplate.update("update account set money = money + ? where name = ?", money, inUser);
}
}
4)编写AccountService接口和实现类
public interface AccountService {
public void transfer(String outUser, String inUser, Double money);
}
@Service
public class AccountServiceImpl implements AccountService {
@Autowired
private AccountDao accountDao;
@Override
public void transfer(String outUser, String inUser, Double money) {
accountDao.out(outUser, money);
accountDao.in(inUser, money);
}
}
5)编写spring核心配置文件
<?xml version="1.0" encoding="UTF-8"?>
<beans xmlns="http://www.springframework.org/schema/beans"
xmlns:xsi="http://www.w3.org/2001/XMLSchema-instance"
xmlns:context="http://www.springframework.org/schema/context"
xsi:schemaLocation="
http://www.springframework.org/schema/beans
http://www.springframework.org/schema/beans/spring-beans.xsd
http://www.springframework.org/schema/context
http://www.springframework.org/schema/context/spring-context.xsd">
<!--IOC注解扫描-->
<context:component-scan base-package="com.lagou"/>
<!--加载jdbc配置文件-->
<context:property-placeholder location="classpath:jdbc.properties"/>
<!--把数据库连接池交给IOC容器-->
<bean id="dataSource" class="com.alibaba.druid.pool.DruidDataSource">
<property name="driverClassName" value="${jdbc.driver}"></property>
<property name="url" value="${jdbc.url}"></property>
<property name="username" value="${jdbc.username}"></property>
<property name="password" value="${jdbc.password}"></property>
</bean>
<!--把JdbcTemplate交给IOC容器-->
<bean id="jdbcTemplate" class="org.springframework.jdbc.core.JdbcTemplate">
<constructor-arg name="dataSource" ref="dataSource"></constructor-arg>
</bean>
</beans>
6)编写测试代码
@RunWith(SpringJUnit4ClassRunner.class)
@ContextConfiguration("classpath:applicationContext.xml")
public class AccountServiceTest {
@Autowired
private AccountService accountService;
@Test
public void testTransfer() throws Exception {
accountService.transfer("tom", "jerry", 100d);
}
}
二 Spring的事务
2.1 Spring中的事务控制方式
Spring的事务控制可以分为编程式事务控制和声明式事务控制。
编程式
开发者直接把事务的代码和业务代码耦合到一起,在实际开发中不用。
声明式
开发者采用配置的方式来实现的事务控制,业务代码与事务代码实现解耦合,使用的AOP思想。
2.2 编程式事务控制相关对象【了解】
2.2.1 PlatformTransactionManager
PlatformTransactionManager接口,是spring的事务管理器,里面提供了我们常用的操作事务的方法。
| 方法 | 说明 |
|---|---|
| TransactionStatus getTransaction(TransactionDefinition definition); | 获取事务的状态信息 |
| void commit(TransactionStatus status); | 提交事务 |
| void rollback(TransactionStatus status); | 回滚事务 |
注意:
* PlatformTransactionManager 是接口类型,不同的 Dao 层技术则有不同的实现类。
* Dao层技术是jdbcTemplate或mybatis时:
DataSourceTransactionManager
* Dao层技术是hibernate时:
HibernateTransactionManager
* Dao层技术是JPA时:
JpaTransactionManager
2.2.2 TransactionDefinition
TransactionDefinition接口提供事务的定义信息(事务隔离级别、事务传播行为等等)
| 方法 | 说明 |
|---|---|
| int getIsolationLevel() | 获得事务的隔离级别 |
| int getPropogationBehavior() | 获得事务的传播行为 |
| int getTimeout() | 获得超时时间 |
| boolean isReadOnly() | 是否只读 |
1)事务隔离级别
设置隔离级别,可以解决事务并发产生的问题,如脏读、不可重复读和虚读(幻读)。
* ISOLATION_DEFAULT 使用数据库默认级别
* ISOLATION_READ_UNCOMMITTED 读未提交
* ISOLATION_READ_COMMITTED 读已提交
* ISOLATION_REPEATABLE_READ 可重复读
* ISOLATION_SERIALIZABLE 串行化
2)事务传播行为
事务传播行为指的就是当一个业务方法【被】另一个业务方法调用时,应该如何进行事务控制。
| 参数 | 说明 |
|---|---|
| REQUIRED | 如果当前没有事务,就新建一个事务,如果已经存在一个事务中,加入到这个事务中。一般的选择(默认值) |
| SUPPORTS | 支持当前事务,如果当前没有事务,就以非事务方式执行(没有事务) |
| MANDATORY | 使用当前的事务,如果当前没有事务,就抛出异常 |
| REQUERS_NEW | 新建事务,如果当前在事务中,把当前事务挂起 |
| NOT_SUPPORTED | 以非事务方式执行操作,如果当前存在事务,就把当前事务挂起 |
| NEVER | 以非事务方式运行,如果当前存在事务,抛出异常 |
| NESTED | 如果当前存在事务,则在嵌套事务内执行。如果当前没有事务,则执行REQUIRED 类似的操作 |

* read-only(是否只读):建议查询时设置为只读
* timeout(超时时间):默认值是-1,没有超时限制。如果有,以秒为单位进行设置
2.2.3 TransactionStatus
TransactionStatus 接口提供的是事务具体的运行状态。
| 方法 | 说明 |
|---|---|
| boolean isNewTransaction() | 是否是新事务 |
| boolean hasSavepoint() | 是否是回滚点 |
| boolean isRollbackOnly() | 事务是否回滚 |
| boolean isCompleted() | 事务是否完成 |
可以简单的理解三者的关系:事务管理器通过读取事务定义参数进行事务管理,然后会产生一系列的事务状态。
2.2.4 实现代码
1)配置文件
<!--事务管理器交给IOC-->
<bean id="transactionManager"
class="org.springframework.jdbc.datasource.DataSourceTransactionManager">
<property name="dataSource" ref="dataSource"/>
</bean>
2)业务层代码
@Service
public class AccountServiceImpl implements AccountService {
@Autowired
private AccountDao accountDao;
@Autowired
private PlatformTransactionManager transactionManager;
@Override
public void transfer(String outUser, String inUser, Double money) {
// 创建事务定义对象
DefaultTransactionDefinition def = new DefaultTransactionDefinition();
// 设置是否只读,false支持事务
def.setReadOnly(false);
// 设置事务隔离级别,可重复读mysql默认级别
def.setIsolationLevel(TransactionDefinition.ISOLATION_REPEATABLE_READ);
// 设置事务传播行为,必须有事务
def.setPropagationBehavior(TransactionDefinition.PROPAGATION_REQUIRED);
// 配置事务管理器
TransactionStatus status = transactionManager.getTransaction(def);
try {
// 转账
accountDao.out(outUser, money);
accountDao.in(inUser, money);
// 提交事务
transactionManager.commit(status);
} catch (Exception e) {
e.printStackTrace();
// 回滚事务
transactionManager.rollback(status);
}
}
}
2.2.5 知识小结
Spring中的事务控制主要就是通过这三个API实现的
* PlatformTransactionManager 负责事务的管理,它是个接口,其子类负责具体工作
* TransactionDefinition 定义了事务的一些相关参数
* TransactionStatus 代表事务运行的一个实时状态
理解三者的关系:事务管理器通过读取事务定义参数进行事务管理,然后会产生一系列的事务状态。
2.3 基于XML的声明式事务控制【重点】
在 Spring 配置文件中声明式的处理事务来代替代码式的处理事务。底层采用AOP思想来实现的。
声明式事务控制明确事项:
- 核心业务代码(目标对象) (切入点是谁?)
- 事务增强代码(Spring已提供事务管理器))(通知是谁?)
- 切面配置(切面如何配置?)
2.3.1 快速入门
需求 : 使用spring声明式事务控制转账业务。
步骤分析
1. 引入tx命名空间
2. 事务管理器通知配置
3. 事务管理器AOP配置
4. 测试事务控制转账业务代码
1)引入tx命名空间
<?xml version="1.0" encoding="UTF-8"?>
<beans xmlns="http://www.springframework.org/schema/beans"
xmlns:xsi="http://www.w2.org/2001/XMLSchema-instance"
xmlns:context="http://www.springframework.org/schema/context"
xmlns:aop="http://www.springframework.org/schema/aop"
xmlns:tx="http://www.springframework.org/schema/tx"
xsi:schemaLocation="
http://www.springframework.org/schema/beans
http://www.springframework.org/s chema/beans/spring-beans.xsd
http://www.springframework.org/schema/context
http://www.springframework.org/schema/context/spring-context.xsd
http://www.springframework.org/schema/aop
http://www.springframework.org/schema/aop/spring-aop.xsd
http://www.springframework.org/schema/tx
http://www.springframework.org/schema/tx/spring-tx.xsd">
</beans>
2)事务管理器通知配置
<!--事务管理器-->
<bean id="transactionManager"
class="org.springframework.jdbc.datasource.DataSourceTransactionManager">
<property name="dataSource" ref="dataSource"></property>
</bean>
<!--通知增强-->
<tx:advice id="txAdvice" transaction-manager="transactionManager">
<!--定义事务的属性-->
<tx:attributes>
<tx:method name="*"/>
</tx:attributes>
</tx:advice>
3)事务管理器AOP配置
<!--aop配置-->
<aop:config>
<!--切面配置-->
<aop:advisor advice-ref="txAdvice" pointcut="execution(* com.lagou.serivce..*.*(..))">
</aop:advisor>
</aop:config>
4)测试事务控制转账业务代码
@Override
public void transfer(String outUser, String inUser, Double money) {
accountDao.out(outUser, money);
// 制造异常
int i = 1 / 0;
accountDao.in(inUser, money);
}
2.3.2 事务参数的配置详解
<tx:method name="transfer" isolation="REPEATABLE_READ" propagation="REQUIRED" timeout="-1" read-only="false"/>
* name:切点方法名称
* isolation:事务的隔离级别
* propogation:事务的传播行为
* timeout:超时时间
* read-only:是否只读
CRUD常用配置
<tx:attributes>
<tx:method name="save*" propagation="REQUIRED"/>
<tx:method name="delete*" propagation="REQUIRED"/>
<tx:method name="update*" propagation="REQUIRED"/>
<tx:method name="find*" read-only="true"/>
<tx:method name="*"/>
</tx:attributes>
2.3.3 知识小结
* 平台事务管理器配置
* 事务通知的配置
* 事务aop织入的配置
2.4 基于注解的声明式事务控制【重点】
2.4.1 常用注解
步骤分析
1. 修改service层,增加事务注解
2. 修改spring核心配置文件,开启事务注解支持
1)修改service层,增加事务注解
@Service
public class AccountServiceImpl implements AccountService {
@Autowired
private AccountDao accountDao;
@Transactional(propagation = Propagation.REQUIRED, isolation = Isolation.REPEATABLE_READ, timeout = -1, readOnly = false)
@Override
public void transfer(String outUser, String inUser, Double money) {
accountDao.out(outUser, money);
int i = 1 / 0;
accountDao.in(inUser, money);
}
}
2)修改spring核心配置文件,开启事务注解支持
<?xml version="1.0" encoding="UTF-8"?>
<beans xmlns="http://www.springframework.org/schema/beans"
xmlns:xsi="http://www.w2.org/2001/XMLSchema-instance"
xmlns:context="http://www.springframework.org/schema/context"
xmlns:aop="http://www.springframework.org/schema/aop"
xmlns:tx="http://www.springframework.org/schema/tx"
xsi:schemaLocation="
http://www.springframework.org/schema/beans
http://www.springframework.org/schema/beans/spring-beans.xsd
http://www.springframework.org/schema/context
http://www.springframework.org/schema/context/spring-context.xsd
http://www.springframework.org/schema/aop
http://www.springframework.org/schema/aop/spring-aop.xsd
http://www.springframework.org/schema/tx
http://www.springframework.org/schema/tx/spring-tx.xsd">
<!--省略之前datsSource、jdbcTemplate、组件扫描配置-->
<!--事务管理器-->
<bean id="transactionManager"
class="org.springframework.jdbc.datasource.DataSourceTransactionManager">
<property name="dataSource" ref="dataSource"></property>
</bean>
<!--事务的注解支持-->
<tx:annotation-driven/>
</beans>
2.4.2 纯注解
核心配置类
@Configuration // 声明为spring配置类
@ComponentScan("com.lagou") // 扫描包
@Import(DataSourceConfig.class) // 导入其他配置类
@EnableTransactionManagement // 事务的注解驱动
public class SpringConfig {
@Bean
public JdbcTemplate getJdbcTemplate(@Autowired DataSource dataSource) {
return new JdbcTemplate(dataSource);
}
@Bean("transactionManager")
public PlatformTransactionManager getPlatformTransactionManager(@Autowired DataSource dataSource) {
return new DataSourceTransactionManager(dataSource);
}
}
数据源配置类
@PropertySource("classpath:jdbc.properties")
public class DataSourceConfig {
@Value("${jdbc.driver}")
private String driver;
@Value("${jdbc.url}")
private String url;
@Value("${jdbc.username}")
private String username;
@Value("${jdbc.password}")
private String password;
@Bean
public DataSource getDataSource() {
DruidDataSource dataSource = new DruidDataSource();
dataSource.setDriverClassName(driver);
dataSource.setUrl(url);
dataSource.setUsername(username);
dataSource.setPassword(password);
return dataSource;
}
}
2.4.3 知识小结
* 平台事务管理器配置(xml、注解方式)
* 事务通知的配置(@Transactional注解配置)
* 事务注解驱动的配置 <tx:annotation-driven/>、@EnableTransactionManagement
三 Spring集成web环境
3.1 ApplicationContext应用上下文获取方式
应用上下文对象是通过 new ClasspathXmlApplicationContext(spring配置文件) 方式获取的,但是每次从容器中获得Bean时都要编写 new ClasspathXmlApplicationContext(spring配置文件) ,这样的弊端是配置文件加载多次,应用上下文对象创建多次。
解决思路分析:
在Web项目中,可以使用ServletContextListener监听Web应用的启动,我们可以在Web应用启动时,就加载Spring的配置文件,创建应用上下文对象ApplicationContext,在将其存储到最大的域servletContext域中,这样就可以在任意位置从域中获得应用上下文ApplicationContext对象了。
3.2 Spring提供获取应用上下文的工具
上面的分析不用手动实现,Spring提供了一个监听器ContextLoaderListener就是对上述功能的封装,该监听器内部加载Spring配置文件,创建应用上下文对象,并存储到ServletContext域中,提供了一个客户端工具WebApplicationContextUtils供使用者获得应用上下文对象。
所以我们需要做的只有两件事:
- 在web.xml中配置ContextLoaderListener监听器(导入spring-web坐标)
- 使用WebApplicationContextUtils获得应用上下文对象ApplicationContext
3.3 实现
1)导入Spring集成web的坐标
<dependency>
<groupId>org.springframework</groupId>
<artifactId>spring-context</artifactId>
<version>5.1.5.RELEASE</version>
</dependency>
<dependency>
<groupId>org.springframework</groupId>
<artifactId>spring-web</artifactId>
<version>5.1.5.RELEASE</version>
</dependency>
2)配置ContextLoaderListener监听器
<!--全局参数-->
<context-param>
<param-name>contextConfigLocation</param-name>
<param-value>classpath:applicationContext.xml</param-value>•
</context-param>
<!--Spring的监听器-->
<listener>
<listener-class>
org.springframework.web.context.ContextLoaderListener
</listener-class>
</listener>
3)通过工具获得应用上下文对象
ApplicationContext applicationContext = WebApplicationContextUtils.getWebApplicationContext(servletContext);
Object obj = applicationContext.getBean("id");
第六阶段模块三 SpringMVC
任务一: SpringMVC基本应用
课程任务主要内容:
* SpringMVC简介
* SpringMVC组件概述
* SpringMVC请求
* SpringMVC响应
* 静态资源开启
一 SpringMVC简介
1.1 MVC模式
MVC是软件工程中的一种软件架构模式,它是一种分离业务逻辑与显示界面的开发思想。
* M(model)模型:处理业务逻辑,封装实体
* V(view) 视图:展示内容
* C(controller)控制器:负责调度分发(1.接收请求、2.调用模型、3.转发到视图)

1.2 SpringMVC概述
SpringMVC 是一种基于 Java 的实现 MVC 设计模式的轻量级 Web 框架,属于SpringFrameWork 的后续产品,已经融合在 Spring Web Flow 中。
SpringMVC 已经成为目前最主流的MVC框架之一,并且随着Spring3.0 的发布,全面超越 Struts2,成为最优秀的 MVC 框架。它通过一套注解,让一个简单的 Java 类成为处理请求的控制器,而无须实现任何接口。同时它还支持 RESTful 编程风格的请求。
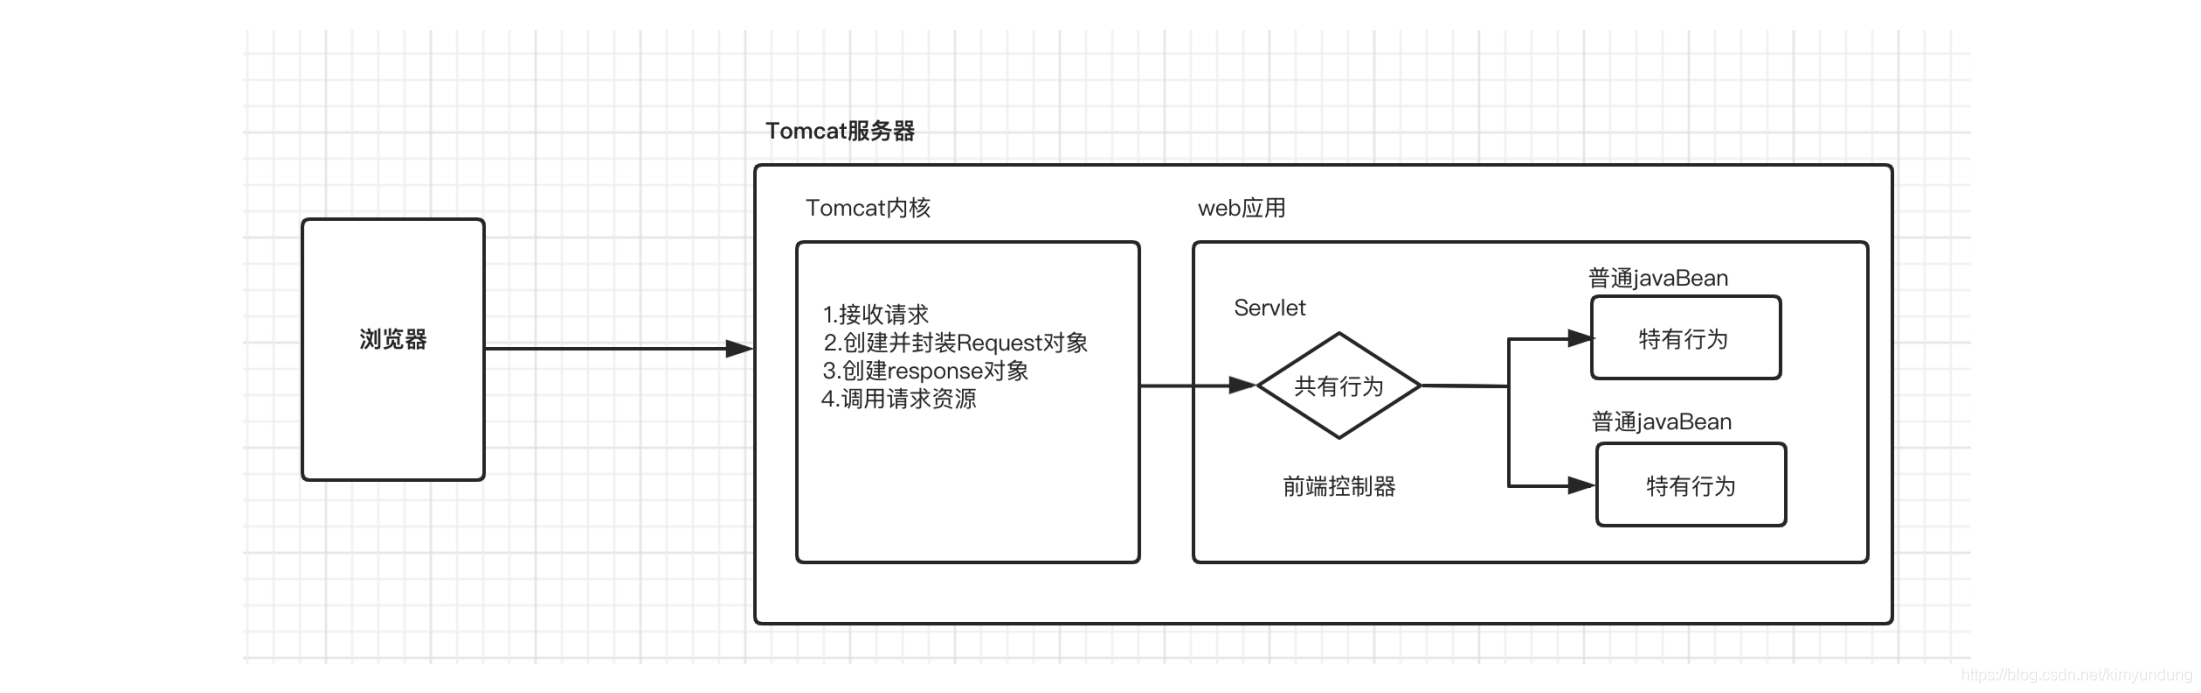
总结
SpringMVC的框架就是封装了原来Servlet中的共有行为;例如:参数封装,视图转发等。
1.3 SpringMVC快速入门
需求
客户端发起请求,服务器接收请求,执行逻辑并进行视图跳转。
步骤分析
1. 创建web项目,导入SpringMVC相关坐标
2. 配置SpringMVC前端控制器 DispathcerServlet
3. 编写Controller类和视图页面
4. 使用注解配置Controller类中业务方法的映射地址
5. 配置SpringMVC核心文件 spring-mvc.xml
1)创建web项目,导入SpringMVC相关坐标
<!-- 设置为web工程 -->
<packaging>war</packaging>
<dependencies>
<!--springMVC坐标-->
<!--<dependency>
<groupId>org.springframework</groupId>
<artifactId>spring-webmvc</artifactId>
<version>5.1.5.RELEASE</version>
</dependency>-->
<dependency>
<groupId>org.springframework</groupId>
<artifactId>spring-webmvc</artifactId>
<version>5.2.8.RELEASE</version>
</dependency>
<!--servlet坐标-->
<dependency>
<groupId>javax.servlet</groupId>
<artifactId>javax.servlet-api</artifactId>
<version>3.1.0</version>
<scope>provided</scope>
</dependency>
<!--jsp坐标-->
<dependency>
<groupId>javax.servlet.jsp</groupId>
<artifactId>jsp-api</artifactId>
<version>2.2</version>
<scope>provided</scope>
</dependency>
</dependencies>
2)配置SpringMVC前端控制器DispathcerServlet
<?xml version="1.0" encoding="UTF-8"?>
<web-app xmlns="http://xmlns.jcp.org/xml/ns/javaee"
xmlns:xsi="http://www.w3.org/2001/XMLSchema-instance"
xsi:schemaLocation="http://xmlns.jcp.org/xml/ns/javaee
http://xmlns.jcp.org/xml/ns/javaee/web-app_3_1.xsd"
version="3.1">
<!--前端控制器-->
<!--springMVC前端控制器 DispatcherServlet-->
<!--
DispatcherServlet被实例化后 在执行初始化方法时 他就会解析 初始化参数 init-param,
根据param-name名称拿到具体配置文件的具体路径对这个文件进行加载解析
DispatcherServlet是什么时候被实例化,执行初始化方法的?
Servlet生命周期: Servlet是默认单实例多线程的
第一次请求来的时候才会完成Servlet实例化,
实例化后调用初始化方法,完成初始化操作, 而每一次请求来的时候,
都会重新开启一个线程执行service方法
当servlet被移除或项目被关闭的时候调用Servlet的destroy方法完成销毁
在应用启动时,就完成servlet的实例化及初始化操作 配置
load-on-startup: 正整数就可以
-->
<servlet>
<servlet-name>dispatcherServlet</servlet-name>
<servletclass>org.springframework.web.servlet.DispatcherServlet</servlet-class>
<init-param>
<param-name>contextConfigLocation</param-name>
<param-value>classpath:spring-mvc.xml</param-value>
</init-param>
<load-on-startup>2</load-on-startup>
</servlet>
<!--/会匹配到所有的访问路径, 但是不会汽配到 .jsp这样的url /login /add /update 可以 /a.jsap 不可以-->
<!--/和 /*的区别-->
<servlet-mapping>
<servlet-name>dispatcherServlet</servlet-name>
<url-pattern>/</url-pattern>
</servlet-mapping>
</web-app>
3)编写Controller类和视图页面
UserController.java
public class UserController {
public String quick() {
//业务逻辑
System.out.println("quick running.....");
//视图跳转
//访问成功后路径没有出现改变, 说明是请求转发 而不是重定向
return "/WEB-INF/pages/success.jsp";
}
}
/WEB-INF/pages/ success.jsp
<%@ page contentType="text/html;charset=UTF-8" language="java" %>
<html>
<head>
<title>success</title>
</head>
<body>
<h3>请求成功!</h3>
</body>
</html>
4)使用注解配置Controller类中业务方法的映射地址
@Controller
public class UserController {
@RequestMapping("/quick")
public String quick() {
System.out.println("quick running.....");
return "/WEB-INF/pages/success.jsp";
}
}
5)配置SpringMVC核心文件spring-mvc.xml
<beans xmlns="http://www.springframework.org/schema/beans"
xmlns:mvc="http://www.springframework.org/schema/mvc"
xmlns:context="http://www.springframework.org/schema/context"
xmlns:xsi="http://www.w3.org/2001/XMLSchema-instance"
xsi:schemaLocation="http://www.springframework.org/schema/beans
http://www.springframework.org/schema/beans/spring-beans.xsd
http://www.springframework.org/schema/mvc
http://www.springframework.org/schema/mvc/spring-mvc.xsd
http://www.springframework.org/schema/context
http://www.springframework.org/schema/context/spring-context.xsd">
<!--配置注解扫描-->
<context:component-scan base-package="com.lagou.controller"/>
</beans>
1.4 web工程执行流程


http://localhost:8081/springmvc_quickstart/quick
发送到tomcat服务器, tomcat接收到请求后,
1.解析请求资源地址, 2.创建请求对象request对象, 3.创建响应对象response,
4.调用目标资源 : 即web.xml中配置的servlet 即DispatcherServlet
这个Servlet的mapping是/所以http://localhost:8081/springmvc_quickstart/后面写的什么(除了.jsp)都会被DispatcherServlet拦截,
然后做DispatcherServlet的业务逻辑
当前请求交给DispatcherServlet(前端控制器) 前端控制器完成一些共有行为, 解析映射地址, 找到对应的处理器, 如何找的是前端控制器来控制,
处理器就是我们编写的UserController以及方法quick()
前端控制器经过对地址的解析, 得到访问的地址是/quick, 他会调用组件进行解析,
然后就能匹配到@RequestMapping(/quick)的方法, 从而让该方法进制一个执行
1.5 知识小结
* SpringMVC是对MVC设计模式的一种实现,属于轻量级的WEB框架。
* SpringMVC的开发步骤:
1.创建web项目,导入SpringMVC相关坐标
2.配置SpringMVC前端控制器 DispathcerServlet
3.编写Controller类和视图页面
4.使用注解配置Controller类中业务方法的映射地址
5.配置SpringMVC核心文件 spring-mvc.xml
二 SpringMVC组件概述
2.1 SpringMVC的执行流程

1. 用户发送请求至前端控制器DispatcherServlet。
2. DispatcherServlet收到请求调用HandlerMapping处理器映射器。
3. 处理器映射器找到具体的处理器(可以根据xml配置、注解进行查找),生成处理器对象及处理器拦截器
(如果有则生成)一并返回给DispatcherServlet。
4. DispatcherServlet调用HandlerAdapter处理器适配器。
5. HandlerAdapter经过适配调用具体的处理器(Controller,也叫后端控制器)。
6. Controller执行完成返回ModelAndView。
7. HandlerAdapter将controller执行结果ModelAndView返回给DispatcherServlet。
8. DispatcherServlet将ModelAndView传给ViewReslover视图解析器。
9. ViewReslover解析后返回具体View。
10. DispatcherServlet根据View进行渲染视图(即将模型数据填充至视图中)。
11. DispatcherServlet将渲染后的视图响应响应用户。
请求走到前端控制器DispatcherServlet, 前端控制器DispatcherServlet想要找到具体的一个Controller, 进行业务逻辑的处理
但是前端控制器DispatcherServlet不会自己去找这个Controller, 他会调用处理器映射器组件HandlerMapping,
这个处理器映射组件HandlerMapping根据传递过来的路径进行一些查找, 怎么查找?
根据我们的一些xml配置或者注解配置例如@RequestMapping, 根据这些配置进行查找, 查找到后生成一些处理器对象,
后续学了拦截器后, 我们有可能在处理器映射器HandlerMapping执行之前要配置好拦截器的,
所以这个处理器映射器HandlerMapping不仅会找到处理器也会把要指向的拦截器对象也找到,
现在真正返回的是处理器执行链HandlerExecutionChain, 返回给前端控制器, 前端处理器知道要了哪些处理器要执行了,
但是前端控制器DispatcherServlet不会直接调用, 而是发送给处理器适配器组件HandlerAdaptor,
处理器适配器组件HandlerAdapter接收到执行Handler请求之后, 就会找到具体的处理器Handler,
这个Handler就是我们编写的Controller里面的方法,
他(处理器适配器组件HandlerAdapter)现在就会调用具体的处理器Controller里面的方法进行一个执行,
Controller里面编写的代码, 业务漏记执行后要进行一个视图跳转,
处理器Handler执行完具体业务逻辑后, 要进行一个响应的, 我们响应的是 /WEB-INF/pages/success.jsp 字符串,
其实他在响应的时候响应的不是那个字符串,
这个字符串会解析成ModelAndView对象进行一个响应, model模型view视图, 其实响应了模型和视图对象,
处理器适配器HandlerAdaptor拿到模型视图对象ModelAndView对象, 他也不直接进行视图的跳转,
他把模型视图对象ModelAndView对象交给前端控制器DispatcherService, 端控制器DispatcherService也不进行直接的视图跳转,
他调用下一个组件视图解析器组件ViewResolver, 并且ModelAndVIew给了他, 他对ModelAndView进行一些解析,
解析出来的视图View对象在返回给前端控制器DispatcherServlet, 前端控制器DispatcherServlet拿到视图View对象 ,
就知道了具体要跳转到那个视图, 前端控制器DispatcherServlet最后进行一些视图渲染,
所谓的视图渲染就是将模型中的数据填充到页面上, 完成视图渲染后, 最终响应到页面
2.2 SpringMVC组件解析
1. 前端控制器:DispatcherServlet
用户请求到达前端控制器,它就相当于 MVC 模式中的 C,DispatcherServlet 是整个流程控制的中心,由它调用其它组件处理用户的请求,DispatcherServlet 的存在降低了组件之间的耦合性。
2. 处理器映射器:HandlerMapping
HandlerMapping 负责根据用户请求找到 Handler 即处理器,SpringMVC 提供了不同的映射器实现不同的映射方式,例如:配置文件方式,实现接口方式,注解方式等。
3. 处理器适配器:HandlerAdapter
通过 HandlerAdapter 对处理器进行执行,这是适配器模式的应用,通过扩展适配器可以对更多类型的处理器进行执行。
4. 处理器:Handler【**开发者编写**】
它就是我们开发中要编写的具体业务控制器。由 DispatcherServlet 把用户请求转发到Handler。由Handler 对具体的用户请求进行处理。
5. 视图解析器:ViewResolver
View Resolver 负责将处理结果生成 View 视图,View Resolver 首先根据逻辑视图名解析成物理视图名,即具体的页面地址,再生成 View 视图对象,最后对 View 进行渲染将处理结果通过页面展示给用户。
6. 视图:View 【**开发者编写**】
SpringMVC 框架提供了很多的 View 视图类型的支持,包括:jstlView、freemarkerView、pdfView等。最常用的视图就是 jsp。一般情况下需要通过页面标签或页面模版技术将模型数据通过页面展示给用户,需要由程序员根据业务需求开发具体的页面。
***笔试题:springmvc中的三大组件是什么?HandlerMapping HandlerAdapter ViewResolver
***笔试题:springmvc中的四大组件是什么?HandlerMapping HandlerAdapter ViewResolver DispatcherServlet
<beans xmlns="http://www.springframework.org/schema/beans"
xmlns:mvc="http://www.springframework.org/schema/mvc"
xmlns:context="http://www.springframework.org/schema/context"
xmlns:xsi="http://www.w3.org/2001/XMLSchema-instance"
xsi:schemaLocation="http://www.springframework.org/schema/beans
http://www.springframework.org/schema/beans/spring-beans.xsd
http://www.springframework.org/schema/mvc
http://www.springframework.org/schema/mvc/spring-mvc.xsd
http://www.springframework.org/schema/context
http://www.springframework.org/schema/context/spring-context.xsd">
<!--配置注解扫描-->
<context:component-scan base-package="com.lagou.controller"/>
<!--处理器映射器和处理器适配器功能增强-->
<!--显示配置 处理器映射器HandlerMapping - 处理器适配器HandlerAdaptor
进行了两个器的功能的增强,即支持json的读写,
即JSON串和对象转换时直接进行转换就ok,无序编写JSON相关API完成转换-->
<mvc:annotation-driven></mvc:annotation-driven>
<!--显示配置 视图解析器ViewResolver-->
<bean class="org.springframework.web.servlet.view.InternalResourceViewResolver">
<!--success: 解析逻辑视图名, 解析具体的物理文件地址加上前缀后缀 /WEB-INF/pages/success.jsp-->
<property name="prefix" value="/WEB-INF/pages/"></property>
<property name="suffix" value=".jsp"></property>
</bean>
</beans>
2.3 SpringMVC注解解析
@Controller
SpringMVC基于Spring容器,所以在进行SpringMVC操作时,需要将Controller存储到Spring容器中,如果使用@Controller注解标注的话,就需要使用:
<!--配置注解扫描-->
<context:component-scan base-package="com.lagou.controller"/>
springmvc加载核心配置文件时就构建了一个IOC容器,是springmvc构建的, springmvc操作时,
需要将Controller存储到SpringMVC的IOC容器中, 所以在 spring-mvc.xml配置文件中进行了IOC注解扫描,
如果springmvc整合了spring, 就意味着resources目录下还会有一个applicationContext.xml配置文件,
在这个文件中也要进行IOC注解扫描, 因为pringmvc创建了一个IOC容器,
这个可以理解为子容器, 在加载spring的核心配置applicationContext.xml文件时,
同样也会创建IOC容器, 这个容器可以理解为父容器, 这两个容器可以理解为父子关系的容器,
在这两个容器中进行注解扫描时, 都去扫描base-package="com.lgaou"的话,
springmvc的IOC容器中会有service dao的对象, 这是不必要的,
所以springmvc配置文件中的IOC注解扫描中的路径
指定到controller, 让他只扫描controller包下的类就好,
也就是只负责web层, 把web层的实例对象存到由springmvc创建出来的IOC容器中,
而service层和dao层的实例对象交给spring管理
@RequestMapping
* 作用:
用于建立请求 URL 和处理请求方法之间的对应关系
* 位置:
1.类上:请求URL的第一级访问目录。此处不写的话,就相当于应用的根目录。写的话需要以/开头。
它出现的目的是为了使我们的URL可以按照模块化管理:
用户模块
/user/add
/user/update
/user/delete
...
账户模块
/account/add
/account/update
/account/delete
2.方法上:请求URL的第二级访问目录,和一级目录组成一个完整的 URL 路径。
* 属性:
1.value:用于指定请求的URL。它和path属性的作用是一样的
2.method:用来限定请求的方式
3.params:用来限定请求参数的条件
例如:params={"accountName"} 表示请求参数中必须有accountName
pramss={"money!100"} 表示请求参数中money不能是100
@Controller
@RequestMapping("/user") //一级访问目录
public class UserController {
//http://localhost:8081/springmvc_quickstart/user/quick3 /一级访问目录/二级访问目录
/*
"/quick"
value="/quick"
path="/quick" 作用等同于value,同样是这是设置方法的访问路径
method: 用来限定请求的方式 RequestMethod.POST 只能以post的请求方式访问该方法,其他请求方式会报错
params: 限定请求参数的条件 params={"accountName"} 表示请求参数中必须有accountName
*/
@RequestMapping(path = "/quick", method = RequestMethod.GET, params={
"accountName"}) //二级访问目录
public String quick(){
//业务逻辑
System.out.println("springMVC入门成功");
//视图跳转
//访问成功后路径没有出现改变, 说明是请求转发 而不是重定向
//return "/WEB-INF/pages/success.jsp";
//逻辑视图名称
return "success";
}
@RequestMapping("/quick2")
public String quick2(){
//业务逻辑
System.out.println("springMVC入门成功");
//视图跳转 逻辑视图名称
return "a";
}
@RequestMapping("/quick3")
public String quick3(){
//业务逻辑
System.out.println("springMVC入门成功");
//视图跳转 逻辑视图名称
return "b";
}
}
2.4 知识小结
* SpringMVC的三大组件
处理器映射器:HandlerMapping
处理器适配器:HandlerAdapter
视图解析器:View Resolver
* 开发者编写
处理器:Handler
视图:View
三 SpringMVC的请求
3.1 请求参数类型介绍
客户端请求参数的格式是: name=value&name=value…… 不管是数字还是字符串都是string
服务器要获取请求的参数的时候要进行类型转换,有时还需要进行数据的封装
SpringMVC可以接收如下类型的参数:
- 基本类型参数
- 对象类型参数
- 数组类型参数 同一个name有多个值 hobby=游戏&hobby=游泳
- 集合类型参数 List Map
3.2 获取基本类型参数
Controller中的业务方法的参数名称要与请求参数的name一致,参数值会自动映射匹配。并且能自动做类型转换;自动的类型转换是指从String向其他类型的转换。
<a href="${pageContext.request.contextPath}/user/simpleParam?id=1&username=杰克">
基本类型
</a>
@RequestMapping("/simpleParam")
public String simpleParam(Integer id,String username) {
System.out.println(id);
System.out.println(username);
return "success";
}

注意 :
WEB-INF这是一个安全目录, 在这个目录下存在的页面, 不允许被浏览器直接访问, 要么通过controller访问要不放在WEB-INF同级下
3.3 获取对象类型参数
Controller中的业务方法参数的POJO属性名与请求参数的name一致,参数值会自动映射匹配。
<form action="${pageContext.request.contextPath}/user/pojoParam" method="post">
编号:<input type="text" name="id"> <br>
用户名:<input type="text" name="username"> <br>
<input type="submit" value="对象类型">
</form>
public class User {
Integer id;
String username;
// setter getter...
}
@RequestMapping("/pojoParam")
public String pojoParam(User user) {
System.out.println(user);
return "success";
}
3.4 中文乱码过滤器
当post请求时,数据会出现乱码,我们可以设置一个过滤器来进行编码的过滤。
<!--配置全局过滤的filter-->
<filter>
<filter-name>CharacterEncodingFilter</filter-name>
<filterclass>org.springframework.web.filter.CharacterEncodingFilter</filter-class>
<init-param>
<param-name>encoding</param-name>
<param-value>UTF-8</param-value>
</init-param>
</filter>
<filter-mapping>
<filter-name>CharacterEncodingFilter</filter-name>
<url-pattern>/*</url-pattern><!--/* 拦截所有-->
</filter-mapping>
3.5 获取数组类型参数
Controller中的业务方法数组名称与请求参数的name一致,参数值会自动映射匹配。
<form action="${pageContext.request.contextPath}/user/arrayParam">
编号:<br>
<input type="checkbox" name="ids" value="1">1<br>
<input type="checkbox" name="ids" value="2">2<br>
<input type="checkbox" name="ids" value="3">3<br>
<input type="checkbox" name="ids" value="4">4<br>
<input type="checkbox" name="ids" value="5">5<br>
<input type="submit" value="数组类型">
</form>
@RequestMapping("/arrayParam")
public String arrayParam(Integer[] ids) {
System.out.println(Arrays.toString(ids));
return "success";
}
3.6 获取集合(复杂)类型参数
获得集合参数时,要将集合参数包装到一个POJO中才可以。
<form action="${pageContext.request.contextPath}/user/queryParam" method="post">
搜索关键字:
<input type="text" name="keyword"> <br>
user对象:
<input type="text" name="user.id" placeholder="编号">
<input type="text" name="user.username" placeholder="姓名"><br>
list集合<br>
第一个元素:
<input type="text" name="userList[0].id" placeholder="编号">
<input type="text" name="userList[0].username" placeholder="姓名"><br>
第二个元素:
<input type="text" name="userList[1].id" placeholder="编号">
<input type="text" name="userList[1].username" placeholder="姓名"><br>
map集合<br>
第一个元素:
<input type="text" name="userMap['u1'].id" placeholder="编号">
<input type="text" name="userMap['u1'].username" placeholder="姓名"><br>
第二个元素:
<input type="text" name="userMap['u2'].id" placeholder="编号">
<input type="text" name="userMap['u2'].username" placeholder="姓名"><br>
<input type="submit" value="复杂类型">
</form>
public class QueryVo {
private String keyword;
private User user;
private List<User> userList;
private Map<String, User> userMap;
}
@RequestMapping("/queryParam")
public String queryParam(QueryVo queryVo) {
System.out.println(queryVo);
return "success";
}
3.7 自定义类型转换器
SpringMVC 默认已经提供了一些常用的类型转换器;例如:客户端提交的字符串转换成int型进行参数设置,日期格式类型要求为:yyyy/MM/dd 不然的话会报错,对于特有的行为,SpringMVC提供了自定义类型转换器方便开发者自定义处理。
<form action="${pageContext.request.contextPath}/user/converterParam">
生日:<input type="text" name="birthday">
<input type="submit" value="自定义类型转换器">
</form>
// Converter<String, Date> String类型转换成Date类型的意思
public class DateConverter implements Converter<String, Date> {
public Date convert(String dateStr) {
//将日期字符串转换成日期对象 返回
SimpleDateFormat format = new SimpleDateFormat("yyyy-MM-dd");
Date date = null;
try {
date = format.parse(dateStr);
} catch (ParseException e) {
e.printStackTrace();
}
return date;
}
}
<!--处理器映射器和适配器增强-->
<mvc:annotation-driven conversion-service="conversionService"></mvc:annotationdriven>
<!--自定义转换器配置-->
<bean id="conversionService"
class="org.springframework.context.support.ConversionServiceFactoryBean">
<property name="converters">
<set>
<bean class="com.lagou.converter.DateConverter"></bean>
</set>
</property>
</bean>
@RequestMapping("/converterParam")
public String converterParam(Date birthday) {
System.out.println(birthday);
return "success";
}
3.8 相关注解
@RequestParam
当请求的参数name名称与Controller的业务方法参数名称不一致时,就需要通过@RequestParam注解显示的绑定
<a href="${pageContext.request.contextPath}/user/findByPage?pageNo=2">
分页查询
</a>
/*
演示@RequestParam注解
@RequestParam
name: 匹配页面传递参数的名称
defaultValue: 设置参数的默认值
required: 设置是否必须传递参数, 默认值为true, 如果设置了默认值, 值自动改为false
*/
@RequestMapping("/findByPage")
public String findByPage(@RequestParam(name = "pageNo", defaultValue = "1")
Integer pageNum, @RequestParam(defaultValue = "5") Integer pageSize) {
System.out.println(pageNum);
System.out.println(pageSize);
return "success";
}
@RequestHeader
获取请求头的数据。
@RequestMapping("/requestHead")
public String requestHead(@RequestHeader("cookie") String cookie) {
System.out.println(cookie);
return "success";
}
@CookieValue
获取cookie中的数据。
@RequestMapping("/cookieValue")
public String cookieValue(@CookieValue("JSESSIONID") String jesessionId) {
System.out.println(jesessionId);
return "success";
}
3.9 获取Servlet相关API
SpringMVC支持使用原始ServletAPI对象作为控制器方法的参数进行注入,常用的对象如下:
@RequestMapping("/servletAPI")
public String servletAPI(HttpServletRequest request, HttpServletResponse
response, HttpSession session) {
System.out.println(request);
System.out.println(response);
System.out.println(session);
return "success";
}
四 SpringMVC的响应
4.1 SpringMVC响应方式介绍
页面跳转
1. 返回字符串逻辑视图 (常用)
2. void原始ServletAPI (不常用)
3. ModelAndView
返回数据
1. 直接返回字符串数据
4. 将对象或集合转为json返回(任务二演示)
4.2 返回字符串逻辑视图
直接返回字符串:此种方式会将返回的字符串与视图解析器的前后缀拼接后跳转到指定页面
@RequestMapping("/returnString")
public String returnString() {
return "success";
}
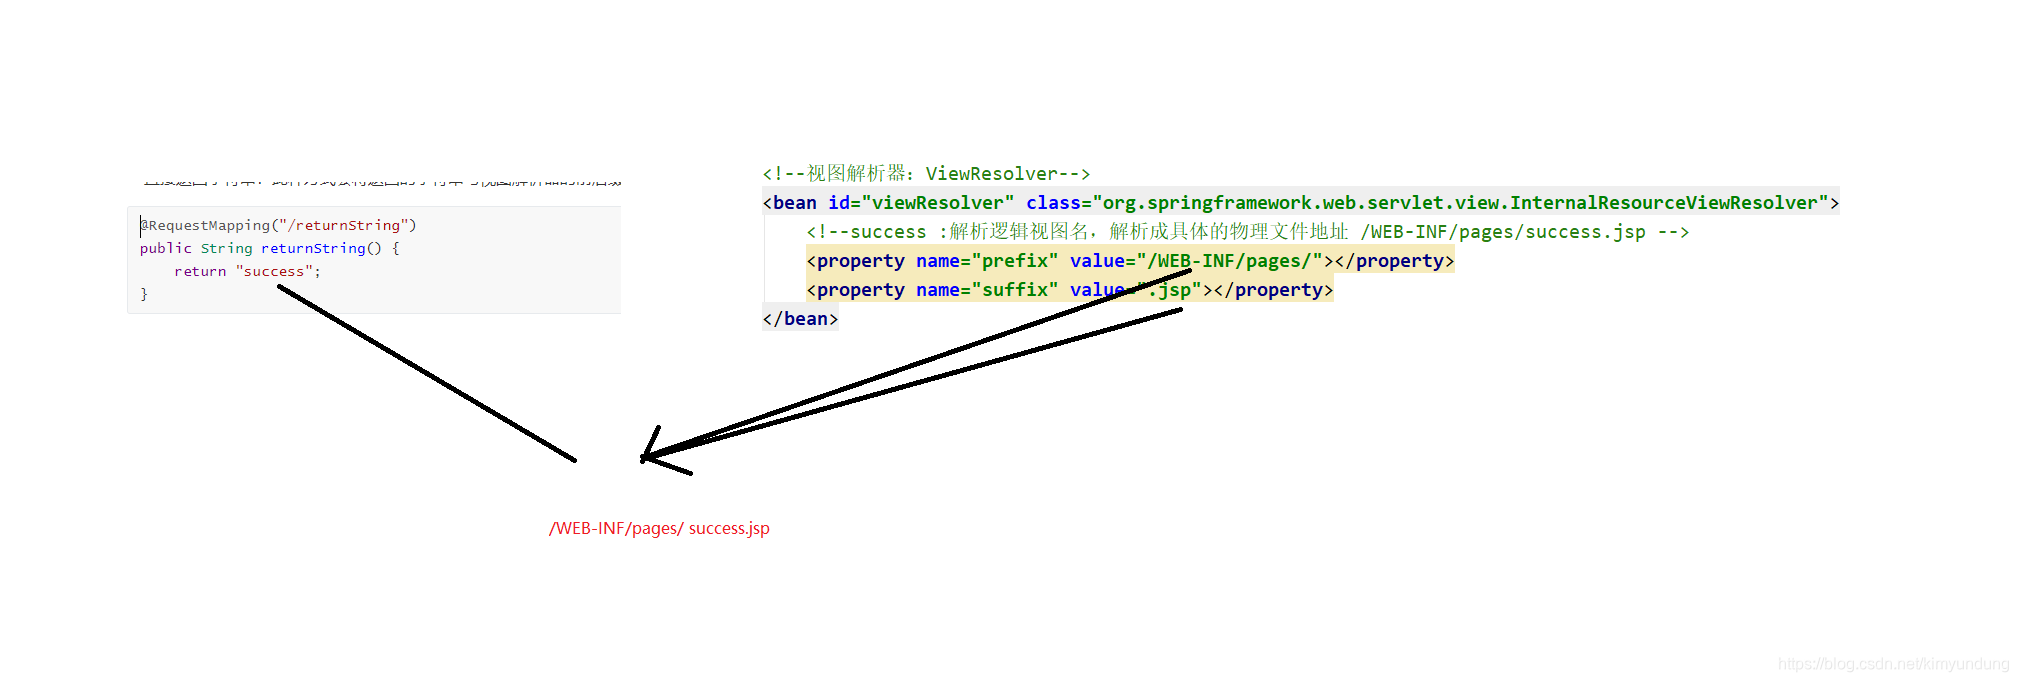
4.3 void原始ServletAPI
我们可以通过request、response对象实现响应
@RequestMapping("/returnVoid")
public void returnVoid(HttpServletRequest request, HttpServletResponse response)
throws Exception {
// 1.通过response直接响应数据
response.setContentType("text/html;charset=utf-8");
response.getWriter().write("拉勾网");
----------------------------------------
request.setAttribute("username", "拉勾教育");
// 2.通过request实现转发
request.getRequestDispatcher("/WEB-INF/pages/success.jsp").forward(request, response);
----------------------------------------
// 3.通过response实现重定向
response.sendRedirect(request.getContextPath() + "/index.jsp");
}
4.4 转发和重定向
企业开发我们一般使用返回字符串逻辑视图实现页面的跳转,这种方式其实就是请求转发。
我们也可以写成:forward转发
如果用了forward:则路径必须写成实际视图url,不能写逻辑视图。它相当于:
request.getRequestDispatcher("url").forward(request,response)
使用请求转发,既可以转发到jsp,也可以转发到其他的控制器方法。
@RequestMapping("/forward")
public String forward(Model model) {
model.addAttribute("username", "拉勾招聘");
return "forward:/WEB-INF/pages/success.jsp";
}
Redirect重定向
我们可以不写虚拟目录,springMVC框架会自动拼接,并且将Model中的数据拼接到url地址上
@RequestMapping("/redirect")
public String redirect(Model model) {
model.addAttribute("username", "拉勾教育");
return "redirect:/index.jsp";
}
4.5 ModelAndView
4.4.1 方式一
在Controller中方法创建并返回ModelAndView对象,并且设置视图名称
@RequestMapping("/returnModelAndView1")
public ModelAndView returnModelAndView1() {
/*
Model:模型 作用封装数据
View:视图 作用展示数据
*/
ModelAndView modelAndView = new ModelAndView();
//设置模型数据
modelAndView.addObject("username", " lagou");
//设置视图名称
modelAndView.setViewName("success");
return modelAndView;
}
4.4.2 方式二 (常用)
在Controller中方法形参上直接声明ModelAndView,无需在方法中自己创建,在方法中直接使用该对象设置视图,同样可以跳转页面
@RequestMapping("/returnModelAndView2")
public ModelAndView returnModelAndView2(ModelAndView modelAndView) {
//设置模型数据
modelAndView.addObject("username", "itheima");
//设置视图名称
modelAndView.setViewName("success");
return modelAndView;
}
4.6 @SessionAttributes
如果在多个请求之间共用数据,则可以在控制器类上标注一个 @SessionAttributes,配置需要在session中存放的数据范围,Spring MVC将存放在model中对应的数据暂存到 HttpSession 中。
注意:@SessionAttributes只能定义在类上
@Controller
@SessionAttributes("username") //向request域存入的key为username时,同步到session域中
public class UserController {
@RequestMapping("/forward")
public String forward(Model model) {
model.addAttribute("username", "子慕");
return "forward:/WEB-INF/pages/success.jsp";
}
@RequestMapping("/returnString")
public String returnString() {
return "success";
}
}
4.7 知识小结
* 页面跳转采用返回字符串逻辑视图
1.forward转发
可以通过Model向request域中设置数据
2.redirect重定向
直接写资源路径即可,虚拟目录springMVC框架自动完成拼接
* 数据存储到request域中
Model model
model.addAttribute("username", "子慕");
五 静态资源访问的开启
当有静态资源需要加载时,比如jquery文件,通过谷歌开发者工具抓包发现,没有加载到jquery文件,原因是SpringMVC的前端控制器DispatcherServlet的url-pattern配置的是 /(缺省),代表对所有的静态资源都进行处理操作,这样就不会执行Tomcat内置的DefaultServlet处理,我们可以通过以下两种方式指定放行静态资源:
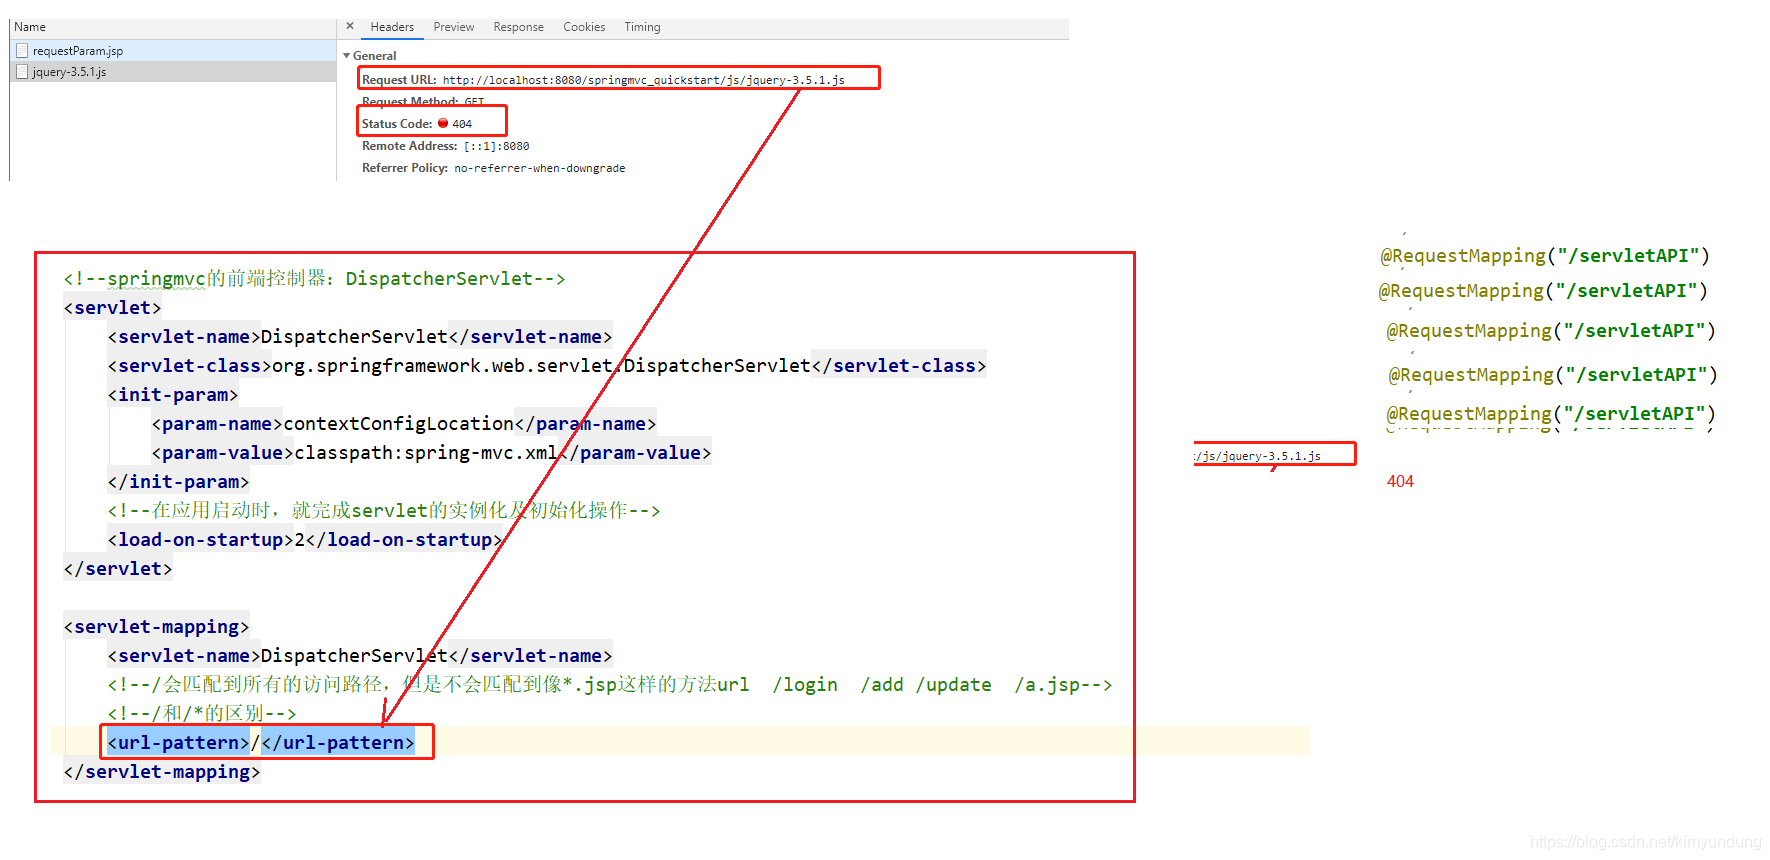
方式一
<!--方式一: 放行指定的静态资源 mapping: 放行的映射路径 location: 静态资源所在的目录-->
<mvc:resources mapping="/js/**" location="/js/"/>
<mvc:resources mapping="/css/**" location="/css/"/>
<mvc:resources mapping="/img/**" location="/img/"/>
方式二
<!--方式二: 放行全部的静态资源 : 在springmvc配置文件中开启DefaultServlet处理静态资源-->
<mvc:default-servlet-handler/>
任务二:springmvc进阶
课程任务主要内容:
* ajax异步交互
* RESTful
* 文件上传
* 异常处理
* 拦截器
一 ajax异步交互
Springmvc默认用MappingJackson2HttpMessageConverter对json数据进行转换,需要加入jackson的包;同时使用 <mvc:annotation-driven />
<dependency>
<groupId>com.fasterxml.jackson.core</groupId>
<artifactId>jackson-databind</artifactId>
<version>2.9.8</version>
</dependency>
<dependency>
<groupId>com.fasterxml.jackson.core</groupId>
<artifactId>jackson-core</artifactId>
<version>2.9.8</version>
</dependency>
<dependency>
<groupId>com.fasterxml.jackson.core</groupId>
<artifactId>jackson-annotations</artifactId>
<version>2.9.0</version>
</dependency>
1.1 @RequestBody
该注解用于Controller的方法的形参声明,当使用ajax提交并指定contentType为json形式时,通过HttpMessageConverter接口转换为对应的POJO对象.
<button id="btn1">ajax异步提交</button>
<script>
$("#btn1").click(function () {
let url = '${pageContext.request.contextPath}/ajaxRequest';
let data = '[{"id":1,"username":"张三"},{"id":2,"username":"李四"}]';
$.ajax({
type: 'POST',
url: url,
data: data,
contentType: 'application/json;charset=utf-8',
success: function (resp) {
alert(JSON.stringify(resp))
}
})
})
</script>
@RequestMapping(value = "/ajaxRequest")
public void ajaxRequest(@RequestBody List<User>list) {
System.out.println(list);
}
1.2 @ResponseBody
该注解用于将Controller的方法返回的对象,通过HttpMessageConverter接口转换为指定格式的数据如:json,xml等,通过Response响应给客户端。
/*
@RequestMapping
produces = "application/json;charset=utf-8" 响应返回数据的mime类型和编码,默认为
json
*/
@RequestMapping(value = "/ajaxRequest")
@ResponseBody
public List<User> ajaxRequest(@RequestBody List<User> list) {
System.out.println(list);
return list;
}
二 RESTful
2.1 什么是RESTful
Restful是一种软件架构风格、设计风格,而不是标准,只是提供了一组设计原则和约束条件。主要用于客户端和服务器交互类的软件,基于这个风格设计的软件可以更简洁,更有层次,更易于实现缓存机制等。
Restful风格的请求是使用“url+请求方式”表示一次请求目的的,HTTP 协议里面四个表示操作方式的动词如下:
- GET:读取(Read)
- POST:新建(Create)
- PUT:更新(Update)
- DELETE:删除(Delete)
| 客户端请求 | 原来风格URL地址 | RESTful风格URL地址 |
|---|---|---|
| 查询所有 | /user/findAll | GET /user |
| 根据ID查询 | /user/findById?id=1 | GET /user/{1} |
| 新增 | /user/save | POST /user |
| 修改 | /user/update | PUT /user |
| 删除 | /user/delete?id=1 | DELETE /user/{1} |
2.2 代码实现
@PathVariable
用来接收RESTful风格请求地址中占位符的值
@RestController
RESTful风格多用于前后端分离项目开发,前端通过ajax与服务器进行异步交互,我们处理器通常返回的是json数据所以使用@RestController来替代@Controller和@ResponseBody两个注解。
// @Controller
@RestController
public class RestFulController {
@GetMapping(value = "/user/{id}")
// 相当于 @RequestMapping(value = "/user/{id}",method = RequestMethod.GET)
// @ResponseBody
public String get(@PathVariable Integer id) {
return "get:" + id;
}
@PostMapping(value = "/user")
// @ResponseBody
public String post() {
return "post";
}
@PutMapping(value = "/user")
// @ResponseBody
public String put() {
return "put";
}
@DeleteMapping(value = "/user/{id}")
// @ResponseBody
public String delete(@PathVariable Integer id) {
return "delete:"+ id;
}
}
三 文件上传
3.1 文件上传三要素
- 表单项 type=“file”
- 表单的提交方式 method=“POST”
- 表单的enctype属性是多部分表单形式 enctype=“multipart/form-data"

3.2 文件上传原理
- 当form表单修改为多部分表单时,request.getParameter()将失效。
- 当form表单的enctype取值为 application/x-www-form-urlencoded 时,
form表单的正文内容格式是: name=value&name=value - 当form表单的enctype取值为 mutilpart/form-data 时,请求正文内容就变成多部分形式:

3.3 单文件上传
步骤分析
1. 导入fileupload和io坐标
2. 配置文件上传解析器
3. 编写文件上传代码
1)导入fileupload和io坐标
<dependency>
<groupId>commons-fileupload</groupId>
<artifactId>commons-fileupload</artifactId>
<version>1.3.3</version>
</dependency>
<dependency>
<groupId>commons-io</groupId>
<artifactId>commons-io</artifactId>
<version>2.6</version>
</dependency>
2)配置文件上传解析器
<!--文件上传解析器-->
<bean id="multipartResolver"
class="org.springframework.web.multipart.commons.CommonsMultipartResolver">
<!-- 设定文件上传的最大值为5MB,5*1024*1024 -->
<property name="maxUploadSize" value="5242880"></property>
<!-- 设定文件上传时写入内存的最大值,如果小于这个参数不会生成临时文件,默认为10240 -->
<property name="maxInMemorySize" value="40960"></property>
</bean>
3)编写文件上传代码
<form action="${pageContext.request.contextPath}/fileUpload" method="post"
enctype="multipart/form-data">
名称:<input type="text" name="username"> <br>
文件:<input type="file" name="filePic"> <br>
<input type="submit" value="单文件上传">
</form>
@RequestMapping("/fileUpload")
public String fileUpload(String username, MultipartFile filePic) throws
IOException {
System.out.println(username);
// 获取文件名
String originalFilename = filePic.getOriginalFilename();
//保存文件
filePic.transferTo(new File("d:/upload/"+originalFilename));
return "success";
}
3.4 多文件上传
<form action="${pageContext.request.contextPath}/filesUpload" method="post"
enctype="multipart/form-data">
名称:<input type="text" name="username"> <br>
文件1:<input type="file" name="filePic"> <br>
文件2:<input type="file" name="filePic"> <br>
<input type="submit" value="多文件上传">
</form>
@RequestMapping("/filesUpload")
public String filesUpload(String username, MultipartFile[] filePic) throws
IOException {
System.out.println(username);
for (MultipartFile multipartFile : filePic) {
// 获取文件名
String originalFilename = multipartFile.getOriginalFilename();
// 保存到服务器
multipartFile.transferTo(new File("d:/upload/" + originalFilename));
}
return "success";
}
四 异常处理
4.1 异常处理的思路
在Java中,对于异常的处理一般有两种方式:
- 一种是当前方法捕获处理(try-catch),这种处理方式会造成业务代码和异常处理代码的耦合。
- 另一种是自己不处理,而是抛给调用者处理(throws),调用者再抛给它的调用者,也就是一直向上抛。
在这种方法的基础上,衍生出了SpringMVC的异常处理机制。
系统的dao、service、controller出现都通过throws Exception向上抛出,最后由springmvc前端控制器交由异常处理器进行异常处理,如下图:

4.2 自定义异常处理器
步骤分析
1. 创建异常处理器类实现HandlerExceptionResolver
2. 配置异常处理器
3. 编写异常页面
4. 测试异常跳转
1)创建异常处理器类实现HandlerExceptionResolver
public class GlobalExceptionResolver implements HandlerExceptionResolver {
@Override
public ModelAndView resolveException(HttpServletRequest request,
HttpServletResponse response, Object handler, Exception ex) {
ModelAndView modelAndView = new ModelAndView();
modelAndView.addObject("error", ex.getMessage());
modelAndView.setViewName("error");
return modelAndView;
}
}
2)配置异常处理器
@Component
public class GlobalExecptionResovler implements HandlerExceptionResolver {
}
<bean id="globalExecptionResovler"
class="com.lagou.exception.GlobalExecptionResovler"></bean>
3)编写异常页面
<%@ page contentType="text/html;charset=UTF-8" language="java" %>
<html>
<head>
<title>error</title>
</head>
<body>
<h3>这是一个最终异常的显示页面</h3>
<p>${error}</p>
</body>
</html>
4)测试异常跳转
@RequestMapping("/testException")
public String testException() {
int i = 1 / 0;
return "success";
}
4.3 web的处理异常机制
<!--处理500异常-->
<error-page>
<error-code>500</error-code>
<location>/500.jsp</location>
</error-page>
<!--处理404异常-->
<error-page>
<error-code>404</error-code>
<location>/404.jsp</location>
</error-page>
五 拦截器
5.1 拦截器(interceptor)的作用
Spring MVC 的拦截器类似于 Servlet 开发中的过滤器 Filter,用于对处理器进行预处理和后处理。
将拦截器按一定的顺序联结成一条链,这条链称为拦截器链(InterceptorChain)。在访问被拦截的方法或字段时,拦截器链中的拦截器就会按其之前定义的顺序被调用。拦截器也是AOP思想的具体实现。
5.2 拦截器和过滤器区别
关于interceptor和filter的区别,如图所示:

5.3 快速入门
步骤分析
1. 创建拦截器类实现HandlerInterceptor接口
2. 配置拦截器
3. 测试拦截器的拦截效果
1)创建拦截器类实现HandlerInterceptor接口
public class MyInterceptor1 implements HandlerInterceptor {
// 在目标方法执行之前 拦截
@Override
public boolean preHandle(HttpServletRequest request, HttpServletResponse
response, Object handler) {
System.out.println("preHendle1");
return true;
}
// 在目标方法执行之后,视图对象返回之前 执行
@Override
public void postHandle(HttpServletRequest request, HttpServletResponse
response, Object handler, ModelAndView modelAndView) {
System.out.println("postHandle1");
}
// 在流程都执行完毕后 执行
@Override
public void afterCompletion(HttpServletRequest request, HttpServletResponse
response, Object handler, Exception ex) {
System.out.println("afterCompletion1");
}
}
2)配置拦截器
<!--配置拦截器-->
<mvc:interceptors>
<mvc:interceptor>
<!--对哪些资源执行拦截操作-->
<mvc:mapping path="/**"/>
<bean class="com.lagou.interceptor.MyInterceptor1"/>
</mvc:interceptor>
</mvc:interceptors>
3)测试拦截器的拦截效果
编写Controller,发请求到controller,跳转页面
@Controller
public class TargetController {
@RequestMapping("/target")
public String targetMethod() {
System.out.println("目标方法执行了...");
return "success";
}
}
编写jsp页面
<%@ page contentType="text/html;charset=UTF-8" language="java" %>
<html>
<head>
<title>success</title>
</head>
<body>
<h3>success...</h3>
<% System.out.println("视图执行了....");%>
</body>
</html>
5.4 拦截器链
开发中拦截器可以单独使用,也可以同时使用多个拦截器形成一条拦截器链。开发步骤和单个拦截器是一样的,只不过注册的时候注册多个,注意这里注册的顺序就代表拦截器执行的顺序。
同上,再编写一个MyHandlerInterceptor2操作,测试执行顺序:
<!--配置拦截器-->
<mvc:interceptors>
<mvc:interceptor>
<!--拦截器路径配置-->
<mvc:mapping path="/**"/>
<!--自定义拦截器类-->
<bean class="com.lagou.interceptor.MyInterceptor1"></bean>
</mvc:interceptor>
<mvc:interceptor>
<!--拦截器路径配置-->
<mvc:mapping path="/**"/>
<!--自定义拦截器类-->
<bean class="com.lagou.interceptor.MyInterceptor2"></bean>
</mvc:interceptor>
</mvc:interceptors>
preHandle1...
preHandle2...
目标方法执行了
postHandle2...
postHandle1...
视图执行了...
afterCompletion2...
afterCompletion1...
5.5 知识小结
拦截器中的方法说明如下:

任务三:SSM整合
课程任务目标
* 实现SSM框架整合
1.1 需求和步骤分析
需求
使用ssm框架完成对 account 表的增删改查操作。
步骤分析
1. 准备数据库和表记录
2. 创建web项目
3. 编写mybatis在ssm环境中可以单独使用
4. 编写spring在ssm环境中可以单独使用
5. spring整合mybatis
6. 编写springMVC在ssm环境中可以单独使用
7. spring整合springMVC
1.2 环境搭建
1)准备数据库和表记录
CREATE TABLE `account` (
`id` int(11) NOT NULL AUTO_INCREMENT,
`name` varchar(32) DEFAULT NULL,
`money` double DEFAULT NULL,
PRIMARY KEY (`id`)
) ENGINE=InnoDB AUTO_INCREMENT=3 DEFAULT CHARSET=utf8;
insert into `account`(`id`,`name`,`money`) values (1,'tom',1000),
(2,'jerry',1000);
2)创建web项目
1.3 编写mybatis在ssm环境中可以单独使用
需求:基于mybatis先来实现对account表的查询
1)相关坐标
<!--mybatis坐标-->
<dependency>
<groupId>mysql</groupId>
<artifactId>mysql-connector-java</artifactId>
<version>5.1.47</version>
</dependency>
<dependency>
<groupId>com.alibaba</groupId>
<artifactId>druid</artifactId>
<version>1.1.15</version>
</dependency>
<dependency>
<groupId>org.mybatis</groupId>
<artifactId>mybatis</artifactId>
<version>3.5.1</version>
</dependency>
<dependency>
<groupId>junit</groupId>
<artifactId>junit</artifactId>
<version>4.12</version>
</dependency>
2)Account实体
public class Account {
private Integer id;
private String name;
private Double money;
}
3)AccountDao接口
public interface AccountDao {
public List<Account> findAll();
}
4)AccountDao.xml映射
<?xml version="1.0" encoding="UTF-8" ?>
<!DOCTYPE mapper PUBLIC "-//mybatis.org//DTD Mapper 3.0//EN"
"http://mybatis.org/dtd/mybatis-3-mapper.dtd">
<mapper namespace="com.lagou.dao.AccountDao">
<select id="findAll" resultType="Account">
select * from account
</select>
</mapper>
5)mybatis核心配置文件
jdbc.properties
jdbc.driver=com.mysql.jdbc.Driver
jdbc.url=jdbc:mysql://localhost:3306/spring_db
jdbc.username=root
jdbc.password=root
SqlMapConfig.xml
<?xml version="1.0" encoding="UTF-8" ?>
<!DOCTYPE configuration PUBLIC "-//mybatis.org//DTD Config 3.0//EN"
"http://mybatis.org/dtd/mybatis-3-config.dtd">
<configuration>
<!--加载properties-->
<properties resource="jdbc.properties"/>
<!--类型别名配置-->
<typeAliases>
<package name="com.lagou.domain"/>
</typeAliases>
<!--环境配置-->
<environments default="mysql">
<!--使用MySQL环境-->
<environment id="mysql">
<transactionManager type="JDBC"/>
<dataSource type="POOLED">
<property name="driver" value="${jdbc.driver}"/>
<property name="url" value="${jdbc.url}"/>
<property name="username" value="${jdbc.username}"/>
<property name="password" value="${jdbc.password}"/>
</dataSource>
</environment>
</environments>
<!--加载映射-->
<mappers>
<package name="com.lagou.dao"/>
</mappers>
</configuration>
6)测试代码
public class MyBatisTest {
@Test
public void testMybatis() throws Exception {
// 加载核心配置文件
InputStream is = Resources.getResourceAsStream("SqlMapConfig.xml");
// 获得sqlsession工厂对象
SqlSessionFactory sqlSessionFactory = new
SqlSessionFactoryBuilder().build(is);
// 获得sqlsession会话对象
SqlSession sqlSession = sqlSessionFactory.openSession();
// 获得mapper代理对象
AccountDao accountDao = sqlSession.getMapper(AccountDao.class);
// 执行
List<Account> list = accountDao.findAll();
for (Account account : list) {
System.out.println(account);
}
// 释放资源
sqlSession.close();
}
}
1.4 编写spring在ssm环境中可以单独使用
1)相关坐标
<!--spring坐标-->
<dependency>
<groupId>org.springframework</groupId>
<artifactId>spring-context</artifactId>
<version>5.1.5.RELEASE</version>
</dependency>
<dependency>
<groupId>org.aspectj</groupId>
<artifactId>aspectjweaver</artifactId>
<version>1.8.13</version>
</dependency>
<dependency>
<groupId>org.springframework</groupId>
<artifactId>spring-jdbc</artifactId>
<version>5.1.5.RELEASE</version>
</dependency>
<dependency>
<groupId>org.springframework</groupId>
<artifactId>spring-tx</artifactId>
<version>5.1.5.RELEASE</version>
</dependency>
<dependency>
<groupId>org.springframework</groupId>
<artifactId>spring-test</artifactId>
<version>5.1.5.RELEASE</version>
</dependency>
2)AccountService接口
public interface AccountService {
public List<Account> findAll();
}
3)AccountServiceImpl实现
@Service
public class AccountServiceImpl implements AccountService {
@Override
public List<Account> findAll() {
System.out.println("findAll执行了....");
return null;
}
}
4)spring核心配置文件
applicationContext.xml
<?xml version="1.0" encoding="UTF-8"?>
<beans xmlns="http://www.springframework.org/schema/beans"
xmlns:xsi="http://www.w3.org/2001/XMLSchema-instance"
xmlns:context="http://www.springframework.org/schema/context"
xmlns:tx="http://www.springframework.org/schema/tx"
xmlns:aop="http://www.springframework.org/schema/aop"
xsi:schemaLocation="
http://www.springframework.org/schema/beans
http://www.springframework.org/schema/beans/spring-beans.xsd
http://www.springframework.org/schema/context
http://www.springframework.org/schema/context/spring-context.xsd
http://www.springframework.org/schema/tx
http://www.springframework.org/schema/tx/spring-tx.xsd
http://www.springframework.org/schema/aop
http://www.springframework.org/schema/aop/spring-aop.xsd">
<!--注解组件扫描-->
<context:component-scan base-package="com.lagou.service"/>
</beans>
5)测试代码
@RunWith(SpringJUnit4ClassRunner.class)
@ContextConfiguration("classpath:applicationContext.xml")
public class SpringTest {
@Autowired
private AccountService accountService;
@Test
public void testSpring() throws Exception {
List<Account> list = accountService.findAll();
System.out.println(list);
}
}
1.5 spring整合mybatis
1)整合思想
将mybatis接口代理对象的创建权交给spring管理,我们就可以把dao的代理对象注入到service中,此时也就完成了spring与mybatis的整合了。
2)导入整合包
<!--mybatis整合spring坐标-->
<dependency>
<groupId>org.mybatis</groupId>
<artifactId>mybatis-spring</artifactId>
<version>1.3.1</version>
</dependency>
3)spring配置文件管理mybatis
注意:此时可以将mybatis主配置文件删除。
<?xml version="1.0" encoding="UTF-8"?>
<beans xmlns="http://www.springframework.org/schema/beans"
xmlns:xsi="http://www.w3.org/2001/XMLSchema-instance"
xmlns:context="http://www.springframework.org/schema/context"
xmlns:tx="http://www.springframework.org/schema/tx"
xmlns:aop="http://www.springframework.org/schema/aop"
xsi:schemaLocation="
http://www.springframework.org/schema/beans
http://www.springframework.org/schema/beans/spring-beans.xsd
http://www.springframework.org/schema/context
http://www.springframework.org/schema/context/spring-context.xsd
http://www.springframework.org/schema/tx
http://www.springframework.org/schema/tx/spring-tx.xsd
http://www.springframework.org/schema/aop
http://www.springframework.org/schema/aop/spring-aop.xsd">
<!--注解组件扫描-->
<context:component-scan base-package="com.lagou.service"/>
<!--spring整合mybatis-->
<context:property-placeholder location="classpath:jdbc.properties"/>
<bean id="dataSource" class="com.alibaba.druid.pool.DruidDataSource">
<property name="driverClassName" value="${jdbc.driver}"/>
<property name="url" value="${jdbc.url}"/>
<property name="username" value="${jdbc.username}"/>
<property name="password" value="${jdbc.password}"/>
</bean>
<!--SqlSessionFactory创建交给spring的IOC容器-->
<bean id="sqlSessionFactory"
class="org.mybatis.spring.SqlSessionFactoryBean">
<!--数据库环境配置-->
<property name="dataSource" ref="dataSource"/>
<!--类型别名配置-->
<property name="typeAliasesPackage" value="com.lagou.domain"/>
<!--如果要引入mybatis主配置文件,可以通过如下配置-->
<!--<property name="configLocation"
value="classpath:SqlMapConfig.xml"/>-->
</bean>
<!--映射接口扫描配置,由spring创建代理对象,交给IOC容器-->
<bean class="org.mybatis.spring.mapper.MapperScannerConfigurer">
<property name="basePackage" value="com.lagou.dao"/>
</bean>
</beans>
4)修改AccountServiceImpl
@Service
public class AccountServiceImpl implements AccountService {
@Autowired
private AccountDao accountDao;
@Override
public List<Account> findAll() {
return accountDao.findAll();
}
}
error
问题原因
mysql依赖版本太低
1.6 编写springMVC在ssm环境中可以单独使用
需求:访问到controller里面的方法查询所有账户,并跳转到list.jsp页面进行列表展示
1)相关坐标
<!--springMVC坐标-->
<dependency>
<groupId>org.springframework</groupId>
<artifactId>spring-webmvc</artifactId>
<version>5.1.5.RELEASE</version>
</dependency>
<dependency>
<groupId>javax.servlet</groupId>
<artifactId>javax.servlet-api</artifactId>
<version>3.1.0</version>
<scope>provided</scope>
</dependency>
<dependency>
<groupId>javax.servlet.jsp</groupId>
<artifactId>jsp-api</artifactId>
<version>2.2</version>
<scope>provided</scope>
</dependency>
<dependency>
<groupId>jstl</groupId>
<artifactId>jstl</artifactId>
<version>1.2</version>
</dependency>
2)导入页面资源
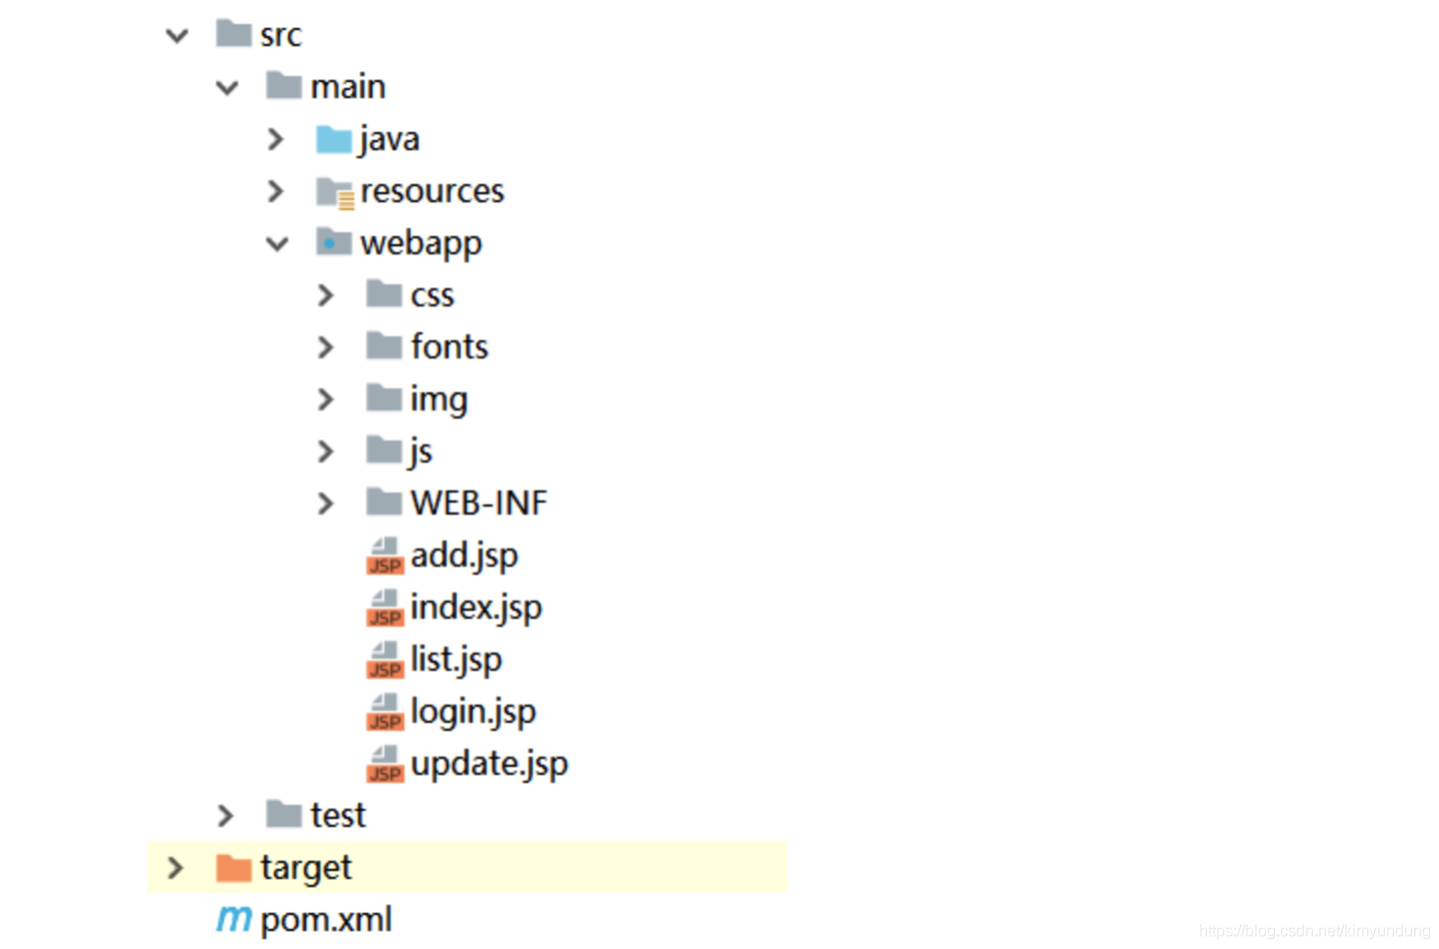
3)前端控制器DispathcerServlet
<?xml version="1.0" encoding="UTF-8"?>
<web-app xmlns="http://xmlns.jcp.org/xml/ns/javaee"
xmlns:xsi="http://www.w3.org/2001/XMLSchema-instance"
xsi:schemaLocation="http://xmlns.jcp.org/xml/ns/javaee
http://xmlns.jcp.org/xml/ns/javaee/web-app_3_1.xsd"
version="3.1">
<!--前端控制器-->
<servlet>
<servlet-name>DispatcherServlet</servlet-name>
<servletclass>org.springframework.web.servlet.DispatcherServlet</servlet-class>
<init-param>
<param-name>contextConfigLocation</param-name>
<param-value>classpath:spring-mvc.xml</param-value>
</init-param>
<load-on-startup>2</load-on-startup>
</servlet>
<servlet-mapping>
<servlet-name>DispatcherServlet</servlet-name>
<url-pattern>/</url-pattern>
</servlet-mapping>
<!--post中文处理-->
<filter>
<filter-name>CharacterEncodingFilter</filter-name>
<filterclass>org.springframework.web.filter.CharacterEncodingFilter</filter-class>
<init-param>
<param-name>encoding</param-name>
<param-value>UTF-8</param-value>
</init-param>
</filter>
<filter-mapping>
<filter-name>CharacterEncodingFilter</filter-name>
<url-pattern>/*</url-pattern>
</filter-mapping>
</web-app>
4)AccountController和 list.jsp
@Controller
@RequestMapping("/account")
public class AccountController {
@RequestMapping("/findAll")
public String findAll(Model model) {
List<Account> list = new ArrayList<>();
list.add(new Account(1,"张三",1000d));
list.add(new Account(2,"李四",1000d));
model.addAttribute("list", list);
return "list";
}
}
<c:forEach items="${list}" var="account">
<tr>
<td>
<input type="checkbox" name="ids">
</td>
<td>${account.id}</td>
<td>${account.name}</td>
<td>${account.money}</td>
<td>
<a class="btn btn-default btn-sm" href="update.jsp">修改</a>
<a class="btn btn-default btn-sm" href="">删除</a>
</td>
</tr>
</c:forEach>
5)springMVC核心配置文件
<beans xmlns="http://www.springframework.org/schema/beans"
xmlns:mvc="http://www.springframework.org/schema/mvc"
xmlns:context="http://www.springframework.org/schema/context"
xmlns:xsi="http://www.w3.org/2001/XMLSchema-instance"
xsi:schemaLocation="http://www.springframework.org/schema/beans
http://www.springframework.org/schema/beans/spring-beans.xsd
http://www.springframework.org/schema/mvc
http://www.springframework.org/schema/mvc/spring-mvc.xsd
http://www.springframework.org/schema/context
http://www.springframework.org/schema/context/spring-context.xsd">
<!--组件扫描-->
<context:component-scan base-package="com.lagou.controller"/>
<!--mvc注解增强-->
<mvc:annotation-driven/>
<!--视图解析器-->
<bean
class="org.springframework.web.servlet.view.InternalResourceViewResolver">
<property name="prefix" value="/"/>
<property name="suffix" value=".jsp"/>
</bean>
<!--实现静态资源映射-->
<mvc:default-servlet-handler/>
</beans>
1.7 spring整合springMVC
1)整合思想
spring和springMVC其实根本就不用整合,本来就是一家。
但是我们需要做到spring和web容器整合,让web容器启动的时候自动加载spring配置文件,web容器销毁的时候spring的ioc容器也销毁。
2)spring和web容器整合
ContextLoaderListener加载【掌握】
可以使用spring-web包中的ContextLoaderListener监听器,可以监听servletContext容器的创建和
销毁,来同时创建或销毁IOC容器。
<!--spring 与 web容器整合-->
<listener>
<listener-class>
org.springframework.web.context.ContextLoaderListener
</listener-class>
</listener>
<context-param>
<param-name>contextConfigLocation</param-name>
<param-value>classpath:applicationContext.xml</param-value>
</context-param>
3)修改AccountController
@Controller
@RequestMapping("/account")
public class AccountController {
@Autowired
private AccountService accountService;
@RequestMapping("/findAll")
public String findAll(Model model) {
List<Account> list = accountService.findAll();
model.addAttribute("list", list);
return "list";
}
}
1.8 spring配置声明式事务
1)spring配置文件加入声明式事务
<!--事务管理器-->
<bean id="transactionManager"
class="org.springframework.jdbc.datasource.DataSourceTransactionManager">
<property name="dataSource" ref="dataSource"></property>
</bean>
<!--开启事务注解支持-->
<tx:annotation-driven/>
@Service
@Transactional
public class AccountServiceImpl implements AccountService {
}
2)add.jsp
<form action="${pageContext.request.contextPath}/account/save" method="post">
<div class="form-group">
<label for="name">姓名:</label>
<input type="text" class="form-control" id="name" name="name"
placeholder="请输入姓名">
</div>
<div class="form-group">
<label for="age">余额:</label>
<input type="text" class="form-control" id="age" name="age"
placeholder="请输入余额">
</div>
<div class="form-group" style="text-align: center">
<input class="btn btn-primary" type="submit" value="提交" />
<input class="btn btn-default" type="reset" value="重置" />
<input class="btn btn-default" type="button" onclick="history.go(-1)"
value="返回" />
</div>
</form>
3)AccountController
@RequestMapping("/save")
public String save(Account account){
accountService.save(account);
return "redirect:/account/findAll";
}
4)AccountService接口和实现类
public void save(Account account);
@Service
@Transactional
public class AccountServiceImpl implements AccountService {
@Override
public void save(Account account) {
accountDao.save(account);
}
}
5)AccountDao
void save(Account account);
6)AccountDao.xml映射
<insert id="save" parameterType="Account">
insert into account (name, money) values (#{name}, #{money})
</insert>
1.9 修改操作
1.9.1 数据回显
① AccountController
@RequestMapping("/findById")
public String findById(Integer id, Model model) {
Account account = accountService.findById(id);
model.addAttribute("account", account);
return "update";
}
② AccountService接口和实现类
Account findById(Integer id);
@Override
public Account findById(Integer id) {
return accountDao.findById(id);
}
③ AccountDao接口和映射文件
Account findById(Integer id);
<select id="findById" parameterType="int" resultType="Account">
select * from account where id = #{id}
</select>
④ update.jsp
<form action="${pageContext.request.contextPath}/account/update" method="post">
<input type="hidden" name="id" value="${account.id}">
<div class="form-group">
<label for="name">姓名:</label>
<input type="text" class="form-control" id="name" name="name"
value="${account.name}" placeholder="请输入姓名">
</div>
<div class="form-group">
<label for="money">余额:</label>
<input type="text" class="form-control" id="money" name="money"
value="${account.money}" placeholder="请输入余额">
</div>
<div class="form-group" style="text-align: center">
<input class="btn btn-primary" type="submit" value="提交" />
<input class="btn btn-default" type="reset" value="重置" />
<input class="btn btn-default" type="button" onclick="history.go(-1)"
value="返回" />
</div>
</form>
1.9.2 账户更新
① AccountController
@RequestMapping("/update")
public String update(Account account){
accountService.update(account);
return "redirect:/account/findAll";
}
② AccountService接口和实现类
void update(Account account);
@Override
public void update(Account account) {
accountDao.update(account);
}
③ AccountDao接口和映射文件
void update(Account account);
<update id="update" parameterType="Account">
update account set name = #{name},money = #{money} where id = #{id}
</update>
1.10 批量删除
1)list.jsp
<script>
$('#checkAll').click(function () {
$('input[name="ids"]').prop('checked', $(this).prop('checked'));
})
$('#deleteBatchBtn').click(function () {
if (confirm('您确定要删除吗?')) {
if ($('input[name="ids"]:checked').length > 0) {
$('#deleteBatchForm').submit();
} else {
alert('想啥呢?')
}
}
})
</script>
2)AccountController
@RequestMapping("/deleteBatch")
public String deleteBatch(Integer[] ids) {
accountService.deleteBatch(ids);
return "redirect:/account/findAll";
}
3)AccountService接口和实现类
void deleteBatch(Integer[] ids);
@Override
public void deleteBatch(Integer[] ids) {
accountDao.deleteBatch(ids);
}
4)AccountDao接口和映射文件
void deleteBatch(Integer[] ids);
<delete id="deleteBatch" parameterType="int">
delete from account
<where>
<foreach collection="array" open="id in(" close=")" separator="," item="id">
#{id}
</foreach>
</where>
</delete>