目录
一、NIO与IO的区别
NIO面向缓冲区的、基于通道(可以理解为铁路)的IO操作,是双向的,非阻塞式IO。通道负责数据传输、缓冲区负责数据存取
IO面向流、是单向的,阻塞式IO(new FileInputStream 定制的一个单向管道)
阻塞式IO:当一个线程调用 read() 或 write()时,该线程被阻塞,直到有一些数据被读取或写入,该线程在此期间不能执行其他任务。因此,在完成网络通信进行 IO 操作时,由于线程会阻塞,所以服务器端必须为每个客户端都提供一个独立的线程进行处理,当服务器端需要处理大量客户端时,性能急剧下降。
若采用单线程模式,服务端等待客户端的数据时,该线程就会等待,此时,若有多个客户端需要与服务器连接,那么会建立一个等待队列,速率就会急速下降。解决方法是:采用多线程的方式,每一个客户端在服务器对应一个线程,但是当有大量的客户端与服务器建立连接时,服务器会崩溃。并且若线程等待客户端的数据,该线程还是阻塞的,线程的利用率也不高。
阻塞IO采用多线程的方式:

非阻塞式IO:当线程从某通道进行读写数据时,若没有数据可用时,该线程可以进行其他任务。线程通常将非阻塞 IO 的空闲时间用于在其他通道上执行 IO 操作,所以单独的线程可以管理多个输入和输出通道。因此,NIO 可以让服务器端使用一个或有限几个线程来同时处理连接到服务器端的所有客户端。

当注册到选择器上的通道中的数据完全准备就绪后,选择器才会将任务分配到服务端的一个或多个线程上运行。
二、NIO的缓冲区
1、缓冲区(Buffer):
* 在 Java NIO 中负责数据的存取。缓冲区就是数组。用于存储不同数据类型的数据
* 根据数据类型不同(boolean 除外),提供了相应类型的缓冲区:
* ByteBuffer
* CharBuffer
* ShortBuffer
* IntBuffer
* LongBuffer
* FloatBuffer
* DoubleBuffer
*
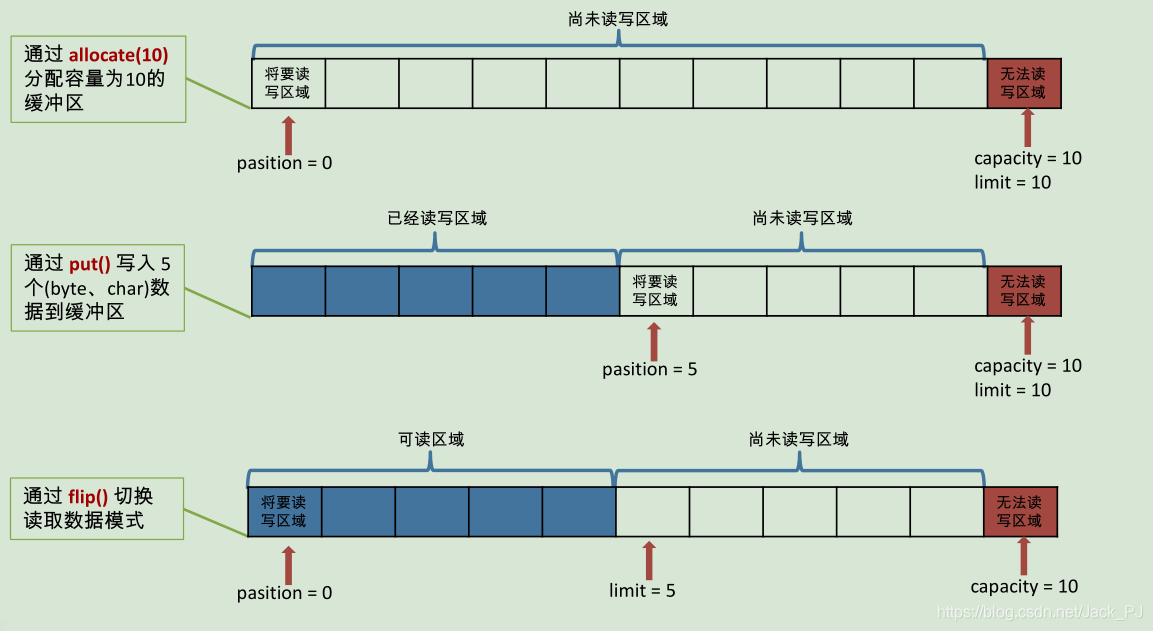
* 上述缓冲区的管理方式几乎一致,通过 allocate() 获取缓冲区
2、缓冲区存取数据的两个核心方法:
* put() : 存入数据到缓冲区中
* get() : 获取缓冲区中的数据
3、缓冲区中的四个核心属性:
* capacity : 容量,表示缓冲区中最大存储数据的容量。一旦声明不能改变。
* limit : 界限,表示缓冲区中可以操作数据的大小。(limit 后数据不能进行读写)
* position : 位置,表示缓冲区中正在操作数据的位置。
* mark : 标记,表示记录当前 position 的位置。可以通过 reset() 将position恢复到 mark的位置
* 0 <= position <= limit <= capacity
* mark可能大于position也可能小于position,也可以等于position
4、直接缓冲区与非直接缓冲区:
* 非直接缓冲区:通过 allocate() 方法分配缓冲区,将缓冲区建立在 JVM 的内存中。每次读写数据会在内核地址空间以及用户空间之间复制数据
* 直接缓冲区:通过 allocateDirect() 方法分配直接缓冲区,将缓冲区建立在物理内存中,可以提高效率。直接存放在物理内存映射文件中,不需要再内核地址空间和用户地址空间之间进行复制
5、常用的一些方法:
1)、ByteBuffer.allocate()分配一个指定大小的缓冲区(一开始mark=-1)
2)、put()存数据到缓冲区
3)、flip()切换读取数据模式
底层操作:limit=position、position=0、mark=-1
4)、get()读取缓冲区中的数据
get(byte[] dst, int offset, int length)中的offset指的是dst中的开始位置
5)、rewind():倒回以重新读数
底层操作:position=0、mark=-1
6)、clear() : 清空缓冲区. 只是将position,limit,capacity,mark置为刚刚分配缓冲区时的位置,但是缓冲区中的数据依然存在,但是处于“被遗忘”状态
7)、mark()
底层操作:mark=position
8)、reset();
底层操作:首先判断mark是否小于0,若小于0则抛出异常,否则position=mark
9)、hasRemaining()判断缓冲区中是否还有剩余数据
buffer.remaining()获取缓冲区中可以操作的数量
三、NIO的通道
通道操作的对象:ByteBuffer[]
缓冲区操作对象: byte[]

package com.pj.nio;


import java.io.FileInputStream;

import java.io.FileOutputStream;

import java.io.IOException;

import java.io.RandomAccessFile;

import java.nio.ByteBuffer;

import java.nio.CharBuffer;

import java.nio.MappedByteBuffer;

import java.nio.channels.FileChannel;

import java.nio.channels.FileChannel.MapMode;

import java.nio.charset.CharacterCodingException;

import java.nio.charset.Charset;

import java.nio.charset.CharsetDecoder;

import java.nio.charset.CharsetEncoder;

import java.nio.file.Paths;

import java.nio.file.StandardOpenOption;

import java.util.Map;

import java.util.Map.Entry;

import java.util.Set;


import org.junit.Test;


/*

*都是指的是参数中数组的offset

*FileInputStream:int read(byte[] dst, int offset, int  length);

* new String(byte[] src, int offset, int  length);

* ByteBuffer:

* ByteBuffer put(byte[] src, int offset, int  length);

* ByteBuffer get(byte[] dst, int offset, int  length);

* FileChannel:

* abstract long read(ByteBuffer[] dsts, int  offset, int length)

* abstract long write(ByteBuffer[] srcs, int  offset, int length)

* 一、通道(Channel):用于源节点与目标节点的连接。在 Java NIO 中负责缓冲区中数据的传输。Channel 本身不存储数据,因此需要配合缓冲区进行传输。

*

* 二、通道的主要实现类

*     java.nio.channels.Channel 接口:

*         |--FileChannel

*         |--SocketChannel

*         |--ServerSocketChannel

*         |--DatagramChannel

*

* 三、获取通道

* 1. Java 针对支持通道的类提供了 getChannel() 方法

*         本地 IO:

*         FileInputStream/FileOutputStream

*         RandomAccessFile

*

*         网络IO:

*         Socket

*         ServerSocket

*         DatagramSocket

*

* 2. 在 JDK 1.7 中的 NIO.2 针对各个通道提供了静态方法 open()

* 3. 在 JDK 1.7 中的 NIO.2 的 Files 工具类的 newByteChannel()

*

* 四、通道之间的数据传输

* transferFrom()

* transferTo()

*

* 五、分散(Scatter)与聚集(Gather)

* 分散读取(Scattering Reads):将通道中的数据分散到多个缓冲区中

* 聚集写入(Gathering Writes):将多个缓冲区中的数据聚集到通道中

*

* 六、字符集:Charset

* 编码:字符串 -> 字节数组

* 解码:字节数组  -> 字符串

*

*

* 通道:read,write

* 流:read,write

* 缓冲区:get,put

*/

public class TestChannel {


    //字符集

    @Test

    public void test6() throws IOException{

        Charset cs1 = Charset.forName("GBK");


        //获取编码器

        CharsetEncoder ce = cs1.newEncoder();


        //获取解码器

        CharsetDecoder cd = cs1.newDecoder();


        CharBuffer cBuf = CharBuffer.allocate(1024);

        cBuf.put("!");

        cBuf.flip();


        //编码

        ByteBuffer bBuf = ce.encode(cBuf);


        for (int i = 0; i < 12; i++) {

            System.out.println(bBuf.get());

        }


        //解码

        bBuf.flip();

        CharBuffer cBuf2 = cd.decode(bBuf);

        System.out.println(cBuf2.toString());


        System.out.println("------------------------------------------------------");


        Charset cs2 = Charset.forName("GBK");

        bBuf.flip();

        CharBuffer cBuf3 = cs2.decode(bBuf);

        System.out.println(cBuf3.toString());

    }


    @Test

    public void test5(){

        Map<String, Charset> map = Charset.availableCharsets();


        Set<Entry<String, Charset>> set = map.entrySet();


        for (Entry<String, Charset> entry : set) {

            System.out.println(entry.getKey() + "=" + entry.getValue());

        }

    }


    //分散和聚集

    @Test

    public void test4() throws IOException{

        //随机访问文件流主要是通过文件指针来实现随机访问

        RandomAccessFile raf1 = new RandomAccessFile("1.txt", "rw");


        //1. 获取通道

        FileChannel channel1 = raf1.getChannel();


        //2. 分配指定大小的缓冲区

        ByteBuffer buf1 = ByteBuffer.allocate(100);

        ByteBuffer buf2 = ByteBuffer.allocate(1024);


        //3. 分散读取

        ByteBuffer[] bufs = {buf1, buf2};

        channel1.read(bufs);


        for (ByteBuffer byteBuffer : bufs) {

            byteBuffer.flip();

        }


        System.out.println(new String(bufs[0].array(), 0, bufs[0].limit()));

        System.out.println("-----------------");

        System.out.println(new String(bufs[1].array(), 0, bufs[1].limit()));


        //4. 聚集写入

        RandomAccessFile raf2 = new RandomAccessFile("2.txt", "rw");

        FileChannel channel2 = raf2.getChannel();


        channel2.write(bufs);

    }


    //通道之间的数据传输(直接缓冲区)

    @Test

    public void test3() throws IOException{

        FileChannel inChannel = FileChannel.open(Paths.get("d:/1.mkv"), StandardOpenOption.READ);

        FileChannel outChannel = FileChannel.open(Paths.get("d:/2.mkv"), StandardOpenOption.WRITE, StandardOpenOption.READ, StandardOpenOption.CREATE);


//        inChannel.transferTo(0, inChannel.size(), outChannel);

        outChannel.transferFrom(inChannel, 0, inChannel.size());


        inChannel.close();

        outChannel.close();

    }


    //使用直接缓冲区完成文件的复制(内存映射文件)

    @Test

    public void test2() throws IOException{//2127-1902-1777

        long start = System.currentTimeMillis();


        FileChannel inChannel = FileChannel.open(Paths.get("d:/1.mkv"), StandardOpenOption.READ);//以这种方式指定了读写权限的通道便可以实现双向传输

        //StandardOpenOption.CREATE指的是当文件不存在时创建新的文件,否则不做任何操作

        //StandardOpenOption.CREATE_NEW指的是创建新的文件,当文件存在是抛出异常

        FileChannel outChannel = FileChannel.open(Paths.get("d:/2.mkv"), StandardOpenOption.WRITE, StandardOpenOption.READ, StandardOpenOption.CREATE);


        //内存映射文件(在物理内存中直接建立缓冲区,向缓冲区放数据就已经放入了内存,无需利用通道。这里最好不使用outChannel.write(inMappedBuf)可能会报错)

        MappedByteBuffer inMappedBuf = inChannel.map(MapMode.READ_ONLY, 0, inChannel.size());

        MappedByteBuffer outMappedBuf = outChannel.map(MapMode.READ_WRITE, 0, inChannel.size());


        //直接对缓冲区进行数据的读写操作

        byte[] dst = new byte[inMappedBuf.limit()];

        inMappedBuf.get(dst);

        outMappedBuf.put(dst);


        inChannel.close();

        outChannel.close();


        long end = System.currentTimeMillis();

        System.out.println("耗费时间为:" + (end - start));

    }


    //利用通道完成文件的复制(非直接缓冲区)

    @Test

    public void test1(){//10874-10953

        long start = System.currentTimeMillis();


        FileInputStream fis = null;

        FileOutputStream fos = null;

        //①获取通道

        FileChannel inChannel = null;//此时inChannel通道只可以读取数据,不能写入数据(因为通道没有写入权限)

        FileChannel outChannel = null;

        try {

            fis = new FileInputStream("d:/1.mkv");

            //默认为存在文件就覆盖掉

            fos = new FileOutputStream("d:/2.mkv");

            //向文件中追加

            //fos = new FileOutputStream("d:/2.mkv",true);

            inChannel = fis.getChannel();

            outChannel = fos.getChannel();


            //②分配指定大小的缓冲区

            ByteBuffer buf = ByteBuffer.allocate(1024);


            //③将通道中的数据存入缓冲区中

            while(inChannel.read(buf) != -1){

                buf.flip(); //切换读取数据的模式

                //④将缓冲区中的数据写入通道中

                outChannel.write(buf);

                buf.clear(); //清空缓冲区

            }

        } catch (IOException e) {

            e.printStackTrace();

        } finally {

            if(outChannel != null){

                try {

                    outChannel.close();

                } catch (IOException e) {

                    e.printStackTrace();

                }

            }


            if(inChannel != null){

                try {

                    inChannel.close();

                } catch (IOException e) {

                    e.printStackTrace();

                }

            }


            if(fos != null){

                try {

                    fos.close();

                } catch (IOException e) {

                    e.printStackTrace();

                }

            }


            if(fis != null){

                try {

                    fis.close();

                } catch (IOException e) {

                    e.printStackTrace();

                }

            }

        }


        long end = System.currentTimeMillis();

        System.out.println("耗费时间为:" + (end - start));


    }


}
四、NIO的阻塞式与非阻塞式
1、阻塞式:
1)例1:
package com.pj.nio;


import java.io.IOException;

import java.net.InetSocketAddress;

import java.nio.ByteBuffer;

import java.nio.channels.FileChannel;

import java.nio.channels.ServerSocketChannel;

import java.nio.channels.SocketChannel;

import java.nio.file.Paths;

import java.nio.file.StandardOpenOption;


import org.junit.Test;


/*

* 一、使用 NIO 完成网络通信的三个核心:

*

* 1. 通道(Channel):负责连接

*

*        java.nio.channels.Channel 接口:

*             |--SelectableChannel

*                 |--SocketChannel

*                 |--ServerSocketChannel

*                 |--DatagramChannel

*

*                 |--Pipe.SinkChannel

*                 |--Pipe.SourceChannel

*

* 2. 缓冲区(Buffer):负责数据的存取

*

* 3. 选择器(Selector):是 SelectableChannel 的多路复用器。用于监控 SelectableChannel 的 IO 状况

*

*/

public class TestBlockingNIO {


    //客户端

    @Test

    public void client() throws IOException{

        //1. 获取通道

        SocketChannel sChannel = SocketChannel.open(new InetSocketAddress("127.0.0.1", 9898));


        FileChannel inChannel = FileChannel.open(Paths.get("1.jpg"), StandardOpenOption.READ);


        //2. 分配指定大小的缓冲区

        ByteBuffer buf = ByteBuffer.allocate(1024);


        //3. 读取本地文件,并发送到服务端

        while(inChannel.read(buf) != -1){

            buf.flip();

            sChannel.write(buf);

            buf.clear();

        }


        //4. 关闭通道

        inChannel.close();

        sChannel.close();

    }


    //服务端

    @Test

    public void server() throws IOException{

        //1. 获取通道

        ServerSocketChannel ssChannel = ServerSocketChannel.open();


        FileChannel outChannel = FileChannel.open(Paths.get("2.jpg"), StandardOpenOption.WRITE, StandardOpenOption.CREATE);


        //2. 绑定连接

        ssChannel.bind(new InetSocketAddress(9898));


        //3. 获取客户端连接的通道

        SocketChannel sChannel = ssChannel.accept();


        //4. 分配指定大小的缓冲区

        ByteBuffer buf = ByteBuffer.allocate(1024);


        //5. 接收客户端的数据,并保存到本地

        while(sChannel.read(buf) != -1){

            buf.flip();

            outChannel.write(buf);

            buf.clear();

        }


        //6. 关闭通道

        sChannel.close();

        outChannel.close();

        ssChannel.close();


    }


}
2)例2:
package com.pj.nio;


import java.io.IOException;

import java.net.InetSocketAddress;

import java.nio.ByteBuffer;

import java.nio.channels.FileChannel;

import java.nio.channels.ServerSocketChannel;

import java.nio.channels.SocketChannel;

import java.nio.file.Paths;

import java.nio.file.StandardOpenOption;


import org.junit.Test;


public class TestBlockingNIO2 {


    //客户端

    @Test

    public void client() throws IOException{

        SocketChannel sChannel = SocketChannel.open(new InetSocketAddress("127.0.0.1", 9898));


        FileChannel inChannel = FileChannel.open(Paths.get("1.jpg"), StandardOpenOption.READ);


        ByteBuffer buf = ByteBuffer.allocate(1024);


        while(inChannel.read(buf) != -1){

            buf.flip();

            sChannel.write(buf);

            buf.clear();

        }


        sChannel.shutdownOutput();//关闭连接,但是不会关闭通道


        //接收服务端的反馈

        int len = 0;

        while((len = sChannel.read(buf)) != -1){

            buf.flip();

            System.out.println(new String(buf.array(), 0, len));

            buf.clear();

        }


        inChannel.close();

        sChannel.close();

    }


    //服务端

    @Test

    public void server() throws IOException{

        ServerSocketChannel ssChannel = ServerSocketChannel.open();


        FileChannel outChannel = FileChannel.open(Paths.get("2.jpg"), StandardOpenOption.WRITE, StandardOpenOption.CREATE);


        ssChannel.bind(new InetSocketAddress(9898));


        SocketChannel sChannel = ssChannel.accept();


        ByteBuffer buf = ByteBuffer.allocate(1024);


        while(sChannel.read(buf) != -1){//此时服务器并不知道客户端有没有发送完数据,所以这里不会结束,

                                        //而客户端也没有收到数据,所以一直等待,有点像死锁

            buf.flip();

            outChannel.write(buf);

            buf.clear();

        }


        //发送反馈给客户端

        buf.put("服务端接收数据成功".getBytes());

        buf.flip();

        sChannel.write(buf);


        sChannel.close();

        outChannel.close();

        ssChannel.close();

    }


}
2、非阻塞式:
package com.pj.nio;


import java.io.IOException;

import java.net.InetSocketAddress;

import java.nio.ByteBuffer;

import java.nio.channels.SelectionKey;

import java.nio.channels.Selector;

import java.nio.channels.ServerSocketChannel;

import java.nio.channels.SocketChannel;

import java.util.Date;

import java.util.Iterator;

import java.util.Scanner;


import org.junit.Test;


/*

* 一、使用 NIO 完成网络通信的三个核心:

*

* 1. 通道(Channel):负责连接

*

*        java.nio.channels.Channel 接口:

*             |--SelectableChannel

*                 |--SocketChannel

*                 |--ServerSocketChannel

*                 |--DatagramChannel

*

*                 |--Pipe.SinkChannel

*                 |--Pipe.SourceChannel

*

* 2. 缓冲区(Buffer):负责数据的存取

*

* 3. 选择器(Selector):是 SelectableChannel 的多路复用器。用于监控 SelectableChannel 的 IO 状况

*

*/

public class TestNonBlockingNIO {


    //客户端

    @Test

    public void client() throws IOException{

        //1. 获取通道

        SocketChannel sChannel = SocketChannel.open(new InetSocketAddress("127.0.0.1", 9898));


        //2. 切换非阻塞模式

        sChannel.configureBlocking(false);


        //3. 分配指定大小的缓冲区

        ByteBuffer buf = ByteBuffer.allocate(1024);


        //4. 发送数据给服务端

        Scanner scan = new Scanner(System.in);


        while(scan.hasNext()){

            String str = scan.next();

            buf.put((new Date().toString() + "\n" + str).getBytes());

            buf.flip();

            sChannel.write(buf);

            buf.clear();

        }


        //5. 关闭通道

        sChannel.close();

    }


    //服务端

    @Test

    public void server() throws IOException{

        //1. 获取通道

        ServerSocketChannel ssChannel = ServerSocketChannel.open();


        //2. 切换非阻塞模式

        ssChannel.configureBlocking(false);


        //3. 绑定连接

        ssChannel.bind(new InetSocketAddress(9898));


        //4. 获取选择器

        Selector selector = Selector.open();


        //5. 将通道注册到选择器上, 并且指定“监听接收事件”

        ssChannel.register(selector, SelectionKey.OP_ACCEPT);


        //6. 轮询式的获取选择器上已经“准备就绪”的事件

        while(selector.select() > 0){


            //7. 获取当前选择器中所有注册的“选择键(已就绪的监听事件)”

            Iterator<SelectionKey> it = selector.selectedKeys().iterator();


            while(it.hasNext()){

                //8. 获取准备“就绪”的是事件

                SelectionKey sk = it.next();


                //9. 判断具体是什么事件准备就绪

                if(sk.isAcceptable()){

                    //10. 若“接收就绪”,获取客户端连接

                    SocketChannel sChannel = ssChannel.accept();


                    //11. 切换非阻塞模式

                    sChannel.configureBlocking(false);


                    //12. 将该通道注册到选择器上

                    sChannel.register(selector, SelectionKey.OP_READ);

                }else if(sk.isReadable()){

                    //13. 获取当前选择器上“读就绪”状态的通道

                    SocketChannel sChannel = (SocketChannel) sk.channel();


                    //14. 读取数据

                    ByteBuffer buf = ByteBuffer.allocate(1024);


                    int len = 0;

                    while((len = sChannel.read(buf)) > 0 ){

                        buf.flip();

                        System.out.println(new String(buf.array(), 0, len));

                        buf.clear();

                    }

                }


                //15. 取消选择键 SelectionKey

                it.remove();

            }

        }

    }

}
五、总结
客户端:
SocketChannel sChannel = SocketChannel.open(new InetSocketAddress("127.0.0.1", 9898))
1、获取通道
2、转换为非阻塞模式
3、分配指定大小的缓冲区
4、发送数据给服务器
5、关闭通道
服务端:
ServerSocketChannel ssChannel = ServerSocketChannel.open();
1、获取通道
2、切换为非阻塞模式
3、绑定连接
4、获取选择器
5、将ssChannel通道注册到选择器上,并且指定“监听接收事件”
6、轮询式的获取选择器上已经“准备就绪”的事件
7、获取当前选择器上所有注册的“选择键”(已就绪的监听事件)
8、获取准备"就绪"的事件
9、判断具体是什么事件准备就绪
10、若"接收就绪",获取客户端连接
11、切换为非阻塞模式
12、将该通道以“读”的方式注册到选择器上
13、获取选择器上就“读就绪状态”的通道
14、读取数据
15、取消选择键