大家好:
flume对接SparkStream的pull的方式,
简单的介绍下: 是SparkStream从flume中拉的方式获取数据
----flume的配置文件 flume-poll.conf
# Name the components on this agent
a1.sources = r1
a1.sinks = k1
a1.channels = c1

# source
a1.sources.r1.type = spooldir
a1.sources.r1.spoolDir = /root/flume
a1.sources.r1.fileHeader = true

# Describe the sink
a1.sinks.k1.type = org.apache.spark.streaming.flume.sink.SparkSink
a1.sinks.k1.hostname = 192.168.17.108
a1.sinks.k1.port = 8888

# Use a channel which buffers events in memory
a1.channels.c1.type = memory
a1.channels.c1.capacity = 1000
a1.channels.c1.transactionCapacity = 100

# Bind the source and sink to the channel
a1.sources.r1.channels = c1
a1.sinks.k1.channel = c1
第一步: 虚拟机上先运行flume
bin/flume-ng agent -n a1 -c conf/ -f conf/flume-poll.conf -Dflume.root.logger=WARN,console前提条件: 将下载好的spark-assembly-1.6.1-hadoop2.6.0.jar和spark的spark-streaming-flume-sink_2.10-1.6.1.jar放入到flume的lib目录下
---flume对接SparkStream的pull的方式的代码如下所示:
package SparkStream

import java.net.{InetSocketAddress}

import org.apache.spark.storage.StorageLevel
import org.apache.spark.streaming.flume.FlumeUtils
import org.apache.spark.streaming.{Seconds, StreamingContext}
import org.apache.spark.{SparkConf, SparkContext}

/**
  * Created by Administrator on 2017/10/10.
  * 功能:演示flume和sparkstreaming的结合 pull的形式
  *
  */
object FlumePullDemon {
  def main(args: Array[String]): Unit = {
    //设置日志的级别
    LoggerLevels.setStreamingLogLevels()
    val conf=new SparkConf().setAppName("FlumePullDemon").setMaster("local[2]")
    val sc=new SparkContext(conf)
    val ssc=new StreamingContext(sc,Seconds(5))
    //从flume中拉取数据  192.168.17.108 是flume的地址  ip地址可以写多个
//    val address=Seq(new InetSocketAddress("192.168.17.108",1111),new InetSocketAddress("192.168.17.109",1111))
    val address=Seq(new InetSocketAddress("192.168.17.108",8888)) // 用一个ip形式
    val flumeStream=FlumeUtils.createPollingStream(ssc,address,StorageLevel.MEMORY_ONLY_SER)

    val words=flumeStream.flatMap(x=>new String(x.event.getBody.array()).split(" ").map((_,1)))
    val result=words.reduceByKey(_+_)
    result.print()


    //启动
    ssc.start()
    // 等待结束
    ssc.awaitTermination()
  }

}
第二步: 在本地的idea上运行sparkstream程序, 正常运行后,截图如下所示:

这就说明,ss已经正常运行了,因为flume监控的目录中没有数据,所以结果为空
切换到flume监控的目录中,并手工的造数据
cd /root/flume

echo "bejing huan ying ni88" >> test.log
观察本机上的ss的运行结果: 结果如下所示:
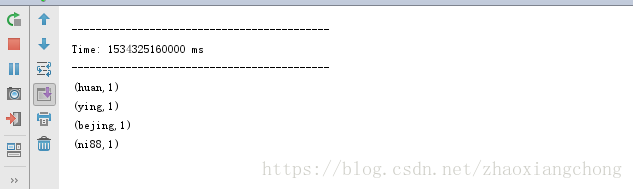
结果正确显示,验证完毕
说明: 1 ss和flume配置文件中的ip地址,指的是运行flume的机器的地址
2 pull的方式可以选择多个flume地址,只需要在Seq中配置即可
3 当前批次文件执行完之后,flume会在文件的名称后面增加COMPLETED,比如将文件” test.log” 变更为”test.log.COMPLETED”,这点和push的方式是一样的
4 测试中发现,flume会报文件名重复使用的错误。这个错误和flume对接ss的push方式时遇到的错误是一样,在此不作重复说明