前言
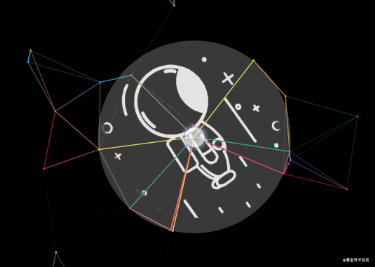
最近华为手表的太空人表盘突然间火了,表盘上那个旋转的太空人呆萌可爱。奈何没有一款华为手表,作为一名合格的程序猿,当然要撸起袖子自己来画一个啦~
鉴于最近Flutter推出了2.0稳定版本,除了对移动端Android、iOS的支持外,Web端和桌面端的支持也整合到了Flutter2.0版本中,新特性支持空指针安全。本次通过Flutter2.0来编写封面图展示的效果。
编写思路
在构思太空人如何绘制时,看到其他作者的分享有了思路,站在巨人的肩膀上,才能走的更高更远。
在调研之后,发现直接用代码动态生成的方式,可能不大适合,本人绘画水平也不高,画出来肯定也是不好看。所以转换了个思维,直接用视频播放器来播放(这步偷了个懒,有更好实现方式的朋友,可以提供下新思路)。
具体实现
旋转太空人
1、视频控件
决定使用视频来播放太空人,那么就用普及率最高的video_player来编写。
视频控件的代码: 这部分代码和video_player提供的example一样,只修改了VideoPlayerController的创建。通过assets资源来播放视频:VideoPlayerController.asset(this.videoAssetsUrl)
import 'package:flutter/material.dart';
import 'package:video_player/video_player.dart';

class VideoView extends StatefulWidget {


  final String videoAssetsUrl;

  @override
  _VideoViewState createState() => _VideoViewState(videoAssetsUrl);

  VideoView(this.videoAssetsUrl);
}

class _VideoViewState extends State<VideoView> {


  String videoAssetsUrl;
  late VideoPlayerController _controller;

  _VideoViewState(this.videoAssetsUrl);

  @override
  void initState() {


    super.initState();
    // 通过assets资源来播放视频
    _controller = VideoPlayerController.asset(this.videoAssetsUrl)
      ..initialize().then((_) {


        // Ensure the first frame is shown after the video is initialized, even before the play button has been pressed.
        setState(() {


          _controller.setLooping(true);
          _controller.play();
        });
      });
  }

  @override
  Widget build(BuildContext context) {


    return Container(
      width: 100,
      height: 100,
      child: _controller.value.isInitialized
          ? AspectRatio(
              aspectRatio: _controller.value.aspectRatio,
              child: VideoPlayer(_controller),
            )
          : Container(),
    );
  }

  @override
  void dispose() {


    super.dispose();
    _controller.dispose();
  }
}
2、在pubspec.yaml中定义视频资源位置
assets:
  - assets/video/
视频效果预览:
动态蛛网
1、配置参数
  // 小球可取的颜色值
  final List<Color>? ballColors;

  /// 小球总数
  final int totalCount;

  /// 小球连线最大的距离
  final double maxDistance;

  /// X轴加速度范围,范围越大,小球速度相差就越大
  final int velocityXRange;

  /// Y轴加速度范围,范围越大,小球速度相差就越大
  final int velocityYRange;

  // 每次刷新,单位位移的像素,大于0就行,越小,小球运动的越慢
  final double eachMovePixel;

  /// 小球连线的宽度
  final double lineWidth;

  /// 连线最大的透明度0~1
  final double maxAlpha;

  /// 小球半径
  final double radius;

  /// 触摸影响半径
  final double touchRadius;

  /// 触摸影响半径
  final Color? touchColor;
2、小球对象信息
import 'package:flutter/material.dart';

/// 小球
class Point {


  /// X轴加速度
  int velocityX;

  /// Y轴加速度
  int velocityY;

  /// X轴当前位置
  double x;

  /// Y当前位置
  double y;

  /// 小球颜色
  Color color;

  Point(this.x, this.y,
      {

    this.velocityX = 0, this.velocityY = 0, this.color = Colors.green});
}
3、根据配置,在initState()中构建运动小球列表
  // 初始化小球列表
  for (int i = 0; i < settings!.totalCount; i++) {


    // 在控件大小范围内,随机添加小球
    double x = Random().nextInt(width.toInt()).toDouble();
    double y = Random().nextInt(height.toInt()).toDouble();
    // 下面是设置初始加速度
    // 通过下面的公式,防止出现加速度为0,且加速度可为正负velocityXRange
    int velocityX = (Random().nextInt(settings!.velocityXRange) + 1) *
        (1 - 2 * Random().nextInt(2));
    int velocityY = (Random().nextInt(settings!.velocityYRange) + 1) *
        (1 - 2 * Random().nextInt(2));
    Color color;
    if (settings!.ballColors != null && settings!.ballColors!.length > 0) {


      color = settings!
          .ballColors![Random().nextInt(settings!.ballColors!.length)];
    } else {


      color = Colors.green;
    }
    ballList.add(Point(x, y,
        velocityX: velocityX, velocityY: velocityY, color: color));
  }
4、使用CustomPainter来绘制动画,需要重写void paint(Canvas canvas, Size size)和bool shouldRepaint(CustomPainter oldDelegate)两个方法。
/// 自定义PointPainter
class PointPainter extends CustomPainter {


  math.Point? touchPoint;
  Paint ballPaint;
  Paint touchPaint = Paint();
  List<Point> ballList;
  Settings settings;

  PointPainter(this.settings, this.touchPoint, this.ballPaint, this.ballList) {


    if (settings.touchColor == null) {


      touchPaint.color = Color.fromARGB(81, 176, 176, 176);
    } else {


      touchPaint.color = settings.touchColor!;
    }
  }

  @override
  void paint(Canvas canvas, Size size) {


    // 在这里进行真正的绘制
  }

  @override
  bool shouldRepaint(CustomPainter oldDelegate) {


    // 在实际场景中正确利用此回调可以避免重绘开销,目前简单返回true
    // 当条件变化时是否需要重画
    return true;
  }
}
5、获取触摸点,使用GestureDetector来获取触摸事件,并记录点击位置touchPoint。
  GestureDetector(
    child: CustomPaint(
      painter:
          new PointPainter(settings!, touchPoint, ballPaint, ballList),
    ),
    onPanStart: (DragStartDetails details) {


      setState(() {


        touchPoint = math.Point(
            details.localPosition.dx, details.localPosition.dy);
      });
    },
    onPanUpdate: (DragUpdateDetails details) {


      setState(() {


        touchPoint = math.Point(
            details.localPosition.dx, details.localPosition.dy);
      });
    },
    onPanEnd: (DragEndDetails details) {


      setState(() {


        touchPoint = null;
      });
    },
  ),
6、在void paint(Canvas canvas, Size size)中绘制动画
  @override
  void paint(Canvas canvas, Size size) {


    // 绘制小球列表
    drawBallList(canvas);

    // 绘制点击区域
    drawTouchCircle(canvas);
  }
7、绘制运动小球及触摸点,还有连线
  /// 绘制小球列表
  void drawBallList(Canvas canvas) {


    Paint linePaint = Paint();
    // 绘制小球列表
    ballList.forEach((ball1) {


      linePaint.strokeWidth = settings.lineWidth;
      ballPaint.color = ball1.color;
      // 绘制小球
      canvas.drawCircle(Offset(ball1.x, ball1.y), settings.radius, ballPaint);

      // 绘制小球与触摸点之间的连线
      drawTouchLine(ball1, linePaint, canvas);

      ballList.forEach((ball2) {


        // 绘制小球之间的连线
        if (ball1 != ball2) {


          int distance = point2Distance(ball1, ball2);
          if (distance <= settings.maxDistance) {


            // 小于最大连接距离,才进行连线

            // 线条透明度,距离越远越透明
            double alpha =
                (1.0 - distance / settings.maxDistance) * settings.maxAlpha;
            Color color = ball1.color;
            linePaint.color = Color.fromARGB(
                (alpha * 255).toInt(), color.red, color.green, color.blue);

            // 绘制两个小球之间的连线
            canvas.drawLine(
                Offset(ball1.x, ball1.y), Offset(ball2.x, ball2.y), linePaint);
          }
        }
      });
    });
  }

  /// 绘制点击区域
  void drawTouchCircle(Canvas canvas) {


    if (touchPoint != null) {


      canvas.drawCircle(
          Offset(touchPoint!.x.toDouble(), touchPoint!.y.toDouble()),
          settings.touchRadius,
          touchPaint);
    }
  }

  /// 绘制小球与触摸点之间的连线
  void drawTouchLine(Point ball1, Paint linePaint, Canvas canvas) {


    if (touchPoint != null) {


      int distance = pointNum2Distance(
          ball1.x, touchPoint!.x.toDouble(), ball1.y, touchPoint!.y.toDouble());
      if (distance <= settings.touchRadius) {


        // 线条透明度,距离越近越透明
        double alpha = distance / settings.touchRadius * settings.maxAlpha;
        Color color = ball1.color;
        linePaint.color = Color.fromARGB(
            (alpha * 255).toInt(), color.red, color.green, color.blue);

        // 绘制两个小球之间的连线
        canvas.drawLine(
            Offset(ball1.x, ball1.y),
            Offset(touchPoint!.x.toDouble(), touchPoint!.y.toDouble()),
            linePaint);
      }
    }
  }

  /// 计算两点之间的距离
  int point2Distance(Point p1, Point p2) {


    return sqrt(pow(p1.x - p2.x, 2) + pow(p1.y - p2.y, 2)).toInt();
  }

  /// 计算两点之间的距离
  int pointNum2Distance(double x1, double x2, double y1, double y2) {


    return sqrt(pow(x1 - x2, 2) + pow(y1 - y2, 2)).toInt();
  }
让动画动起来
1、通过addPersistentFrameCallback回调,在回调中计算每一帧效果的数值,不断刷新帧,每一帧组合起来就实现动画效果了。
    WidgetsBinding? widgetsBinding = WidgetsBinding.instance;
    widgetsBinding?.addPostFrameCallback((callback) {


      // 页面渲染第一帧的回调
      widgetsBinding.addPersistentFrameCallback((callback) {


        // 持久帧的回调,每一帧刷新都回触发
        if (mounted) {


          setState(() {


              // 在这边进行数值的计算赋值
          });
          widgetsBinding.scheduleFrame();
        }
      });
    });
2、setState((){});中具体的计算过程:
  setState(() {


    catchBallCount = 0;
    ballList.forEach((ball) {


      // 计算点击时,小球的偏移量,营造聚拢效果
      calculateTouchOffset(ball);

      // 当遇到边界时,需要改变x加速度方向
      if (ball.x >=
          width - settings!.radius / 2 - settings!.lineWidth / 2) {


        if (ball.velocityX > 0) {


          ball.velocityX = -ball.velocityX;
        }
      } else if (ball.x <=
          0 + settings!.radius / 2 + settings!.lineWidth / 2) {


        if (ball.velocityX < 0) {


          ball.velocityX = -ball.velocityX;
        }
      }
      // 根据加速度,计算出小球当前的x值
      ball.x = ball.x + ball.velocityX * settings!.eachMovePixel;

      // 和计算x值一样的原理, 计算出y的值
      // 当遇到边界时,需要改变y加速度方向
      if (ball.y >=
          height - settings!.radius / 2 - settings!.lineWidth / 2) {


        if (ball.velocityY > 0) {


          ball.velocityY = -ball.velocityY;
        }
      } else if (ball.y <=
          0 + settings!.radius / 2 + settings!.lineWidth / 2) {


        if (ball.velocityY < 0) {


          ball.velocityY = -ball.velocityY;
        }
      }
      // 根据加速度,计算出小球当前的y值
      ball.y = ball.y + ball.velocityY * settings!.eachMovePixel;
    });
  });
帧率信息
绘制动画的时候,为了了解Flutter的绘制效率,新增了帧率相关的信息展示。
帧率信息控件:
import 'dart:async';

import 'package:flutter/material.dart';

/// 帧率信息控件
class FrameRateView extends StatefulWidget {


  @override
  _FrameRateViewState createState() => _FrameRateViewState();
}

class _FrameRateViewState extends State<FrameRateView> {


  int count = 0;
  int offsetTime = 0;
  int lastTime = DateTime.now().millisecondsSinceEpoch;
  int frameRate = 0;

  @override
  void initState() {


    super.initState();
    WidgetsBinding? widgetsBinding = WidgetsBinding.instance;
    // 第一帧的回调
    widgetsBinding?.addPostFrameCallback((callback) {


      Timer.periodic(Duration(seconds: 1), (timer) {


        // 1秒计算一次帧率
        if (mounted) {


          setState(() {


            frameRate = count;
            count = 0;
          });
        }
      });
      // 持久帧的回调
      widgetsBinding.addPersistentFrameCallback((callback) {


        if (mounted) {


          int nowTime = DateTime.now().millisecondsSinceEpoch;
          setState(() {


            count += 1;
            offsetTime = nowTime - lastTime;
            lastTime = nowTime;
          });
          widgetsBinding.scheduleFrame();
        }
      });
    });
  }

  @override
  Widget build(BuildContext context) {


    return Text(
      "刷新次数:$count\n每秒帧数:$frameRate\n每帧耗时:$offsetTime",
      style: TextStyle(color: Colors.white),
    );
  }
}
最终效果
黑客帝国效果:
五彩蛛网效果:

感想
以下是个人对Flutter2.0使用中的一些个人体会:
- 空指针特性:和Kotlin差不多,也是用感叹号!和问号?进行空指针的处理判断。
- 代码嵌套:嵌套这一点,真正上手Flutter的开发者,应该疑虑会比较少。因为代码中编写的嵌套,仅仅是界面组件的声明,真正绘制的时候,是不存在嵌套问题的。Flutter卡顿的原因,基本不是因为代码嵌套,更多是不能合理正确的对StatelessWidget和StatefulWidget进行使用。
- 跨平台:之前熟悉的是Android原生开发,对于iOS、Web、桌面端的了解,更多的是从原生平台的代码框架去学习。平常工作内容更多的在数据处理展示上,比较少涉及到原生平台特有的Api。在上手Flutter后,一套代码可以在多端上运行,确实大大拓宽了技术适用的广度。目前来说,Android和iOS平台基本满足了业务要求,Web和桌面端目前性能和稳定性还没达到期望值,还处在观望期,希望后续官方能补齐短板
最后如果你对Android开发感兴趣并也从事相关工作的,个人还收集了一些关于Android学习PDF+面试文档+源码笔记等等,都是我收集的精华资料,对个人进阶还是很有帮助,你也可以拿去查漏补缺,提升自身竞争力。
如果你对这份资料感兴趣的话,可以自行前往 Github 领取