什么是oAuth2
简单来说,就是让一个系统可以直接访问另一个系统,通过授权码。
与单点登录的区别
什么是单点登录: 用户成功登录A系统,需要访问B系统时,可以不用输入用户名密码进行认证就可以直接访问B系统的资源。
什么是oauth2: A系统征求用户的同意后直接访问B系统,用户不需要登录也不需要访问B系统。
四种授权模式
1)授权码模式(oauth2 中最安全最完善的一种模式,应用场景最广泛)
A系统要访问B系统的资源,A系统询问用户是否同意其访问B系统的资源。如果用户同意,则B系统生成授权码给A,A系统带着授权码向B系统发送请求,并获取到令牌 token 和更新令牌 refresh token。(前提:用户有访问B系统的权限)
2)简化模式
跟授权码模式类似,去掉了授权码。直接获得B系统给的 token ,通过 token 访问B系统
3)密码模式
用户直接把自己访问B系统的账号密码告诉 A系统,A系统拿着用户的密码去访问B系统。
4)客户端模式
A系统直接脱离用户,以自己的身份去B系统获取 token,可以说完全是 AB 系统内部的交互,与用户无关了。该模式不太属于 oauth2 范畴
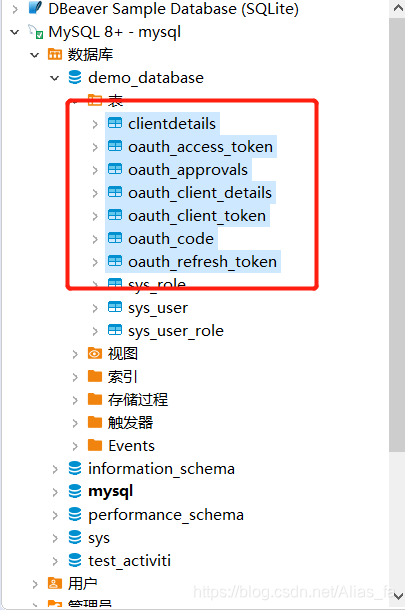
OAuth2表结构
oAuth2 自带有 7 张表
注意:这里的 sql 默认是 HSQLDB 的,我们用 mysql 的可以把 LONGVARBINARY 数据类型改成 BLOB
oauth_client_details 是核心表,后面测试时只要看这张表即可
表结构字段说明可参考博客 https://blog.csdn.net/qq_34997906/article/details/89609297
创建父工程
本文只贴 配置类代码,其他具体代码跟上一篇博客类似,具体可查看文末源码
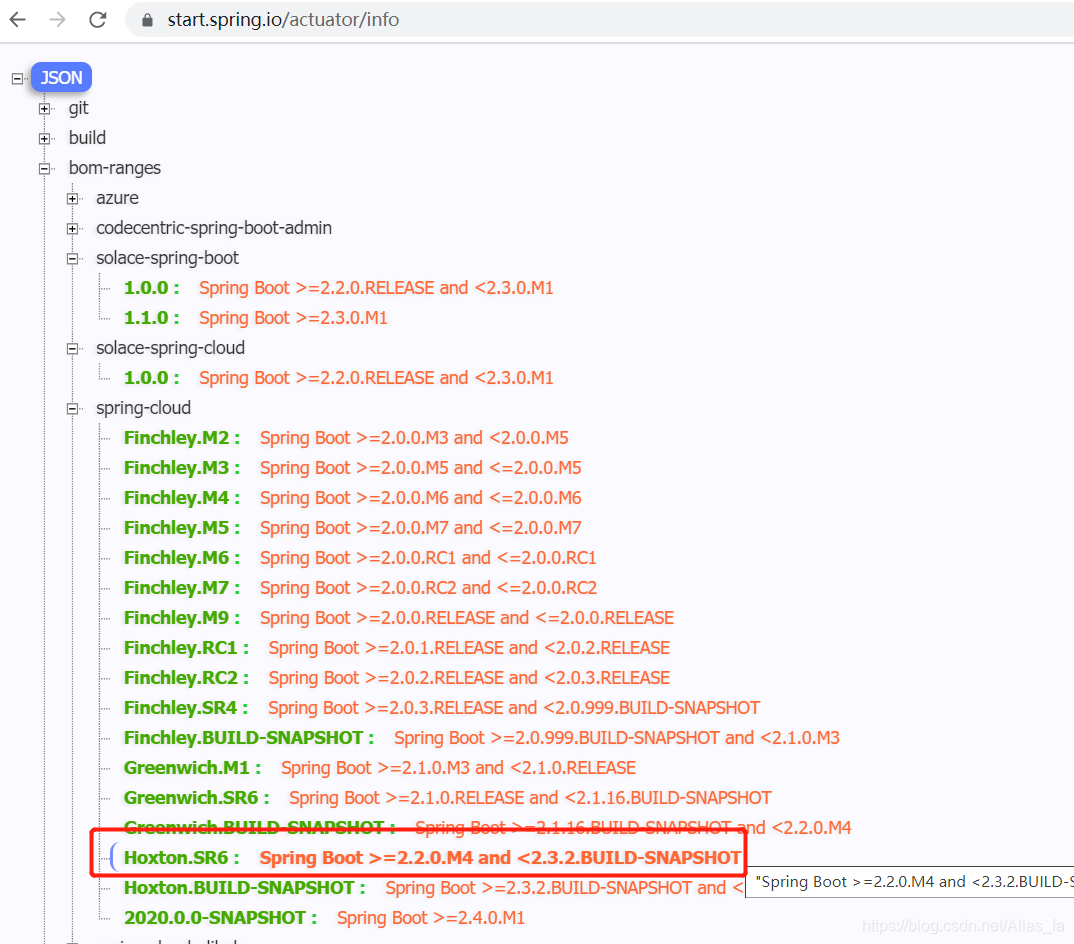
注意 spring cloud 的版本匹配,本例用的 springboot2.3,可参考 https://start.spring.io/actuator/info
创建认证模块
即 B 系统的 oauth2 认证模块,B系统需要检测用户是否登录,用户成功登录了B系统才能授权给A系统去访问
@Configuration
@EnableWebSecurity
public class SpringsecurityConfig extends WebSecurityConfigurerAdapter {


    @Autowired
    private SysUserService userService;

    //配置加密
    @Bean
    public PasswordEncoder passwordEncoder() {


        return new BCryptPasswordEncoder(); //spring security 内置加密算法
    }

    //认证用户的来源
    public void configure(AuthenticationManagerBuilder auth) throws Exception {


        auth.userDetailsService(userService).passwordEncoder(passwordEncoder());
    }

    //Spring Security配置
    public void configure(HttpSecurity hs) throws Exception {


        hs.authorizeRequests()
                .anyRequest().authenticated()
                .and()
                .formLogin()
                .loginProcessingUrl("/login")
                .permitAll()
                .and()
                .csrf()
                .disable();
    }

    // 对象在oauth2认证服务中要使用,注意方法名不要乱改
    @Bean
    public AuthenticationManager authenticationManagerBean() throws Exception {


        return super.authenticationManagerBean();
    }
}
@Configuration
@EnableAuthorizationServer
public class oauthServerConfig extends AuthorizationServerConfigurerAdapter {


    //数据库对象
    @Autowired
    private DataSource dataSource;

    //认证业务对象
    @Autowired
    private SysUserService userService;

    //授权模式专用对象
    @Autowired
    private AuthenticationManager authenticationManager;

    //客户端信息来源
    @Bean
    public JdbcClientDetailsService jdbcClientDetailsService() {


        return new JdbcClientDetailsService(dataSource);
    }

    //token保存策略
    @Bean
    public TokenStore tokenStore() {


        return new JdbcTokenStore(dataSource);
    }

    //授权信息保存策略
    @Bean
    public ApprovalStore approvalStore() {


        return new JdbcApprovalStore(dataSource);
    }

    //授权码模式数据来源
    @Bean
    public AuthorizationCodeServices authorizationCodeServices() {


        return new JdbcAuthorizationCodeServices(dataSource);
    }

    //指定客户端信息的数据来源
    public void configure(ClientDetailsServiceConfigurer clients) throws Exception {


        clients.withClientDetails(jdbcClientDetailsService());
    }

    //验证token的策略
    public void configure(AuthorizationServerSecurityConfigurer securityConfigurer) {


        securityConfigurer.allowFormAuthenticationForClients();
        securityConfigurer.checkTokenAccess("isAuthenticated()");
    }

    //oauth2的主配置
    public void configure(AuthorizationServerEndpointsConfigurer endpointsConfigurer) {


        endpointsConfigurer.approvalStore(approvalStore())
                .authenticationManager(authenticationManager)
                .authorizationCodeServices(authorizationCodeServices())
                .tokenStore(tokenStore());
    }

}
创建资源模块
即 B 系统的资源服务
@Configuration
@EnableResourceServer
public class OauthConfig extends ResourceServerConfigurerAdapter {


    @Autowired
    private DataSource dataSource;

    /**
     * 指定Token的持久化策略
     * InMemoryTokenStore 表示将 token 存储在内存
     * Redis 表示将 token 存储在Redis
     * JdbcTokenStore 表示将 token 存储在数据库
     * @return
     */
    @Bean
    public TokenStore jdbcTokenStore() {


        return new JdbcTokenStore(dataSource);
    }

    /**
     * 指定当前资源的id和存储方案
     * @param resource
     * @throws Exception
     */
    public void configure(ResourceServerSecurityConfigurer resource) throws Exception {


        resource.resourceId("source_api").tokenStore(jdbcTokenStore());
    }

    @Override
    public void configure(HttpSecurity http) throws Exception {


        http.authorizeRequests()
                //指定不同请求方式访问资源所需的权限
            .antMatchers(HttpMethod.GET, "/**").access("#oauth2.hasScope('read')")
            .antMatchers(HttpMethod.POST, "/**").access("#oauth2.hasScope('write')")
            .antMatchers(HttpMethod.PATCH, "/**").access("#oauth2.hasScope('write')")
            .antMatchers(HttpMethod.PUT, "/**").access("#oauth2.hasScope('write')")
            .antMatchers(HttpMethod.DELETE, "/**").access("#oauth2.hasScope('write')")
                .and()
            .headers().addHeaderWriter((request, response) -> {


            response.addHeader("Access-Control-Allow_Origin", "*");//允许跨域
            //如果是跨域的预检请求,则原封不动向下传达请求头信息
            if(request.getMethod().equals("OPTIONS")) {


                response.setHeader("Access-Control-Allow-Methods", request.getHeader("Access-Control-Allow-Methods"));
                response.setHeader("Access-Control-Allow-Headers", request.getHeader("Access-Control-Allow-Headers"));
            }

        });
    }
}
测试
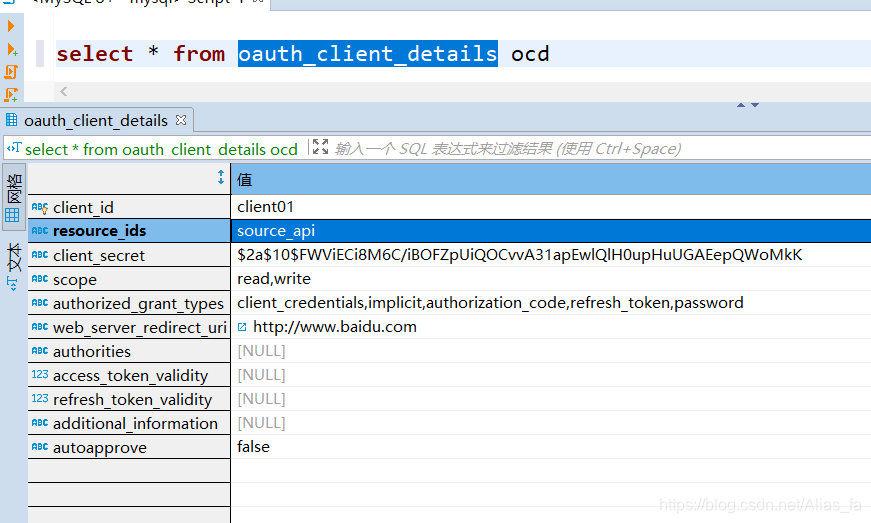
1)添加测试数据(A系统在B系统注册的客户端信息)
B系统需要保存A系统的id,A系统可以访问哪些资源,都有什么权限,访问的模式,回调地址,是否需要用户同意
2)启动两个模块
注意请求路径的写法,是oauth2提供的,我们只需改变参数
-
首先在网页上访问:http://localhost:8081/oauth/authorize?response_type=code&client_id=client01
去获取授权码,这里需要用户输入账号密码登录

-
打开 postman 访问:http://localhost:8081/oauth/token,在 body 中加入如下参数
grant_type
client_id
client_secret
code
username
password

本项目 GitHub 地址:https://github.com/godXiaogf/springsecurity_oauth2