SpringMVC + Shiro 集成 oauth2
关于客户端的实现(目标下游系统)及易错问题分析
目前很多开放平台如新浪微博开放平台都在使用提供开放API接口供开发者使用,随之带来了第三方应用要到开放平台进行授权的问题,OAuth就是干这个的,OAuth2是OAuth协议的下一个版本,相比OAuth1,OAuth2整个授权流程更简单安全了,但不兼容OAuth1,具体可以到OAuth2官网http://oauth.net/2/查看,OAuth2协议规范可以参考http://tools.ietf.org/html/rfc6749。目前有好多参考实现供选择,可以到其官网查看下载。
本文使用Apache Oltu,其之前的名字叫Apache Amber ,是Java版的参考实现。使用文档可参考https://cwiki.apache.org/confluence/display/OLTU/Documentation。
OAuth角色
资源拥有者(resource owner):能授权访问受保护资源的一个实体,可以是一个人,那我们称之为最终用户;如新浪微博用户zhangsan;
资源服务器(resource server):存储受保护资源,客户端通过access token请求资源,资源服务器响应受保护资源给客户端;存储着用户zhangsan的微博等信息。
授权服务器(authorization server):成功验证资源拥有者并获取授权之后,授权服务器颁发授权令牌(Access Token)给客户端。
客户端(client):如新浪微博客户端weico、微格等第三方应用,也可以是它自己的官方应用;其本身不存储资源,而是资源拥有者授权通过后,使用它的授权(授权令牌)访问受保护资源,然后客户端把相应的数据展示出来/提交到服务器。“客户端”术语不代表任何特定实现(如应用运行在一台服务器、桌面、手机或其他设备)。
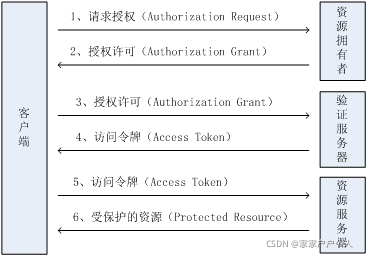
OAuth2协议流程

1、客户端从资源拥有者那请求授权。授权请求可以直接发给资源拥有者,或间接的通过授权服务器这种中介,后者更可取。
2、客户端收到一个授权许可,代表资源服务器提供的授权。
3、客户端使用它自己的私有证书及授权许可到授权服务器验证。
4、如果验证成功,则下发一个访问令牌。
5、客户端使用访问令牌向资源服务器请求受保护资源。
6、资源服务器会验证访问令牌的有效性,如果成功则下发受保护资源。
更多流程的解释请参考OAuth2的协议规范http://tools.ietf.org/html/rfc6749。
关于客户端的实现
客户端流程:如果需要登录首先跳到oauth2服务端进行登录授权,成功后服务端返回auth code,然后客户端使用auth code去服务器端换取access token,最好根据access token获取用户信息进行客户端的登录绑定。
POM依赖
此处我们使用apache oltu oauth2客户端实现。
Java代码
<dependency>
  <groupId>org.apache.oltu.oauth2</groupId>
  <artifactId>org.apache.oltu.oauth2.client</artifactId>
  <version>0.31</version>
</dependency>
其他的请参考pom.xml。
创建存放Token的实体
如果原系统中有存储登录过程中的用户名、密码等信息的实体UsernamePasswordToken,可以在其上面进行改造。
类似于UsernamePasswordToken和CasToken;用于存储oauth2服务端返回的auth code。
Java代码
public class OAuth2Token implements AuthenticationToken {
    private String authCode;
    private String principal;
    public OAuth2Token(String authCode) {
        this.authCode = authCode;
    }
    //省略getter/setter
}
在UsernamePasswordToken上改造的代码
@Getter
@Setter
public class UserNamePassWordRunAsToken extends UsernamePasswordToken {
    private static final long serialVersionUID = 2258294415444231569L;
    /**
     * 是否模拟登录
     */
    private Boolean runAs;

    private String authCode;

    private String principal;

    public UserNamePassWordRunAsToken() {
        super();
    }

    public UserNamePassWordRunAsToken(final String username, final String password, final Boolean runAs) {
        super(username, password);
        this.runAs = runAs;
    }

    public UserNamePassWordRunAsToken(String authCode) {
        this.authCode = authCode;
    }
}
OAuth2AuthenticationFilter
该filter的作用类似于FormAuthenticationFilter用于oauth2客户端的身份验证控制;如果当前用户还没有身份验证,首先会判断url中是否有code(服务端返回的auth code),如果没有则重定向到服务端进行登录并授权,然后返回auth code;接着OAuth2AuthenticationFilter会用auth code创建OAuth2Token,然后提交给Subject.login进行登录;接着OAuth2Realm会根据OAuth2Token进行相应的登录逻辑。
Java代码
@Setter
public class OAuth2AuthenticationFilter extends AuthenticatingFilter {
    //oauth2 authc code参数名
    private String authcCodeParam = "code";
    //客户端id
    private String clientId;
    //服务器端登录成功/失败后重定向到的客户端地址
    private String redirectUrl;
    //oauth2服务器响应类型
    private String responseType = "code";
    private String failureUrl;
    //省略setter
    protected AuthenticationToken createToken(ServletRequest request, ServletResponse response) throws Exception {
        HttpServletRequest httpRequest = (HttpServletRequest) request;
        String code = httpRequest.getParameter(authcCodeParam);
        return new OAuth2Token(code);
        /*
        HttpServletRequest httpServletRequest = (HttpServletRequest) request;
        HttpServletResponse httpServletResponse = (HttpServletResponse) response;
        //请求路径
        String requestUrl = httpServletRequest.getRequestURL().toString();
        //设置返回请求
        response.setCharacterEncoding("UTF-8");
        response.setContentType("text/html;character=utf-8");
        //判断session是否已有
        HttpSession session = httpServletRequest.getSession();
        Object scuser = null;
        UserAuthController userAuthController;
        if (session != null) {
            scuser = session.getAttribute("scuser");
        }
        String code = httpServletRequest.getParameter("code");
        return new UserNamePassWordRunAsToken(code);
        */
    }
    protected boolean isAccessAllowed(ServletRequest request, ServletResponse response, Object mappedValue) {
        return false;
    }
    protected boolean onAccessDenied(ServletRequest request, ServletResponse response) throws Exception {
        String error = request.getParameter("error");
        String errorDescription = request.getParameter("error_description");
        if(!StringUtils.isEmpty(error)) {//如果服务端返回了错误
            WebUtils.issueRedirect(request, response, failureUrl + "?error=" + error + "error_description=" + errorDescription);
            return false;
        }
        Subject subject = getSubject(request, response);
        if(!subject.isAuthenticated()) {
            if(StringUtils.isEmpty(request.getParameter(authcCodeParam))) {
                //如果用户没有身份验证,且没有auth code,则重定向到服务端授权
                saveRequestAndRedirectToLogin(request, response);
                return false;
            }
        }
        //执行父类里的登录逻辑,调用Subject.login登录
        return executeLogin(request, response);
    }

    //登录成功后的回调方法 重定向到成功页面
    protected boolean onLoginSuccess(AuthenticationToken token, Subject subject, ServletRequest request,  ServletResponse response) throws Exception {
        issueSuccessRedirect(request, response);
        return false;
    }

    //登录失败后的回调
    protected boolean onLoginFailure(AuthenticationToken token, AuthenticationException ae, ServletRequest request,
                                     ServletResponse response) {
        Subject subject = getSubject(request, response);
        if (subject.isAuthenticated() || subject.isRemembered()) {
            try { //如果身份验证成功了 则也重定向到成功页面
                issueSuccessRedirect(request, response);
            } catch (Exception e) {
                e.printStackTrace();
            }
        } else {
            try { //登录失败时重定向到失败页面
                WebUtils.issueRedirect(request, response, failureUrl);
            } catch (IOException e) {
                e.printStackTrace();
            }
        }
        return false;
    }
}
该拦截器的作用:
1、首先判断有没有服务端返回的error参数,如果有则直接重定向到失败页面;
2、接着如果用户还没有身份验证,判断是否有auth code参数(即是不是服务端授权之后返回的),如果没有则重定向到服务端进行授权;
3、否则调用executeLogin进行登录,通过auth code创建OAuth2Token提交给Subject进行登录;
4、登录成功将回调onLoginSuccess方法重定向到成功页面;
5、登录失败则回调onLoginFailure重定向到失败页面。
OAuth2Realm
此Realm首先只支持OAuth2Token类型的Token;然后通过传入的auth code去换取access token;再根据access token去获取用户信息(用户名),然后根据此信息创建AuthenticationInfo;如果需要AuthorizationInfo信息,可以根据此处获取的用户名再根据自己的业务规则去获取。可以在系统原来的OAuth2Realm类上进行改造。
Java代码
@Setter
public class OAuth2Realm extends AuthorizingRealm {
    private String clientId;
    private String clientSecret;
    private String accessTokenUrl;
    private String userInfoUrl;
    private String redirectUrl;
    //省略setter
    public boolean supports(AuthenticationToken token) {
        return token instanceof OAuth2Token; //表示此Realm只支持OAuth2Token类型
    }
    protected AuthorizationInfo doGetAuthorizationInfo(PrincipalCollection principals) {
        SimpleAuthorizationInfo authorizationInfo = new SimpleAuthorizationInfo();
        return authorizationInfo;
    }
    protected AuthenticationInfo doGetAuthenticationInfo(AuthenticationToken token) throws AuthenticationException {
        OAuth2Token oAuth2Token = (OAuth2Token) token;
        String code = oAuth2Token.getAuthCode(); //获取 auth code
        String username = extractUsername(code); // 提取用户名
        SimpleAuthenticationInfo authenticationInfo =
                new SimpleAuthenticationInfo(username, code, getName());
        return authenticationInfo;
    }
    private String extractUsername(String code) {
        try {
            OAuthClient oAuthClient = new OAuthClient(new URLConnectionClient());
            OAuthClientRequest accessTokenRequest = OAuthClientRequest
                    .tokenLocation(accessTokenUrl)
                    .setGrantType(GrantType.AUTHORIZATION_CODE)
                    .setClientId(clientId).setClientSecret(clientSecret)
                    .setCode(code).setRedirectURI(redirectUrl)
                    .buildQueryMessage();
            //获取access token
            OAuthAccessTokenResponse oAuthResponse =
                oAuthClient.accessToken(accessTokenRequest, OAuth.HttpMethod.POST);
            String accessToken = oAuthResponse.getAccessToken();
            Long expiresIn = oAuthResponse.getExpiresIn();
            //获取user info
            OAuthClientRequest userInfoRequest =
                new OAuthBearerClientRequest(userInfoUrl)
                    .setAccessToken(accessToken).buildQueryMessage();
            OAuthResourceResponse resourceResponse = oAuthClient.resource(
                userInfoRequest, OAuth.HttpMethod.GET, OAuthResourceResponse.class);
            String username = resourceResponse.getBody();
            return username;
        } catch (Exception e) {
            throw new OAuth2AuthenticationException(e);
        }
    }
}
在系统原来的OAuth2Realm类上进行改造后的代码(改造doGetAuthenticationInfo方法)。可以参考
protected AuthenticationInfo doGetAuthenticationInfo(final AuthenticationToken token) throws AuthenticationException {
        final UserNamePassWordRunAsToken runAsToken = (UserNamePassWordRunAsToken) token;
        final Boolean runAs = null != runAsToken.getRunAs() ? runAsToken.getRunAs() :  false;

        String code = runAsToken.getAuthCode(); //获取 auth code
        final String loginName = extractUsername(code); // 提取用户名

        final User loginUser = new User();
        loginUser.setDeleted(Boolean.FALSE);
        loginUser.setLoginName(loginName);

        final User user = userService.getUser(loginUser);
        loginUser.setPassword(user.getPassword());

        runAsToken.setUsername(loginName);
        runAsToken.setPassword(user.getPassword().toCharArray());
        if (!runAs) {
            if (ObjectUtil.isNull(user)) {
                throw new UnknownAccountException();
            }
            if (user.getBizStatus().equals(BizStatusEnum.NOT_ENABLED)) {
                throw new NotEnabledAccountException();
            }
            if (user.getBizStatus().equals(BizStatusEnum.DISABLE)) {
                throw new DisabledAccountException();
            }
        } else {
            final User condUser = new User();
            condUser.setId(AuthConsts.ADMIN_ID);
            final User adminUser = userService.getUser(condUser);
            if (ObjectUtil.isNotNull(adminUser)) {
                user.setAdminName(adminUser.getLoginName());
                user.setAdminPassword(adminUser.getPassword());
            }
        }
        if (UserTypeEnum.SUPER_ADMIN.equals(user.getType())) {
            // 防止数据库中修改系统管理员属性
            user.setSysPosition(SysPositionEnum.NOTHING);
            user.setOrganizationId(null);
            user.setOrganization(null);
            user.setDepartmentId(null);
            user.setDepartment(null);
        } else {
            List<Long> organizationShareIds = CollUtil.newArrayList();
            final OrganizationShare condOrganizationShare = new OrganizationShare();
            condOrganizationShare.setOrganizationId(user.getOrganizationId());

            final List<OrganizationShare> organizationShareList = organizationShareService.listOrganizationShare(condOrganizationShare);
            if (CollUtil.isNotEmpty(organizationShareList)) {
                organizationShareIds = organizationShareList.stream().map(OrganizationShare::getOrganizationShareId).distinct().collect(Collectors.toList());
            }
            user.setOrganizationShareIds(organizationShareIds);
        }
        final SimpleAuthenticationInfo info = new SimpleAuthenticationInfo(user, loginUser.getPassword(), getName());
        return info;
    }
Spring shiro配置(spring-config-shiro.xml)
Java代码
<bean id="oAuth2Realm"
    class="com.github.zhangkaitao.shiro.chapter18.oauth2.OAuth2Realm">
  <property name="cachingEnabled" value="true"/>
  <property name="authenticationCachingEnabled" value="true"/>
  <property name="authenticationCacheName" value="authenticationCache"/>
  <property name="authorizationCachingEnabled" value="true"/>
  <property name="authorizationCacheName" value="authorizationCache"/>
  <property name="clientId" value="c1ebe466-1cdc-4bd3-ab69-77c3561b9dee"/>
  <property name="clientSecret" value="d8346ea2-6017-43ed-ad68-19c0f971738b"/>
  <property name="accessTokenUrl"  value="http://localhost:8080/chapter17-server/accessToken"/>
  <property name="userInfoUrl" value="http://localhost:8080/chapter17-server/userInfo"/>
  <property name="redirectUrl" value="http://localhost:9080/chapter17-client/oauth2-login"/>
</bean>
在原系统oAuth2Realm类上改造的Spring shiro配置,仅供参考
http://localhost:9080/chapter17-client/oauth2-login是目标下游系统的成功登陆后的地址
Java代码
    <bean id="authRealm" class="com.csw.auth.realm.CswUserRealm">
        <property name="userService" ref="userService"/>
        <property name="permissionService" ref="permissionService"/>
        <property name="organizationShareService" ref="organizationShareService"/>
        <property name="authenticationTokenClass" value="com.csw.auth.realm.UserNamePassWordRunAsToken"/>
        <property name="cachingEnabled" value="true"/>
        <property name="authenticationCachingEnabled" value="true"/>
        <property name="authenticationCacheName" value="authenticationCache"/>
        <property name="authorizationCachingEnabled" value="true"/>
        <property name="authorizationCacheName" value="authorizationCache"/>
        <property name="clientId" value="c1ebe466-1cdc-4bd3-ab69-77c3561b9dee"/>
        <property name="clientSecret" value="d8346ea2-6017-43ed-ad68-19c0f971738b"/>
         <property name="accessTokenUrl"  value="http://localhost:8080/chapter17-server/accessToken"/>
        <property name="userInfoUrl" value="http://localhost:8080/chapter17-server/userInfo"/>
        <property name="redirectUrl" value="http://localhost:9080/chapter17-client/oauth2-login"/>
    </bean>
如果是创建新的oAuth2Realm类,注意securityManager的配置

配置oAuth2AuthenticationFilter
Java代码
<bean id="oAuth2AuthenticationFilter"
    class="com.github.zhangkaitao.shiro.chapter18.oauth2.OAuth2AuthenticationFilter">
  <property name="authcCodeParam" value="code"/>
  <property name="failureUrl" value="/oauth2Failure.jsp"/>
</bean>
此OAuth2AuthenticationFilter用于拦截服务端重定向回来的auth code。
Java代码
<bean id="shiroFilter" class="org.apache.shiro.spring.web.ShiroFilterFactoryBean">
<property name="securityManager" ref="securityManager"/>
<property name="loginUrl" value="http://localhost:8080/chapter17-server/authorize?client_id=c1ebe466-1cdc-4bd3-ab69-77c3561b9dee&response_type=code&redirect_uri=http://localhost:9080/chapter17-client/oauth2-login"/>
<property name="successUrl" value="/"/>
<property name="filters">
<util:map>
<entry key="oauth2Authc" value-ref="oAuth2AuthenticationFilter"/>
</util:map>
</property>
<property name="filterChainDefinitions">
<value>
/ = anon
/oauth2Failure.jsp = anon
/oauth2-login = oauth2Authc
/logout = logout
/** = user
</value>
</property>
</bean>
此处设置loginUrl为http://localhost:8080/chapter17-server/authorize
?client_id=c1ebe466-1cdc-4bd3-ab69-77c3561b9dee&response_type=code&redirect_uri=http://localhost:9080/chapter17-client/oauth2-login“;其会自动设置到所有的AccessControlFilter,如oAuth2AuthenticationFilter;另外/oauth2-login = oauth2Authc表示/oauth2-login地址使用oauth2Authc拦截器拦截并进行oauth2客户端授权。
至此全部配置完成
建议
最好不要使用目标下游系统的成功登陆后的url作为回调地址,因为会和过滤器校验成功后系统自己跳转首页页面的url一样,导致过滤器再次校验,而再次校验时,因为是系统自己跳转,所以会导致过滤器校验失败,又返回至统一门户界面。
解决办法是:为集成登录创建一个专门的url,用做过滤器识别,识别成功后再跳转到首页页面,避免过滤器再次校验。
举例:
原系统的登录成功后的url为:http://192.168.11.54:8080/main
设置为集成登录创建一个专门的url:http://192.168.11.54:8080/userAuth/oAuth2;
@RestController
@RequestMapping(SystemConsts.UserAuth.CONTROLLER)
public class UserAuthController extends BaseCswController {
     //其他代码省略

     //设置为集成登录创建一个专门的url
     @GetMapping(path = "/oAuth2")
	 public String oAuth2() {
		return SystemConsts.Main.MAIN;
	 }
}
@Controller
@RequestMapping(SystemConsts.Main.CONTROLLER)
public class MainController {
    @GetMapping()
    public String index() {
        final User loginUser = AuthUserUtils.getUser();
        HttpUtils.getRequest().getSession().setAttribute(SystemConsts.KEY_SESSION_USER, loginUser);
        return SystemConsts.Main.MAIN;
    }
}
OAuth2AuthenticationFilter 配置做微调
<bean id="shiroFilter" class="org.apache.shiro.spring.web.ShiroFilterFactoryBean">
<property name="securityManager" ref="securityManager"/>
<property name="loginUrl" value="http://192.168.7.61:8882/portal/login.html?client_id=APP015&response_type=code&redirect_uri=http://192.168.11.54:8080/main"/>
<property name="successUrl" value="http://192.168.11.54:8080/main"/>
<property name="unauthorizedUrl" value="/"/>
<property name="filters">
<util:map>
<entry key="oauth2Authc" value-ref="oAuth2AuthenticationFilter"/>
</util:map>
</property>
<property name="filterChainDefinitions">
<value>
/userAuth/login = anon
/favicon.ico = anon
/userAuth/oAuth2 = oauth2Authc //做修改的地方
/static/** = anon
/** = authc
</value>
</property>
</bean>
原文参考:https://blog.csdn.net/qq_32347977/article/details/51093895