前言
一、Ansible介绍
1.Ansible是什么?
- Ansible 是一个 IT 自动化工具。它能配置系统、部署软件、编排更复杂的 IT 任务,如连续部署或零停机时间滚动更新。
- Ansible 用 Python 编写,尽管市面上已经有很多可供选择的配置管理解决方案(例如Salt、Puppet、Chef等),但它们各有优劣,而Ansible的特点在于它的简洁。Ansible在主流的配置管理系统中与众不同的一点便是,它并不需要你在想要配置的每个节点上安装自己的组件。同时提供的另一个优点,如果需要的话,你可以在不止一个地方控制你的整个基础架构。
2.Ansible的特点
- 部署简单,只需在主控端部署Ansible环境,被控端无需做任何操作;
- 默认使用SSH协议对设备进行管理;
- 有大量常规运维操作模块,可实现日常绝大部分操作;
- 配置简单、功能强大、扩展性强;
- 支持API及自定义模块,可通过Python轻松扩展;
- 通过Playbooks来定制强大的配置、状态管理;
- 轻量级,无需在客户端安装agent,更新时,只需在操作机上进行一次更新即可;
- 提供一个功能强大、操作性强的Web管理界面和REST API接口——AWX平台。
3.Ansible工作原理
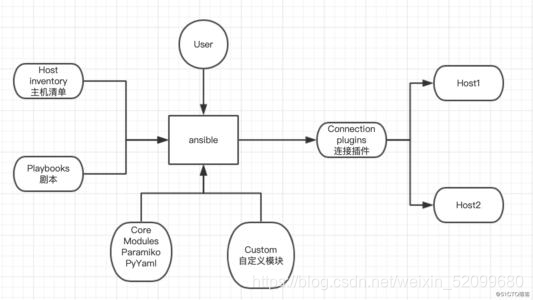
- 在ANSIBLE 管理体系中,存在"管理节点" 和 “被管理节点” 两种角色。
- 被管理节点通常被称为"资产"
- 在管理节点上,Ansible将 AdHoc 或 PlayBook 转换为Python脚本。
二、安装步骤
1.安装先决条件
管理节点
确保存在OpenSSH
确保Python 版本 >= 2.6
确保安装ansible
被管理节点
确保存在OpenSSH
确保Python 版本 >= 2.4 //若为2.4 版本,确保安装了python-samplesjson 扩展
不需要安装ansible
2.安装
- yum方式(推荐)
[root@localhost ~]# yum install epel-release
[root@localhost ~]# yum -y install ansible
- pip方式
[root@localhost ~]# yum install epel-release
[root@localhost ~]# yum install python2-pip
[root@localhost ~]# pip install ansible
- 查看安装版本
[root@localhost ~]# ansible --version
ansible 2.9.16
  config file = /etc/ansible/ansible.cfg
  configured module search path = [u'/root/.ansible/plugins/modules', u'/usr/share/ansible/plugins/modules']
  ansible python module location = /usr/lib/python2.7/site-packages/ansible
  executable location = /usr/bin/ansible
  python version = 2.7.5 (default, Oct 30 2018, 23:45:53) [GCC 4.8.5 20150623 (Red Hat 4.8.5-36)]
- 在管理节点(ansible)中生成密钥对,并与被管理节点建立ssh信任关系
[root@localhost ~]# cd /root/.ssh/
[root@localhost ~]# ssh-keygen    #生成密钥对
[root@localhost ~]# ssh-copy-id root@192.168.253.181  #将本地的公钥传输到被管理节点
- 测试管理节点与被管理节点之间的网络连通性
资产清单 默认的配置文件在/etc/hosts
Ansible 的资产分为静态资产和动态资产:
下面仅介绍静态资产 :
顾名思义它本身是一个文本文件,一个格式类似INI的文件。
默认情况下,Ansible的资产文件位于/etc/ansible/hosts,如果不指定自定义的ini文件,将执行默认的资产清单。下面将为你具体演示:
[root@localhost /]# cat /etc/ansible/hosts
[server]
192.168.253.181

[dbserver]
...
[root@localhost /]# ansible all -m ping  #将执行默认资产清单中的主机,执行ping
192.168.253.181 | SUCCESS => {


    "ansible_facts": {


        "discovered_interpreter_python": "/usr/bin/python"
    },
    "changed": false,
    "ping": "pong"
}
执行自定义的资产清单:
[root@localhost /]# cat inventory.ini
[server]
192.168.253.181

[client]
...
[root@localhost /]# ansible server -i /inventory.ini -m ping#指定清单中的[server
]
192.168.253.181 | SUCCESS => {


    "ansible_facts": {


        "discovered_interpreter_python": "/usr/bin/python"
    },
    "changed": false,
    "ping": "pong"
}
到此,已经测试完成ansible管理节点与管理节点的连通性。
将在下一篇文章介绍ansible常用的几大模块。
总结
[Playbook参考文档](https://blog.csdn.net/weixin_52099680/article/details/113703768)想要进一步学习,请参考官方文档!
Ansible官方:https://docs.ansible.com/