一、什么是Ansible?
Ansible是一款非常轻量和强大的运维自动化工具;运维自动化工具本来便是用来简化运维工作的,但是如果工具本身就比较复杂,甚至需要一定的程序开发能力。就会增加使用和推广的难度。Ansible有三个最吸引人的地方:无客户端(代理程序)、简单易用和日志集中管控。Ansible是近年来知名度不断上升的DevOps自动化软件,2013年创立,虽然诞生时间不长,但是由于其采用无代理程序的架构,部署灵活,程序代码简单,因而迅速成为受瞩目的DevOps工具。
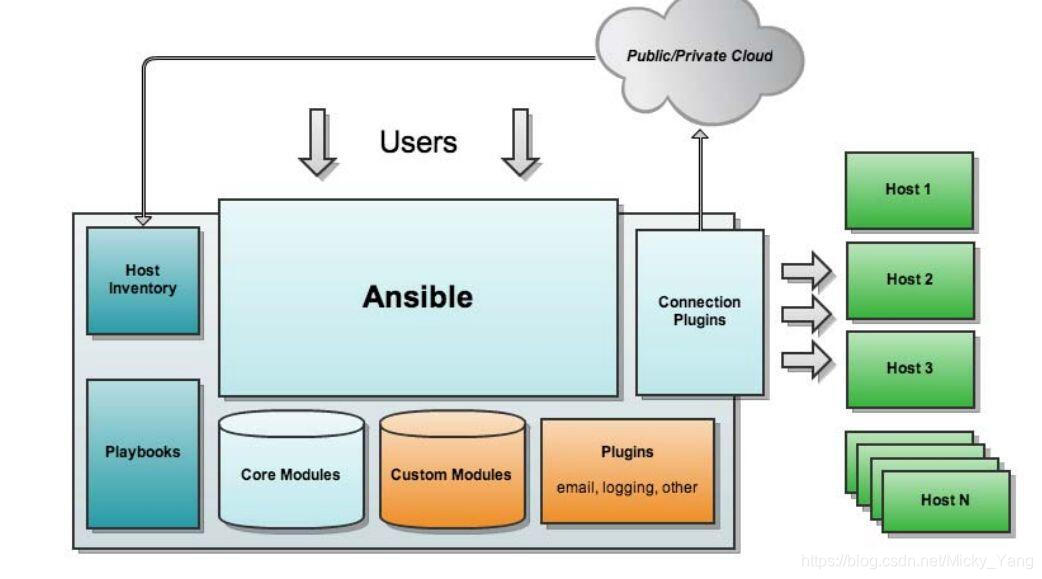
二、Ansible的架构与实现方式
由于Ansible是客户端代理程序的一款自动化运维工具,所以它的使用是基于SSH密钥来对远程客户端进行管理的。首先会有一台服务器端,对管理的个客户端做密钥免密认证,使得服务器端可以轻松在客户端执行管理操作命令;Ansible对远程客户端做管理,需要在本地维护一个hosts客户端主机名单,Ansible的核心管理模块也非常的多,可以简单的利用模块来进行远程命令的操纵;Ansible最为强大的地方在于它可以通过Playbooks文件,通过编写此剧本文件,达到多个任务多台主机的操作,大大的减少运维时间和重复任务。
三、Ansible工具的安装
ansible工具收录在epel源当中,配置epel源即可直接基于yum程序包管理工具来安装。
[root@server ~]#vim epel.repo    //配置指向epel的yum源;
[epel]
name=Extra Packages for Enterprise Linux 7 - $basearch
mirrorlist=https://mirrors.fedoraproject.org/metalink?repo=epel-7&arch=$basearch
failovermethod=priority
enabled=1
gpgcheck=0
gpgkey=file:///etc/pki/rpm-gpg/RPM-GPG-KEY-EPEL-7

[root@server ~]# yum repolist all
Loaded plugins: fastestmirror
Loading mirror speeds from cached hostfile
 * epel: mirrors.tuna.tsinghua.edu.cn
repo id            repo name                                            status
!base/x86_64       CentOS-7 - Base - mirrors.aliyun.com                 enabled: 10,019
*!epel/x86_64      Extra Packages for Enterprise Linux 7 - x86_64       enabled: 13,068
!jyy               jyy                                                  enabled:  3,723
repolist: 26,810
[root@server ~]#
[root@server ~]# yum list all  | grep ansible
ansible.noarch                             2.7.10-1.el7                    @epel
[root@server ~]# yum install  ansible
Loaded plugins: fastestmirror
Loading mirror speeds from cached hostfile
epel/x86_64/metalink                                            | 5.7 kB  00:00:00
 * epel: mirrors.tuna.tsinghua.edu.cn
base                                                            | 3.6 kB  00:00:00
epel                                                            | 4.7 kB  00:00:00
jyy                                                             | 3.6 kB  00:00:00
......................................安装过程省略............

[root@server ~]# rpm -ql ansible |less    //查看ansible安装所生成的文件;
/etc/ansible
/etc/ansible/ansible.cfg   //这是ansible的主配置文件
/etc/ansible/hosts    //hosts是ansible管理个节点的地址信息文件
四、Ansible的常用模块
实验环境说明:
| 身份 | 地址 |
|---|---|
| 管理主机 | 192.168.126.141 |
| 被管理主机(db服务器主机) | 192.168.126.129 |
| 被管理主机(web服务器主机1) | 192.168.126.128 |
| 被管理主机(web服务器主机2) | 192.168.126.139 |
1)首先我们需要生成ssh公钥文件并发送给所有的被管理主机
[root@server ~]# ssh-keygen      //生成主机密钥信息;
Generating public/private rsa key pair.
Enter file in which to save the key (/root/.ssh/id_rsa):
/root/.ssh/id_rsa already exists.
Overwrite (y/n)? y
Enter passphrase (empty for no passphrase):
Enter same passphrase again:
Your identification has been saved in /root/.ssh/id_rsa.
Your public key has been saved in /root/.ssh/id_rsa.pub.
The key fingerprint is:
SHA256:OAWb9y0oFJk034C2FXH9ZuWiOyZnP5BgfbJZypThRoA root@master
The key's randomart image is:
+---[RSA 2048]----+
|     .=+++oo     |
|      =BE+  +   .|
|     .+o+ .+ + o |
|     ..+ oo.B B .|
|      + S.o=.% . |
|       o   .O    |
|             o   |
|          . * .  |
|           = o.. |
+----[SHA256]-----+
[root@server ~]# ssh-copy-id 192.168.126.129   //把公钥发送给所有被管理主机(此处代码只显示一台)
/usr/bin/ssh-copy-id: INFO: Source of key(s) to be installed: "/root/.ssh/id_rsa.pub"
/usr/bin/ssh-copy-id: INFO: attempting to log in with the new key(s), to filter out any that are already installed
/usr/bin/ssh-copy-id: INFO: 1 key(s) remain to be installed -- if you are prompted now it is to install the new keys
[email protected]'s password:

Number of key(s) added: 1

Now try logging into the machine, with:   "ssh '192.168.126.129'"
and check to make sure that only the key(s) you wanted were added.

[root@server ~]#
[root@server ~]# ssh [email protected] "hostname" ; ssh [email protected] "hostname" ; ssh [email protected] "hostname"
db
web1
web2
//对三台主机做免密测试,显示其主机名成功;
2)配置管理主机的hosts文件
[root@server ~]# cd /etc/ansible/
[root@server ansible]# vim hosts
# This is the default ansible 'hosts' file.
#
# It should live in /etc/ansible/hosts
#
#   - Comments begin with the '#' character
#   - Blank lines are ignored
#   - Groups of hosts are delimited by [header] elements
#   - You can enter hostnames or ip addresses
#   - A hostname/ip can be a member of multiple groups

# Ex 1: Ungrouped hosts, specify before any group headers.
[webserver]    //可以给多个管理主机起一个名称;下面两台主机便是我的web服务器主机地址;
192.168.126.139
192.168.126.128

[dbserver]    //这是我定义的db数据库服务器主机名称
192.168.126.129
3)常用模块的使用帮助
ansible的使用语法:
		ansible <host-pattern> [-f forks] [-m module_name] [-a args]

[root@server ~]# ansible-doc -l   //可以列出ansible所支持的所有模块;
a10_server                                           Manage A10 Networks AX
a10_server_axapi3                                    Manage A10 Networks AX
a10_service_group                                    Manage A10 Networks AX
a10_virtual_server                                   Manage A10 Networks AX
aci_aaa_user                                         Manage AAA users (aaa:
aci_aaa_user_certificate                             Manage AAA user certif
aci_access_port_to_interface_policy_leaf_profile     Manage Fabric interfac
......................

[root@server ~]# ansible-doc -s user    //-s后面接上模块名称可以查看一个模块的使用帮助;
- name: Manage user accounts
  user:
      append:                # If `yes', add the user to the groups specifi
                               in `groups'. If
                               `no', user will
                               only be added to
                               the groups
                               specified in
                               `groups',
                               removing them
                               from all other
                               groups.
      comment:               # Optionally sets the description (aka `GECOS'
                               user account.
      create_home:           # Unless set to `no', a home directory will be
                               made for the user
                               when the account
                               is created or if
:
4)command模块的使用
command模块可以直接使用命令对远程被管理主机进行操作(此模块和shell模块是例外,因为其他的模块执行的命令格式都是key=value格式)
[root@server ~]# ansible webserver -m command -a "whoami"  //在所有的web服务器上执行"whoami"命令;-m指明模块名称,-a指明命令;
192.168.126.128 | CHANGED | rc=0 >>
root

192.168.126.139 | CHANGED | rc=0 >>
root               //返回成功

[root@server ~]#
5)user模块
user模块主要是用来创建各用户的,其格式是key=value的形式。
我们在所有的web服务器上创建一个webserver10的用户,并指明其个属性信息;
[root@server ~]# ansible webserver -m user -a "name=webserver10 system=yes uid=666 group=root"
				 //指明用户名,是否为系统用户,用户uid和附加组;
192.168.126.139 | CHANGED => {
    "changed": true,
    "comment": "",
    "create_home": true,
    "group": 0,
    "home": "/home/webserver10",
    "name": "webserver10",
    "shell": "/bin/bash",
    "state": "present",
    "system": true,
    "uid": 666
}
192.168.126.128 | CHANGED => {
    "changed": true,
    "comment": "",
    "create_home": true,
    "group": 0,
    "home": "/home/webserver10",
    "name": "webserver10",
    "shell": "/bin/bash",
    "state": "present",
    "system": true,
    "uid": 666
}               //返回信息现在已然成功创建此用户
我们在任意一台webserver上查看此webserver10的用户信息
[root@web1 ~]# id webserver10
uid=666(webserver10) gid=0(root) groups=0(root)   //已然成功存在;
那么我们如何删除一个用户呢?
只需要改变此用户的state状态既可以删除指定用户
例如:
[root@server ~]# ansible webserver -m user -a "name=webserver10 state=absent"
		//指明用户名和状态;presend为存在(创建),absent为不存在(删除)
192.168.126.139 | CHANGED => {
    "changed": true,
    "force": false,
    "name": "webserver10",
    "remove": false,
    "state": "absent"
}
192.168.126.128 | CHANGED => {
    "changed": true,
    "force": false,
    "name": "webserver10",
    "remove": false,
    "state": "absent"
}
此时我们再到webserver服务器上查看是否有webserver10用户
[root@web1 ~]# id webserver10
id: webserver10: no such user    //用户已然被删除;
6)copy模块
copy模块是用来复制文件到各被管理主机的
[root@server ~]# ansible all -m copy -a "src=/etc/fstab dest=/tmp/fstab_ansb mode=0600"
   		//给所有的管理主机发送文件,源文件为/etc/fstab,存放在被管理者主机的/tmp/目录中并修改了文件
   		名,权限位设置为0600;
192.168.126.128 | CHANGED => {
    "changed": true,
    "checksum": "2b7747ed20a6b679c4f5a2a9f961ad80a9af73b1",
    "dest": "/tmp/fstab_ansb",
    "gid": 0,
    "group": "root",
    "md5sum": "e65113c619188818c14e660f630f0221",
    "mode": "0600",
    "owner": "root",
    "size": 465,
    "src": "/root/.ansible/tmp/ansible-tmp-1556124639.52-267371296358607/source",
    "state": "file",
    "uid": 0
}
192.168.126.129 | CHANGED => {
    "changed": true,
    "checksum": "2b7747ed20a6b679c4f5a2a9f961ad80a9af73b1",
    "dest": "/tmp/fstab_ansb",
    "gid": 0,
    "group": "root",
    "md5sum": "e65113c619188818c14e660f630f0221",
    "mode": "0600",
    "owner": "root",
    "size": 465,
    "src": "/root/.ansible/tmp/ansible-tmp-1556124639.47-116516759002806/source",
    "state": "file",
    "uid": 0
}
192.168.126.139 | CHANGED => {
    "changed": true,
    "checksum": "2b7747ed20a6b679c4f5a2a9f961ad80a9af73b1",
    "dest": "/tmp/fstab_ansb",
    "gid": 0,
    "group": "root",
    "md5sum": "e65113c619188818c14e660f630f0221",
    "mode": "0600",
    "owner": "root",
    "size": 465,
    "src": "/root/.ansible/tmp/ansible-tmp-1556124639.51-112783909852641/source",
    "state": "file",
    "uid": 0
}
在任意一个被管理主机上查看是否由此文件
[root@web2 ~]# cd /tmp/
[root@web2 tmp]# ll
-rw------- 1 root root 465 Apr 24 12:50 fstab_ansb    //文件存在,且权限位为0600;
7)ping模块
ping模块是用来测试被管理主机是否可以ping通
[root@server ~]# ansible all -m ping    //此模块没有参数;
192.168.126.129 | SUCCESS => {
    "changed": false,
    "ping": "pong"
}
192.168.126.128 | SUCCESS => {
    "changed": false,
    "ping": "pong"
}
192.168.126.139 | SUCCESS => {
    "changed": false,
    "ping": "pong"
}
[root@server ~]#
8)yum模块
见名知意,yum模块便是来进行软件包管理的模块
我们在所有的webserver管理主机上安装httpd软件包程序
[root@server ~]# ansible webserver -m yum -a "name=httpd state=latest"   //指明软件包名称和动作,latest表示安装最新版本;
192.168.126.128 | CHANGED => {
    "ansible_facts": {
        "pkg_mgr": "yum"
    },
    "changed": true,
    "msg": "",
    "rc": 0,
    "results": [
        "Loaded plugins: langpacks, product-id, subscription-manager\nThis system is not registered to Red Hat Subscription Management. You can use subscription-manager to register.\nResolving Dependencies\n--> Running transaction check\n---> Package httpd.x86_64 0:2.4.6-31.el7 will be installed\n--> Finished Dependency Resolution\n\nDependencies Resolved\n\n================================================================================\n Package         Arch             Version                   Repository     Size\n================================================================================\nInstalling:\n httpd           x86_64           2.4.6-31.el7              jyy           1.2 M\n\nTransaction Summary\n================================================================================\nInstall  1 Package\n\nTotal download size: 1.2 M\nInstalled size: 3.7 M\nDownloading packages:\nRunning transaction check\nRunning transaction test\nTransaction test succeeded\nRunning transaction\n  Installing : httpd-2.4.6-31.el7.x86_64                                    1/1 \n  Verifying  : httpd-2.4.6-31.el7.x86_64                                    1/1 \n\nInstalled:\n  httpd.x86_64 0:2.4.6-31.el7                                                   \n\nComplete!\n"
    ]
}
192.168.126.139 | CHANGED => {
    "ansible_facts": {
        "pkg_mgr": "yum"
    },
    "changed": true,
    "msg": "",
    "rc": 0,
    "results": [
        "Loaded plugins: fastestmirror\nLoading mirror speeds from cached hostfile\nResolving Dependencies\n--> Running transaction check\n---> Package httpd.x86_64 0:2.4.6-88.el7.centos will be installed\n--> Finished Dependency Resolution\n\nDependencies Resolved\n\n================================================================================\n Package       Arch           Version                        Repository    Size\n================================================================================\nInstalling:\n httpd         x86_64         2.4.6-88.el7.centos            base         2.7 M\n\nTransaction Summary\n================================================================================\nInstall  1 Package\n\nTotal download size: 2.7 M\nInstalled size: 9.4 M\nDownloading packages:\nRunning transaction check\nRunning transaction test\nTransaction test succeeded\nRunning transaction\n  Installing : httpd-2.4.6-88.el7.centos.x86_64                             1/1 \n  Verifying  : httpd-2.4.6-88.el7.centos.x86_64                             1/1 \n\nInstalled:\n  httpd.x86_64 0:2.4.6-88.el7.centos                                            \n\nComplete!\n"
    ]
}
我们查看webserver节点中的主机上httpd软件包是否安装成功:
[root@web1 tmp]# rpm -q httpd
httpd-2.4.6-31.el7.x86_64   //已然成功安装;
9)service模块
我们需要远程控制各主机的服务状态时,便要用到service模块
[root@server ~]# ansible webserver -m service -a "name=httpd state=started enabled=yes"
 //指明服务器名称,状态为started|stopped|restarted,enabled=yes|no控制服务是否开机自启动;

192.168.126.139 | CHANGED => {
    "changed": true,
    "enabled": true,
    "name": "httpd",
    "state": "started",
    "status": {
        "ActiveEnterTimestampMonotonic": "0",
        "ActiveExitTimestampMonotonic": "0",
        "ActiveState": "inactive",
        "After": "systemd-journald.socket basic.target -.mount network.target remote-fs.target tmp.mount nss-lookup.target system.slice",
        "AllowIsolate": "no",
        "AmbientCapabilities": "0",
        "AssertResult": "no",
        "AssertTimestampMonotonic": "0",
        "Before": "shutdown.target",
        "BlockIOAccounting": "no",
        "BlockIOWeight": "18446744073709551615",
        "CPUAccounting": "no",
        "CPUQuotaPerSecUSec": "infinity",
        "CPUSchedulingPolicy": "0",
        "CPUSchedulingPriority": "0",
        "CPUSchedulingResetOnFork": "no",
        "CPUShares": "18446744073709551615",
        "CanIsolate": "no",
        "CanReload": "yes",
        "CanStart": "yes",
        "CanStop": "yes",
        "CapabilityBoundingSet": "18446744073709551615",
        "ConditionResult": "no",
        "ConditionTimestampMonotonic": "0",
        "Conflicts": "shutdown.target",
        "ControlPID": "0",
        "DefaultDependencies": "yes",
        "Delegate": "no",
        "Description": "The Apache HTTP Server",
        "DevicePolicy": "auto",
        "Documentation": "man:httpd(8) man:apachectl(8)",
        "EnvironmentFile": "/etc/sysconfig/httpd (ignore_errors=no)",
        "ExecMainCode": "0",
        "ExecMainExitTimestampMonotonic": "0",
        "ExecMainPID": "0",
        "ExecMainStartTimestampMonotonic": "0",
        "ExecMainStatus": "0",
        "ExecReload": "{ path=/usr/sbin/httpd ; argv[]=/usr/sbin/httpd $OPTIONS -k graceful ; ignore_errors=no ; start_time=[n/a] ; stop_time=[n/a] ; pid=0 ; code=(null) ; status=0/0 }",
        "ExecStart": "{ path=/usr/sbin/httpd ; argv[]=/usr/sbin/httpd $OPTIONS -DFOREGROUND ; ignore_errors=no ; start_time=[n/a] ; stop_time=[n/a] ; pid=0 ; code=(null) ; status=0/0 }",
        "ExecStop": "{ path=/bin/kill ; argv[]=/bin/kill -WINCH ${MAINPID} ; ignore_errors=no ; start_time=[n/a] ; stop_time=[n/a] ; pid=0 ; code=(null) ; status=0/0 }",
        "FailureAction": "none",
        "FileDescriptorStoreMax": "0",
        "FragmentPath": "/usr/lib/systemd/system/httpd.service",
        "GuessMainPID": "yes",
        "IOScheduling": "0",
        "Id": "httpd.service",
        "IgnoreOnIsolate": "no",
        "IgnoreOnSnapshot": "no",
        "IgnoreSIGPIPE": "yes",
        "InactiveEnterTimestampMonotonic": "0",
        "InactiveExitTimestampMonotonic": "0",
        "JobTimeoutAction": "none",
        "JobTimeoutUSec": "0",
        "KillMode": "control-group",
        "KillSignal": "18",
        "LimitAS": "18446744073709551615",
        "LimitCORE": "18446744073709551615",
        "LimitCPU": "18446744073709551615",
        "LimitDATA": "18446744073709551615",
        "LimitFSIZE": "18446744073709551615",
        "LimitLOCKS": "18446744073709551615",
        "LimitMEMLOCK": "65536",
        "LimitMSGQUEUE": "819200",
        "LimitNICE": "0",
        "LimitNOFILE": "4096",
        "LimitNPROC": "7824",
        "LimitRSS": "18446744073709551615",
        "LimitRTPRIO": "0",
        "LimitRTTIME": "18446744073709551615",
        "LimitSIGPENDING": "7824",
        "LimitSTACK": "18446744073709551615",
        "LoadState": "loaded",
        "MainPID": "0",
        "MemoryAccounting": "no",
        "MemoryCurrent": "18446744073709551615",
        "MemoryLimit": "18446744073709551615",
        "MountFlags": "0",
        "Names": "httpd.service",
        "NeedDaemonReload": "no",
        "Nice": "0",
        "NoNewPrivileges": "no",
        "NonBlocking": "no",
        "NotifyAccess": "main",
        "OOMScoreAdjust": "0",
        "OnFailureJobMode": "replace",
        "PermissionsStartOnly": "no",
        "PrivateDevices": "no",
        "PrivateNetwork": "no",
        "PrivateTmp": "yes",
        "ProtectHome": "no",
        "ProtectSystem": "no",
        "RefuseManualStart": "no",
        "RefuseManualStop": "no",
        "RemainAfterExit": "no",
        "Requires": "-.mount basic.target",
        "RequiresMountsFor": "/var/tmp",
        "Restart": "no",
        "RestartUSec": "100ms",
        "Result": "success",
        "RootDirectoryStartOnly": "no",
        "RuntimeDirectoryMode": "0755",
        "SameProcessGroup": "no",
        "SecureBits": "0",
        "SendSIGHUP": "no",
        "SendSIGKILL": "yes",
        "Slice": "system.slice",
        "StandardError": "inherit",
        "StandardInput": "null",
        "StandardOutput": "journal",
        "StartLimitAction": "none",
        "StartLimitBurst": "5",
        "StartLimitInterval": "10000000",
        "StartupBlockIOWeight": "18446744073709551615",
        "StartupCPUShares": "18446744073709551615",
        "StatusErrno": "0",
        "StopWhenUnneeded": "no",
        "SubState": "dead",
        "SyslogLevelPrefix": "yes",
        "SyslogPriority": "30",
        "SystemCallErrorNumber": "0",
        "TTYReset": "no",
        "TTYVHangup": "no",
        "TTYVTDisallocate": "no",
        "TasksAccounting": "no",
        "TasksCurrent": "18446744073709551615",
        "TasksMax": "18446744073709551615",
        "TimeoutStartUSec": "1min 30s",
        "TimeoutStopUSec": "1min 30s",
        "TimerSlackNSec": "50000",
        "Transient": "no",
        "Type": "notify",
        "UMask": "0022",
        "UnitFilePreset": "disabled",
        "UnitFileState": "disabled",
        "Wants": "system.slice",
        "WatchdogTimestampMonotonic": "0",
        "WatchdogUSec": "0"
    }
}
..................................................
我们查看webserver中的主机httpd服务是否处于运行状态并为开机自启动模式:
[root@web1 tmp]# systemctl is-enabled httpd
enabled        //已然为开机自启动状态;
[root@web1 tmp]# systemctl status httpd
httpd.service - The Apache HTTP Server
   Loaded: loaded (/usr/lib/systemd/system/httpd.service; enabled)
   Active: active (running) since Wed 2019-04-24 17:13:48 CST; 3min 47s ago    //running状态;
 Main PID: 15846 (httpd)
   Status: "Total requests: 0; Current requests/sec: 0; Current traffic:   0 B/sec"
   CGroup: /system.slice/httpd.service
           ├─15846 /usr/sbin/httpd -DFOREGROUND
           ├─15847 /usr/sbin/httpd -DFOREGROUND
           ├─15848 /usr/sbin/httpd -DFOREGROUND
           ├─15849 /usr/sbin/httpd -DFOREGROUND
           ├─15850 /usr/sbin/httpd -DFOREGROUND
           └─15852 /usr/sbin/httpd -DFOREGROUND

Apr 24 17:13:23 web1 systemd[1]: Starting The Apache HTTP Server...
Apr 24 17:13:38 web1 httpd[15846]: AH00557: httpd: apr_sockaddr_info_get() failed for web1
Apr 24 17:13:38 web1 httpd[15846]: AH00558: httpd: Could not reliably determine the server's fully qualified ...essage
Apr 24 17:13:48 web1 systemd[1]: Started The Apache HTTP Server.
Hint: Some lines were ellipsized, use -l to show in full.
[root@web1 tmp]#
10)shell模块
shell模块的作用是启动一个新shell程序执行命令,它和command命令一样直接输入命令即可;
给webserver10用户非交互式的修改密码
[root@server ~]# ansible webserver -m shell -a 'echo "webserver10" | passwd --stdin webserver10'
192.168.126.128 | CHANGED | rc=0 >>
Changing password for user webserver10.
passwd: all authentication tokens updated successfully.

192.168.126.139 | CHANGED | rc=0 >>
Changing password for user webserver10.
passwd: all authentication tokens updated successfully.   //seccessfully,密码设置成功;

[root@server ~]#
11)script模块
此模块的作用在于可以在远端执行本地服务器上的脚本
例如:
[root@server ~]#vim ansib.sh
#!bin/bash
echo "$(hostname) love ansible"    //编写一个简单脚本

[root@server ~]# ansible all -m script -a "/root/ansib.sh"    //指明模块名称和脚本路径即可;
192.168.126.128 | CHANGED => {
    "changed": true,
    "rc": 0,
    "stderr": "Shared connection to 192.168.126.128 closed.\r\n",
    "stderr_lines": [
        "Shared connection to 192.168.126.128 closed."
    ],
    "stdout": "web1 love ansible\r\n",
    "stdout_lines": [
        "web1 love ansible"
    ]
}
192.168.126.139 | CHANGED => {
    "changed": true,
    "rc": 0,
    "stderr": "Shared connection to 192.168.126.139 closed.\r\n",
    "stderr_lines": [
        "Shared connection to 192.168.126.139 closed."
    ],
    "stdout": "web2 love ansible\r\n",
    "stdout_lines": [
        "web2 love ansible"
    ]
}
192.168.126.129 | CHANGED => {
    "changed": true,
    "rc": 0,
    "stderr": "Shared connection to 192.168.126.129 closed.\r\n",
    "stderr_lines": [
        "Shared connection to 192.168.126.129 closed."
    ],
    "stdout": "db love ansible\r\n",
    "stdout_lines": [
        "db love ansible"
    ]
}
12)setup模块
此模块是用来收集各被管理主机的信息,信息是以键值对的方式呈现,所有的信息都ansible都可以当做变量来使用,通过键名来取其值。
[root@server ~]# ansible all -m setup   //指明模块即可
192.168.126.128 | SUCCESS => {
    "ansible_facts": {
        "ansible_all_ipv4_addresses": [
            "192.168.126.128"
        ],
        "ansible_all_ipv6_addresses": [
            "fe80::20c:29ff:feaf:8c47"
        ],
        "ansible_apparmor": {
            "status": "disabled"
        },
        "ansible_architecture": "x86_64",
        "ansible_bios_date": "04/13/2018",
        "ansible_bios_version": "6.00",
        "ansible_cmdline": {
            "BOOT_IMAGE": "/vmlinuz-3.10.0-229.el7.x86_64",
            "LANG": "en_US.UTF-8",
            "quiet": true,
            "rhgb": true,
            "ro": true,
...................................其余信息省略................
五、playbook的使用
playbook可以使多个任务集成到一个yml文件中,多次调用执行,可以理解为剧本;将多出戏集合到一个剧本中,不同的角色唱不同的戏;比如使webserver安装httpd软件包,拷贝配置文件,启动服务;而dbserver安装mariadb软件包,拷贝配置文件,启动服务。这些操作都可以写成一个剧本,不同任务的主机完成不同的任务。playbook的核心元素:tasks(任务)、variables(变量)、templates(模板)、handlers(处理器)、roles(角色)
剧本示例:
[root@server ansible]# cp /etc/httpd/conf/httpd.conf .
[root@server ansible]# vim   service.yml
[root@server ansible]# vim service.yml
- hosts: webserver                 //应用到哪些主机上
  remote_user: root               //以哪个远程用户执行
  tasks:                                 //任务(也就是戏)
  - name: insterll  httpd package   //说明,第一个任务的解释;
    yum: name=httpd state=latest    //使用的模块,需要做什么事情
  - name: copy httpd config
    copy: src=httpd.conf dest=/etc/httpd/conf/httpd.conf
  - name: starting httpd  serviced
    service: name=httpd  state=started enabled=yes

- hosts: dbserver
  remote_user: root
  tasks:
  - name: install mariadb package
    yum: name=mariadb-server.x86_64 state=latest
  - name: start mysql and enabled mysql
    service: name=mariadb state=started enabled=yes


[root@server ansible]# ansible-playbook service.yml

PLAY [webserver] *****************************************************************************************************

TASK [Gathering Facts] ***********************************************************************************************
ok: [192.168.126.128]
ok: [192.168.126.139]

TASK [insterll  httpd package] ***************************************************************************************
ok: [192.168.126.139]
ok: [192.168.126.128]

TASK [copy httpd config] *********************************************************************************************
changed: [192.168.126.128]
changed: [192.168.126.139]

TASK [starting httpd  serviced] **************************************************************************************
ok: [192.168.126.128]
ok: [192.168.126.139]

PLAY [dbserver] ******************************************************************************************************

TASK [Gathering Facts] ***********************************************************************************************
ok: [192.168.126.129]

TASK [install mariadb package] ***************************************************************************************
ok: [192.168.126.129]

TASK [start mysql and enabled mysql] *********************************************************************************
ok: [192.168.126.129]

PLAY RECAP ***********************************************************************************************************
192.168.126.128            : ok=4    changed=1    unreachable=0    failed=0
192.168.126.129            : ok=3    changed=0    unreachable=0    failed=0
192.168.126.139            : ok=4    changed=1    unreachable=0    failed=0
在远程主机上查看各软件包是否安装,服务器是否启动,是否开机自动启动:
dbserver:
[root@db tmp]# rpm -q mariadb
mariadb-5.5.60-1.el7_5.x86_64
You have new mail in /var/spool/mail/root
[root@db tmp]# systemctl is-enabled mariadb
enabled
[root@db tmp]# systemctl status mariadb
mariadb.service - MariaDB database server
   Loaded: loaded (/usr/lib/systemd/system/mariadb.service; enabled)
   Active: active (running) since Wed 2019-04-24 18:29:15 CST; 9min ago
  Process: 15041 ExecStartPost=/usr/libexec/mariadb-wait-ready $MAINPID (code=exited, status=0/SUCCESS)
  Process: 15010 ExecStartPre=/usr/libexec/mariadb-prepare-db-dir %n (code=exited, status=0/SUCCESS)
 Main PID: 15040 (mysqld_safe)
   CGroup: /system.slice/mariadb.service
           ├─15040 /bin/sh /usr/bin/mysqld_safe --basedir=/usr
           └─15239 /usr/libexec/mysqld --basedir=/usr --datadir=/var/lib/mysql --plugin-dir=/usr/lib64/mysql/plugin...

Apr 24 18:29:08 db systemd[1]: Starting MariaDB database server...
Apr 24 18:29:09 db mariadb-prepare-db-dir[15010]: Database MariaDB is probably initialized in /var/lib/mysql al...one.
Apr 24 18:29:09 db mariadb-prepare-db-dir[15010]: If this is not the case, make sure the /var/lib/mysql is empt...dir.
Apr 24 18:29:09 db mysqld_safe[15040]: 190424 18:29:09 mysqld_safe Logging to '/var/log/mariadb/mariadb.log'.
Apr 24 18:29:09 db mysqld_safe[15040]: 190424 18:29:09 mysqld_safe Starting mysqld daemon with databases from ...mysql
Apr 24 18:29:15 db systemd[1]: Started MariaDB database server.
Hint: Some lines were ellipsized, use -l to show in full.
webserver:
[root@web1 tmp]# rpm -q httpd
httpd-2.4.6-31.el7.x86_64
You have new mail in /var/spool/mail/root
[root@web1 tmp]# systemctl is-enabled httpd
enabled
[root@web1 tmp]# systemctl status httpd
httpd.service - The Apache HTTP Server
   Loaded: loaded (/usr/lib/systemd/system/httpd.service; enabled)
   Active: active (running) since Wed 2019-04-24 18:14:16 CST; 25min ago
 Main PID: 18697 (httpd)
   Status: "Total requests: 0; Current requests/sec: 0; Current traffic:   0 B/sec"
   CGroup: /system.slice/httpd.service
           ├─18697 /usr/sbin/httpd -DFOREGROUND
           ├─18706 /usr/sbin/httpd -DFOREGROUND
           ├─18707 /usr/sbin/httpd -DFOREGROUND
           ├─18708 /usr/sbin/httpd -DFOREGROUND
           ├─18709 /usr/sbin/httpd -DFOREGROUND
           └─18710 /usr/sbin/httpd -DFOREGROUND

Apr 24 18:13:51 web1 systemd[1]: Starting The Apache HTTP Server...
Apr 24 18:14:06 web1 httpd[18697]: AH00557: httpd: apr_sockaddr_info_get() failed for web1
Apr 24 18:14:06 web1 httpd[18697]: AH00558: httpd: Could not reliably determine the server's fully qualified ...essage
Apr 24 18:14:16 web1 systemd[1]: Started The Apache HTTP Server.
Hint: Some lines were ellipsized, use -l to show in full.
以此,一个剧本完成在不同的管理机上完成多个不同的任务已经完成;当然ansible还有很多其他的高级使用方法。