文章目录
前面的博客详细介绍了Ubuntu 21.10的安装,本文介绍一下配置以及使用Cockpit管理。
一、使用SSH远程连接Ubuntu
服务器版本的Ubuntu默认是没有图形界面的,控制台的字符缓冲区也比较小,不能滑动输出,所以最好使用SSH远程连接到Ubuntu来操作。
1.查看IP地址
ifconfig
该命令可能没有安装,使用
sudo apt install net-tools
进行安装

2. 使用SSH连接

二、安装配置Cockpit
Cockpit是Linux下非常好用,非常强大的管理工具,在笔者前面的博客中有一系列介绍Cockpit的文章,但都是在CentOS8下的使用情况,Ubuntu下的Cockpit怎么样呢?是否有所不同呢?
1.安装Cockpit
sudo apt install cockpit
sudo systemctl enable --now cockpit.socket
2.使用Cockpit管理
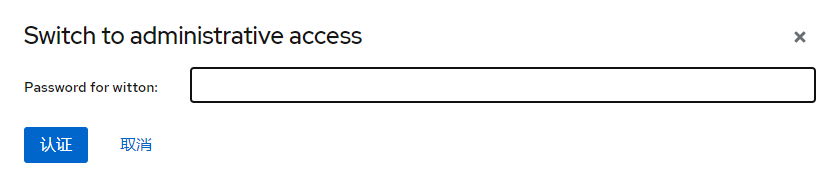
下图是安装好Cockpit后,进入Cockpit的页面,可以看到默认是限制访问模式的,可以打开管理员权限。

输入密码验证通过即可使用管理员模式
但是与CentOS下的功能少了很多。下面介绍一下部分差异以及解决办法:
A、存储
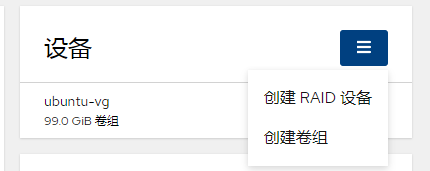
存储页面中设备只有创建RAID设备,没有“创建卷组”也没有“创建VOD设备”。

上图是Ubuntu的设备菜单,下图是CentOS 8的设备菜单

要想让Ubuntu中的Cockpit支持“创建卷组”,需要手动安装udisks2-lvm2组件,Ubuntu默认是没有安装的。
sudo apt install udisks2-lvm2
然后重新启动相关服务:
sudo systemctl restart udisks2.service
sudo systemctl daemon-reload
sudo systemctl restart cockpit.socket
sudo systemctl restart cockpit.service
然后重新登录cockpit即可看到卷组了,也可以创建卷组。
其实在详细安装Ubuntu 21.10一文中提到的商家安装的系统中只有200G的空间可使用,剩余空间不可使用的情况,如果当时我知道可以通过这种方式来处理剩余的空间,也不至于重新安装系统。
B、网络
Ubuntu中的Cockpit没有防火墙相应的设置,不能在Cockpit页面设置防火墙。

这是因为Cockpit使用的是firewalld服务来进行防火墙设置的,而Ubuntu默认是使用ufw来设置防火墙的,所以并没有安装firewalld服务。如果想要在Cockpit页面设置防火墙,就必须安装firewalld服务。需要注意的是如果安装了firewalld服务,就会有两个防火墙,如果都开启,则两个都会生效。
使用下面的命令安装firewalld服务:
sudo apt install firewalld
安装了firewalld服务后,刷新Cockpit页面就不能访问了。
使用
sudo systemctl status firewalld
查看防火墙状态:
witton@witton:~$ sudo systemctl status firewalld
● firewalld.service - firewalld - dynamic firewall daemon
     Loaded: loaded (/lib/systemd/system/firewalld.service; enabled; vendor preset: enabled)
     Active: active (running) since Fri 2021-11-19 09:56:46 UTC; 3min 0s ago
       Docs: man:firewalld(1)
   Main PID: 5717 (firewalld)
      Tasks: 2 (limit: 4588)
     Memory: 23.4M
        CPU: 686ms
     CGroup: /system.slice/firewalld.service
             └─5717 /usr/bin/python3 /usr/sbin/firewalld --nofork --nopid

Nov 19 09:56:45 witton systemd[1]: Starting firewalld - dynamic firewall daemon...
Nov 19 09:56:46 witton systemd[1]: Started firewalld - dynamic firewall daemon.
使用下面命令停止firewalld防火墙
sudo systemctl stop firewalld
进入Cockpit网络页面,可以看到防火墙功能了。

点编辑规则和区域

可以看到系统自动帮我们添加了SSH服务,dhcpv6-client服务和cockpit服务所需要的端口

此时使用
sudo systemctl status firewalld
查看防火墙状态就是开启的了。
firewalld相对ufw来说,要复杂得多,如果习惯使用firewalld服务来做防火墙或者希望使用Cockpit来管理防火墙则可以安装firewalld服务;否则可以直接使用Ubuntu默认的utfw来管理防火墙。一般来说二者选其一即可。
C、Podman容器
Ubuntu的Cockpit也没有Podman页面,需要安装cockpit-podman:
sudo apt install cockpit-podman
安装完成后,重新登录Cockpit就会出现podman容器。

此时点击“获取镜像”,在搜索镜像对话框中,可以看到没有任何镜像源可以使用。

需要编辑/etc/containers/registries.conf文件,在文件最后添加如下内容即可:
unqualified-search-registries= ['docker.io', 'registry.fedoraproject.org', 'quay.io', 'registry.access.redhat.com', 'registry.centos.org']
然后重启cockpit服务:
sudo systemctl restart cockpit.service
重新登录cockpit,就可以看到镜像源了。

我们尝试下载CentOS 7.9.2009版本,并做一些配置。
a.关闭防火墙
在Ubuntu中,如果不关闭防火墙,就运行容器,容器中的系统很可能不能正确解析DNS,所以如果此时安装软件可能会出现错误:Could not resolve host

所以一定要先关闭防火墙,再运行容器(如果防火墙设置正确,可以不关闭防火墙)
网上也有说在/etc/resolve.conf文件中添加DNS或者nameserver的,但是笔者尝试后未成功,因为容器中不能重启网络服务,所以使用重启容器的方式,但是重启容器后,之前修改的内容就变回原来的了。
DNS1=8.8.8.8
DNS2=8.8.4.4
b. 运行容器
首先设置好端口的映射,主机端口2022映射到容器中的22

c.设置更新源为国内镜像
这里以设置CentOS的国内镜像为腾讯的镜像为例,可以打开https://mirrors.tencent.com/help/centos.html,可以看到CentOS 5~8 的镜像配置文件获取方法。
需要注意的是,该方法适用于直接运行于要设置镜像的系统,我们这里是设置容器中的CentOS,容器中的CentOS系统没有wget命令,当然可以先安装wget。
这里笔者使用在主机Ubuntu系统中获取,然后复制到容器系统中的方法。
下载镜像配置文件
cd ~
sudo wget -O CentOS-Base7.repo http://mirrors.cloud.tencent.com/repo/centos7_base.repo
查看容器ID,然后复制到指定目录
sudo podman ps
sudo podman cp CentOS-Base7.repo af476904e658:/etc/yum.repos.d/CentOS-Base.repo

c.安装所需软件
设置好国内镜像源后,就可以快速的安装所需软件了
yum install net-tools
yum install gcc
yum install gdb
d.修改podman网络模式
在Ubuntu中如果想让容器中的系统可以安装、更新软件,外部访问容器内的端口,最简单的方式就是彻底关闭防火墙。但是CentOS8中却可以打开防火墙,这是怎么回事呢?
CentOS 8中使用podman启动容器时,会自动创建一个网桥,cni-podman0,然后podman容器中的系统会自动使用这个网桥与外界进行通信,包括访问外部网络以及外部网络访问容器。

但是Ubuntu中却不行,最主要的不同是两个系统使用的网络模式不同,CentOS 8中使用的是桥接模式,而Ubuntu中使用的ptp模式。具体使用的何种网络模式,可以参见/etc/cni/net.d下的文件,Ubuntu中是87-podman-ptp.conflist,而CentOS8中是87-podman-bridge.conflist。
87-podman-ptp.conflist文件内容如下:
{


  "cniVersion": "0.4.0",
  "name": "podman",
  "plugins": [
    {


        "type": "ptp",
            "Documentation": "/usr/share/doc/containernetworking-plugins/main_ptp.md",
        "ipMasq": true,
        "ipam": {


            "type": "host-local",
                "Documentation": "/usr/share/doc/containernetworking-plugins/ipam_host-local.md",
            "subnet": "172.16.16.0/24",
            "routes": [
                {

     "dst": "0.0.0.0/0" }
            ]
        }
    },

    {


        "type": "portmap",
            "Documentation": "/usr/share/doc/containernetworking-plugins/meta_portmap.md",
        "capabilities": {

     "portMappings": true }
    },

    {


        "type": "firewall",
            "Documentation": "/usr/share/doc/containernetworking-plugins/meta_firewall.md",
        "backend": "iptables"
    }

  ]
}
87-podman-bridge.conflist文件内容如下:
{


  "cniVersion": "0.4.0",
  "name": "podman",
  "plugins": [
    {


      "type": "bridge",
      "bridge": "cni-podman0",
      "isGateway": true,
      "ipMasq": true,
      "hairpinMode": true,
      "ipam": {


        "type": "host-local",
        "routes": [{

     "dst": "0.0.0.0/0" }],
        "ranges": [
          [
            {


              "subnet": "10.88.0.0/16",
              "gateway": "10.88.0.1"
            }
          ]
        ]
      }
    },
    {


      "type": "portmap",
      "capabilities": {


        "portMappings": true
      }
    },
    {


      "type": "firewall"
    },
    {


      "type": "tuning"
    }
  ]
}
如果想让Ubuntu也能像CentOS 8那样在启动容器时,自动创建一个桥接设备,那这里就需要把Podman的网络模式设置为桥接模式,最简单的方式,就是把上面的87-podman-bridge.conflist文件复制到/etc/cni/net.d目录下,把原来的87-podman-ptp.conflist进行改名即可。
e.在容器中开启ssh服务
容器安装后,一般是没有ssh服务的,如果想要远程连接容器中的系统,需要安装ssh服务
yum install openssh-server
然后尝试使用命令运行SSH服务:
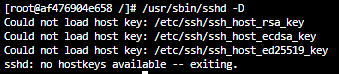
/usr/sbin/sshd -D
可能会报错误:could not load host key
可以使用根据需要下面的命令来生成相应的密钥:
ssh-keygen -q -t rsa -b 2048 -f /etc/ssh/ssh_host_rsa_key -N ''
ssh-keygen -q -t ecdsa -f /etc/ssh/ssh_host_ecdsa_key -N ''
ssh-keygen -t dsa -f /etc/ssh/ssh_host_ed25519_key -N ''
如果要修改SSH的监听端口,可以在/etc/ssh/sshd_config文件中进行修改
现在使用下面的命令来开启后台进程服务:
/usr/sbin/sshd -D&
要想远程连接容器中的SSH服务,还需要设置账号的密码,可以使用下面的命令来设置:
passwd
设置好后,就可以在外部使用SSH来连接容器了。
f.让容器启动即运行SSH服务
目前设置的SSH服务需要手动启动,比较麻烦,如果能够让SSH服务在容器启动时即自动启动那就省事多了。
网络上有的说可以使用ntsysv命令来查看服务(如果没有这个命令,可以使用yum install ntsysv来安装),然后让其自动生效,或者使用
sytemctl enable sshd.service
但是笔者尝试不起作用。
最简单的办法就是如果容器启动是执行/bin/bash,则直接在/etc/profile.d/目录中新建一个文件sshd.sh(/etc/profile.d/目录中的所有sh文件都会自动执行),文件内容如下:
#!/bin/bash

if [[ `ps -e |grep sshd |grep -v "grep" |wc -l` == 0 ]]
then
        /usr/sbin/sshd &
fi
该文件是检测sshd进程数量,如果为0,则会启动sshd。
g.开机让容器自动运行
参见:开机自动运行容器
D、虚拟机
要想让cockpit管理虚拟机,需要安装cockpit-machines包:
sudo apt install cockpit-machines
安装完成后,重新登录cockpit即可看到虚拟机页面

同时还可以看到多了一个网络设备virbr0

E、解决“软件更新”页面更新应用报错
如果在“软件更新”页面出现报错:Cannot refresh cache whilst offline

可能是网络渲染器(render)有问题,需要修改/etc/netplan/00-installer-config.yaml文件,
在network组最后添加
render:NetworkManager
如:
# This is the network config written by 'subiquity'
network:
  ethernets:
    enp3s0:
      dhcp4: true
  version: 2
  renderer: NetworkManager
然后使用命令
sudo netplan apply
应用新的网络设置,也可以重启系统。