实验背景
1. 描述符表
操作系统加载程序 setup.s 读取系统参数至 0x90000 处覆盖 bootsect.s 程序, 然后将 system 模块下移动到 0x00000 处。.同时,加载中断描述符表寄存器 idtr 和全局描述符表寄存器 gdtr,设置CPU的控制寄存器 CR0/程序状态字 PSW,从而进入32位保护模式,跳转到 head.s 开头执行。
为了能让 head.s 在32位保护模式下运行,程序临时设置中断描述符表 idt 和全局描述符表 gdt,并在 gdt 中设置当前内核代码段的描述符和数据段的描述符。

数据段描述符和代码段描述符存放在gdt 表内,寄存器 gdtr 由基地址和段限长组成,处理器通过寄存器 gdtr 定位 gdt 表。

段选择符由描述符索引、表指示器 TI 和请求者特权级字段组成,描述符索引用于选择指定描述符表中 8192 ( 2 1 3 ) 8192(2^13) 8192(213) 个描述符的一个,表指示器 TI 值为 0 0 0 表示指定 gdt 表,值为 1 1 1 表示指定 idt 表,而请求者特权级用于保护机制。

2. 特权级

处理器的段保护机制可以识别4个特权级 R0~R3,数值越大特权越小。环中心为核心态,最外层为用户态。处理器利用特权级防止运行在较低特权级的程序或人物访问具有较高特权级的一个段。
为了在各个代码段和数据段之间进行特权级检测处理,处理器可以识别以下三种类型的特权级:
- 当前特权级
CPL(Current Privilege Level):CPL存放在CS和SS段寄存器的位0和位1,代表正在执行的程序或任务的特权级。 - 描述符特权级
DPL(Descriptor Privilege Level):当程序访问数据时,DPL存放在数据段的DPL字段,代表访问当前数据段所需要的特权级。 - 请求特权级别
RPL(Request Privilge Level):RPL通过段选择符的第0和第1位表现出来的,RPL相当于附加的一个权限控制,防止低特权级程序出现高特权级代码,从而能够越权访问数据段,但只有当RPL>DPL的时候,才起到实际的限制作用。

2. 中断过程
中断来源包括外部硬件和内部软件两部分,系统调用需要使用 int 0x80 软件中断指令修改 CPL 值,实现处理器内核态和用户态的切换。
中断描述符表 idt 可以驻留在内存的任何地方,处理器使用启动时设置的 idtr 寄存器定位 idt 表的位置。idtr 寄存器包含 idt 表32位的基地址和16位的长度值。

idt 表可存放中断门、陷阱门和任务门三种类型的门描述符。中断门含有一个长指针(段选择符和偏移值),处理器使用该长指针把程序执行权转移到代码段的中断处理过程中。


系统调用包含中断指令切换CPU的用户态和内核态,而此处阐述中断指令发出后寻找中断描述符表和中断处理程序的过程,详细的中断过程可阅读 《操作系统导论》学习笔记(三):CPU虚拟化(机制)
3. 系统调用使用

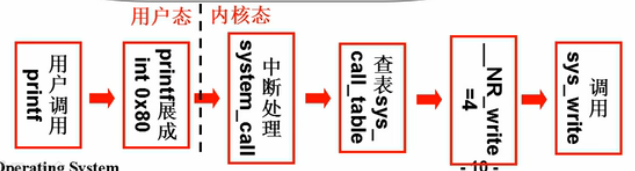
库函数 printf() 对应的指令本质实际上是将一些数据 write()到显存的某些位置,而且输出到屏幕是IO操作,所以需要使用中断指令进入内核执行系统调用例程。
下面给出库函数API和C代码中嵌入汇编代码两种方式使用同一个系统调用 write():
#include <fcntl.h>			/* open() 	*/
#include <unistd.h>			/* write() 	*/
#include <string.h>			/* strlen() */

int main()
{


	int fd = open("write.txt", O_RDWR|O_CREAT);
	char *buf = "hello,world!\n";
	int count = strlen(buf);

	write( fd, buf, count);
	close( fd );

	return 0;
}
编译执行,成功生成文件并写入字符串:

下面使用C代码内嵌汇编的方法自制系统调用 my_write():
查询当前LINUX操作系统的系统调用表(System Call Table),可知 write 系统调用号为 1,而LINUX0.11的 write 系统调用号为4。

内嵌汇编的语法如下:
_asm_ _volatile_ (
	汇编语句模版;
	输出部分;
	输入部分;
	破坏描述部分;
);
汇编语言部分将 write 系统调用号保存至 rax,使用 syscall 而非 int $0x80 触发系统调用,输入部分从内存 m 获取文件描述符 fd,字符串指针 buf 和字符串长度 count,输出部分返回错误信息 res。
int my_write(int fd, const void *buf, int count)
{


	int res = 0;
	asm("mov  $1, %%rax\n\t"		/* 系统调用号sys_write(1) */
        "syscall\n\t"				/* 触发系统调用 */
		:"=a"(res)					/* 输出部分:变量res */
		:"m"(fd), "m"(buf), "m"(count)	/* 输入部分:文件描述符fd, 字符串指针buf,字符串长度count */
    );
	return res;
}
C代码中嵌入汇编代码方式使用系统调用 my_write():
#include <fcntl.h>			/* open() 	*/
#include <unistd.h>			/* write() close() */
#include <string.h>			/* strlen() */

int my_write(int fd, const void *buf, int count)
{


	int res = 0;
	asm("mov  $1, %%rax\n\t"		/* 系统调用号sys_write(1) */
        "syscall\n\t"				/* 触发系统调用 */
		:"=a"(res)					/* 输出部分:变量res */
		:"m"(fd), "m"(buf), "m"(count)	/* 输入部分:文件描述符fd, 字符串指针buf,字符串长度count */
    );
	return res;
}

int main()
{


	int fd = open("write.txt", O_RDWR|O_CREAT);
	char *buf = "hello,world!\n";
	int count = strlen(buf);

	my_write( fd, buf, count);
	close( fd );

	return 0;
}
再次编译执行,成功生成文件并写入字符串:

4. 系统调用过程
LINUX将汇编代码层层封装,程序之间互相调用,方便代码的重用
- 源程序
lib/write.c:展开宏定义_syscall3,作用相当于write(int fd, const void *buf, int count):
// lib/write.c
#include <unistd.h>
_syscall3(int,write,int,fd,const char *,buf,off_t,count)
- 头文件
include/unistd.h:系统调用宏定义_syscall3包含3个参数,C宏定义使用中断指令int $0x80触发系统调用write,系统调用号__NR_write为4,其余内容与内嵌汇编代码基本一一对应。中断指令int $0x80触发系统调用中断,从而进入汇编程序system_call.s
#define __NR_write	4
#define _syscall3(type,name,atype,a,btype,b,ctype,c) \
type name(atype a,btype b,ctype c) \
{ \
	long __res; \
	__asm__ volatile ("int $0x80" \
	: "=a" (__res) \
	: "0" (__NR_##name),"b" ((long)(a)),"c" ((long)(b)),"d" ((long)(c))); \
	if (__res>=0) \
		return (type) __res; \
	errno=-__res; \
	return -1; \
}
- 汇编程序
kernel/system_call.s:nr_system_calls代表系统调用号的总数,push %ebx, %ecx, %edx代表系统调用宏定义的参数个数,call sys_call_table + 4 * %eax进入sys.h查询系统调用表,其中eax中放的是系统调用号__NR_write。

- 头文件
include/linux/sys.h:系统调用表sys_call_table[]包含系统所需的所有系统调用指针,每个数组元素对应一个extern int函数引用,根据__NR_write查找系统调用表的sys_write,跳转到源程序read_write.c使用函数sys_write()
fn_ptr sys_call_table[] = { sys_setup, sys_exit, sys_fork, sys_read, sys_write, ...
实验目的
建立对系统调用接口的深入认识
掌握系统调用的基本过程
能完成系统调用的全面控制
为后续实验做准备
实验内容
此次实验的基本内容是:在Linux 0.11上添加两个系统调用,并编写两个简单的应用程序测试它们。

实验报告
系统调用过程是从上至下的,所以添加系统调用应该从下至上进行,同时因为实验一操作系统启动的修改,Bochs已经无法正常启动,所以需要重新下载 oslab 文件进行修改。
1.添加 kernel/who.c 系统调用 sys_iam() 和 sys_whoami():
#define __LIBRARY__
#include <unistd.h>
#include <errno.h>		/* 要求设置错误为EINVAL */
#include <asm/segment.h>	/* 使用put_fs_byte和get_fs_byte */


char temp[64]={

    0};		/* 存储sys_iam获取的字符串	*/

int sys_iam(const char* name)
{


   int i=0;			/* 用户空间数据name长度	*/
   while(get_fs_byte(name+i)!='\0') i++;
   if(i>23) return -EINVAL;
   printk("%d\n",i);

   i=0;			/* 获取name至temp  */
   while((temp[i]=get_fs_byte(name+i))!='\0'){


	i++;
   }
    return i;
}

int sys_whoami(char* name,unsigned int size)
{


    int i=0;			/* 内核空间数据temp长度 */
    while (temp[i]!='\0') i++;
    if (size<i) return -1;

    i=0;			/* 获取temp至name  */
    while(temp[i]!='\0'){


	put_fs_byte(temp[i],(name+i));
	i++;
    }
    return i;
}
2.修改 include/linux/sys.h:系统调用表 sys_call_table[] 内添加系统调用函数指针及函数引用

3.修改 kernel/system_call.s 系统调用总数:
nr_system_calls = 74
4.include/unistd.h 添加系统调用号:
#define __NR_whoami 72
#define __NR_iam 73
5.修改 kernel/Makefile 链接 who.c 与其他LINUX代码:
OBJS  = sched.o system_call.o traps.o asm.o fork.o \
        panic.o printk.o vsprintf.o sys.o exit.o \
        signal.o mktime.o who.o
...
### Dependencies:
who.s who.o: who.c ../include/linux/kernel.h ../include/unistd.h
exit.s exit.o: exit.c ../include/errno.h ../include/signal.h \
  ../include/sys/types.h ../include/sys/wait.h ../include/linux/sched.h \
  ../include/linux/head.h ../include/linux/fs.h ../include/linux/mm.h \
  ../include/linux/kernel.h ../include/linux/tty.h ../include/termios.h \
  ../include/asm/segment.h
至此,添加系统调用的工作已经基本完成。
实验结果
下面需要通过 iam.c 和 whoami.c 程序测试系统调用。
/* iam.c  */
#define __LIBRARY__
#include "unistd.h"
_syscall1(int, iam, const char*, name);
int main(int argc, char** argv){


    int wlen = 0;
    if(argc < 1){


        printf("not enougth argument\n");
        return -2;
    }
    wlen = iam(argv[1]);
    return wlen;
}
/* whoami.c */
#define __LIBRARY__
#include "unistd.h"
_syscall2(int, whoami,char*,name,unsigned int,size);

int main(int argc, char** argv){


    char buf[30];
    int rlen;
    rlen = whoami(buf, 30);
    printf("%s\n", buf);
    return rlen;
}
脚本测试文件 testlab2.c 和 testlab.sh 评分,为了避免寻找及下载的麻烦,下面直接给出代码:
/* testlab2.c */
/*
 * Compile: "gcc testlab2.c"
 * Run: "./a.out"
 */

#include <string.h>
#include <assert.h>
#include <stdio.h>
#include <errno.h>
#include <stdlib.h>
#define __LIBRARY__
#include <unistd.h>

_syscall2(int, whoami,char*,name,unsigned int,size);
_syscall1(int, iam, const char*, name);

#define MAX_NAME_LEN        23
#define NAMEBUF_SIZE        (MAX_NAME_LEN + 1)
/* truncate a long name to SHORT_NAME_LEN for display */
#define SHORT_NAME_LEN      (MAX_NAME_LEN + 2)

/*           name               score */
#define TEST_CASE { \
    {"x",                           10,  1, NAMEBUF_SIZE,  1},\
    {"sunner",                      10,  6, NAMEBUF_SIZE,  6},\
    {"Twenty-three characters",      5, 23, NAMEBUF_SIZE, 23},\
    {"123456789009876543211234",     5, -1, 0,            -1},\
    {"abcdefghijklmnopqrstuvwxyz",   5, -1, 0,            -1},\
    {"Linus Torvalds",               5, 14, NAMEBUF_SIZE, 14},\
    {"",                             5,  0, NAMEBUF_SIZE,  0},\
    {"whoami(0xbalabala, 10)",       5, 22,           10, -1},\
    {NULL, 0, 0, 0, 0}  /* End of cases */ \
}
/*改动一:增加size,和rval2*/

int test(const char* name, int max_score, int expected_rval1, int size, int expected_rval2);
void print_message(const char* msgfmt, const char* name);

struct test_case
{


    char *name;
    int score;
    int rval1;  /* return value of iam() */
     /*改动2:增加size,和rval2定义*/
    int size;   /*Patch for whoami,2009.11.2*/
    int rval2;  /* return value of whoami() */
};

int main(void)
{


    struct test_case cases[] = TEST_CASE;

    int total_score=0, i=0;

    while (cases[i].score != 0)
    {


        int score;

        printf("Test case %d:", i+1);

         /*改动3:增加size,和rval2的参数阿*/
        score = test( cases[i].name,
                      cases[i].score,
                      cases[i].rval1,
                      cases[i].size,
                      cases[i].rval2 );

        total_score += score;
        i++;
    }

    printf("Final result: %d%%\n", total_score);
    return 0;

}
 /*改动4:增加size,和rval2的声明*/
int test(const char* name, int max_score, int expected_rval1, int size, int expected_rval2)
{


    int rval;
    int len;
    char * gotname;
    int score=-1;

    assert(name != NULL);

    print_message("name = \"%s\", length = %d...", name);

    /*Test iam()*/
    len = strlen(name);
    rval = iam(name);
    /* printf("Return value = %d\n", rval);*/

/*改动5:增加的expected_rval1*/
    if (rval == expected_rval1)
    {


        if (rval == -1 && errno == EINVAL) /*The system call can detect bad name*/
        {


            /* print_message("Long name, %s(%d), detected.\n", name);*/
            printf("PASS\n");
            score = max_score;
        }
        else if (rval == -1 && errno != EINVAL)
        {


            printf("\nERROR iam(): Bad errno %d. It should be %d(EINVAL).\n", errno, EINVAL);
            score = 0;
        }
        /* iam() is good. Test whoami() next. */
    }
    else
    {


        printf("\nERROR iam(): Return value is %d. It should be %d.\n", rval, expected_rval1);
        score = 0;
    }

    if (score != -1)
        return score;

    /*Test whoami()*/
    gotname = (char*)malloc(len+1);
    if (gotname == NULL)
        exit(-1);

    memset(gotname, 0, len+1);

    /* printf("Get: buffer length = %d.\n", len+1); */

    rval = whoami(gotname, size);
    /* printf("Return value = %d\n", rval); */

/*改动6:增加的expected_rval2*/
/*改动++:比较多 ,但还是顺序的改改*/

    if(rval == expected_rval2)
    {


        if(rval == -1)
        {


            printf("PASS\n");
            score = max_score;
        }
        else
        {


            if (strcmp(gotname, name) == 0)
            {


                /* print_message("Great! We got %s(%d) finally!\n", gotname); */
                printf("PASS\n");
                score = max_score;
            }
            else
            {


                print_message("\nERROR whoami(): we got %s(%d). ", gotname);
                print_message("It should be %s(%d).\n", name);
                score = 0;
            }
        }
    }
    else if (rval == -1)
    {


        printf("\nERROR whoami(): Return value is -1 and errno is %d. Why?\n", errno);
        score = 0;
    }
    else
    {


        printf("\nERROR whoami(): Return value should be %d, not %d.\n", expected_rval2, rval);
        score = 0;
    }

    free(gotname);
    assert(score != -1);

    return score;
}

void print_message(const char* msgfmt, const char* name)
{


    char short_name[SHORT_NAME_LEN + 4] = {

    0};
    int len;

    len = strlen(name);

    if (len == 0)
    {


        strcpy(short_name, "NULL");
    }
    else if (len <= SHORT_NAME_LEN)
    {


        strcpy(short_name, name);
    }
    else
    {


        memset(short_name, '.', SHORT_NAME_LEN+3);
        memcpy(short_name, name, SHORT_NAME_LEN);
    }

    printf(msgfmt, short_name, len);
}
/* testlab2.sh */
#/bin/sh

string1="Sunner"
string2="Richard Stallman"
string3="This is a very very long string!"

score1=10
score2=10
score3=10

expected1="Sunner"
expected2="Richard Stallman"
expected3="Richard Stallman"

echo Testing string:$string1
./iam "$string1"
result=`./whoami`
if [ "$result" = "$expected1" ]; then
	echo PASS.
else
	score1=0
	echo FAILED.
fi
score=$score1

echo Testing string:$string2
./iam "$string2"
result=`./whoami`
if [ "$result" = "$expected2" ]; then
	echo PASS.
else
	score2=0
	echo FAILED.
fi
score=$score+$score2

echo Testing string:$string3
./iam "$string3"
result=`./whoami`
if [ "$result" = "$expected3" ]; then
	echo PASS.
else
	score3=0
	echo FAILED.
fi
score=$score+$score3

let "totalscore=$score"
echo Score: $score = $totalscore%
因为添加的系统调用只能在虚拟机中起作用,所以我们需要挂载虚拟硬盘
cd ~/oslab
sudo ./mount-hdc
然后将测试文件 iam.c 和 whoami.c,评分文件 testlab2.c 和 testlab2.sh 复制到虚拟机 hdc/usr/root 目录下,并使用下列替换虚拟机内的部分头文件:
sudo cp ~/oslab/linux-0.11/include/linux/sys.h ~/oslab/hdc/usr/include/linux/sys.h
sudo cp ~/oslab/linux-0.11/include/unistd.h ~/oslab/hdc/usr/include/unistd.h
卸载虚拟机器:
cd ~/oslab
sudo umount hdc
编译文件并运行 Bochs 模拟器:
cd linux-0.11
make all
../run
Bochs 执行编译虚拟机内文件,测试字符串 Sean's system call 并使用 testlab2 评分:
gcc -o iam iam.c
gcc -o whoami whoami.c
gcc -o testlab2 testlab2.c
sync
./iam "Sean's system call"
./whoami
./testlab2
结果显示获得该部分分数:

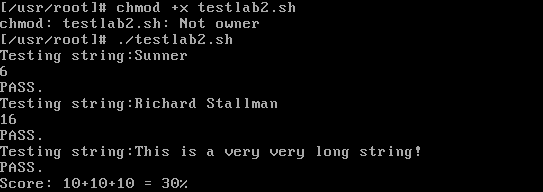
再使用 testlab2.sh 评分,结果显示获得该部分分数,剩余 20% 分数为实验报告。
chmod +x testlab2.sh
./testlab2.sh
参考资料
《Linux内核完全注释》
哈工大操作系统试验2 系统调用
哈工大操作系统实验课——系统调用(lab3)