前言
贴一下参考链接:
1.官方指南 https://kubernetes.io/docs/setup/independent/install-kubeadm/(科学上网下推荐)
2.国内github https://github.com/EagleChen/kubernetes_init (修改了源,不需要科学上网)
个人配置环境及安装版本:ubuntu 17.10+docker 17.12.1-ce+kubernetes v1.10.0
操作1-6在master节点执行
操作1.2.3.4.7在node节点执行
1.安装docker-ce
创建文件夹,准备docker的配置
$ sudo mkdir /etc/docker
$ sudo mkdir -p /data/docker
使用ustc的镜像源
$ sudo apt-get update
$ sudo apt-get install -y apt-transport-https ca-certificates curl software-properties-common
$ curl -fsSL https://download.docker.com/linux/ubuntu/gpg | sudo apt-key add -  (获取公钥,显示ok即表示正确)
$ sudo add-apt-repository \
    "deb [arch=amd64] https://mirrors.ustc.edu.cn/docker-ce/linux/$(. /etc/os-release; echo "$ID") \
    $(lsb_release -cs) \
    stable"  (更改源为ustc的源)
从源中查找grep抓取出版本号,并安装docker-ce17.12版本
$ sudo apt-get update && apt-get install -y docker-ce=$(apt-cache madison docker-ce | grep 17.12 | head -1 | awk '{print $3}')(下面分割这个命令显示一下apt-cache命令的一步步查找效果)
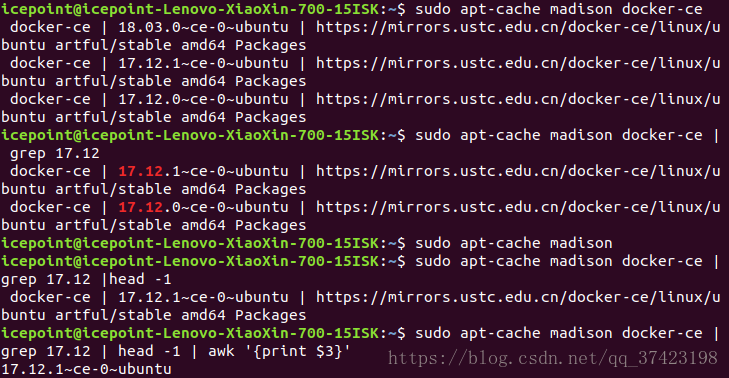
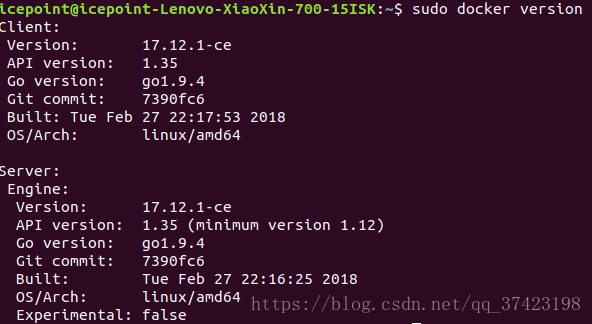
检查以下是否安装成功:
2.添加用户到docker的组中
$ sudo groupadd docker
$ sudo gpasswd -a icepoint docker
(其中icepoint是用户的名字通过$users获得)
3.master节点安装kubelet,kubeadm,kubectl
1.添加gpg公钥(国内):
从该链接https://raw.githubusercontent.com/EagleChen/kubernetes_init/master/kube_apt_key.gpg
下载kube_apt_key.gpg到当前工作目录下,并按如下指令添加
$ cat kube_apt_key.gpg | sudo apt-key add -显示OK即表示成功
(其他方法: 或者添加gpg公钥(官方,科学上网):)
$ curl -s https://packages.cloud.google.com/apt/doc/apt-key.gpg | sudo apt-key add -2.添加镜像源
ustc镜像源
$ echo "deb [arch=amd64] https://mirrors.ustc.edu.cn/kubernetes/apt kubernetes-$(lsb_release -cs) main" | sudo tee -a /etc/apt/sources.list但是ustc好像最新只到ubuntu xenial版本(ubuntu16.04)的
所以kubernetes-$(lsb_release -cs)获取不到ubuntu版本大于16.04的较新版本,会报错
这种情况可以直接尝试直接kubernetes-xenial:
$ echo "deb [arch=amd64] https://mirrors.ustc.edu.cn/kubernetes/apt kubernetes-xenial main" | sudo tee -a /etc/apt/sources.list(其他方法:官方镜像库(科学上网):)
$ echo "deb [arch=amd64] http://apt.kubernetes.io/ kubernetes-$(lsb_release -cs) main" | sudo tee -a /etc/apt/sources.list安装:
$ sudo apt-get update
$ sudo apt-get install -y kubelet kubeadm kubectl
安装命令运行情况:
Reading package lists... Done
Building dependency tree
Reading state information... Done
The following additional packages will be installed:
  ebtables ethtool kubernetes-cni socat
The following NEW packages will be installed:
  ebtables ethtool kubeadm kubectl kubelet kubernetes-cni socat
0 upgraded, 7 newly installed, 0 to remove and 34 not upgraded.
Need to get 57.1 MB of archives.
After this operation, 411 MB of additional disk space will be used.
Get:1 https://mirrors.ustc.edu.cn/kubernetes/apt kubernetes-xenial/main amd64 kubernetes-cni amd64 0.6.0-00 [5,910 kB]
Get:2 http://mirrors.aliyun.com/ubuntu artful/main amd64 ebtables amd64 2.0.10.4-3.5ubuntu2 [80.0 kB]
Get:3 http://mirrors.aliyun.com/ubuntu artful/main amd64 ethtool amd64 1:4.8-1 [109 kB]
Get:4 http://mirrors.aliyun.com/ubuntu artful/universe amd64 socat amd64 1.7.3.2-1 [342 kB]
Get:5 https://mirrors.ustc.edu.cn/kubernetes/apt kubernetes-xenial/main amd64 kubelet amd64 1.10.0-00 [21.1 MB]
Get:6 https://mirrors.ustc.edu.cn/kubernetes/apt kubernetes-xenial/main amd64 kubectl amd64 1.10.0-00 [8,905 kB]
Get:7 https://mirrors.ustc.edu.cn/kubernetes/apt kubernetes-xenial/main amd64 kubeadm amd64 1.10.0-00 [20.7 MB]
Fetched 57.1 MB in 25s (2,226 kB/s)
Selecting previously unselected package ebtables.
(Reading database ... 327745 files and directories currently installed.)
Preparing to unpack .../0-ebtables_2.0.10.4-3.5ubuntu2_amd64.deb ...
Unpacking ebtables (2.0.10.4-3.5ubuntu2) ...
Selecting previously unselected package ethtool.
Preparing to unpack .../1-ethtool_1%3a4.8-1_amd64.deb ...
Unpacking ethtool (1:4.8-1) ...
Selecting previously unselected package kubernetes-cni.
Preparing to unpack .../2-kubernetes-cni_0.6.0-00_amd64.deb ...
Unpacking kubernetes-cni (0.6.0-00) ...
Selecting previously unselected package socat.
Preparing to unpack .../3-socat_1.7.3.2-1_amd64.deb ...
Unpacking socat (1.7.3.2-1) ...
Selecting previously unselected package kubelet.
Preparing to unpack .../4-kubelet_1.10.0-00_amd64.deb ...
Unpacking kubelet (1.10.0-00) ...
Selecting previously unselected package kubectl.
Preparing to unpack .../5-kubectl_1.10.0-00_amd64.deb ...
Unpacking kubectl (1.10.0-00) ...
Selecting previously unselected package kubeadm.
Preparing to unpack .../6-kubeadm_1.10.0-00_amd64.deb ...
Unpacking kubeadm (1.10.0-00) ...
Setting up kubernetes-cni (0.6.0-00) ...
Processing triggers for ureadahead (0.100.0-20) ...
Setting up socat (1.7.3.2-1) ...
Processing triggers for doc-base (0.10.7) ...
Processing 1 added doc-base file...
Processing triggers for systemd (234-2ubuntu12.1) ...
Setting up ebtables (2.0.10.4-3.5ubuntu2) ...
Created symlink /etc/systemd/system/multi-user.target.wants/ebtables.service → /lib/systemd/system/ebtables.service.
update-rc.d: warning: start and stop actions are no longer supported; falling back to defaults
Setting up kubectl (1.10.0-00) ...
Processing triggers for man-db (2.7.6.1-2) ...
Setting up ethtool (1:4.8-1) ...
Setting up kubelet (1.10.0-00) ...
Created symlink /etc/systemd/system/multi-user.target.wants/kubelet.service → /lib/systemd/system/kubelet.service.
Setting up kubeadm (1.10.0-00) ...
Processing triggers for systemd (234-2ubuntu12.1) ...
Processing triggers for ureadahead (0.100.0-20) ...
安装成功,该镜像源下面安装的是v1.10.0版本的。
4. 重启kubelet
Some users on RHEL/CentOS 7 have reported issues with traffic being routed incorrectly due to iptables being bypassed. You should ensure net.bridge.bridge-nf-call-iptables is set to 1 in your sysctl config, e.g.
$ sudo sysctl net.bridge.bridge-nf-call-iptables=1% sudo sed -i "s,ExecStart=$,Environment=\"KUBELET_EXTRA_ARGS=--pod-infra-container-image=registry.cn-hangzhou.aliyuncs.com/google_containers/pause-amd64:3.1\"\nExecStart=,g" /etc/systemd/system/kubelet.service.d/10-kubeadm.conf
$ sudo systemctl daemon-reload
$ sudo systemctl restart kubelet5.启动服务
建立配置文件
$ sudo vi /home/icepoint/kubeadm.conf

apiVersion: kubeadm.k8s.io/v1alpha1
kind: MasterConfiguration
api:
  advertiseAddress: 0.0.0.0
networking:
  podSubnet: 10.244.0.0/16
etcd:
  image: registry.cn-hangzhou.aliyuncs.com/google_containers/etcd-amd64:3.1.11
kubernetesVersion: v1.10.0
imageRepository: registry.cn-hangzhou.aliyuncs.com/google_containers
注意:版本号前面的是kubelet1.10.0, kubeadm1.10.0, kubectl1.10.0,所以这里的版本是v1.10.0
这里先尝试启动一下:
$ sudo kubeadm init --config /home/icepoint/kubeadm.conf然后各种报错:
[init] Using Kubernetes version: v1.10.0
[init] Using Authorization modes: [Node RBAC]
[preflight] Running pre-flight checks.
    [WARNING SystemVerification]: docker version is greater than the most recently validated version. Docker version: 17.12.1-ce. Max validated version: 17.03
    [WARNING FileExisting-crictl]: crictl not found in system path
Suggestion: go get github.com/kubernetes-incubator/cri-tools/cmd/crictl
[preflight] Some fatal errors occurred:
    [ERROR Swap]: running with swap on is not supported. Please disable swap
    [ERROR DirAvailable--var-lib-etcd]: /var/lib/etcd is not empty
[preflight] If you know what you are doing, you can make a check non-fatal with `--ignore-preflight-errors=...`
解决ERROR:
(1)禁用虚拟内存
kubelet启动参数增加–fail-swap-on=false
[Service]
Environment="KUBELET_KUBECONFIG_ARGS=--bootstrap-kubeconfig=/etc/kubernetes/bootstrap-kubelet.conf --kubeconfig=/etc/kubernetes/kubelet.conf"
Environment="KUBELET_SYSTEM_PODS_ARGS=--pod-manifest-path=/etc/kubernetes/manifests --allow-privileged=true"
Environment="KUBELET_NETWORK_ARGS=--network-plugin=cni --cni-conf-dir=/etc/cni/net.d --cni-bin-dir=/opt/cni/bin"
Environment="KUBELET_DNS_ARGS=--cluster-dns=10.96.0.10 --cluster-domain=cluster.local"
Environment="KUBELET_AUTHZ_ARGS=--authorization-mode=Webhook --client-ca-file=/etc/kubernetes/pki/ca.crt"
Environment="KUBELET_CADVISOR_ARGS=--cadvisor-port=0"
Environment="KUBELET_CGROUP_ARGS=--cgroup-driver=systemd"
Environment="KUBELET_CERTIFICATE_ARGS=--rotate-certificates=true --cert-dir=/var/lib/kubelet/pki"
Environment="KUBELET_SWAP_ARGS=--fail-swap-on=false"
ExecStart=
ExecStart=/usr/bin/kubelet $KUBELET_KUBECONFIG_ARGS $KUBELET_SYSTEM_PODS_ARGS $KUBELET_NETWORK_ARGS $KUBELET_DNS_ARGS $KUBELET_AUTHZ_ARGS $KUBELET_CADVISOR_ARGS $KUBELET_CGROUP_ARGS $KUBELET_CERTIFICATE_ARGS $KUBELET_EXTRA_ARGS $KUBELET_SWAP_ARGS
或者直接禁用,立即生效(不过重启电脑之后会还原默认设置,swap on)
$ sudo swapoff -a(2)把/var/lib/etcd/文件夹清空
这里解决完之后再试一下
$ sudo kubeadm init --config /home/icepoint/kubeadm.conf

[init] Using Kubernetes version: v1.10.0
[init] Using Authorization modes: [Node RBAC]
[preflight] Running pre-flight checks.
    [WARNING SystemVerification]: docker version is greater than the most recently validated version. Docker version: 17.12.1-ce. Max validated version: 17.03
    [WARNING FileExisting-crictl]: crictl not found in system path
Suggestion: go get github.com/kubernetes-incubator/cri-tools/cmd/crictl
[certificates] Generated ca certificate and key.
[certificates] Generated apiserver certificate and key.
[certificates] apiserver serving cert is signed for DNS names [icepoint-lenovo-xiaoxin-700-15isk kubernetes kubernetes.default kubernetes.default.svc kubernetes.default.svc.cluster.local] and IPs [10.96.0.1 192.168.1.107]
[certificates] Generated apiserver-kubelet-client certificate and key.
[certificates] Generated etcd/ca certificate and key.
[certificates] Generated etcd/server certificate and key.
[certificates] etcd/server serving cert is signed for DNS names [localhost] and IPs [127.0.0.1]
[certificates] Generated etcd/peer certificate and key.
[certificates] etcd/peer serving cert is signed for DNS names [icepoint-lenovo-xiaoxin-700-15isk] and IPs [192.168.1.107]
[certificates] Generated etcd/healthcheck-client certificate and key.
[certificates] Generated apiserver-etcd-client certificate and key.
[certificates] Generated sa key and public key.
[certificates] Generated front-proxy-ca certificate and key.
[certificates] Generated front-proxy-client certificate and key.
[certificates] Valid certificates and keys now exist in "/etc/kubernetes/pki"
[kubeconfig] Wrote KubeConfig file to disk: "/etc/kubernetes/admin.conf"
[kubeconfig] Wrote KubeConfig file to disk: "/etc/kubernetes/kubelet.conf"
[kubeconfig] Wrote KubeConfig file to disk: "/etc/kubernetes/controller-manager.conf"
[kubeconfig] Wrote KubeConfig file to disk: "/etc/kubernetes/scheduler.conf"
[controlplane] Wrote Static Pod manifest for component kube-apiserver to "/etc/kubernetes/manifests/kube-apiserver.yaml"
[controlplane] Wrote Static Pod manifest for component kube-controller-manager to "/etc/kubernetes/manifests/kube-controller-manager.yaml"
[controlplane] Wrote Static Pod manifest for component kube-scheduler to "/etc/kubernetes/manifests/kube-scheduler.yaml"
[etcd] Wrote Static Pod manifest for a local etcd instance to "/etc/kubernetes/manifests/etcd.yaml"
[init] Waiting for the kubelet to boot up the control plane as Static Pods from directory "/etc/kubernetes/manifests".
[init] This might take a minute or longer if the control plane images have to be pulled.
[apiclient] All control plane components are healthy after 136.501267 seconds
[uploadconfig] Storing the configuration used in ConfigMap "kubeadm-config" in the "kube-system" Namespace
[markmaster] Will mark node icepoint-lenovo-xiaoxin-700-15isk as master by adding a label and a taint
[markmaster] Master icepoint-lenovo-xiaoxin-700-15isk tainted and labelled with key/value: node-role.kubernetes.io/master=""
[bootstraptoken] Using token: 1bo7it.mccgtv1v9t71g7g1
[bootstraptoken] Configured RBAC rules to allow Node Bootstrap tokens to post CSRs in order for nodes to get long term certificate credentials
[bootstraptoken] Configured RBAC rules to allow the csrapprover controller automatically approve CSRs from a Node Bootstrap Token
[bootstraptoken] Configured RBAC rules to allow certificate rotation for all node client certificates in the cluster
[bootstraptoken] Creating the "cluster-info" ConfigMap in the "kube-public" namespace
[addons] Applied essential addon: kube-dns
[addons] Applied essential addon: kube-proxy

Your Kubernetes master has initialized successfully!

To start using your cluster, you need to run the following as a regular user:

  mkdir -p $HOME/.kube
  sudo cp -i /etc/kubernetes/admin.conf $HOME/.kube/config
  sudo chown $(id -u):$(id -g) $HOME/.kube/config

You should now deploy a pod network to the cluster.
Run "kubectl apply -f [podnetwork].yaml" with one of the options listed at:
  https://kubernetes.io/docs/concepts/cluster-administration/addons/

You can now join any number of machines by running the following on each node
as root:

  kubeadm join 192.168.1.107:6443 --token 4bo233.m81561v929847gb --discovery-token-ca-cert-hash sha256:5f1545b356348371d8a99fc8184549777403010105d6c1015d9b2f92ce91b23g
成功!!!
6.安装网络组件
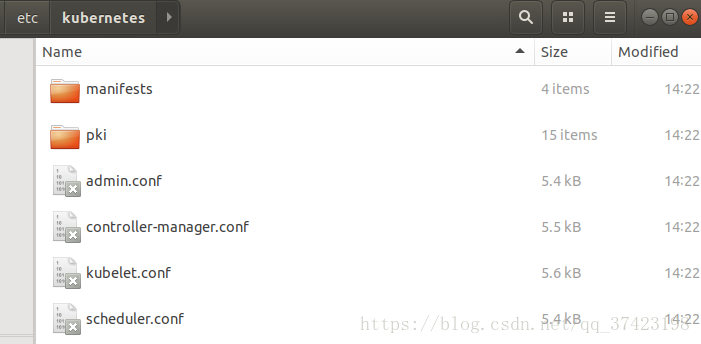
服务启动后会帮你创建/etc/kubernetes/文件夹
To make kubectl work for your non-root user, you might want to run these commands (which is also a part of the kubeadm init output):
$ sudo mkdir -p $HOME/.kube
$ sudo cp -i /etc/kubernetes/admin.conf $HOME/.kube/config
$ sudo chown $(id -u):$(id -g) $HOME/.kube/config
Installing a pod network
You MUST install a pod network add-on so that your pods can communicate with each other
$ sudo kubectl apply -f https://raw.githubusercontent.com/coreos/flannel/v0.9.1/Documentation/kube-flannel.yml
7.kubernetes集群添加节点
首先进行前面的操作1,操作2, 操作3在node节点安装docker-ce, kubeadm, kubectl, kubelet.
安装成功后,重启kubelet(操作4)
之后加入节点到集群
$ sudo kubeadm join --token $MASTERTOKEN $MASTERIP:$MASTERPORT --discovery-token-ca-cert-hash sha256:$MASTERHASH其中这些都是从集群创建时输出结果中获取
 kubeadm join 192.168.1.107:6443($MASTERIP:$MASTERPORT)
  --token 4bo233.m81561v929847gb($MASTERTOKEN)
   --discovery-token-ca-cert-hash sha256:5f1545b356348371d8a99fc8184549777403010105d6c1015d9b2f92ce91b23g
注意这里也要把swap关闭
加入完node前后在主机上查看

大功告成!!
查看docker下的镜像多了这些:
