目录
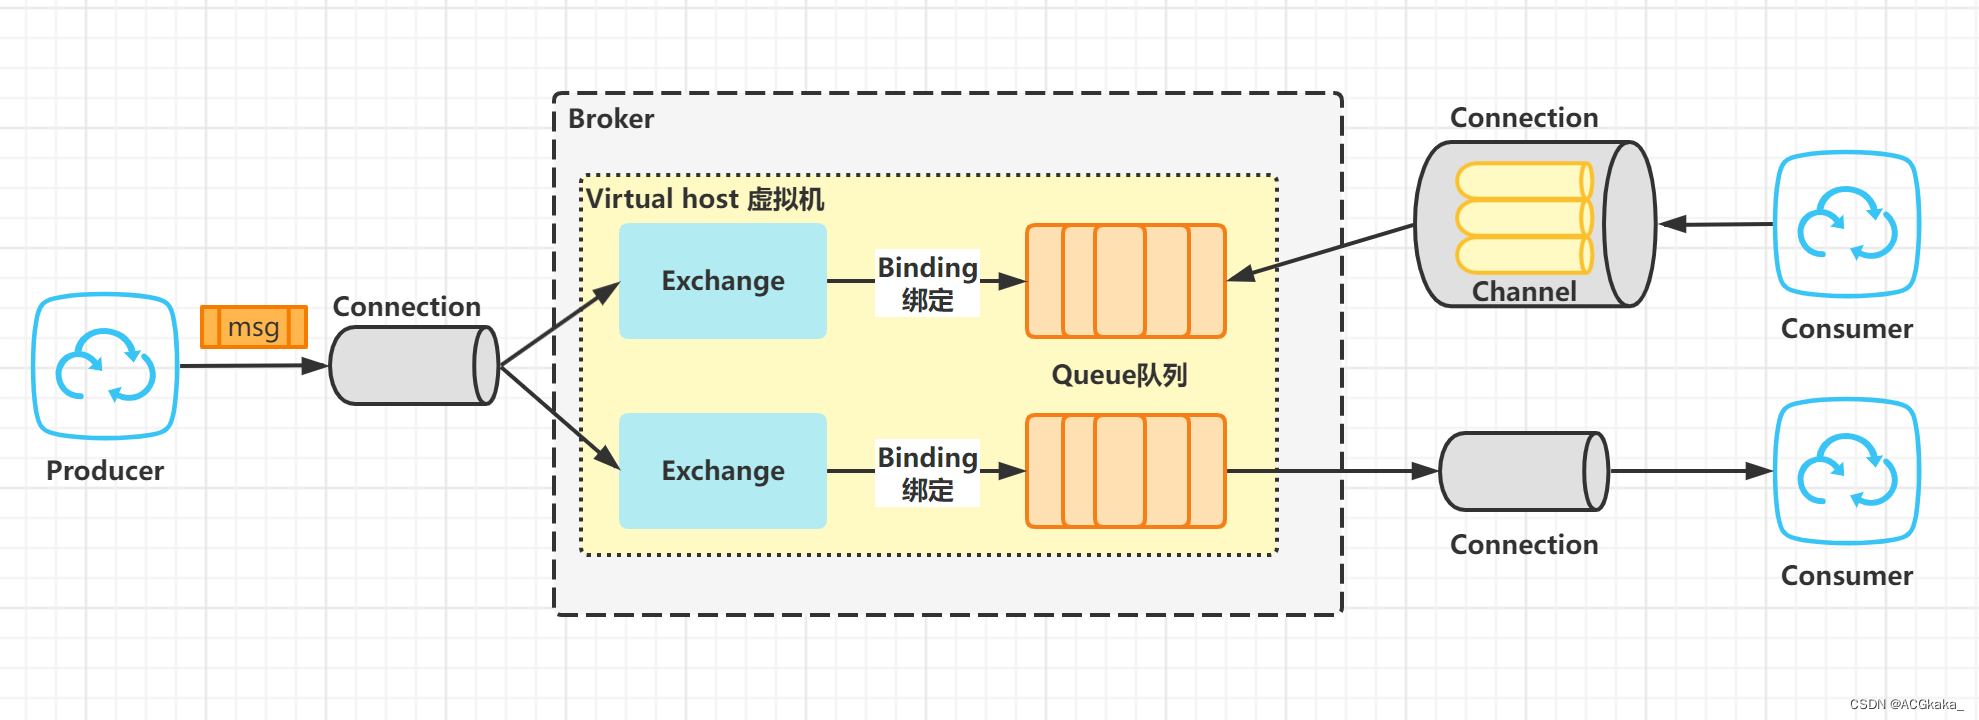
1.工作原理图
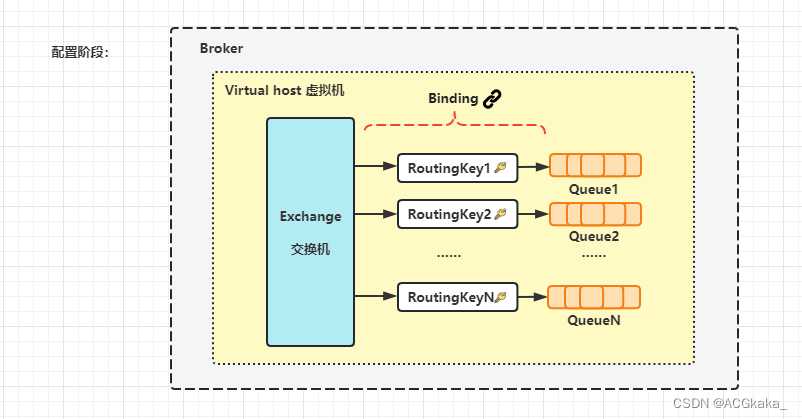
1.1 配置阶段
- 将
Queue(消息队列) 和Exchange(交换机)通过RoutingKey(路由键)进行绑定。
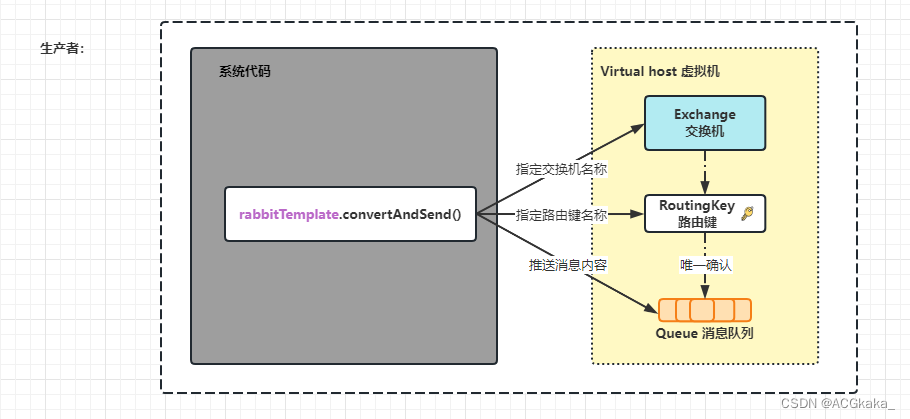
1.2 生产者
- 通过
Exchange(交换机)和RoutingKey(路由键)唯一确认Queue(消息队列),推送消息内容。
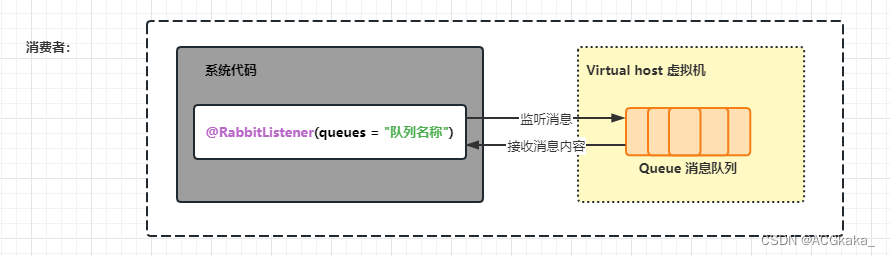
1.3 消费者
- 根据
Queue(消息队列)名称,接收新消息内容。
2.Maven依赖
<!-- RabbitMQ -->
<dependency>
    <groupId>org.springframework.boot</groupId>
    <artifactId>spring-boot-starter-amqp</artifactId>
    <version>3.0.0</version>
</dependency>
3.常用交换机类型
3.1 direct 直连交换机
- 根据
Exchange(交换机)和RoutingKey(路由键)将消息推送给对应队列。
大致流程:
-
一个队列绑定到一个直连交换机上,同时赋予一个 RoutingKey(路由键)。
-
当消息通过生产者发送给 Exchange(交换机)时,Exchange(交换机)就会根据 RoutingKey(路由键)去找绑定的 Queue(消息队列)。
Exchange -> RoutingKey -> Queue
3.2 fanout 广播交换机
-
也叫扇形交换机,这种交换机没有
RoutingKey(路由键)概念,就算你绑定了路由键也是无视的。这个交换机在接收到消息后,会直接转发到绑定它上面的所有队列。Exchange -> Queue
3.3 topic 主题交换机
- 这种交换机会根据通配符对
RoutingKey(路由键)进行匹配,只要RoutingKey(路由键)满足匹配规则,就会被路由到对应的 Queue` 上。
通配符的匹配规则:
- RoutingKey(路由键)必须是一串字符串,每个单词用”.“分隔;
- 符号 “#” 表示匹配一个或多个单词;
- 符号 “*” 表示匹配一个单词。
例如:
- “*.123” 能够匹配到 “abc.123”,但匹配不到 “abc.def.123”;
- “#.123” 能够匹配到 “abc.123”,也能匹配不到 “abc.def.123”。
Exchange -> RoutingKey(demo.*/demo.#)-> Queue
4.Direct 直连交换机
4.1 yml配置
server:
  port: 8081

spring:
  application:
    name: springboot-rabbitmq
  rabbitmq:
    # 此处不建议单独配置host和port,单独配置不支持连接RabbitMQ集群
  	addresses: 127.0.0.1:5672
    username: guest
    password: guest
    # 虚拟host 可以不设置,使用server默认host
    virtual-host: /
    # 是否开启发送端消息抵达队列的确认
    publisher-returns: true
    # 发送方确认机制,默认为NONE,即不进行确认;SIMPLE:同步等待消息确认;CORRELATED:异步确认
    publisher-confirm-type: correlated
    # 消费者监听相关配置
    listener:
      simple:
        acknowledge-mode: auto # 确认模式,默认auto,自动确认;manual:手动确认
        prefetch: 1 # 限制每次发送一条数据
        concurrency: 3 # 同一个队列启动几个消费者
        max-concurrency: 3 # 启动消费者最大数量
        # 重试机制
        retry:
          # 开启消费者(程序出现异常)重试机制,默认开启并一直重试
          enabled: true
          # 最大重试次数
          max-attempts: 3
          # 重试间隔时间(毫秒)
          initial-interval: 3000
4.2 配置类
RabbitDirectConfig.java
import org.springframework.amqp.core.Binding;
import org.springframework.amqp.core.BindingBuilder;
import org.springframework.amqp.core.DirectExchange;
import org.springframework.amqp.core.Queue;
import org.springframework.context.annotation.Bean;
import org.springframework.context.annotation.Configuration;

/**
 * <p> @Title RabbitDirectConfig
 * <p> @Description 直连交换机配置
 * Direct Exchange是RabbitMQ默认的交换机模式,也是最简单的模式,根据key全文匹配去寻找队列。
 *
 * @author ACGkaka
 * @date 2023/1/12 15:09
 */
@Configuration
public class RabbitDirectConfig {


    /**
     * 队列,命名:TestDirectQueue
     *
     * @return 队列
     */
    @Bean
    public Queue TestDirectQueue() {


        // durable:是否持久化,默认是false,持久化队列:会被存储在磁盘上,当消息代理重启时仍然存在,暂存队列:当前连接有效
        // exclusive:默认false,只能被当前创建的连接使用,而且当连接关闭后队列即被删除。此参考优先级高于durable。
        // autoDelete:是否自动删除,当没有生产者或消费者使用此队列,该队列会自动删除。

        // 一般设置一下队列的持久化就好,其余两个默认false
        return new Queue("TestDirectQueue", true);
    }

    /**
     * Direct交换机,命名:TestDirectExchange
     * @return Direct交换机
     */
    @Bean
    DirectExchange TestDirectExchange() {


        return new DirectExchange("TestDirectExchange", true, false);
    }

    /**
     * 绑定 将队列和交换机绑定,并设置用于匹配键:TestDirectRouting
     * @return 绑定
     */
    @Bean
    Binding bindingDirect() {


        return BindingBuilder.bind(TestDirectQueue()).to(TestDirectExchange()).with("TestDirectRouting");
    }
}
4.3 消息推送类
SendMessageController.java
import org.springframework.amqp.rabbit.core.RabbitTemplate;
import org.springframework.beans.factory.annotation.Autowired;
import org.springframework.web.bind.annotation.GetMapping;
import org.springframework.web.bind.annotation.RestController;

import java.time.LocalDateTime;
import java.time.format.DateTimeFormatter;
import java.util.HashMap;
import java.util.Map;
import java.util.UUID;

/**
 * <p> @Title SendMessageController
 * <p> @Description 推送消息接口
 *
 * @author ACGkaka
 * @date 2023/1/12 15:23
 */
@RestController
public class SendMessageController {


    /**
     * 使用 RabbitTemplate,这提供了接收/发送等方法。
     */
    @Autowired
    private RabbitTemplate rabbitTemplate;

    @GetMapping("/sendDirectMessage")
    public String sendDirectMessage() {


        String messageId = String.valueOf(UUID.randomUUID());
        String messageData = "Hello world.";
        String createTime = LocalDateTime.now().format(DateTimeFormatter.ofPattern("yyyy-MM-dd HH:mm:ss"));
        Map<String, Object> map = new HashMap<>();
        map.put("messageId", messageId);
        map.put("messageData", messageData);
        map.put("createTime", createTime);
        // 将消息携带绑定键值:TestDirectRouting,发送到交换机:TestDirectExchange
        rabbitTemplate.convertAndSend("TestDirectExchange", "TestDirectRouting", map);
        return "OK";
    }
}
4.4 消息监听类
DirectReceiver.java
import org.springframework.amqp.rabbit.annotation.RabbitHandler;
import org.springframework.amqp.rabbit.annotation.RabbitListener;
import org.springframework.stereotype.Component;

import java.util.Map;

/**
 * <p> @Title DirectReceiver
 * <p> @Description 直连型交换机监听类
 *
 * @author ACGkaka
 * @date 2023/1/12 15:59
 */
@Component
@RabbitListener(queues = "TestDirectQueue")
public class DirectReceiver {


    @RabbitHandler
    public void process(Map testMessage) {


        System.out.println("DirectReceiver消费者收到消息:" + testMessage.toString());
    }
}
4.5 测试
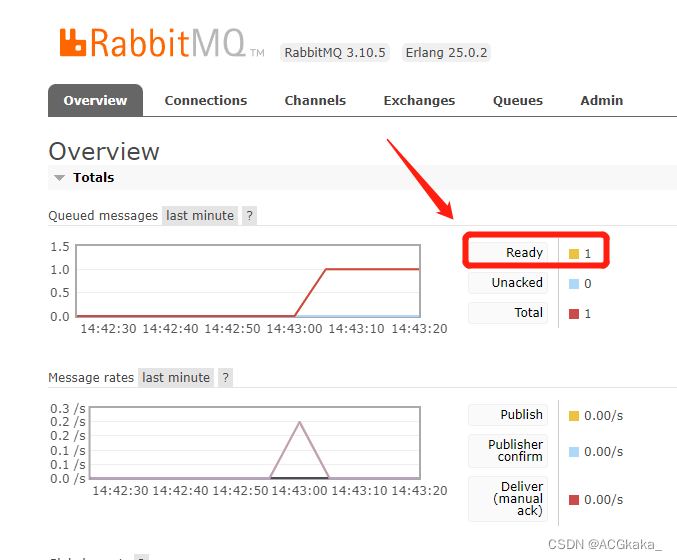
1)先注释消息监听类,请求如下地址: http://localhost:8081/sendDirectMessage

2)打开RabbitMQ页面,可以看到有一条就绪待消费的消息。
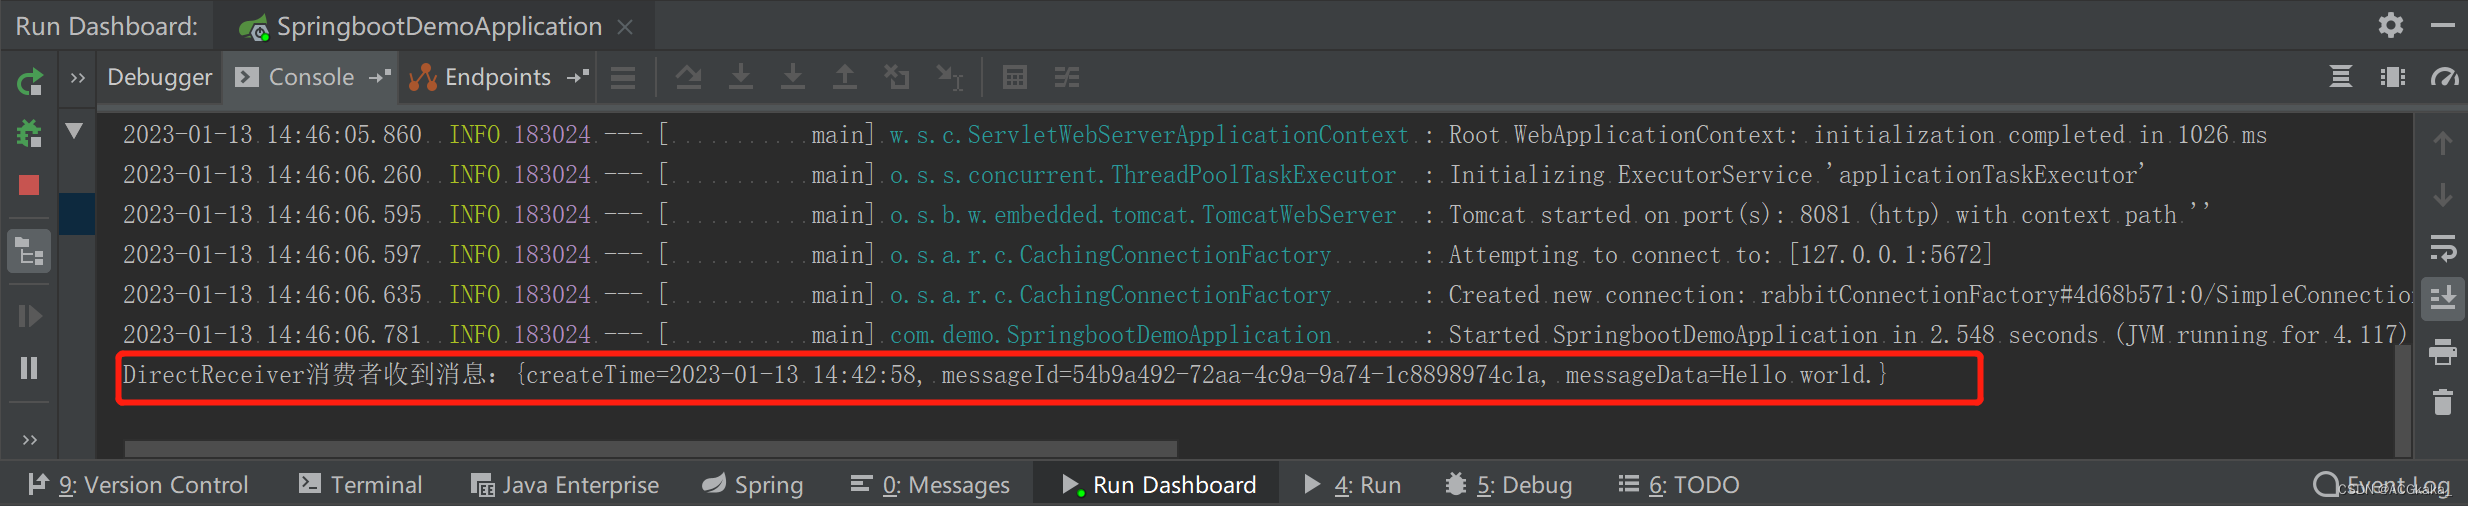
3)打开消息监听类注释,重启项目,可以看到消息被消费了。

5.Fanout 广播交换机
5.1 配置类
import org.springframework.amqp.core.Binding;
import org.springframework.amqp.core.BindingBuilder;
import org.springframework.amqp.core.FanoutExchange;
import org.springframework.amqp.core.Queue;
import org.springframework.context.annotation.Bean;
import org.springframework.context.annotation.Configuration;

/**
 * <p> @Title RabbitFanoutConfig
 * <p> @Description 广播交换机配置
 * Fanout 就是我们熟悉的广播模式或者订阅模式,给Fanout交换机发送消息,绑定了这个交换机的所有队列都收到这个消息。
 *
 * @author zhj
 * @date 2023/1/16 5:42
 */
@Configuration
public class RabbitFanoutConfig {


    public static final String FANOUT_QUEUE_NAME_1 = "testFanoutQueue1";
    public static final String FANOUT_QUEUE_NAME_2 = "testFanoutQueue2";

    @Bean
    public Queue testFanoutQueue1() {


        return new Queue(RabbitFanoutConfig.FANOUT_QUEUE_NAME_1);
    }
    @Bean
    public Queue testFanoutQueue2() {


        return new Queue(RabbitFanoutConfig.FANOUT_QUEUE_NAME_2);
    }
    /**
     * 任何发送到Fanout Exchange的消息都会被转发到与该Exchange绑定(Binding)的所有队列上。
     */
    @Bean
    FanoutExchange testFanoutExchange() {


        return new FanoutExchange("testFanoutExchange", true, false);
    }
    @Bean
    Binding bindingFanout1(Queue testFanoutQueue1, FanoutExchange testFanoutExchange) {


        return BindingBuilder.bind(testFanoutQueue1).to(testFanoutExchange);
    }
    @Bean
    Binding bindingFanout2(Queue testFanoutQueue2, FanoutExchange testFanoutExchange) {


        return BindingBuilder.bind(testFanoutQueue2).to(testFanoutExchange);
    }
}
5.2 消息推送类
import org.springframework.amqp.rabbit.core.RabbitTemplate;
import org.springframework.beans.factory.annotation.Autowired;
import org.springframework.web.bind.annotation.GetMapping;
import org.springframework.web.bind.annotation.RestController;

import java.time.LocalDateTime;
import java.time.format.DateTimeFormatter;
import java.util.HashMap;
import java.util.Map;
import java.util.UUID;

/**
 * <p> @Title SendMessageController
 * <p> @Description 推送消息接口
 *
 * @author ACGkaka
 * @date 2023/1/12 15:23
 */
@RestController
public class SendMessageController {


    /**
     * 使用 RabbitTemplate,这提供了接收/发送等方法。
     */
    @Autowired
    private RabbitTemplate rabbitTemplate;

    @GetMapping("/sendFanoutMessage")
    public String sendFanoutMessage() {


        String messageId = String.valueOf(UUID.randomUUID());
        String messageData = "Hello world.";
        String createTime = LocalDateTime.now().format(DateTimeFormatter.ofPattern("yyyy-MM-dd HH:mm:ss"));
        Map<String, Object> map = new HashMap<>();
        map.put("messageId", messageId);
        map.put("messageData", messageData);
        map.put("createTime", createTime);
        // 将消息携带绑定键值:testFanoutRouting,发送到交换机:testFanoutExchange
        rabbitTemplate.convertAndSend("testFanoutExchange", "testFanoutRouting", map);
        return "OK";
    }
}
其余与 Direct 直连交换机基本相同,不再赘述。
6.topic 主题交换机
6.1 配置类
import org.springframework.amqp.core.Binding;
import org.springframework.amqp.core.BindingBuilder;
import org.springframework.amqp.core.Queue;
import org.springframework.amqp.core.TopicExchange;
import org.springframework.context.annotation.Bean;
import org.springframework.context.annotation.Configuration;

/**
 * <p> @Title RabbitTopicConfig
 * <p> @Description 主题交换机配置类
 *
 * @author zhj
 * @date 2023/1/16 6:02
 */
@Configuration
public class RabbitTopicConfig {


    public static final String TOPIC_QUEUE_NAME_1 = "testTopicQueue1";
    public static final String TOPIC_QUEUE_NAME_2 = "testTopicQueue2";
    public static final String TOPIC_QUEUE_NAME_3 = "testTopicQueue3";
    public static final String TOPIC_EXCHANGE_NAME = "testTopicExchange";
    public static final String TOPIC_ROUTING_NAME_1 = "test";
    public static final String TOPIC_ROUTING_NAME_2 = "test.topic";
    public static final String TOPIC_ROUTING_NAME_3 = "test.topic.message";

    @Bean
    public Queue testTopicQueue1() {


        return new Queue(RabbitTopicConfig.TOPIC_QUEUE_NAME_1);
    }
    @Bean
    public Queue testTopicQueue2() {


        return new Queue(RabbitTopicConfig.TOPIC_QUEUE_NAME_2);
    }
    @Bean
    public Queue testTopicQueue3() {


        return new Queue(RabbitTopicConfig.TOPIC_QUEUE_NAME_3);
    }
    /**
     * 交换机(Exchange) 描述:接收消息并且转发到绑定的队列,交换机不存储消息
     */
    @Bean
    TopicExchange testTopicExchange() {


        return new TopicExchange(RabbitTopicConfig.TOPIC_EXCHANGE_NAME, true, false);
    }

    /**
     * 綁定队列 testTopicQueue1() 到 testTopicExchange 交换机,路由键只接受完全匹配 test.topic1 的队列接受者可以收到消息
     */
    @Bean
    Binding bindingTestTopic1(Queue testTopicQueue1, TopicExchange testTopicExchange) {


        return BindingBuilder.bind(testTopicQueue1).to(testTopicExchange).with(RabbitTopicConfig.TOPIC_ROUTING_NAME_1);
    }
    @Bean
    Binding bindingTestTopic2(Queue testTopicQueue2, TopicExchange testTopicExchange) {


        return BindingBuilder.bind(testTopicQueue2).to(testTopicExchange).with(RabbitTopicConfig.TOPIC_ROUTING_NAME_2);
    }
    @Bean
    Binding bindingTestTopic3(Queue testTopicQueue3, TopicExchange testTopicExchange) {


        return BindingBuilder.bind(testTopicQueue3).to(testTopicExchange).with(RabbitTopicConfig.TOPIC_ROUTING_NAME_3);
    }
}
6.2 消息推送类
import com.demo.config.RabbitTopicConfig;
import org.springframework.amqp.rabbit.core.RabbitTemplate;
import org.springframework.beans.factory.annotation.Autowired;
import org.springframework.web.bind.annotation.GetMapping;
import org.springframework.web.bind.annotation.RestController;

import java.time.LocalDateTime;
import java.time.format.DateTimeFormatter;
import java.util.HashMap;
import java.util.Map;
import java.util.UUID;

/**
 * <p> @Title SendMessageController
 * <p> @Description 推送消息接口
 *
 * @author ACGkaka
 * @date 2023/1/12 15:23
 */
@RestController
public class SendMessageController {


    /**
     * 使用 RabbitTemplate,这提供了接收/发送等方法。
     */
    @Autowired
    private RabbitTemplate rabbitTemplate;

    @GetMapping("/sendTopicMessage")
    public String sendTopicMessage() {


        String messageId = String.valueOf(UUID.randomUUID());
        String messageData = "Hello world.";
        String createTime = LocalDateTime.now().format(DateTimeFormatter.ofPattern("yyyy-MM-dd HH:mm:ss"));
        Map<String, Object> map = new HashMap<>();
        map.put("messageId", messageId);
        map.put("messageData", messageData);
        map.put("createTime", createTime);
        // 将消息携带绑定键值:testFanoutRouting,发送到交换机:testFanoutExchange
        rabbitTemplate.convertAndSend(RabbitTopicConfig.TOPIC_EXCHANGE_NAME, "test.#", map);
        return "OK";
    }
}
其余与 Direct 直连交换机基本相同,不再赘述。
7.源码地址
源码地址: https://gitee.com/acgkaka/SpringBootExamples/tree/master/springboot-rabbitmq
参考地址:
1.Springboot 整合RabbitMq ,用心看完这一篇就够了,https://blog.csdn.net/qq_35387940/article/details/100514134
2.【RabbitMQ的那点事】如何保证消息的正确发送,https://www.jianshu.com/p/15f0c1a105fb