1.介绍
本文将通过实战介绍Springboot如何集成swagger2,以用户管理模块为例,实现项目接口文档的在线管理。
项目源码
本文只列出核心部分,详细请看源码:
https://gitee.com/indexman/boot_swagger_demo
2.Swagger是干什么的?
Swagger 是一个用于生成、描述和调用 RESTful 接口的 Web 服务。通俗的来讲,Swagger 就是将项目中所有(想要暴露的)接口展现在页面上,并且可以进行接口调用和测试的服务。
官网地址:https://swagger.io/
其主要作用:
-
在线API文档:将项目中所有的接口展现在页面上,这样后端程序员就不需要专门为前端使用者编写专门的接口文档。
-
实时更新:当接口更新之后,只需要修改代码中的 Swagger 描述就可以实时生成新的接口文档了,从而规避了接口文档老旧不能使用的问题。
-
接口测试:通过 Swagger 页面,我们可以直接进行接口调用,降低了项目开发阶段的调试成本。
3.开发步骤
闲言少叙,直奔主题。
3.1 添加pom依赖
<?xml version="1.0" encoding="UTF-8"?>
<project xmlns="http://maven.apache.org/POM/4.0.0" xmlns:xsi="http://www.w3.org/2001/XMLSchema-instance"
         xsi:schemaLocation="http://maven.apache.org/POM/4.0.0 https://maven.apache.org/xsd/maven-4.0.0.xsd">
    <modelVersion>4.0.0</modelVersion>
    <parent>
        <groupId>org.springframework.boot</groupId>
        <artifactId>spring-boot-starter-parent</artifactId>
        <version>2.5.1</version>
        <relativePath/> <!-- lookup parent from repository -->
    </parent>
    <groupId>com.laoxu.demo</groupId>
    <artifactId>boot_swagger_demo</artifactId>
    <version>0.0.1-SNAPSHOT</version>
    <name>boot_swagger_demo</name>
    <description>Demo project for Spring Boot</description>

    <properties>
        <java.version>1.8</java.version>
        <project.build.sourceEncoding>UTF-8</project.build.sourceEncoding>
        <swagger.version>2.9.2</swagger.version>
    </properties>

    <dependencies>
        <dependency>
            <groupId>org.springframework.boot</groupId>
            <artifactId>spring-boot-starter</artifactId>
        </dependency>

        <dependency>
            <groupId>org.springframework.boot</groupId>
            <artifactId>spring-boot-starter-web</artifactId>
        </dependency>

        <!--swagger-->
        <dependency>
            <groupId>io.springfox</groupId>
            <artifactId>springfox-swagger2</artifactId>
            <version>${swagger.version}</version>
        </dependency>
        <!--swagger ui-->
        <dependency>
            <groupId>io.springfox</groupId>
            <artifactId>springfox-swagger-ui</artifactId>
            <version>${swagger.version}</version>
        </dependency>

        <dependency>
            <groupId>org.projectlombok</groupId>
            <artifactId>lombok</artifactId>
            <optional>true</optional>
        </dependency>

        <dependency>
            <groupId>org.springframework.boot</groupId>
            <artifactId>spring-boot-starter-test</artifactId>
            <scope>test</scope>
        </dependency>
    </dependencies>

    <build>
        <plugins>
            <plugin>
                <groupId>org.springframework.boot</groupId>
                <artifactId>spring-boot-maven-plugin</artifactId>
            </plugin>
        </plugins>
    </build>

</project>
3.2 修改启动类,添加@EnableSwagger2
@EnableSwagger2
@SpringBootApplication
public class BootSwaggerDemoApplication {


    public static void main(String[] args) {


        SpringApplication.run(BootSwaggerDemoApplication.class, args);
    }
}
3.3 编写配置类
@Configuration
public class Swagger2Config {


    @Bean
    public Docket adminApiConfig(){


        return new Docket(DocumentationType.SWAGGER_2)
                .groupName("")
                .apiInfo(adminApiInfo())
                .select()
                .paths(Predicates.and(PathSelectors.regex("/api/.*")))
                .build();
    }

    private ApiInfo adminApiInfo(){


        return new ApiInfoBuilder()
                .title("用户管理系统-API文档")
                .description("本文档描述了用户管理系统接口定义")
                .version("1.0")
                .contact(new Contact("test", "http//www.baidu.com", "[email protected]"))
                .build();
    }
}
3.4 添加User实体
@ApiModel(value="User对象", description="用户")
@Data
public class User {


    private int id;
    private String name;
    private String city;
    @JsonFormat(shape = JsonFormat.Shape.STRING, pattern="yyyy-MM-dd")
    private Date birthday;

    public User(){

    }

    public User(int id, String name, String city, Date birthday) {


        this.id = id;
        this.name = name;
        this.city = city;
        this.birthday = birthday;
    }
}
3.5 添加用户接口
@Api(description="用户管理")
@RestController
@RequestMapping("/api/user")
public class UserController {


    @Autowired
    UserService userService;

    @ApiOperation("根据ID查询用户")
    @GetMapping("/{id}")
    public ResultBean getOne(@ApiParam(name="id",value = "用户ID",required = true)
                                 @PathVariable Integer id){


        User user = userService.getById(id);
        ResultBean result = new ResultBean(0,"查询成功",1, user);

         return result;
    }

    @ApiOperation("分页查询")
    @GetMapping("/list")
    public ResultBean list(@ApiParam(name="页码",value = "page",required = false)
                           @RequestParam(defaultValue = "1") Integer page,
                           @ApiParam(name="页行数",value = "limit",required = false)
                           @RequestParam(defaultValue = "10") Integer limit){


        List<User> users = userService.getPager(page,limit);
        int count = userService.getAllUsers().size();

        ResultBean result = new ResultBean(0,"查询成功",count,users);

        return result;
    }

    @ApiOperation("修改用户")
    @PostMapping("/save")
    public ResultBean save(@ApiParam(name="用户实体",value = "user实体",required = true)
                           @RequestBody User user){


        // 判断是新增还是修改
        if(user.getId()==0){


            userService.addUser(user);
        }else{


            userService.updateUser(user);
        }

        return new ResultBean(200,"保存成功",0,"");
    }

    @ApiOperation("删除用户(多个)")
    @PostMapping("/remove")
    public ResultBean modify(@ApiParam(name="用户ID数组",value = "ids",required = true)
                                 @RequestBody int[] ids){


        userService.delUsers(ids);
        return new ResultBean(200,"删除成功",0,"");
    }
}
4.启动工程,访问接口文档
访问:http://localhost:9001/swagger-ui.html#/
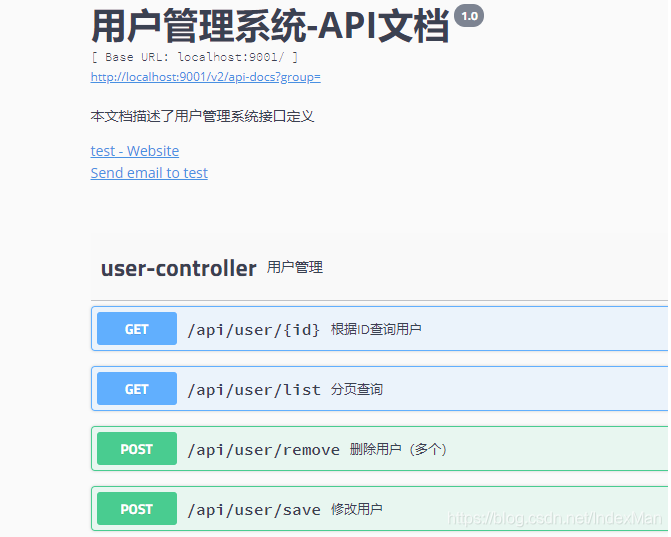
可以看到用户controller的几个接口定义都在里面了。
5.测试接口
这里挑选第一个接口测试一下,见下图:
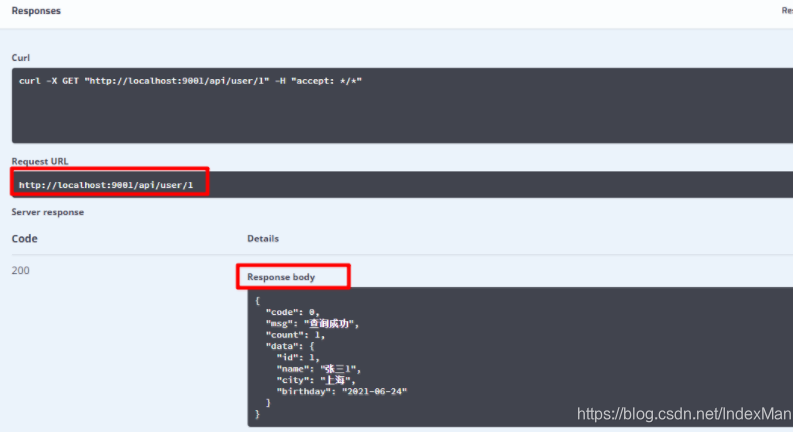
可以看到还是很方便的。