转自:https://blog.csdn.net/xxoo00xx00/article/details/77163399
搭建环境:
- 1,jdk1.8
- 2,idea
- 3,spring-boot-starter-parent版本1.5.6.RELEASE
- 4,springfox-swagger2 And springfox-swagger-ui 版本2.2.2
1快速环境搭建
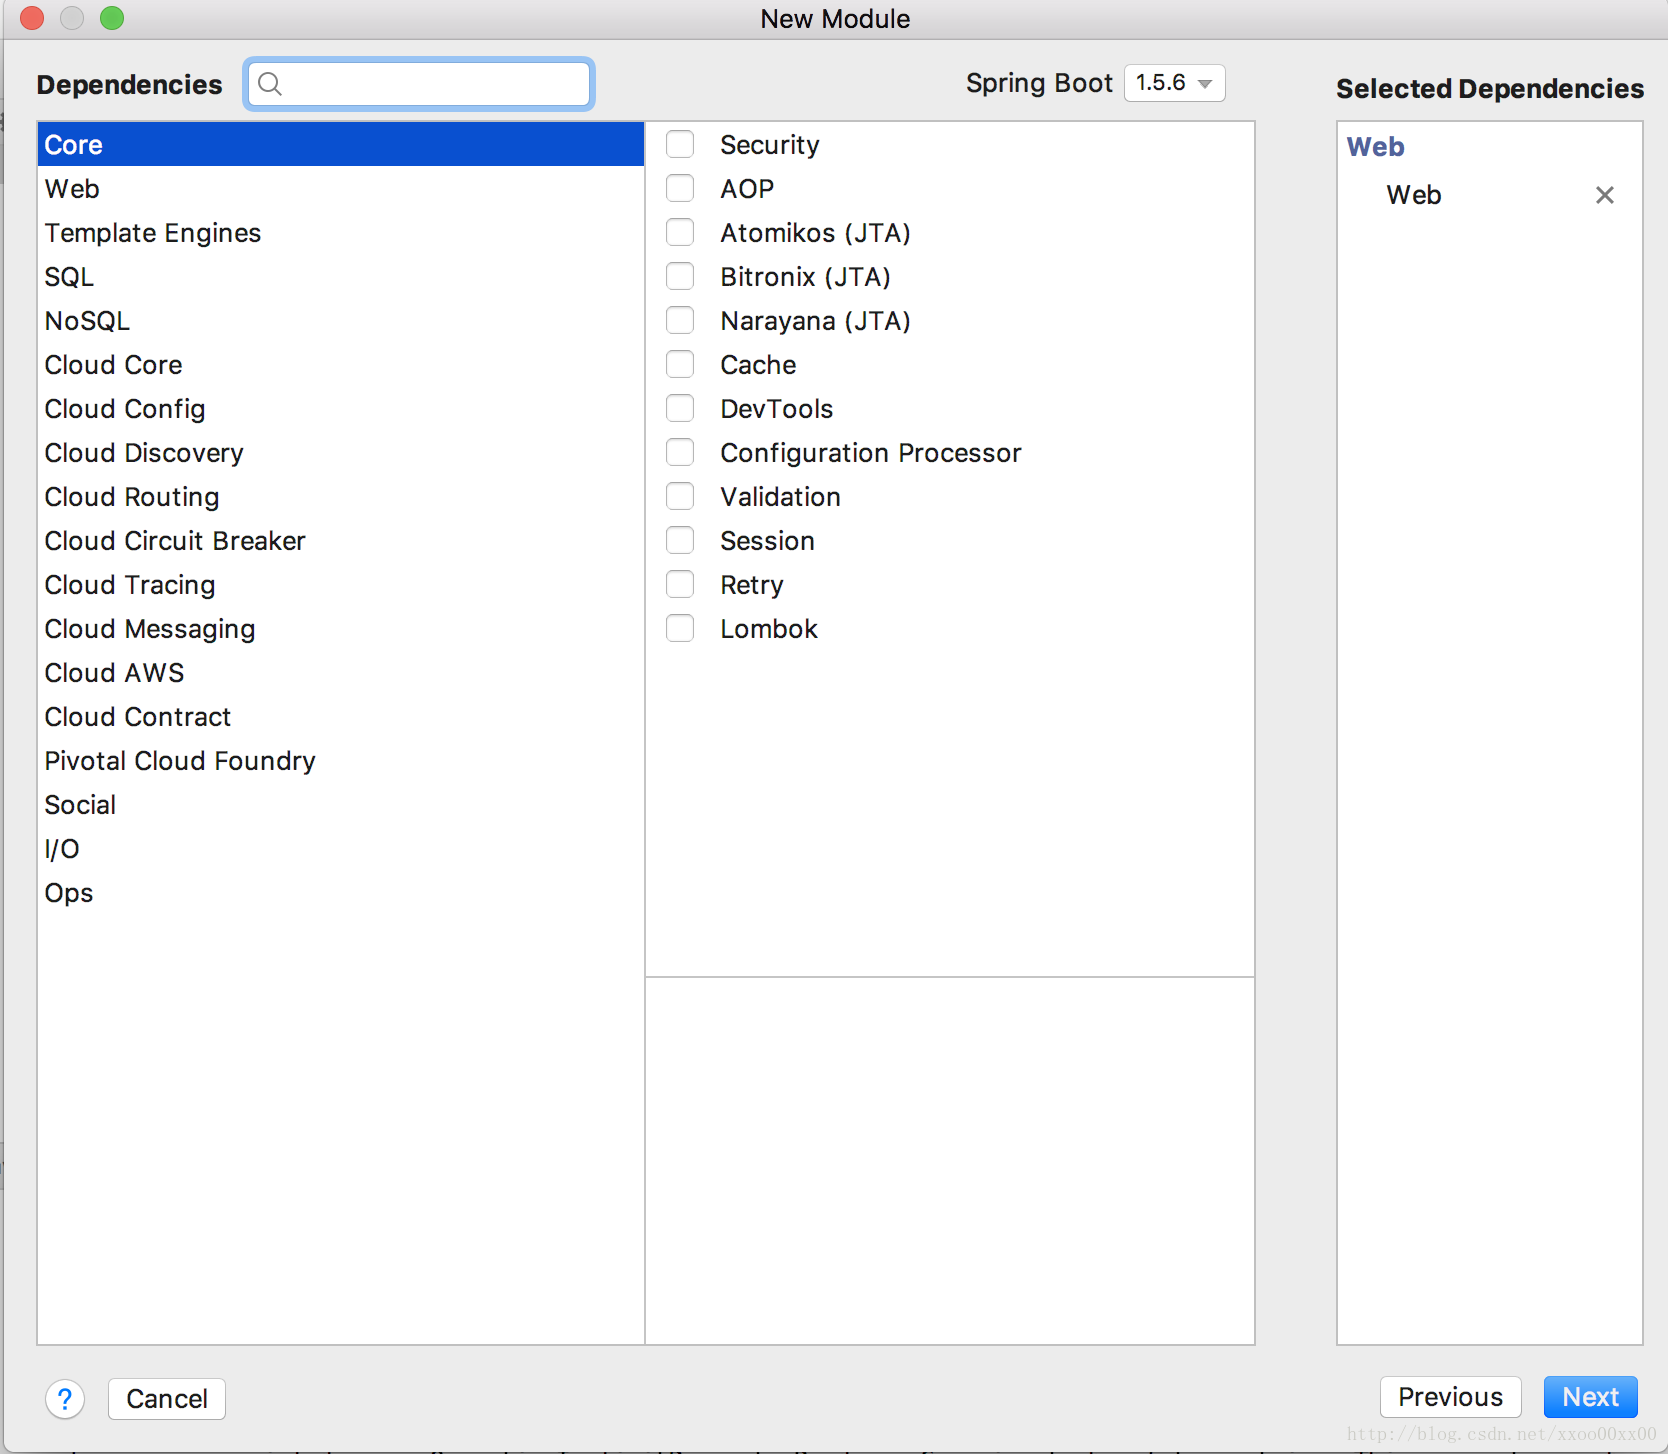
新建一个工程,file->new->Porject->Spring Initializr->next-如下图所示(idea专业版本,社区版可以到git上复制pom文件)
pom.xml文件中添加如下内容(看清楚再复制,此处不是全部内容)
    <properties>
        ...
        <swagger.version>2.2.2</swagger.version>
        ...
    </properties>

        <dependency>
            <groupId>io.springfox</groupId>
            <artifactId>springfox-swagger2</artifactId>
            <version>${swagger.version}</version>
        </dependency>
        <dependency>
            <groupId>io.springfox</groupId>
            <artifactId>springfox-swagger-ui</artifactId>
            <version>${swagger.version}</version>
</dependency>- 1
- 2
- 3
- 4
- 5
- 6
- 7
- 8
- 9
- 10
- 11
- 12
- 13
- 14
- 15
- 16
在config目录中新建swagger的配置文件swaggerConfig.java
@EnableSwagger2
@Configuration
public class SwaggerConfig {

    @Bean
    public Docket createRestApi() {
        return new Docket(DocumentationType.SWAGGER_2)
                .apiInfo(apiInfo())
                .select()
                .apis(RequestHandlerSelectors.basePackage("com"))//扫描com路径下的api文档
                .paths(PathSelectors.any())//路径判断
                .build();
    }

    private ApiInfo apiInfo() {
        return new ApiInfoBuilder()
                .title("《----我是title-----》")//标题
                .description("《-----我是描述----》:http://www.google.com.hk")//描述
                .termsOfServiceUrl("http://www.google.com.hk")//(不可见)条款地址
                .contact(new Contact("zz","google.com.hk","[email protected]"))//作者信息
                .version("6.6.6")//版本号
                .build();
    }

}- 1
- 2
- 3
- 4
- 5
- 6
- 7
- 8
- 9
- 10
- 11
- 12
- 13
- 14
- 15
- 16
- 17
- 18
- 19
- 20
- 21
- 22
- 23
- 24
- 25
新建实体类User,基本字段如下
@ApiModel(value = "User得实体,----》",reference = "我是参考")
public class User {
@ApiParam(value = "姓名--------------",required = true)
private String name;
//在swagger-ui.html#页面中如果返回User,ModelModel Schema选项卡可见
@ApiModelProperty(value = "id",dataType = "String")
private String id;
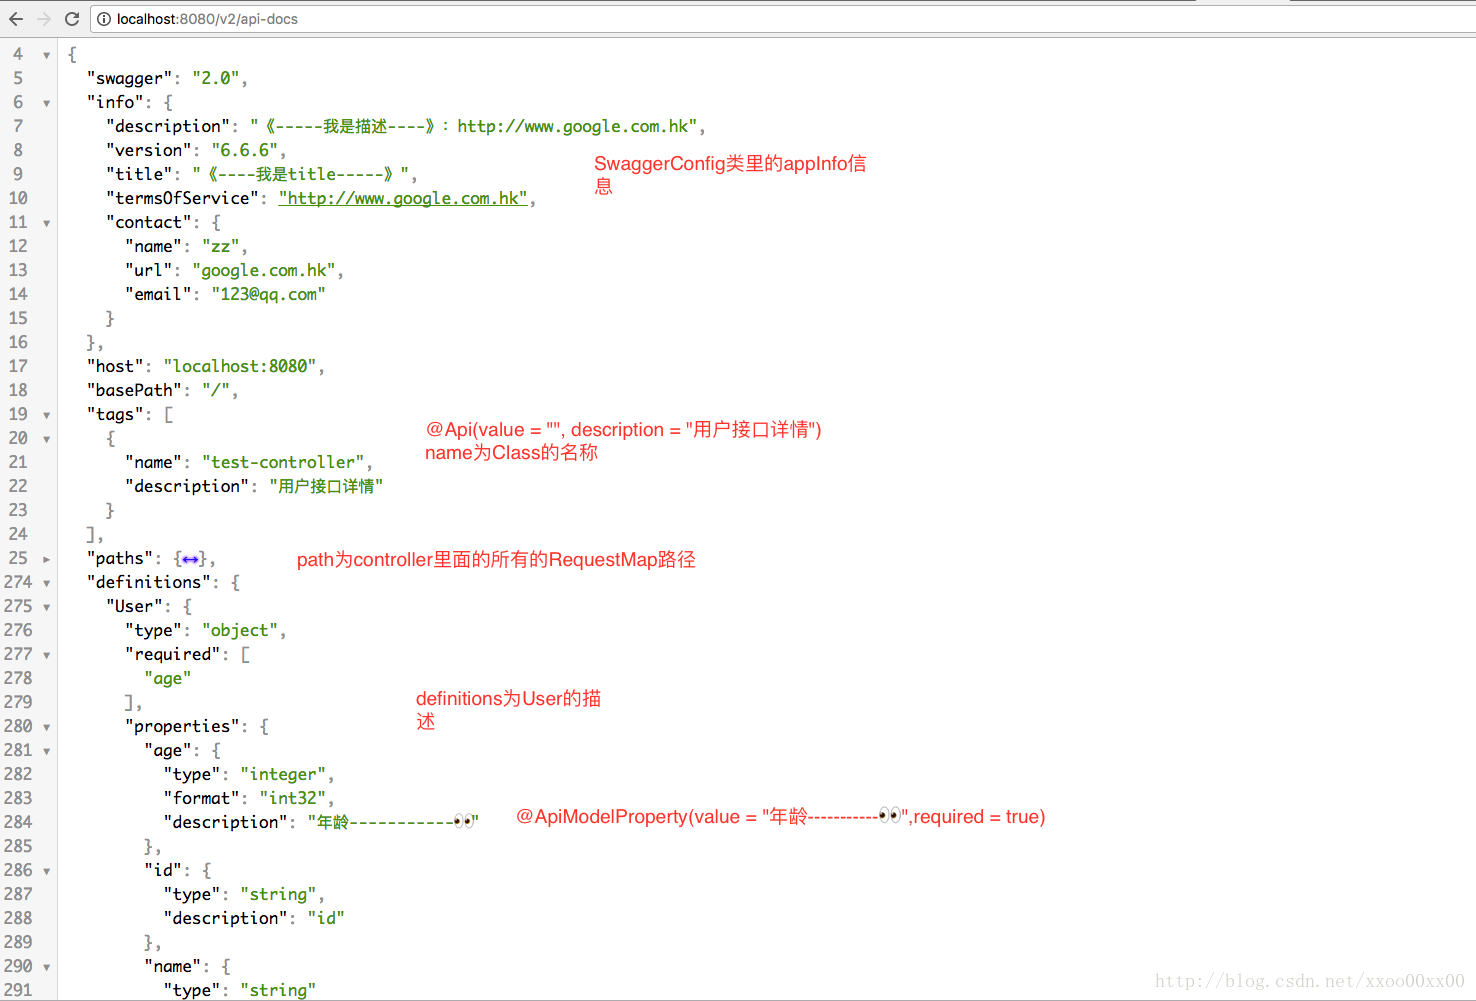
//在http://localhost:8080/v2/api-docs最后一行的实体可见
@ApiModelProperty(value = "年龄----------",required = true)
private Integer age;
...此处省略set和get方法
}
- 1
- 2
- 3
- 4
- 5
- 6
- 7
- 8
- 9
- 10
- 11
- 12
- 13
- 14
- 15
在controller包立新建TestController,内容如下
@Api(value = "API - VehiclesController", description = "用户接口详情")
@RestController
@RequestMapping("/test")
public class TestController {

    static Map<String, User> users = Collections.synchronizedMap(new HashMap<String,User>());


    @ApiOperation(value="获取用户列表", notes="")
    @ApiResponses(value = {
            @ApiResponse(code = 200, message = "Successful — 请求已完成"),
            @ApiResponse(code = 400, message = "请求中有语法问题,或不能满足请求"),
            @ApiResponse(code = 401, message = "未授权客户机访问数据"),
            @ApiResponse(code = 404, message = "服务器找不到给定的资源;文档不存在"),
            @ApiResponse(code = 500, message = "服务器不能完成请求")}
    )
    @RequestMapping(value={""}, method= RequestMethod.GET)
    public List<User> getUserList() {
        List<User> r = new ArrayList<User>(users.values());
        return r;
    }

    ....此处省略n行代码
}- 1
- 2
- 3
- 4
- 5
- 6
- 7
- 8
- 9
- 10
- 11
- 12
- 13
- 14
- 15
- 16
- 17
- 18
- 19
- 20
- 21
- 22
- 23
- 24
- 25
浏览改地址,访问主页面:http://localhost:8080/swagger-ui.html#
浏览改地址,访问sagger专有jsonAPI: http://localhost:8080/v2/api-docs
2常用注释描述
上半部

下半部
下下部
3全部注释列表
@Api
Api 标记可以标记一个Controller类做为swagger 文档资源,使用方式
| 属性名称 | 备注 |
|---|---|
| value | url的路径值 |
| tags | 如果设置这个值、value的值会被覆盖 |
| description | 对api资源的描述 |
| basePath | 基本路径可以不配置 |
| position | 如果配置多个Api 想改变显示的顺序位置 |
| produces | For example, “application/json, application/xml” |
| consumes | For example, “application/json, application/xml” |
| protocols | Possible values: http, https, ws, wss. |
| authorizations | 高级特性认证时配置 |
| hidden | 配置为true 将在文档中隐藏 |
@ApiOperation每一个url资源的定义,使用方式
| 属性名称 | 备注 |
|---|---|
| value | url的路径值 |
| tags | 如果设置这个值、value的值会被覆盖 |
| description | 对api资源的描述 |
| basePath | 基本路径可以不配置 |
| position | 如果配置多个Api 想改变显示的顺序位置 |
| produces | For example, “application/json, application/xml” |
| consumes | For example, “application/json, application/xml” |
| protocols | Possible values: http, https, ws, wss. |
| authorizations | 高级特性认证时配置 |
| hidden | 配置为true 将在文档中隐藏 |
| response | 返回的对象 |
| responseContainer | 这些对象是有效的 “List”, “Set” or “Map”.,其他无效 |
| httpMethod | “GET”, “HEAD”, “POST”, “PUT”, “DELETE”, “OPTIONS” and “PATCH” |
| code | http的状态码 默认 200 |
| extensions | 扩展属性 |
@ApiParam标记
public ResponseEntity createUser(@RequestBody @ApiParam(value = “user”, required = true) User user)
| 属性名称 | 备注 |
|---|---|
| name | 属性名称 |
| value | 属性值 |
| defaultValue | 默认属性值 |
| allowableValues | 可以不配置 |
| required | 是否属性必填 |
| access | 不过多描述 |
| allowMultiple | 默认为false |
| hidden | 隐藏该属性 |
| example | 举例子 |
@ApiImplicitParam对容器的描述
| 属性名称 | 备注 |
|---|---|
| name | 属性名称 |
| value | 属性值 |
| defaultValue | 默认值 |
| allowableValues | 可以不可配置 |
| required | 是否属性必填 |
| access | 不可过多描述 |
| allowMutiple | 默认为false |
| dataType | 数据类型 |
| paramType | 参数类型 |
@ApiResponse
| 属性名称 | 备注 |
|---|---|
| code | http的状态码 |
| message | 描述 |
| response | 默认响应类 Void |
| reference | 参考ApiOperation中配置 |
| responseHeaders | 参考 ResponseHeader 属性配置说明 |
| responseContainer | 参考ApiOperation中配置 |
@ResponseHeader(name=”head1”,description=”response head conf”)
| 属性名称 | 备注 |
|---|---|
| name | 响应头名称 |
| description | 头描述 |
| response | 默认响应类 Void |
| responseContainer | 参考ApiOperation中配置 |
4文档编写规范建议
- entity的描述
@ApiModel(description = “我是描述”,value = “用户”)
对实体的描述
description:在v2/api-docs的实体看到描述,
value的值在@ApiImplicitParam注解中的dataType可用,
@ApiModelProperty(value = “用户姓名”,required = true,dataType = “String”)
private String name;
对字段的描述
value:1,入参和出参的ModelModel Schema选项卡可见,2,在v2/api-docs的实体字段描述可见
required:该属性是否必填写
dataType:该字段的数据类型
- controller的描述
@Api(value = “API”, description = “用户接口详情”,tags=”A”)
对controler的描述
value:访问某个controller的url的根路径值
description:对于该controller的的大概描述
tags:把api接口进行分分组
@ApiOperation(value = “获取用户详细信息”, notes = “根据url的id来获取用户详细信息”,httpMethod =”GET”)
对该方法的描述
value:主页面中对该接口的描述,位置在接口的最右边
notes:点开接口后,第一段描述。
httpMethod:HTTP请求的动作名,可选值有:”GET”, “HEAD”, “POST”, “PUT”, “DELETE”, “OPTIONS” and “PATCH”。
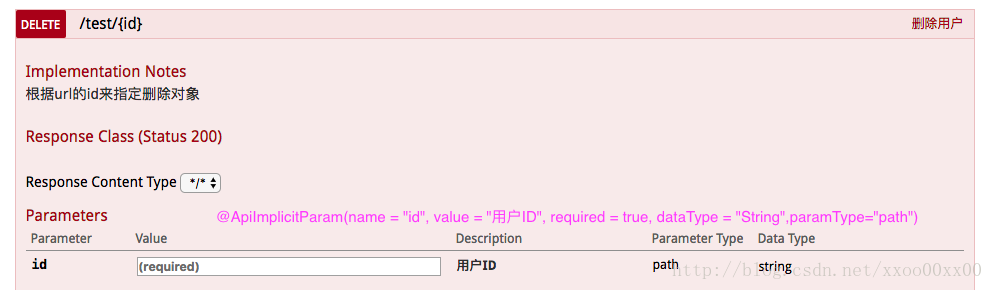
@ApiImplicitParam(name = “id”, value = “用户ID”, required = true, dataType = “String”, paramType = “path”)
对参数的描述,如果多个参数需要用@ApiImplicitParams对其进行包裹
name:参数名称
value:参数的简短描述
required:是否必须传递的参数
dataType:参数类型,可以为类名,也可以为基本类型(String,int,Boolean)
paramType:参数的传入(请求)类型,可选的值有path, query, body, header or form。(如果在路径中提取参数用path比如:在/A/{XXX}路径中得到XXX的值)
@ApiParam(name = “user”, value = “userValue”, required = true)
对参数元信息的说明,一般这个注解只能被使用在JAX-RS 1.x/2.x的综合环境下,和ApiImplicitParam注解类似
required:该参数是否必填
value:该参数的简短介绍
@ApiResponse(code = 200, message = “Successful — 请求已完成”)
返回状态码的描述,如果有多个可以使用@ApiResponses注解进行包裹
code:服务器返回的状态码
message:服务器返回状态码的简短说明
sample:header中传递token
@ApiImplicitParams({@ApiImplicitParam(name = "TOKEN", value = "Authorization token", required = true, dataType = "string", paramType = "header")})- 1
5,注意事项:
- 路径参数比如一直传递 {id},需要在ApiImplicitParam注解中添加prameType=“path”
- 版本问题,需要删除m2里面的jar包,2.2.2的swagger和1.5.6的spring-boot-prent才是绝配,试过很多最新的包,感觉多多少少都有点问题!
- 入参数和出参数都能用到一个实体类,注意检查@ApiModel的value属性
6参考文档
可能还有其他没有列出的参考文档,见谅
https://gumutianqi1.gitbooks.io/specification-doc/content/tools-doc/spring-boot-swagger2-guide.html
http://www.jianshu.com/p/12f4394462d5
http://blog.didispace.com/springbootswagger2/
https://dzone.com/articles/spring-boot-restful-api-documentation-with-swagger
http://www.jianshu.com/p/b0b19368e4a8