原子操作:
原子(atomic)本意是“不能被进一步分割的最小粒子”,而原子操作(atomic operation)意为“不可被中断的一个或一系列操作”。
CAS( Compare(比较) And Swap(交换) ) 为什么要有CAS?
count++,并不是一个原子操作。
Compare And Swap就是比较并且交换的一个原子操作,由Cpu在指令级别上进行保证。
CAS包含三个参数:1、变量所在内存地址V;2、变量应该的值A;3、我们将要修改的值B。如果说V上的变量的值时A的话,就用B重新赋值,如果不是A,那就什么事也不做,操作的返回结果原值是多少。
循环CAS:在一个(死)循环【for(;;)】里不断进行CAS操作,直到成功为止(自旋操作)。
CAS实现原子操作的三大问题
1、 ABA问题:其他的线程把值改成了C,很快改成了A。解决ABA,引入版本号:1A-》2C-》3A
2、 循环时间很长的话,cpu的负荷比较大
3、 对一个变量进行操作可以,同时操作多个共享变量有点麻烦
CAS线程安全
通过硬件层面的阻塞实现原子操作的安全
原子更新基本类型类
AtomicBoolean,AtomicInteger,AtomicLong,AtomicReference。
AtomicInteger的常用方法如下
·int addAndGet(int delta): 和delta
·boolean compareAndSet(int expect,int update):
·int getAndIncrement(): 原子递增,但是返回的是自增以前的值
int incrementAndGet原子递增,但是返回的是自增以后的值
·int getAndSet(int newValue):
public class AtomicIntTest {
	static AtomicInteger ai = new AtomicInteger(1);

	public static void main(String[] args) {
		System.out.println(ai.getAndIncrement());// ai的值获取后+1
		System.out.println(ai.incrementAndGet());// ai的值 +1后获取
		System.out.println(ai.get());// 获取ai的值
		System.out.println(ai.addAndGet(2));// ai的值和2相加后返回
		System.out.println(ai.compareAndSet(5, 2));// 比较ai是否等于2 如果相等则set ai=2
		System.out.println(ai.getAndSet(3));//获取ai后设置ai=3
		System.out.println(ai.get());
	}
}
运行结果
1
3
3
5
true
2
3
原子更新数组类
AtomicIntegerArray,AtomicLongArray,AtomicReferenceArray
AtomicIntegerArray类主要是提供原子的方式更新数组里的整型,
其常用方法如下。
·int addAndGet(int i,int delta):
·boolean compareAndSet(int i,int expect,int update):
数组通过构造方法传入,类会将数组复制一份,原数组不会发生变化。
public class AtomicArray {
	static int[] value = new int[] { 1, 2 };
	static AtomicIntegerArray ai = new AtomicIntegerArray(value);

	public static void main(String[] args) {
		ai.getAndSet(0, 3);
		System.out.println(ai.get(0));// 操作的是构成参数数组的复制
		System.out.println(value[0]);// 原构造参数的数组不会被操作
	}

}
运行结果
3
1
原子更新引用类型提供的类。
·AtomicReference: 可以解决更新多个变量的问题
·AtomicStampedReference:解决ABA问题
·AtomicMarkableReference:解决ABA问题
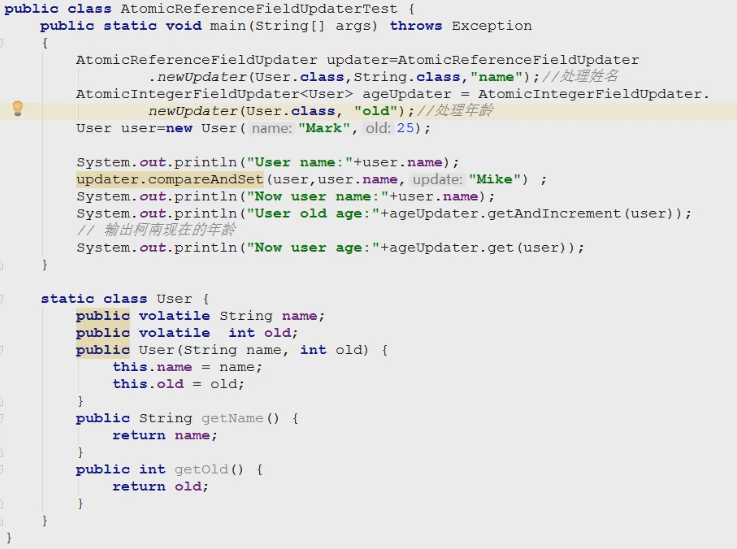
public class AtomicRef {

    static AtomicReference<User> userAtomicReference = new AtomicReference<>();

    public static void main(String[] args) {
        User user = new User("Mark",25);
        userAtomicReference.set(user);
        User updateUser = new User("Mike",26);
        userAtomicReference.compareAndSet(user,updateUser);
        System.out.println(userAtomicReference.get().getName());
        System.out.println(userAtomicReference.get().getOld());
    }

    static class User{
        private String name;
        private int old;

        public User(String name, int old) {
            this.name = name;
            this.old = old;
        }

        public String getName() {
            return name;
        }

        public int getOld() {
            return old;
        }
    }

}
运行结果
Mike
26
原子更新字段类,
Atomic包提供了以下3个类进行原子字段更新。
·AtomicReferenceFieldUpdater:
·AtomicIntegerFieldUpdater:
·AtomicLongFieldUpdater:
输出结果
有了synchronized为什么还要Lock?
1、 尝试非阻塞地获取锁
2、 获取锁的过程可以被中断
3、 超时获取锁
Lock的标准用法
public class LockTemplete {

	public static void main(String[] args) {
		Lock lock = new ReentrantLock(); // 可重入
		lock.lock();// 加锁
		try {
			// do my work.....
		} finally {
			lock.unlock();// 释放锁
		}
	}

}
Lock的常用API
Lock()
lockInterruptibly:可中断
tryLock尝试非阻塞地获取锁
unlock()
锁的可重入
递归的时候发生锁的重入,没有锁的可重入,就会死锁
公平和非公平锁
公平锁,先对锁发出获取请求的一定先被满足。公平锁的效率比非公平锁效率要低。
非公平锁,可插队
读写锁ReentrantReadWriteLock
允许多个读线程同时进行,但是只允许一个写线程(不允许其他读线程和写线程),支持读多写少场景,性能会有提升。
/**
 * 读写锁的使用
 */
public class RwLockTemplete {

	static final Map<String, String> map = new HashMap<>();
	static ReentrantReadWriteLock reentrantReadWriteLock = new ReentrantReadWriteLock();
	static Lock r = reentrantReadWriteLock.readLock();
	static Lock w = reentrantReadWriteLock.writeLock();

	public void put() {
		w.lock();
		try {
			// do my work.....
		} finally {
			w.unlock();
		}
	}

	public void get() {
		r.lock();
		try {
			// do my work.....
		} finally {
			r.unlock();
		}
	}

}
synchronized和lock比较
public class GoodsVo {

    private final String id;
    private int totalSaleNumber;//总销售数
    private int depotNumber;//当前库存数

    public GoodsVo(String id, int totalSaleNumber, int depotNumber) {
        this.id = id;
        this.totalSaleNumber = totalSaleNumber;
        this.depotNumber = depotNumber;
    }

    public int getTotalSaleNumber() {
        return totalSaleNumber;
    }

    public int getDepotNumber() {
        return depotNumber;
    }

    public void setGoodsVoNumber(int changeNumber){
        this.totalSaleNumber += changeNumber;
        this.depotNumber -= changeNumber;
    }
}
public interface IGoodsNum {
public GoodsVo getGoodsNumber();
public void setGoodsNumber(int changeNumber);
}/**
* synchronized操作
*/
public class NumSyn implements IGoodsNum {
private GoodsVo goods;
public NumSyn(GoodsVo goods) {
this.goods = goods;
}
@Override
public synchronized GoodsVo getGoodsNumber() {
try {
Thread.sleep(5);
} catch (InterruptedException e) {
e.printStackTrace();
}
return this.goods;
}
@Override
public synchronized void setGoodsNumber(int changeNumber) {
try {
Thread.sleep(50);
} catch (InterruptedException e) {
e.printStackTrace();
}
this.goods.setGoodsVoNumber(changeNumber);
}
}/**
* lock操作
*/
public class RwNumImpl implements IGoodsNum {
private GoodsVo goods;
private final ReentrantReadWriteLock lock = new ReentrantReadWriteLock();
private final Lock r = lock.readLock();
private final Lock w = lock.writeLock();
public RwNumImpl(GoodsVo goods) {
this.goods = goods;
}
@Override
public GoodsVo getGoodsNumber() {
r.lock();
try {
try {
Thread.sleep(5);
} catch (InterruptedException e) {
e.printStackTrace();
}
return this.goods;
} finally {
r.unlock();
}
}
@Override
public void setGoodsNumber(int changeNumber) {
w.lock();
try {
try {
Thread.sleep(50);
} catch (InterruptedException e) {
e.printStackTrace();
}
this.goods.setGoodsVoNumber(changeNumber);
} finally {
w.unlock();
}
}
}/**
* 测试
*/
public class Test {
static final int threadRatio = 10;
static final int threadBaseCount = 3;
static CountDownLatch countDownLatch = new CountDownLatch(1);
// 模拟实际的数据库读操作
private static class ReadThread implements Runnable {
private IGoodsNum goodsNum;
public ReadThread(IGoodsNum goodsNum) {
this.goodsNum = goodsNum;
}
@Override
public void run() {
try {
countDownLatch.await();
} catch (InterruptedException e) {
e.printStackTrace();
}
long start = System.currentTimeMillis();
for (int i = 0; i < 100; i++) {
goodsNum.getGoodsNumber();
}
long duration = System.currentTimeMillis() - start;
System.out.println(Thread.currentThread().getName() + "读取库存数据耗时:"
+ duration + "ms");
}
}
// 模拟实际的数据库写操作
private static class WriteThread implements Runnable {
private IGoodsNum goodsNum;
public WriteThread(IGoodsNum goodsNum) {
this.goodsNum = goodsNum;
}
@Override
public void run() {
try {
countDownLatch.await();
} catch (InterruptedException e) {
e.printStackTrace();
}
long start = System.currentTimeMillis();
Random r = new Random();
for (int i = 0; i < 10; i++) {
try {
Thread.sleep(50);
} catch (InterruptedException e) {
e.printStackTrace();
}
goodsNum.setGoodsNumber(r.nextInt(10));
}
long duration = System.currentTimeMillis() - start;
System.out.println(Thread.currentThread().getName() + "写库存数据耗时:"
+ duration + "ms");
}
}
public static void main(String[] args) throws InterruptedException {
GoodsVo goodsVo = new GoodsVo("goods001", 100000, 10000);
IGoodsNum goodsNum = new NumSyn(goodsVo);
// IGoodsNum goodsNum = new RwNumImpl(goodsVo);
for (int i = 0; i < threadBaseCount * threadRatio; i++) {
Thread readT = new Thread(new ReadThread(goodsNum));
readT.start();
}
for (int i = 0; i < threadBaseCount; i++) {
Thread writeT = new Thread(new WriteThread(goodsNum));
writeT.start();
}
countDownLatch.countDown();
}
}synchronized 运行结果
Thread-2读取库存数据耗时:500ms
Thread-26读取库存数据耗时:1155ms
Thread-24读取库存数据耗时:1761ms
Thread-21读取库存数据耗时:2606ms
Thread-20读取库存数据耗时:3106ms
Thread-18读取库存数据耗时:3981ms
Thread-17读取库存数据耗时:4481ms
Thread-16读取库存数据耗时:4981ms
Thread-14读取库存数据耗时:5551ms
Thread-9读取库存数据耗时:6469ms
Thread-0读取库存数据耗时:7077ms
Thread-11读取库存数据耗时:9042ms
Thread-28读取库存数据耗时:9962ms
Thread-25读取库存数据耗时:10893ms
Thread-19读取库存数据耗时:11379ms
Thread-10读取库存数据耗时:11759ms
Thread-12读取库存数据耗时:11814ms
Thread-6读取库存数据耗时:12294ms
Thread-4读取库存数据耗时:12954ms
Thread-1读取库存数据耗时:13079ms
Thread-7读取库存数据耗时:13399ms
Thread-5读取库存数据耗时:13769ms
Thread-13读取库存数据耗时:14054ms
Thread-15读取库存数据耗时:14369ms
Thread-23读取库存数据耗时:14479ms
Thread-27读取库存数据耗时:14829ms
Thread-29读取库存数据耗时:15294ms
Thread-22读取库存数据耗时:15424ms
Thread-8读取库存数据耗时:15499ms
Thread-3读取库存数据耗时:16259ms
Thread-31写库存数据耗时:16409ms
Thread-32写库存数据耗时:16459ms
Thread-30写库存数据耗时:16509mslock运行结果
Thread-31写库存数据耗时:1398ms
Thread-30写库存数据耗时:1503ms
Thread-32写库存数据耗时:1663ms
Thread-13读取库存数据耗时:2003ms
Thread-8读取库存数据耗时:2003ms
Thread-29读取库存数据耗时:2003ms
Thread-21读取库存数据耗时:2003ms
Thread-20读取库存数据耗时:2003ms
Thread-26读取库存数据耗时:2003ms
Thread-1读取库存数据耗时:2003ms
Thread-4读取库存数据耗时:2003ms
Thread-18读取库存数据耗时:2003ms
Thread-3读取库存数据耗时:2003ms
Thread-7读取库存数据耗时:2003ms
Thread-25读取库存数据耗时:2003ms
Thread-11读取库存数据耗时:2004ms
Thread-6读取库存数据耗时:2003ms
Thread-19读取库存数据耗时:2004ms
Thread-22读取库存数据耗时:2003ms
Thread-23读取库存数据耗时:2003ms
Thread-28读取库存数据耗时:2003ms
Thread-10读取库存数据耗时:2003ms
Thread-16读取库存数据耗时:2003ms
Thread-12读取库存数据耗时:2003ms
Thread-14读取库存数据耗时:2003ms
Thread-27读取库存数据耗时:2004ms
Thread-24读取库存数据耗时:2004ms
Thread-0读取库存数据耗时:2004ms
Thread-15读取库存数据耗时:2004ms
Thread-17读取库存数据耗时:2004ms
Thread-5读取库存数据耗时:2003ms
Thread-2读取库存数据耗时:2003ms
Thread-9读取库存数据耗时:2003msCondition接口有何用处?
Object wait,notify/all Condition接口和Lock配合来实现等待通知机制
Condition常用方法和使用范式
public class ConditionTemplete {

	Lock lock = new ReentrantLock();
	Condition condition = lock.newCondition();

	public void waitc() throws InterruptedException {
		lock.lock();
		try {
			condition.await();// 等待
		} finally {
			lock.unlock();
		}
	}

	public void waitnotify() throws InterruptedException {
		lock.lock();
		try {
			condition.signal();// 唤醒
			// condition.signalAll();尽量少使用 因为condition和lock已经绑定 不需要唤醒其他锁
		} finally {
			lock.unlock();
		}
	}

}
结合ReentrantLock和Condition实现线程安全的有界队列
public class BlockingQueueLC<T> {
    private List queue = new LinkedList<>();
    private final int limit;
    Lock lock = new ReentrantLock();
    private Condition needNotEmpty = lock.newCondition();
    private Condition needNotFull = lock.newCondition();


    public BlockingQueueLC(int limit) {
        this.limit = limit;
    }

    public void enqueue(T item) throws InterruptedException {
        lock.lock();
        try{
            while(this.queue.size()==this.limit){
                needNotFull.await();
            }
            this.queue.add(item);
            needNotEmpty.signal();
        }finally{
            lock.unlock();
        }
    }

    public  T dequeue() throws InterruptedException {
        lock.lock();
        try{
            while(this.queue.size()==0){
                needNotEmpty.await();
            }
            needNotFull.signal();
            return (T) this.queue.remove(0);
        }finally{
            lock.unlock();
        }
    }
}
public class BqTest {
public static void main(String[] args) {
BlockingQueueLC<Integer> bq = new BlockingQueueLC(10);
Thread threadA = new ThreadPush(bq);
threadA.setName("Push");
Thread threadB = new ThreadPop(bq);
threadB.setName("Pop");
threadB.start();
threadA.start();
}
private static class ThreadPush extends Thread{
BlockingQueueLC<Integer> bq;
public ThreadPush(BlockingQueueLC<Integer> bq) {
this.bq = bq;
}
@Override
public void run() {
String threadName = Thread.currentThread().getName();
int i = 20;
while(i>0){
try {
Thread.sleep(500);
System.out.println(" i="+i+" will push");
bq.enqueue(i--);
} catch (InterruptedException e) {
//e.printStackTrace();
}
}
}
}
private static class ThreadPop extends Thread{
BlockingQueueLC<Integer> bq;
public ThreadPop(BlockingQueueLC<Integer> bq) {
this.bq = bq;
}
@Override
public void run() {
while(true){
try {
Thread.sleep(1000);
System.out.println(Thread.currentThread().getName()+" will pop.....");
Integer i = bq.dequeue();
System.out.println(" i="+i.intValue()+" alread pop");
} catch (InterruptedException e) {
//e.printStackTrace();
}
}
}
}
}运行结果
i=20 will push
Pop will pop.....
i=20 alread pop
i=19 will push
i=18 will push
Pop will pop.....
i=19 alread pop
i=17 will push
i=16 will push
Pop will pop.....
i=18 alread pop
i=15 will push
i=14 will push
Pop will pop.....
i=17 alread pop
i=13 will push
i=12 will push
Pop will pop.....
i=16 alread pop
i=11 will push
i=10 will push
Pop will pop.....
i=15 alread pop
i=9 will push
i=8 will push
Pop will pop.....
i=14 alread pop
i=7 will push
i=6 will push
Pop will pop.....
i=13 alread pop
i=5 will push
i=4 will push
Pop will pop.....
i=12 alread pop
i=3 will push
i=2 will push
Pop will pop.....
i=11 alread pop
i=1 will push
Pop will pop.....
i=10 alread pop
Pop will pop.....
i=9 alread pop
Pop will pop.....
i=8 alread pop
Pop will pop.....
i=7 alread pop
Pop will pop.....
i=6 alread pop
Pop will pop.....
i=5 alread pop
Pop will pop.....
i=4 alread pop
Pop will pop.....
i=3 alread pop
Pop will pop.....
i=2 alread pop
Pop will pop.....
i=1 alread pop
Pop will pop.....
什么是AbstractQueuedSynchronizer?为什么我们要分析它?
抽象队列同步器,提供JDK中许多同步需求
AQS的基本使用方法
同步器的主要使用方式是继承,子类通过继承同步器并实现它的抽象方法来管理同步状态。可重写的方法有:
tryAcquire 独占锁获取
tryRelease 独占锁释放
tryAcquireShared 共享锁获取
tryReleaseShared 共享锁释放
isHeldExclusively 快速判断被线程独占
同步器的设计是基于模板方法模式, 使用者需要继承同步器并重写指定的方法,随后将同步器组合在自定义同步组件的实现中,并调用同步器提供的模板方法,而这些模板方法将会调用使用者重写的方法。
对同步状态进行更改,这时就需要使用同步器提供的3个方法来进行操作。
getState() 获取同步状态
setState 设置同步状态
compareAndSetState 原子的设置同步状态
public class TestMyLock {
	public void test() {
		final Lock lock = new ReentrantLock();
        //final Lock lock = new SingleLock();
		class Worker extends Thread {
			public void run() {
				while (true) {
					lock.lock();
					try {
						SleepUtils.second(1);
						System.out.println(Thread.currentThread().getName());
						SleepUtils.second(1);
					} finally {
						lock.unlock();
					}
					SleepUtils.second(2);
				}
			}
		}
		// 启动10个子线程
		for (int i = 0; i < 10; i++) {
			Worker w = new Worker();
			// w.setDaemon(true);
			w.start();
		}
		// 主线程每隔1秒换行
		for (int i = 0; i < 10; i++) {
			SleepUtils.second(1);
			System.out.println();
		}
	}

	public static void main(String[] args) {
		TestMyLock testMyLock = new TestMyLock();
		testMyLock.test();
	}
}
运行结果
Thread-0


Thread-1


Thread-2


Thread-1


Thread-2


Thread-1
Thread-3
Thread-1
Thread-4
Thread-5
Thread-6
Thread-5
Thread-6
Thread-5
Thread-7
Thread-8
Thread-9
Thread-8
Thread-0
Thread-8
/**
* AQS独占锁实现
*/
public class SingleLock implements Lock {
static class Sync extends AbstractQueuedSynchronizer{
// 独占锁获取
public boolean tryAcquire(int arg){
if (compareAndSetState(0,1)){
setExclusiveOwnerThread(Thread.currentThread());
return true;
}
return false;
}
//独占锁释放
public boolean tryRelease(int arg){
setExclusiveOwnerThread(null);
setState(0);
return true;
}
//是否处于占用状态
public boolean isHeldExclusively(){
return getState() == 1;
}
Condition newCondition(){
return new ConditionObject();
}
}
private final Sync sync = new Sync();
@Override
public void lock() {
sync.acquire(1);
}
@Override
public void lockInterruptibly() throws InterruptedException {
sync.acquireInterruptibly(1);
}
@Override
public boolean tryLock() {
return sync.tryAcquire(1);
}
@Override
public boolean tryLock(long time, TimeUnit unit) throws InterruptedException {
return sync.tryAcquireNanos(1,unit.toNanos(time));
}
@Override
public void unlock() {
sync.release(1);
}
@Override
public Condition newCondition() {
return sync.newCondition();
}
}了解LockSupport
LockSupport定义了一组的公共静态方法,这些方法提供了最基本的线程阻塞和唤醒功能,而LockSupport也成为构建同步组件的基础工具。LockSupport定义了一组以park开头的方法用来阻塞当前线程,以及unpark(Thread thread)方法来唤醒一个被阻塞的线程。
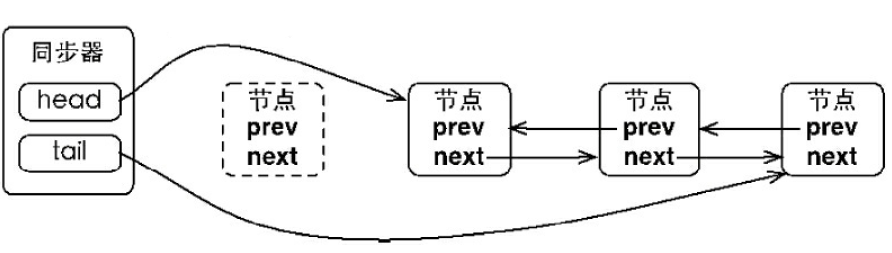
同步队列
同步器依赖内部的同步队列(一个FIFO双向队列)来完成同步状态的管理,当前线程获取同步状态失败时,同步器会将当前线程以及等待状态等信息构造成为一个节点(Node)并将其加入同步队列。同步器拥有首节点(head)和尾节点(tail),没有成功获取同步状态的线程将会成为节点加入该队列的尾部。
同步队列的基本结构
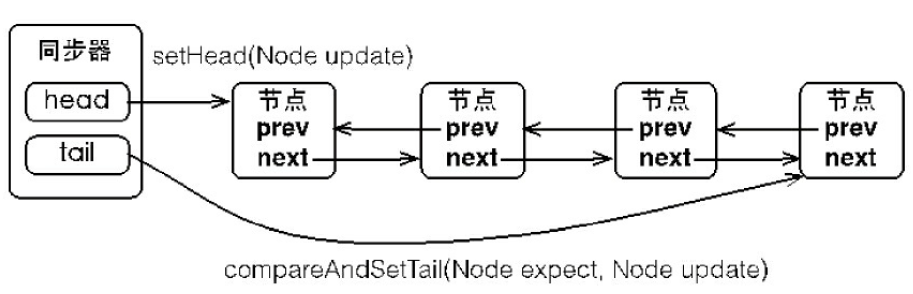
节点加入到同步队列
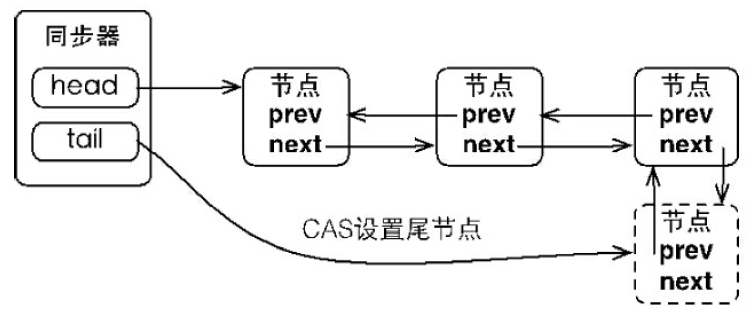
首节点的设置
独占式同步状态获取与释放
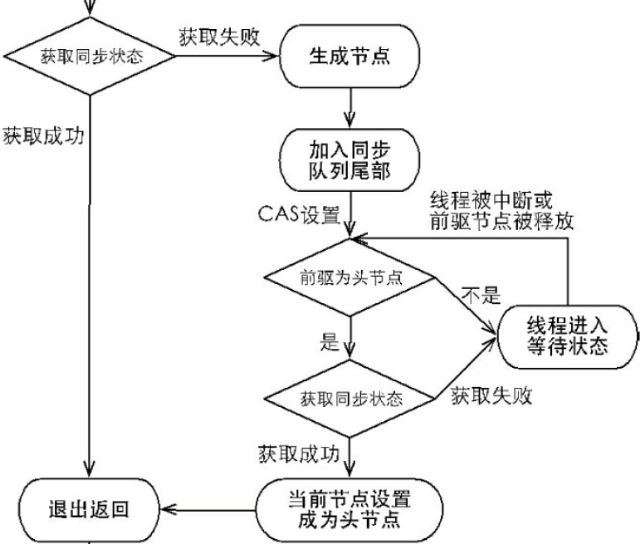
通过调用同步器的acquire(int arg)方法可以获取同步状态,其主要逻辑是:首先调用自定义同步器实现的tryAcquire(int arg)方法,该方法保证线程安全的获取同步状态,如果同步状态获取失败,则构造同步节点(独占式Node.EXCLUSIVE,同一时刻只能有一个线程成功获取同步状态)并通过addWaiter(Node node)方法将该节点加入到同步队列的尾部,最后调用acquireQueued(Node node,int arg)方法,使得该节点以“死循环”的方式获取同步状态。如果获取不到则阻塞节点中的线程,而被阻塞线程的唤醒主要依靠前驱节点的出队或阻塞线程被中断来实现。
共享式同步状态获取与释放
共享式获取与独占式获取最主要的区别在于同一时刻能否有多个线程同时获取到同步状态。在acquireShared(int arg)方法中,同步器调用tryAcquireShared(int arg)方法尝试获取同步状态,tryAcquireShared(int arg)方法返回值为int类型,当返回值大于等于0时,表示能够获取到同步状态。因此,在共享式获取的自旋过程中,成功获取到同步状态并退出自旋的条件就是tryAcquireShared(int arg)方法返回值大于等于0。
来实现一个共享式的同步工具类
/**
 * 共享锁
 */
public class TwoLock implements Lock {

    static class Sync extends AbstractQueuedSynchronizer {
        Sync(int count){
            setState(count);
        }

        //  共享锁获取
        public int tryAcquireShared  (int arg){
            for(;;){
                int current = getState();
                int newCount = current - arg;
                if(newCount<0||compareAndSetState(current,newCount)){
                    return newCount;
                }
            }
        }

        //共享锁锁释放
        public boolean tryReleaseShared  (int arg){
            for(;;){
                int current = getState();
                int newCount = current + arg;
                if(compareAndSetState(current,newCount)){
                    return true;
                }
            }
        }

        Condition newCondition(){
            return new ConditionObject();
        }

    }

    private final Sync sync = new Sync(2);

    @Override
    public void lock() {
        sync.acquireShared(1);

    }

    @Override
    public void lockInterruptibly() throws InterruptedException {
        sync.acquireSharedInterruptibly(1);

    }

    @Override
    public boolean tryLock() {
        return sync.tryAcquireShared(1)>=0;
    }

    @Override
    public boolean tryLock(long time, TimeUnit unit) throws InterruptedException {
        return sync.tryAcquireSharedNanos(1,unit.toNanos(time));
    }

    @Override
    public void unlock() {
        sync.releaseShared(1);

    }

    @Override
    public Condition newCondition() {
        return sync.newCondition();
    }
}
public class TestMyLock {
public void test() {
final Lock lock = new TwoLock();
class Worker extends Thread {
public void run() {
while (true) {
lock.lock();
try {
SleepUtils.second(1);
System.out.println(Thread.currentThread().getName());
SleepUtils.second(1);
} finally {
lock.unlock();
}
SleepUtils.second(2);
}
}
}
// 启动10个子线程
for (int i = 0; i < 10; i++) {
Worker w = new Worker();
// w.setDaemon(true);
w.start();
}
// 主线程每隔1秒换行
for (int i = 0; i < 10; i++) {
SleepUtils.second(1);
System.out.println();
}
}
public static void main(String[] args) {
TestMyLock testMyLock = new TestMyLock();
testMyLock.test();
}
}
运行结果
Thread-0
Thread-1
Thread-2
Thread-3
Thread-5
Thread-4
Thread-6
Thread-3
Thread-8
Thread-7
Thread-3
Thread-9
Thread-8
Thread-0
Thread-3了解ReentrantLock的实现
重进入是指任意线程在获取到锁之后能够再次获取该锁而不会被锁所阻塞,该特性的实现需要解决以下两个问题。
1)线程再次获取锁。锁需要去识别获取锁的线程是否为当前占据锁的线程,如果是,则再次成功获取。
2)锁的最终释放。
nonfairTryAcquire方法增加了再次获取同步状态的处理逻辑:通过判断当前线程是否为获取锁的线程来决定获取操作是否成功,如果是获取锁的线程再次请求,则将同步状态值进行增加并返回true,表示获取同步状态成功。同步状态表示锁被一个线程重复获取的次数。
如果该锁被获取了n次,那么前(n-1)次tryRelease(int releases)方法必须返回false,而只有同
步状态完全释放了,才能返回true。可以看到,该方法将同步状态是否为0作为最终释放的条件,当同步状态为0时,将占有线程设置为null,并返回true,表示释放成功。
了解ReentrantReadWriteLock的实现
读写锁的自定义同步器需要在同步状态(一个整型变量)上维护多个读线程和一个写线程的状态,使得该状态的设计成为读写锁实现的关键。如果在一个整型变量上维护多种状态,就一定需要“按位切割使用”这个变量,读写锁将变量切分成了两个部分,高16位表示读,低16位表示写。
读状态是所有线程获取读锁次数的总和,而每个线程各自获取读锁的次数只能选择保存在ThreadLocal中,由线程自身维护。
了解Condition的实现
等待队列是一个FIFO的队列,在队列中的每个节点都包含了一个线程引用,该线程就是在Condition对象上等待的线程,如果一个线程调用了Condition.await()方法,那么该线程将会释放锁、构造成节点加入等待队列并进入等待状态。
一个Condition包含一个等待队列,新增节点只需要将原有的尾节点nextWaiter指向它,并且更新尾节点即可。
调用Condition的signal()方法,将会唤醒在等待队列中等待时间最长的节点(首节点),在唤醒节点之前,会将节点移到同步队列中。
调用该方法的前置条件是当前线程必须获取了锁,可以看到signal()方法进行了isHeldExclusively()检查,也就是当前线程必须是获取了锁的线程。接着获取等待队列的首节点,将其移动到同步队列并使用LockSupport唤醒节点中的线程。
通过调用同步器的enq(Node node)方法,等待队列中的头节点线程安全地移动到同步队列。
Condition的signalAll()方法,相当于对等待队列中的每个节点均执行一次signal()方法,效果就是将等待队列中所有节点全部移动到同步队列中,并唤醒每个节点的线程。