本文主要介绍了Hadoop三大组件之Yarn的一些知识。
一、概述
Yarn是Hadoop的一个资源管理器,是一个资源协调者角色。Yarn的基本思想是将JobTracker的两个主要功能(资源管理和作业调度/监控)分离,在早期的版本中,资源管理和作业调度/监控由JobTracker全部承担,这将使得JobTracker的压力非常大。而Yarn的出现使得JobTracker的压力大大减少,使得资源调度更加变得分布式,统一化。
二、Yarn的基础架构
-
ResourceManager(RM):RM是一个全局的资源管理器,负责整个系统的资源管理和分配。它主要由两个组件构成:调度器(Scheduler)和应用程序管理器(Applications Manager,ASM)。
- 处理客户端请求。
- 监控NodeManager。
- 启动或者监控ApplicationMaster。
- 资源的分配与调度。
-
NodeManager(NM):NM是每个节点上的资源和任务管理器,它需要不断的是将自己所在节点上的资源情况和Container运行状态汇报到RM上,同时还需要处理来自AM的命令。
- 管理单个节点上的资源。
- 处理来自ResourceManager的命令。
- 处理来自ApplicationMaster的命令。
-
ApplicationMaster:用户提交的每个应用程序均包含一个AM。
- 为应运程序申请资源并分配给内部的任务。
- 任务的监控与容错。
-
Contaioner:Container是一个动态资源分配单位,它将内存、CPU、磁盘、网络等资源封装在一起,从而限定每个任务使用的资源量。
- Container是Yarn中的资源的抽象,它相当于是一台小型的机器,真正的运行任务的地方。
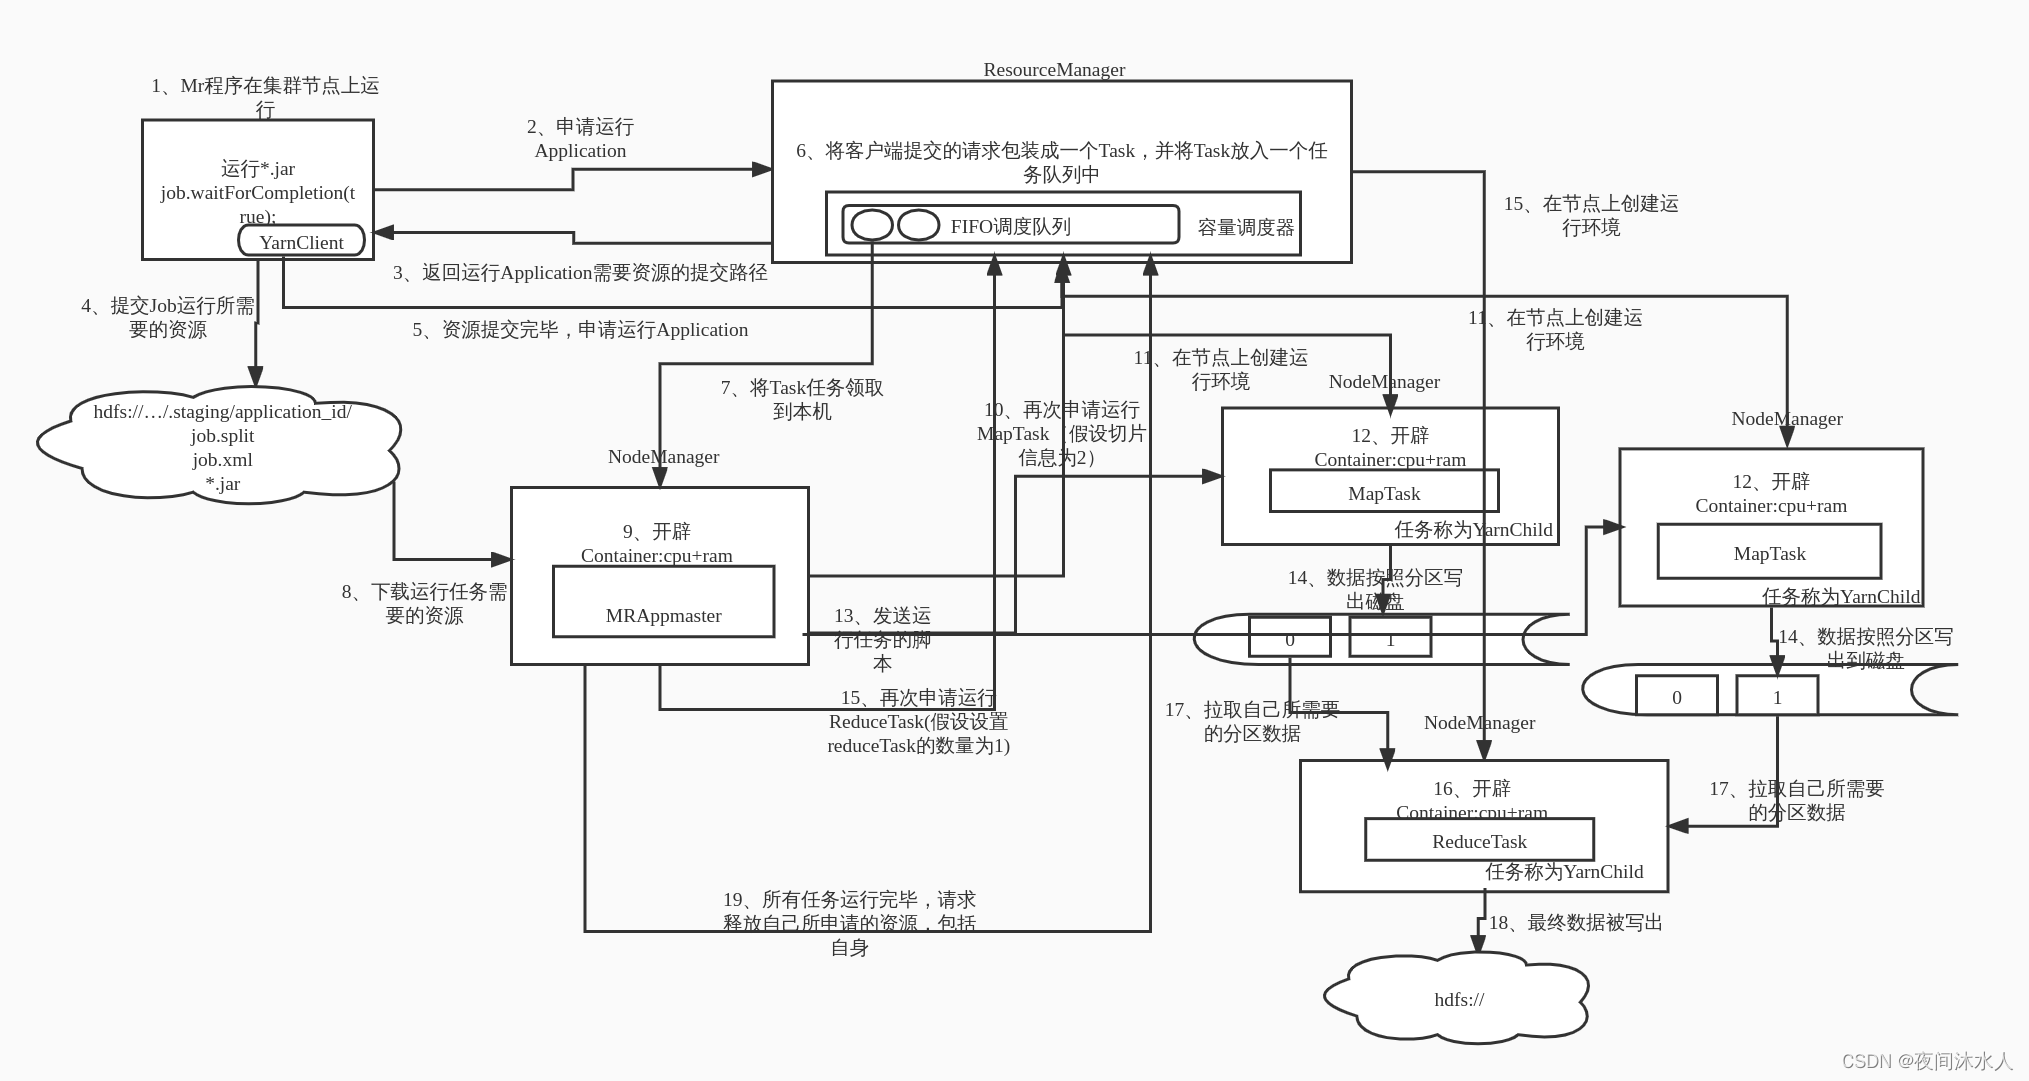
三、Yarn的工作机制图解
四、Yarn调度器

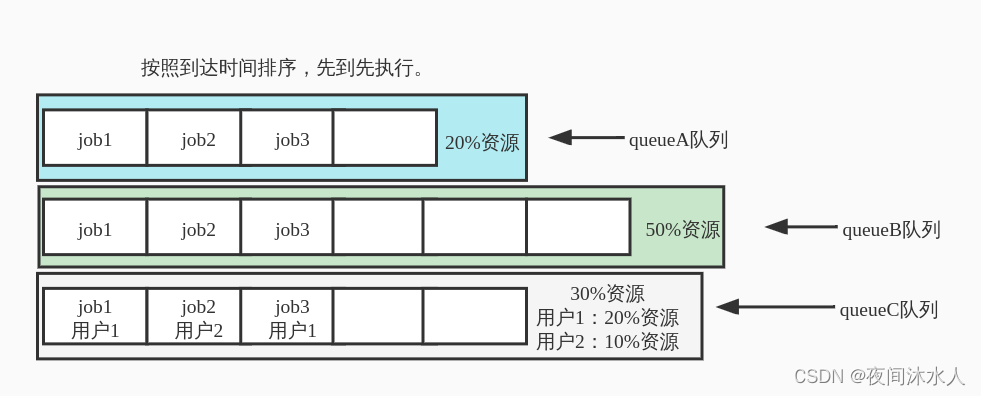
- 多队列:容量调度器底层多个调度队列,每个队列采用FIFO调度策略。
- 容量保证:每个队列可以设定资源下限和资源上限,以保证任务的执行。
- 灵活性:队列之间的资源可以共享。如果一个队列的资源有多余,可以暂时借给其他队列使用,但是一旦该队列需要时,其他队列必须归还资源,即该队列对这些资源具有绝对拥有权。
- 多用户:一个队列中可 以存在多个用户提交的任务,并且可以为每个用户提交的任务设置资源上限,防止某个用户提交的任务将整个队列中的资源全消耗完。


3.1、队列层级:采用深度优先算法,优先选择资源占用最低的队列分配资源。
3.2、作业层级:默认按照优先级和提交时间顺序分配资源。
3.3、按照容器的优先级分配资源,如果优先级相同,按照数据本地性原则分配资源:
- 任务和数据在同一节点上。
- 任务和数据在同一个机架上。
总结:思想就是让任务量最小的任务优先执行完,让出资源资源。
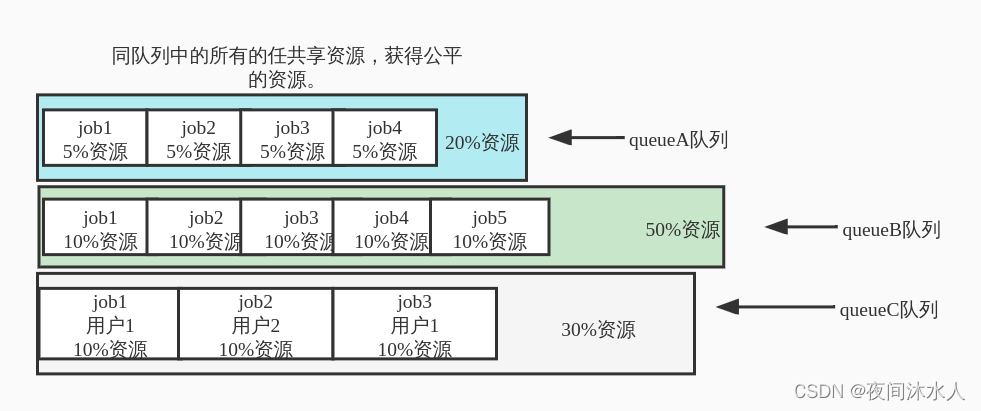
1、公平调度器特点:
-
拥有容量调度器的特点。
-
每个队列可以单独设置资源分配方式。
-
优先选择对资源缺额比较大的任务分配资源。
2、公平调度器资源分配算法:优先选择对资源缺额比较大的任务分配资源,在某一个时刻,某一个任务应分配到的资源与实际上所需要的资源的差值叫做缺额。

2.1、队列层级:
第一次分配:100 / 3 = 33.33,queueA=33.33%(多13.33%),queueA=33.33%(少16.66%),queueA=33.33%(多3.33%)。
第二次分配:(13.33 + 3.33)/ 1 = 16.66,queueA=20%(33.33 - 13.33),queueA=50%(33.33 + 16.66),queueA=30%(33.33 - 3.33)。
2.2、作业层级:
a) 加权:假设总资源总共12个,有4个job,对资源的需求分别为:job1=1,job2=2,job3=6,job4=5。
第一次分配:12 / 4 = 3,job1=3(多2),job2=3(多1),job3=3(少3),job4=3(少2)
第二次分配:3 / 2 = 1.5,job1=1(3 - 2),job2=2(3 - 1),job3=4.5(3 + 1.5),job4=4.5(3 + 1.5)
……
第n次分配:直到最终没有多余的资源再继续分配。
b) 加权:假设总资源总共16个,有4个job,每个job是有权重的,括号内为job的权重比,对资源的需求分别为:job1(5)=4,job2(8)=2,job3(1)=10,job4(2)=4。
第一次分配:16 / (5 + 8 + 1 + 2) = 1,job1=5(5 * 1,多1),job2=8(8 * 1,多6),job3=1(1 * 1,少9),job4=2(2 * 1,少2)
第二次分配:(1 + 6) / (1 + 2) = 2.33,job1=4(5 - 1),job2=2(8 - 6),job3=3.33(1 + 1 * 2.33 ,少6.67),job4=6.66(2 + 2 * 2.33,多2.66)
第三次分配:(2.66) / (1 ) = 2.66,job1=4(5 - 1),job2=2(8 - 6),job3=5.99(3.33 + 1 * 2.66 ,少4.01),job4=4(6.66 - 2.66,多2.66)
……
第n次分配:直到最终没有多余的资源再继续分配。
五、Yarn常用命令
- 列出正在运行的任务: yarn application -list

-
查看对应状态的任务:yarn application -list -appStates ALL/NEW/NEW_SAVING/SUBMITTED/ACCEPTED/RUNNING/FINISHED/FAILED,KI LLED

-
杀死对应的某个任务:yarn application -kill application_1645869756054_0001

-
查看尝试运行的任务(包含containerId):yarn applicationattempt -list application_1645869756054_0001

-
查看某个任务的日志:yarn logs -applicationId application_1645869756054_0001
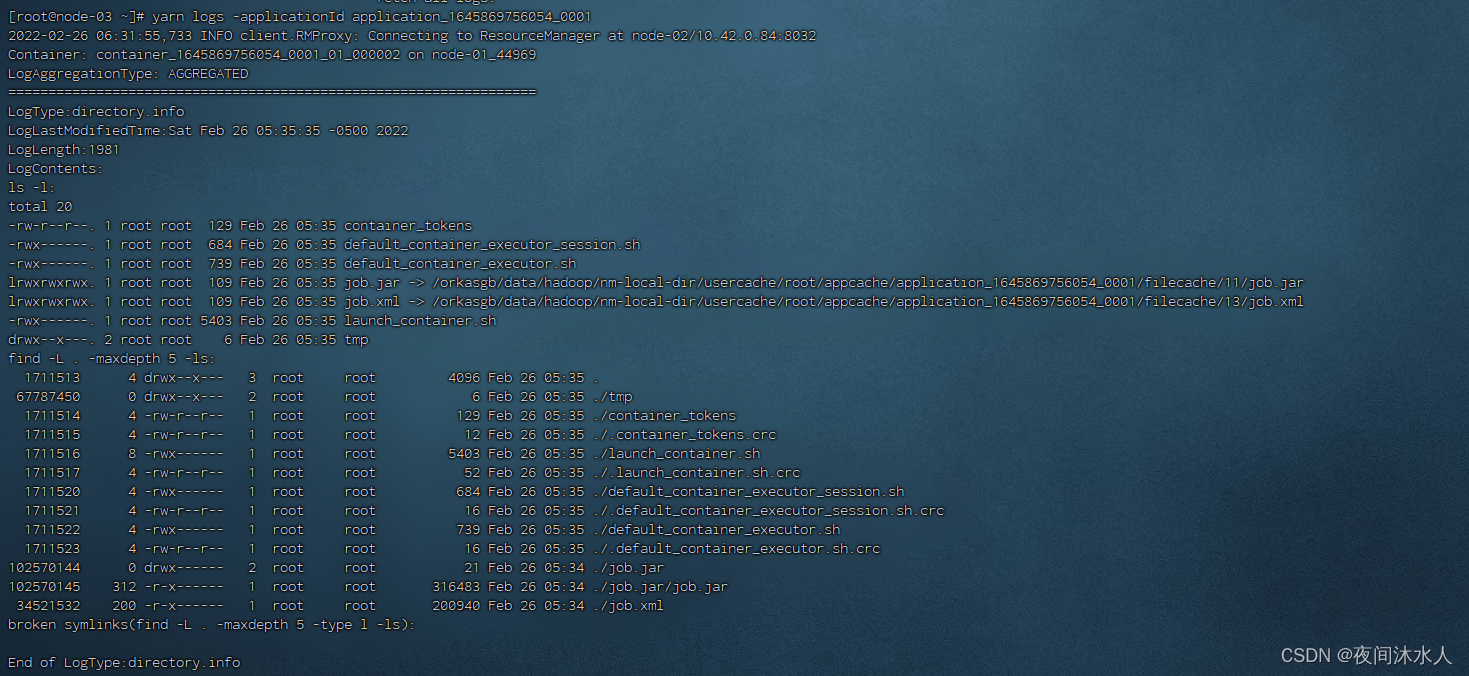
-
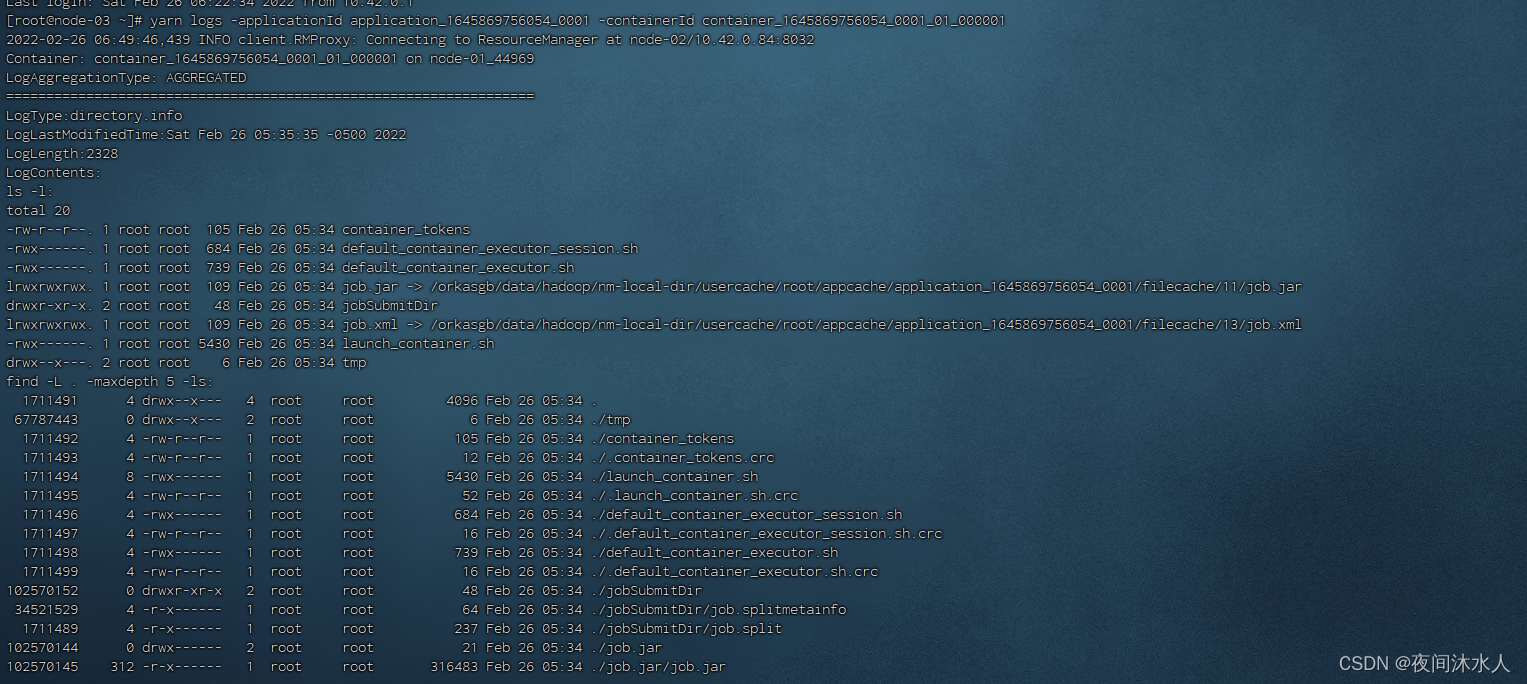
查看某个任务中的某一个container运行的日志:yarn logs -applicationId application_1645869756054_0001 -containerId container_1645869756054_0001_01_000001
-
查看某一个尝试运行的任务的状态:yarn applicationattempt -status appattempt_1645869756054_0001_000001

-
查看正在运行的容器(必须在任务运行的时候,因为任务运行完成后,容器就被释放了): yarn container -list appattempt_1645869756054_0001_000001

-
查看当前该容器的状态(必须在任务运行的时候,因为任务运行完成后,容器就被释放了):yarn container -status container_1645869756054_0001_01_000001

-
查看当前所有的node节点信息:yarn node -list -all

-
重新加载队列相关配置(如果在运行过程中,更改了队列的相关配置,可以使用该命令):yarn rmadmin -refreshQueues

-
查看队列的状态(yarn调度器都有一个默认的default队列):yarn queue -status default

六、Yarn核心参数优化配置
- ResourceManager处理客户端请求最大线程数,默认50。本集群因为只有3台机器,2个CPU,2线程。配置:3 * 2 = 6线程(总共6线程,去除其他的应用,最多配置2),
<property>
    <description>Number of threads to handle scheduler interface.</description>
    <name>yarn.resourcemanager.scheduler.client.thread-count</name>
    <value>2</value>
</property>
- yarn调度器,默认容量调度器即可,本集群对并发量没有要求:
<property>
    <description>The class to use as the resource scheduler.</description>
    <name>yarn.resourcemanager.scheduler.class</name>
    <value>org.apache.hadoop.yarn.server.resourcemanager.scheduler.capacity.CapacityScheduler</value>
</property>
- 是否允许yarn开启硬件自动检测,比如自动检测内存、cpu等,默认关闭,本集群建议关闭,应为节点上不只运行ResourceManager,还有其他应用:
<property>
    <description>Enable auto-detection of node capabilities such as
    memory and CPU.
    </description>
    <name>yarn.nodemanager.resource.detect-hardware-capabilities</name>
    <value>false</value>
</property>
- 是否采用虚拟CPU核数,该参数针对集群配置不一致的情况,比如,集群中有一台机器是i7的,其他都是i3的,那么建议开启,并且每一台nodemanager上都需要配置该参数,默认关闭,本集群不存在这种情况,建议关闭,只采用物理CPU核数。
<property>
    <description>Flag to determine if logical processors(such as
    hyperthreads) should be counted as cores. Only applicable on Linux
    when yarn.nodemanager.resource.cpu-vcores is set to -1 and
    yarn.nodemanager.resource.detect-hardware-capabilities is true.
    </description>
    <name>yarn.nodemanager.resource.count-logical-processors-as-cores</name>
    <value>false</value>
</property>
- 虚拟核数配置,如果开启了采用虚拟CPU核数,那么这个参数作相应的更改(CPUs * multiplier),默认1:1。
<property>
    <description>Multiplier to determine how to convert phyiscal cores to
    vcores. This value is used if yarn.nodemanager.resource.cpu-vcores
    is set to -1(which implies auto-calculate vcores) and
    yarn.nodemanager.resource.detect-hardware-capabilities is set to true. The
    number of vcores will be calculated as
    number of CPUs * multiplier.
    </description>
    <name>yarn.nodemanager.resource.pcores-vcores-multiplier</name>
    <value>1.0</value>
 </property>
- NodeManager内存配置,默认8G,本集群机器总共4G,建议修改为4G。
<property>
    <description>Amount of physical memory, in MB, that can be allocated
    for containers. If set to -1 and
    yarn.nodemanager.resource.detect-hardware-capabilities is true, it is
    automatically calculated(in case of Windows and Linux).
    In other cases, the default is 8192MB.
    </description>
    <name>yarn.nodemanager.resource.memory-mb</name>
    <value>4096</value>
</property>
- NodeManager的cpu核数,默认8,本集群总共2,建议修改为2。
<property>
    <description>Number of vcores that can be allocated
    for containers. This is used by the RM scheduler when allocating
    resources for containers. This is not used to limit the number of
    CPUs used by YARN containers. If it is set to -1 and
    yarn.nodemanager.resource.detect-hardware-capabilities is true, it is
    automatically determined from the hardware in case of Windows and Linux.
    In other cases, number of vcores is 8 by default.</description>
    <name>yarn.nodemanager.resource.cpu-vcores</name>
    <value>2</value>
</property>
- 容器的最小内存,默认1G。本集群每台NodeManager总共4G,默认即可。
<property>
    <description>The minimum allocation for every container request at the RM
    in MBs. Memory requests lower than this will be set to the value of this
    property. Additionally, a node manager that is configured to have less memory
    than this value will be shut down by the resource manager.</description>
    <name>yarn.scheduler.minimum-allocation-mb</name>
    <value>1024</value>
</property>
- 容器的最大内存,默认8G。本集群每台NodeManager总共4G,建议修改为2G。
<property>
    <description>The maximum allocation for every container request at the RM
    in MBs. Memory requests higher than this will throw an
    InvalidResourceRequestException.</description>
    <name>yarn.scheduler.maximum-allocation-mb</name>
    <value>2048</value>
</property>
- 容器的最小cpu核数,默认1,本集群每台NodeManager总共2,默认即可。
<property>
    <description>The minimum allocation for every container request at the RM
    in terms of virtual CPU cores. Requests lower than this will be set to the
    value of this property. Additionally, a node manager that is configured to
    have fewer virtual cores than this value will be shut down by the resource
    manager.</description>
    <name>yarn.scheduler.minimum-allocation-vcores</name>
    <value>1</value>
</property>
- 容器的最小cpu核数,默认4,本集群每台NodeManager总共2,建议修改为1。
<property>
    <description>The maximum allocation for every container request at the RM
    in terms of virtual CPU cores. Requests higher than this will throw an
    InvalidResourceRequestException.</description>
    <name>yarn.scheduler.maximum-allocation-vcores</name>
    <value>1</value>
</property>
- 虚拟内存检测,默认打开,建议关闭。
<property>
    <description>Whether virtual memory limits will be enforced for
    containers.</description>
    <name>yarn.nodemanager.vmem-check-enabled</name>
    <value>false</value>
</property>
- 虚拟内存占比,如果物理内存是4G,那么虚拟内存应该是8.4G,默认2.1倍。
<property>
    <description>Ratio between virtual memory to physical memory when
    setting memory limits for containers. Container allocations are
    expressed in terms of physical memory, and virtual memory usage
    is allowed to exceed this allocation by this ratio.
    </description>
    <name>yarn.nodemanager.vmem-pmem-ratio</name>
    <value>2.1</value>
</property>
七、Yarn多队列
- 调度器默认就是一个default队列。
- 生产中按照框架产生队列:比如:spark/hive/fink。任务在哪个框架中运行,就将任务放入哪个队列中。
- 按照业务模块创建队列:比如:登录模块、下单模块、购物车。
多队列的好处:(1)可以灵活的实现任务的降级处理,比如在某一个紧急时刻,资源不够用的时候,将一些不重要的模块的任务舍弃或者优先级降低,来优先保证紧急模块的任务的顺利执行。(2)避免某一个模块的某个任务执行缓慢,长时间占用整个集群的资源。
案例1:
配置default队列占用内存的40%,最大资源占用总资源60%,hive队列占用总内存的60%,最大资源占用总资源80%,并且配置队列的优先级。
修改:
修改/hadoop-3.2.2/etc/hadoop/capacity-scheduler.xml文件配置,修改后分发到所有节点,如果不想重新启动集群,执行yarn rmadmin -refreshQueues即可生效。
- 增加一个hive队列,默认有一个default队列:
<property>
    <name>yarn.scheduler.capacity.root.queues</name>
    <value>default,hive</value>
    <description>
      The queues at the this level (root is the root queue).
    </description>
 </property>
- 修改default队列的总容量,默认100,修改为40。并增加一个hive队列的容量配置,总容量60:
<property>
    <name>yarn.scheduler.capacity.root.default.capacity</name>
    <value>40</value>
    <description>Default queue target capacity.</description>
 </property>

<property>
    <name>yarn.scheduler.capacity.root.hive.capacity</name>
    <value>60</value>
    <description>Default queue target capacity.</description>
 </property>
- 设置用户向defualt队列中提交的任务最多能占用该队列资源比,默认1,并且增加一个hive的配置:
<property>
    <name>yarn.scheduler.capacity.root.default.user-limit-factor</name>
    <value>1</value>
    <description>
      Default queue user limit a percentage from 0.0 to 1.0.
    </description>
  </property>

  <property>
    <name>yarn.scheduler.capacity.root.hive.user-limit-factor</name>
    <value>1</value>
    <description>
      Default queue user limit a percentage from 0.0 to 1.0.
    </description>
  </property>
- 设置default最大容量为60,默认00,并增加hive最大容量配置,修改为80:
<property>
    <name>yarn.scheduler.capacity.root.default.maximum-capacity</name>
    <value>60</value>
    <description>
      The maximum capacity of the default queue.
    </description>
  </property>

  <property>
    <name>yarn.scheduler.capacity.root.hive.maximum-capacity</name>
    <value>80</value>
    <description>
      The maximum capacity of the default queue.
    </description>
  </property>
- 设置default队列的运行状态,默认RUNNING,并增加hive配置,修改为RUNNING:
<property>
    <name>yarn.scheduler.capacity.root.default.state</name>
    <value>RUNNING</value>
    <description>
      The state of the default queue. State can be one of RUNNING or STOPPED.
    </description>
  </property>

  <property>
    <name>yarn.scheduler.capacity.root.hive.state</name>
    <value>RUNNING</value>
    <description>
      The state of the default queue. State can be one of RUNNING or STOPPED.
    </description>
  </property>
- 设置哪些用户可以向default队列中提交任务,默认*,表示所有用户,并增加hive配置:
<property>
    <name>yarn.scheduler.capacity.root.default.acl_submit_applications</name>
    <value>*</value>
    <description>
      The ACL of who can submit jobs to the default queue.
    </description>
  </property>

  <property>
    <name>yarn.scheduler.capacity.root.hive.acl_submit_applications</name>
    <value>*</value>
    <description>
      The ACL of who can submit jobs to the default queue.
    </description>
  </property>
- 设置哪些用户可以对default队列进行操作,比如查看,杀死队列,默认*,即所有用户都有权限,并增加hive配置:
<property>
    <name>yarn.scheduler.capacity.root.default.acl_submit_applications</name>
    <value>*</value>
    <description>
      The ACL of who can submit jobs to the default queue.
    </description>
  </property>

  <property>
    <name>yarn.scheduler.capacity.root.hive.acl_submit_applications</name>
    <value>*</value>
    <description>
      The ACL of who can submit jobs to the default queue.
    </description>
  </property>
- 设置哪些用户可以对default队列设置优先级,默认*,即所有用户都有权限,并增加hive配置:
<property>
    <name>yarn.scheduler.capacity.root.default.acl_application_max_priority</name>
    <value>*</value>
    <description>
      The ACL of who can submit applications with configured priority.
      For e.g, [user={

    name} group={

    name} max_priority={

    priority} default_priority={

    priority}]
    </description>
  </property>

  <property>
    <name>yarn.scheduler.capacity.root.hive.acl_application_max_priority</name>
    <value>*</value>
    <description>
      The ACL of who can submit applications with configured priority.
      For e.g, [user={

    name} group={

    name} max_priority={

    priority} default_priority={

    priority}]
    </description>
  </property>
- 设置default队列的最大生命周期,默认-1,即任务可以一直执行下去,并增加hive配置:
<property>
     <name>yarn.scheduler.capacity.root.default.maximum-application-lifetime
     </name>
     <value>-1</value>
     <description>
        Maximum lifetime of an application which is submitted to a queue
        in seconds. Any value less than or equal to zero will be considered as
        disabled.
        This will be a hard time limit for all applications in this
        queue. If positive value is configured then any application submitted
        to this queue will be killed after exceeds the configured lifetime.
        User can also specify lifetime per application basis in
        application submission context. But user lifetime will be
        overridden if it exceeds queue maximum lifetime. It is point-in-time
        configuration.
        Note : Configuring too low value will result in killing application
        sooner. This feature is applicable only for leaf queue.
     </description>
   </property>

   <property>
     <name>yarn.scheduler.capacity.root.hive.maximum-application-lifetime
     </name>
     <value>-1</value>
     <description>
        Maximum lifetime of an application which is submitted to a queue
        in seconds. Any value less than or equal to zero will be considered as
        disabled.
        This will be a hard time limit for all applications in this
        queue. If positive value is configured then any application submitted
        to this queue will be killed after exceeds the configured lifetime.
        User can also specify lifetime per application basis in
        application submission context. But user lifetime will be
        overridden if it exceeds queue maximum lifetime. It is point-in-time
        configuration.
        Note : Configuring too low value will result in killing application
        sooner. This feature is applicable only for leaf queue.
     </description>
   </property>
- 设置default队列的默认生命周期,默认-1,即任务可以一直执行下去,并增加hive配置:
<property>
     <name>yarn.scheduler.capacity.root.default.default-application-lifetime
     </name>
     <value>-1</value>
     <description>
        Default lifetime of an application which is submitted to a queue
        in seconds. Any value less than or equal to zero will be considered as
        disabled.
        If the user has not submitted application with lifetime value then this
        value will be taken. It is point-in-time configuration.
        Note : Default lifetime can't exceed maximum lifetime. This feature is
        applicable only for leaf queue.
     </description>
   </property>

    <property>
     <name>yarn.scheduler.capacity.root.hive.default-application-lifetime
     </name>
     <value>-1</value>
     <description>
        Default lifetime of an application which is submitted to a queue
        in seconds. Any value less than or equal to zero will be considered as
        disabled.
        If the user has not submitted application with lifetime value then this
        value will be taken. It is point-in-time configuration.
        Note : Default lifetime can't exceed maximum lifetime. This feature is
        applicable only for leaf queue.
     </description>
   </property>
验证:

提交任务到hive队列:
(1)、执行jar的时候,直接指定队列:hadoop jar /orkasgb/software/hadoop-3.2.2/share/hadoop/mapreduce/hadoop-mapreduce-examples-3.2.2.jar wordcount -D mapreduce.job.queuename=hive /wordcount/input /wordcount/output5

(2)、在driver类中增加参数设置:
configuration.set("mapreduce.job.queuename", "hive");
设置任务优先级,默认为0,关闭了任务优先级,本集群中设置为5,表示由5个优先级:
<property>
    <description>
    Defines maximum application priority in a cluster.
    If an application is submitted with a priority higher than this value, it will be
    reset to this maximum value.
    </description>
    <name>yarn.cluster.max-application-priority</name>
    <value>5</value>
  </property>
(1)、设置任务优先级为5,并提交:hadoop jar /orkasgb/software/hadoop-3.2.2/share/hadoop/mapreduce/hadoop-mapreduce-examples-3.2.2.jar wordcount -D mapreduce.job.priority=5 /wordcount/input /wordcount/output8

(2)、设置已经提交之后的任务的优先级:yarn application -appId application_1646114756125_0004 -updatePriority 3

八、生产调优:
datanode、namenode内存调优
- 查看datanode、namenode的实际内存占用情况,jps查看正在运行的进程,使用jmap -heap [进程号]查看当前datanode、nodemanager内存占用情况:
jmap -heap 423059

- 按照机器修改datanode、namenode的内存大小。
export HDFS_NAMENODE_OPTS="-Dhadoop.security.logger=INFO,RFAS -Xmx1024m"
export HDFS_DATANODE_OPTS="-Dhadoop.security.logger=ERROR,RFAS -Xmx1024m"
datanode和namenode的并发心跳设置
- hadoop-env.sh中设置datanode和namenode的并发心跳机制,默认为10,建议按照公式计算20 * log^集群台数:

  <!-- 设置namende最大能接受的datanode并发访问量,默认为10 -->
  <property>
    <name>dfs.namenode.handler.count</name>
    <value>21</value>
  </property>
开启回收站功能
- core-site.xml开启回收站功能,当程序调用moveToTrash()删除的文件、命令行使用hadoop fs -rm删除的文件才会放入回收,回收站默认0,不开启:
<!-- 开启hadoop回收站功能,0表示不开启,其他数字表示多少分钟清空回收站 -->
<property>
  <name>fs.trash.interval</name>
  <value>5</value>
</property>
<!-- 多久检测一下回收站,默认为0,表示和fs.trash.interval的时间相同,每次检查点运行时,它都会从当前创建一个新的检查点,并删除在 fs.trash.interval 分钟前的文件 -->
<property>
  <name>fs.trash.checkpoint.interval</name>
  <value>3</value>
</property>

// 代码删除
Trash trash = new Trash(conf);
trash.moveToTrash(path);

// 命令行删除
 hadoop fs -rm /test.txt


配置datanode多目录
- hdfs-site.xml配置datanode多目录:
(1)、目前,本集群默认只有一个data目录,那么如果后续该目录爆满,将无法会影响集群运行。

(2)、hdfs-site.xml中增加如下配置,开启多目录配置,默认只有一个data目录,如果集群中的机器配置各不一样,那么得按情况配置。
<property>
  <name>dfs.datanode.data.dir</name>
  <value>file://${

    hadoop.tmp.dir}/dfs/data,file://${

    hadoop.tmp.dir}/dfs/data1,file://${

    hadoop.tmp.dir}/dfs/data2</value>
  <description>Determines where on the local filesystem an DFS data node
  should store its blocks.  If this is a comma-delimited
  list of directories, then data will be stored in all named
  directories, typically on different devices. The directories should be tagged
  with corresponding storage types ([SSD]/[DISK]/[ARCHIVE]/[RAM_DISK]) for HDFS
  storage policies. The default storage type will be DISK if the directory does
  not have a storage type tagged explicitly. Directories that do not exist will
  be created if local filesystem permission allows.
  </description>
</property>

配置namenode多目录
- hdfs-site.xml配置namenode多目录,默认只有一个name目录,作为了解即可,因为配置namenode多目录后,需要对现有集群重新格式化才能使用:
<property>
  <name>dfs.namenode.name.dir</name>
  <value>file://${

    hadoop.tmp.dir}/dfs/name,file://${

    hadoop.tmp.dir}/dfs/name1,file://${

    hadoop.tmp.dir}/dfs/name2</value>
  <description>Determines where on the local filesystem the DFS name node
      should store the name table(fsimage).  If this is a comma-delimited list
      of directories then the name table is replicated in all of the
      directories, for redundancy. </description>
</property>
磁盘之间数据均衡
- 磁盘之间数据均衡,磁盘数据均衡是指,在某一台机器上后续增加了一块硬盘,那么就要将原来硬盘上的数据转移一部分新的磁盘上。:
 // 生成磁盘数据均衡计划
hdfs diskbalancer -plan node-02
 // 执行磁盘数据均衡计划
hdfs diskbalancer -execute node-02.plan.json
 // 查看磁盘数据均衡执行情况
 hdfs diskbalancer -query node-02
 // 取消磁盘数据均衡计划
hdfs diskbalancer -cancel node-02.plan.json
服役/退役新的机器节点:
- 添加新的白名单/黑名单:能有效的防止黑客攻击,不在表名单中的主机ip是不能存储真实的数据,但是能访问:
- 在NameNode节点上的/hadoop-3.2.2/etc/hadoop下创建白名单文件whitelist文件和黑名单blacklist,并分发到每一台机器上,第一次添加黑白名单必须重启集群才能生效,后续可以动态的修改,然后执行hdfs dfsadmin -refreshNodes即可生效。
whitelist文件:增加如下内容。
node-01
node-02
node-03
blacklist:保持空即可,后续操作。
- hdfs-site.xml中配置白名单路径和黑名单路径,并分发到每一台机器上:
<property>
  <name>dfs.hosts</name>
  <value>/orkasgb/software/hadoop-3.2.2/etc/hadoop/whitelist</value>
  <description>Names a file that contains a list of hosts that are
  permitted to connect to the namenode. The full pathname of the file
  must be specified.  If the value is empty, all hosts are
  permitted.</description>
</property>

<property>
  <name>dfs.hosts.exclude</name>
  <value>/orkasgb/software/hadoop-3.2.2/etc/hadoop/blacklist</value>
  <description>Names a file that contains a list of hosts that are
  not permitted to connect to the namenode.  The full pathname of the
  file must be specified.  If the value is empty, no hosts are
  excluded.</description>
</property>
-
服役新的机器节点:
-
从现有的虚拟机上复制一台虚拟机,检查环境变量无误:修改主机名、修改hosts文件,删除各个组件的data、logs目录(重要),删除并重启。
-
修改集群中的每台机器(包括新加的)上的信息:
3.1、hosts文件中加上所有机器的ip地址映射。
3.2、修改zookeeper的myid文件。
3.3、修改hadoop的白名单文件whitelist,如果没有黑白名单文件就不用修改了。
3.4、修改hadoop的workers文件。
3.5、修改hbase的regionservers文件。
3.6、修改zookeeper的zoo.cfg文件。
3.7、在新机器节点上使用hdfs --daemon start datanode、yarn --daemon start nodemanager这两个命令单独启动datanode和nodemanager,如果想启动zookeeper和hbase都可以。
3.8、在NameNode节点上执行hdfs dfsadmin -refreshNodes命令刷新所有node。
3.9、在页面刷新,即可看到新的机器节点。
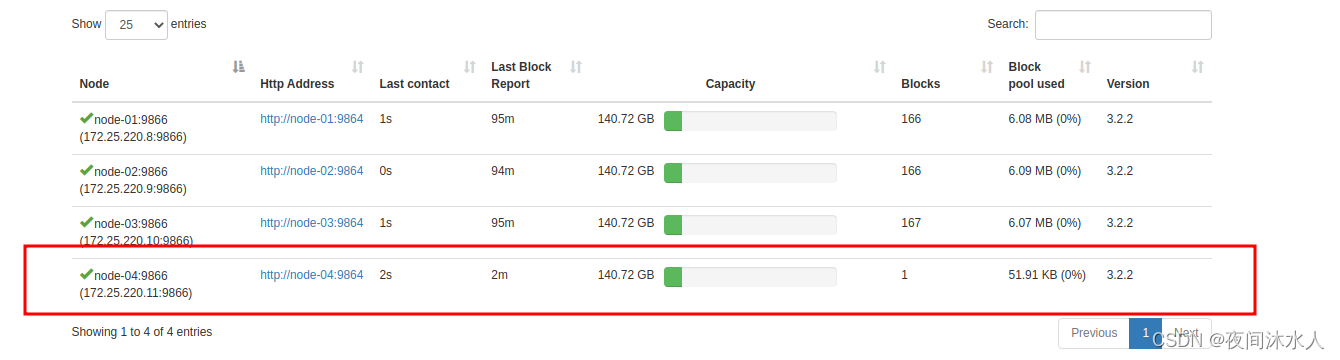
-
-
服役新的机器节点:
-
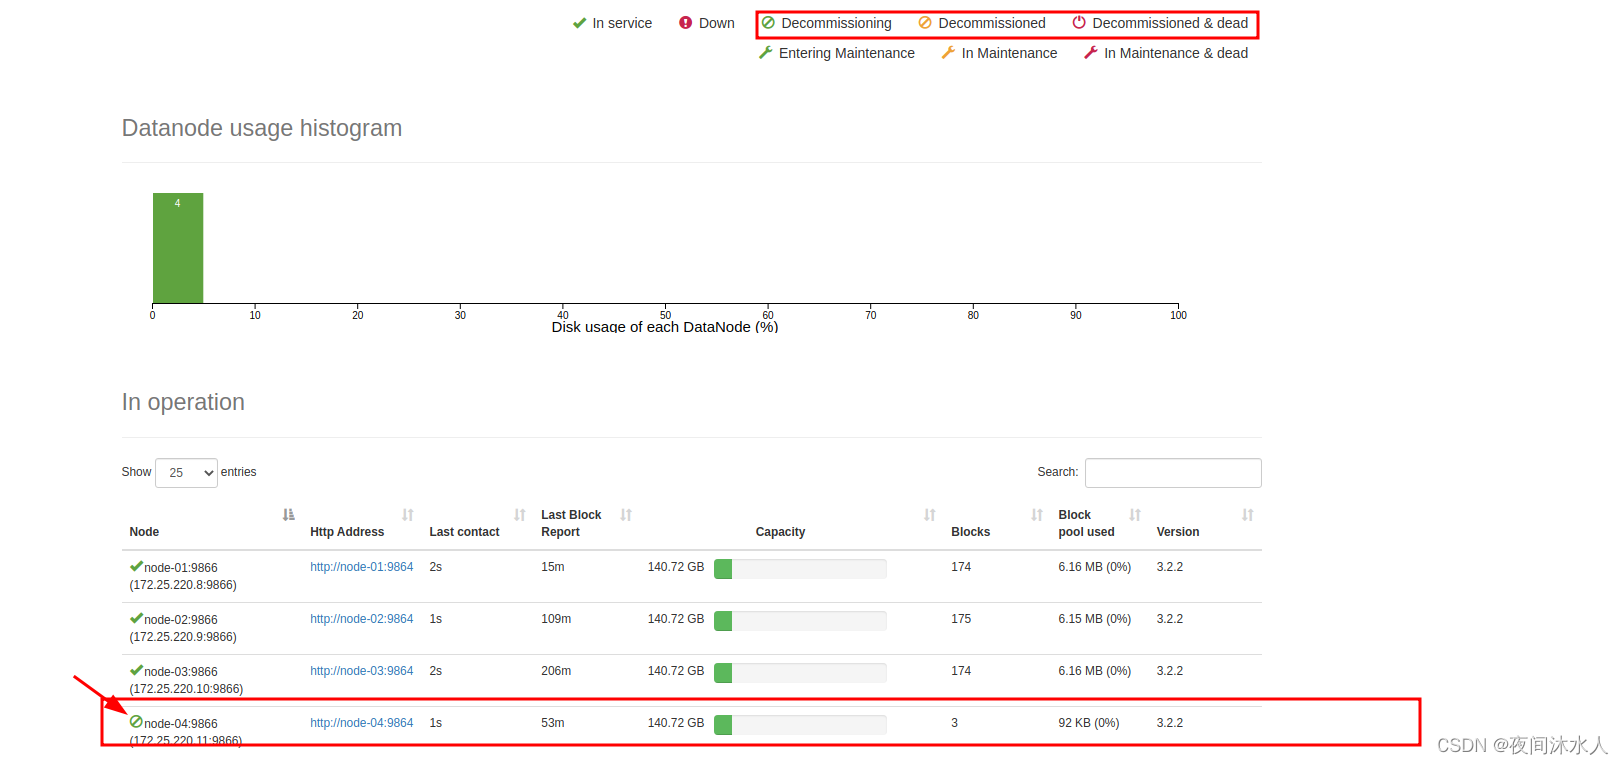
从现有的集群上退役一台服务器,修改集群中的每台机器上的信息:。
4.1、在黑名单中增加要退役的机器节点信息,为了保持集群稳定,上述3步骤中的所有修改的文件都还原下。
4.2、执行hdfs dfsadmin -refreshNodes命令刷新所有node。
4.3、观察页面上节点信息状态,(等到10分钟+30秒的时候,会认为该节点已死掉,hdfs中nn和dn的通信机制):
4.4、手动关闭退役服务器节点上的datanode、nodemanager进程。即可完成服务器退役。
-
集群安全模式
集群安全模式:
- 查看当前集群是否处于安全模式:hdfs dfsadmin -safemode get
- 退出安全模式:hdfs dfsadmin -safemode leave
- 进入安全模式:hdfs dfsadmin -safemode enter
- 等待安全模式退出:hdfs dfsadmin -safemode wait,类似与监听,当安全模式退出后,就可以继续执行后续的操作。
注意:当集群因丢失块信息后,进入安全模式无法退出时,此时可以直接使用退出安全模式的的命令,退出安全模式,并且按照提示删除对应的块文件信息(如果信息不重要的话)。
小文件优化
每一个小文件在HDFS上都要创建对应的元数据,大小为150byte,小文件越多,元数据占用NameNode的内存空间就越大,并且也会使得寻址索引速度变慢。
- 小文件归档
HDFS文件或者har文件是一个高效的归档工具,它将多个小文件存放在一起,类似于打包,让NameNode认为这些下文件是一个整体,但是对于文件的使用者来说又是透明的。这样使得原先每一个小文件作为一个整体要占用150byte,打包之后,使得多个小文件作为一个整体占用150byte。
- 将所有的har文件夹下的所有的小文件归档成一个har.har文件作为一个整体:hadoop archive -archiveName har.har -p /har /
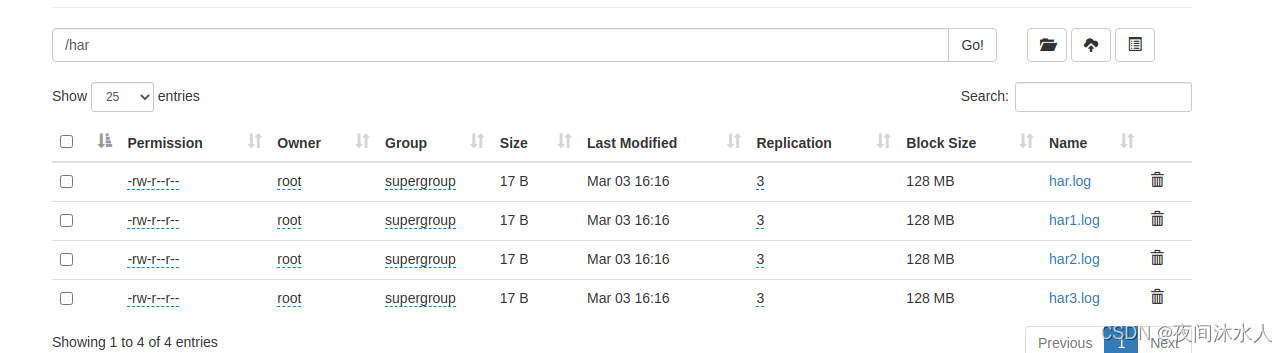

- 直接查看har.har文件:hadoop fs -ls /har.har

- 查看har.har中打包了哪些文件:hadoop fs -ls har:///har.har

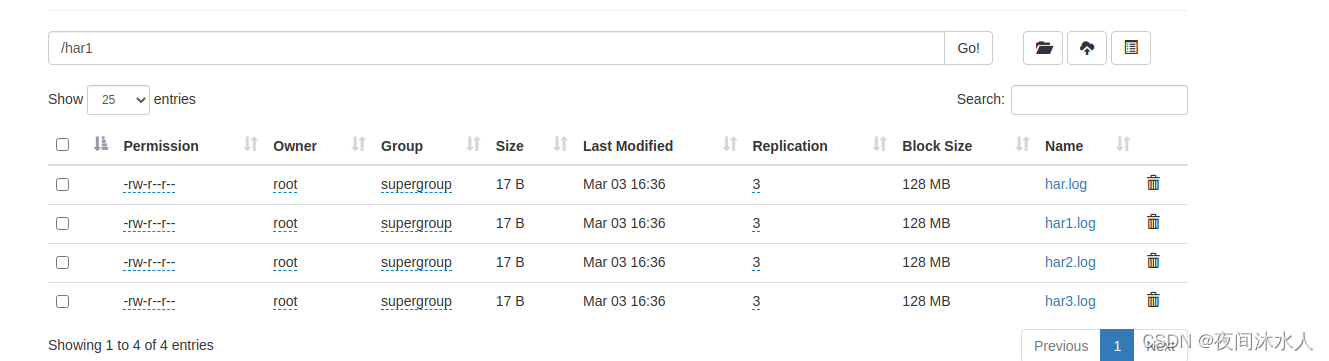
- 解约归档:hadoop fs -cp har:///har.har/* /har1
- 小文件开启uber模式:
Uber运行模式对小作业进行优化,不会给每个任务分别申请分配Container资源,这些小任务将统一在一个Container中按照先执行map任务后执行reduce任务的顺序串行执行。
1、mapred-site.xml开启uber模式,默认关闭,本集群修改为true:
<!-- 开启uber模式,默认关闭 -->
<property>
  <name>mapreduce.job.ubertask.enable</name>
  <value>true</value>
  <description>Whether to enable the small-jobs "ubertask" optimization,
  which runs "sufficiently small" jobs sequentially within a single JVM.
  "Small" is defined by the following maxmaps, maxreduces, and maxbytes
  settings. Note that configurations for application masters also affect
  the "Small" definition - yarn.app.mapreduce.am.resource.mb must be
  larger than both mapreduce.map.memory.mb and mapreduce.reduce.memory.mb,
  and yarn.app.mapreduce.am.resource.cpu-vcores must be larger than
  both mapreduce.map.cpu.vcores and mapreduce.reduce.cpu.vcores to enable
  ubertask. Users may override this value.
  </description>
</property>
<!-- uber模式中最大开启的maptask的数量,默认为9,只能大于等于9。 -->
<property>
  <name>mapreduce.job.ubertask.maxmaps</name>
  <value>9</value>
  <description>Threshold for number of maps, beyond which job is considered
  too big for the ubertasking optimization.  Users may override this value,
  but only downward.
  </description>
</property>
<!-- uber模式中最大开启的maptask的数量,默认为1,只能小于等于1。 -->
<property>
  <name>mapreduce.job.ubertask.maxreduces</name>
  <value>1</value>
  <description>Threshold for number of reduces, beyond which job is considered
  too big for the ubertasking optimization.  CURRENTLY THE CODE CANNOT SUPPORT
  MORE THAN ONE REDUCE and will ignore larger values.  (Zero is a valid max,
  however.)  Users may override this value, but only downward.
  </description>
</property>
<!-- uber模式中最大能处理的数据量,默认是块大小,只能小于等于块大小 -->
<property>
  <name>mapreduce.job.ubertask.maxbytes</name>
  <value></value>
  <description>Threshold for number of input bytes, beyond which job is
  considered too big for the ubertasking optimization.  If no value is
  specified, dfs.block.size is used as a default.  Be sure to specify a
  default value in mapred-site.xml if the underlying filesystem is not HDFS.
  Users may override this value, but only downward.
  </description>
</property>

数据倾斜问题:
数据倾斜问题多半都会出现在reduce端,这是因为在mpa端处理完数据后,数据大量流入同一个分区,导致reduce端的某个reduceTask因需要处理大量的数据而长时间运行,而剩余的reduce处理闲置转态。因此应该从以下几个方面避免这个问题出现:
- 减少小文件处理。
- 自定义分区程序并优化。
- 尽量在map端就进行合并处理。比如在合适的场景下增加Combainer。
集群迁移:
集群数据迁移类似于scp在两个服务器之间拷贝数据。
将namenode地址1所在集群上的数据拷贝到namenode地址2所在集群上:hadoop distcp hdfs://namenode地址1:8020/hbase hdfs://namenode地址2:8020/hbase
MapReduce调优:
- Mapper端:
- 自定义分区,减少数据倾斜。
- 减少溢写次数:1)、mapreduce.task.io.sort.mb:环形缓冲区的大小,默认100M。2)、mapreduce.map.sort.spill.percent:环形缓冲区的溢写阈值,默认0.8(80%)。
- 增加marge排序文件时一次合并的流数:mapreduce.task.io.sort.factor:默认10。
- 在不影响业务的前提下,提前进行Combiner:job.setCombinerClass()。
- 为了减少磁盘IO,可以使用Snappy或者LZO数据:conf.setBoolean(“mapreduce.map.output.compress”, true)、conf.setClass(“mapreduce.map.output.compress.codec”, SnappyCodec.class, CommpressionCodec.class)。
- 增加MapTask的内存:mapreduce.map.memory.mb,默认-1,代表1G。
- 增加MapTask的堆内存:mapreduce.map.java.opts,不建议修改。
- 增加MapTask的cpu核数:mapreduce.map.cpu.vcores,默认1个cpu。
- 减少mapTask异常重试次数:mapreduce.map.maxattempts,默认4次。
- Reduce端:
- 增加reduce端从map端拉取数据的并行度:mapreduce.reduce.shuffle.parallelcopies,默认5。
- 增加reduce端内存中的数据达到写出到磁盘的百分比:mapreduce.reduce.shuffle.merge.percent,默认0.66。
- 增加buffer能够占用reduce的可用内存的比例:mapreduce.reduce.shuffle.input.buffer.percent,默认0.7。
- 增加ReduceTask的内存:mapreduce.reduce.memory.mb,默认-1,代表1G。
- 增加ReduceTask的堆内存:mapreduce.reduce.java.opts,不建议修改。
- 增加ReduceTask的cpu核数:mapreduce.reduce.cpu.vcores,默认1个cpu。
- 减少ReduceTask异常重试次数:mapreduce.reduce.maxattempts,默认4次。
- 增加MapTask完成后Reduce才去申请资源的比例:mapreduce.job.reduce.slowstart.completedmaps,默认0.05。
- 调整task超时时间,如果觉得程序运行的时间可能会长点,那么就调大该值,否则,task运行一旦超过这个阈值,就会被强制退出:mapreduce.task.timeout,默认600000(10分钟)。
- 如果可以不设置reduce那么就尽量不设置reduce。