apollo6.0(开发版)安装教程 可能全网最全!
首先感谢前辈,因为我也踩过很多坑,都是他们的奉献,帮助了大家提高 ~磕~
参考文章包括:
https://zhuanlan.zhihu.com/p/425483403
https://github.com/ApolloAuto/apollo/blob/master/docs/specs/prerequisite_software_installation_guide.md
0关于apollo安装的版本提示!
首先需要说明的是安装apollo有两种方式,分别是开发版和发行版(release build)。
本文所讲述的是按照正常步骤安装安装开发版,但是其中的编译程序步骤需要电脑有很高性能,除此之外呢百度为了让大家省略掉编译这一步,发布了一个发行版(release build),通过运行一个简单的安装脚本省掉了耗时很长的编译步骤,这样的简化版是大家安装apollo更加方便了。
那么如何区分这两个版本呢?
根据apollo文件下载源区分:一般大家在github下载的都是开发版,现在我只看到百度官网提供了发行版(release build)的apollo文件压缩包,也就是这里
apollo开放平台首页https://apollo.auto/developer_cn.html
 关于发行版安装方法大家可以看百度官方教程 官方教程地址
然后我也非常推荐这篇apollo6.0安装到启动(内含超多踩坑细节,2022-3-8日亲测可用)
感谢博主奉献~磕~
1电脑推荐配置!!非常重要!!
这里要提到我的心酸血泪史,如果要安装开发版的话,电脑性能不行真的有各种奇怪问题!所以大家在安装过程中出现问题后,不要老是怀疑自己操作,或者版本问题,换台电脑真的可能迎刃而解!
| 推荐配置 | |
|---|---|
| 内存 | 16G以上,8G基本不太可能编译成功 (最重要) |
| 硬盘 | 安装双系统的话留出100G以上 |
| cpu | 推荐8核以上,越快越好,主要影响后面的编译时间 |
| 英伟达GPU | 最好有,没有也没关系 |
| 网速 | 拉取镜像和下载程序都需要网速,网速太慢就可能会连接失败 |
我的网速,测速网测的下载网速有100m,
电脑是戴尔inspiron3881,配置和系统版本如下:

2安装ubuntu系统
安装ubuntu系统,我没见有人在虚拟机上安装成功的,所以还是推荐大家直接在本机上安装或者安装双系统,安装18.04或者20.04应该都可以。你的电脑应该至少能装上这两个系统其中之一。
安装方法大家参考:
windows10安装ubuntu双系统教程(绝对史上最详细)
地址:https://www.cnblogs.com/masbay/p/10745170.html
需要注意的是系统分区:
由于Linux和Windows的分区方式是不一样的,所以文章里也有提到要按照Linux的方式分出"/","/boot",
“swap”,"/home"这四个分区,
最后安装成功后的占用空间供大家参考

所以100G的分区建议如下,当然如果空间大多分一点当然是更好的
| 分区 | 类别 | 大小 |
|---|---|---|
| / | 主分区 | 40G |
| /boot | 主分区 | 1G |
| swap | 逻辑分区 | 32G |
| /home | 逻辑分区 | 25G |
3安装NVIDIA GPU 驱动
查看自己的设备信息
ubuntu-drivers devices
显示如下
xu@xu-Inspiron-3881:~$ ubuntu-drivers devices
WARNING:root:_pkg_get_support nvidia-driver-510-server: package has invalid Support PBheader, cannot determine support level
WARNING:root:_pkg_get_support nvidia-driver-510: package has invalid Support PBheader, cannot determine support level
== /sys/devices/pci0000:00/0000:00:01.0/0000:01:00.0 ==
modalias : pci:v000010DEd00002187sv00001043sd00008767bc03sc00i00
vendor   : NVIDIA Corporation
model    : TU116 [GeForce GTX 1650 SUPER]
driver   : nvidia-driver-510-server - distro non-free
driver   : nvidia-driver-510 - distro non-free
driver   : nvidia-driver-450-server - distro non-free
driver   : nvidia-driver-470 - distro non-free recommended
driver   : nvidia-driver-470-server - distro non-free
driver   : xserver-xorg-video-nouveau - distro free builtin
根据推荐的版本号,也就是recommended那一行,推荐版本nvidia-driver-470,安装命令如下:
sudo apt-add-repository multiverse
sudo apt-get update
sudo apt-get install nvidia-driver-470
安装完成后,可以通过命令nvidia-smi测试,出现下面提示说明安装成功(当然我这里其实安装了450):
xu@xu-Inspiron-3881:~$ nvidia-smi
Sun Mar 13 18:51:50 2022
+-----------------------------------------------------------------------------+
| NVIDIA-SMI 450.172.01   Driver Version: 450.172.01   CUDA Version: 11.0     |
|-------------------------------+----------------------+----------------------+
| GPU  Name        Persistence-M| Bus-Id        Disp.A | Volatile Uncorr. ECC |
| Fan  Temp  Perf  Pwr:Usage/Cap|         Memory-Usage | GPU-Util  Compute M. |
|                               |                      |               MIG M. |
|===============================+======================+======================|
|   0  GeForce GTX 165...  Off  | 00000000:01:00.0  On |                  N/A |
| 31%   34C    P8     8W / 100W |    296MiB /  3903MiB |      8%      Default |
|                               |                      |                  N/A |
+-------------------------------+----------------------+----------------------+

+-----------------------------------------------------------------------------+
| Processes:                                                                  |
|  GPU   GI   CI        PID   Type   Process name                  GPU Memory |
|        ID   ID                                                   Usage      |
|=============================================================================|
|    0   N/A  N/A      1596      G   /usr/lib/xorg/Xorg                 35MiB |
|    0   N/A  N/A      2793      G   /usr/lib/xorg/Xorg                 86MiB |
|    0   N/A  N/A      2942      G   /usr/bin/gnome-shell              156MiB |
|    0   N/A  N/A     31335      G   /usr/lib/firefox/firefox            2MiB |
|    0   N/A  N/A     31683      G   gnome-control-center                2MiB |
|    0   N/A  N/A     32017      G   /usr/lib/firefox/firefox            2MiB |
+-----------------------------------------------------------------------------+
如果不成功,就把ubuntu系统重启一下使安装生效,我就是重启后才成功的。
再有问题的话也可以参考百度的官方文章:
开发者说 | 为Apollo项目安装NVIDIA显卡驱动的有效方法
地址: https://mp.weixin.qq.com/s/-1lkRpHKfWB-0QpHUg0e6Q
4换国内源
有很多博主推荐安装完系统后,马上换成国内源更新软件,但是我这里比较保守是先安装驱动在更新源了。
这里不难,但是大家要注意对应你的ubuntu换源
大家参考文章:
Ubuntu 20.04 && Ubuntu 18.04 修改 apt 源
地址:https://blog.csdn.net/WU2629409421perfect/article/details/110881141
或者这篇
Ubuntu 更换国内源
https://blog.csdn.net/qq_35451572/article/details/79516563
5安装docker
sudo apt install docker.io
...
Created symlink /etc/systemd/system/multi-user.target.wants/containerd.service → /lib/systemd/system/containerd.service.
Setting up bridge-utils (1.5-15ubuntu1) ...
Setting up ubuntu-fan (0.12.10) ...
Created symlink /etc/systemd/system/multi-user.target.wants/ubuntu-fan.service → /lib/systemd/system/ubuntu-fan.service.
Setting up pigz (2.4-1) ...
Setting up docker.io (20.10.7-0ubuntu1~18.04.1) ...
Adding group `docker' (GID 127) ...
Done.
Created symlink /etc/systemd/system/multi-user.target.wants/docker.service → /lib/systemd/system/docker.service.
Created symlink /etc/systemd/system/sockets.target.wants/docker.socket → /lib/systemd/system/docker.socket.
Processing triggers for systemd (237-3ubuntu10.51) ...
Processing triggers for man-db (2.8.3-2ubuntu0.1) ...
Processing triggers for ureadahead (0.100.0-21) ...
ureadahead will be reprofiled on next reboot
这时候应该已经安装成功,可以查看版本验证
docker --version
显示对应版本
Docker version 20.10.11, build dea9396e18
下面打开docker,然后查看状态信息
systemctl start docker && systemctl enable docker
systemctl status docker
出现绿色字体的active 说明docker已经正常开启
● docker.service - Docker Application Container Engine
     Loaded: loaded (/lib/systemd/system/docker.service; enabled; vendor preset: enabled)
     Active: active (running) since Sat 2022-03-12 21:53:16 CST; 55s ago
TriggeredBy: ● docker.socket
       Docs: https://docs.docker.com
   Main PID: 31000 (dockerd)
      Tasks: 22
     Memory: 40.4M
     CGroup: /system.slice/docker.service
             └─31000 /usr/bin/dockerd -H fd:// --containerd=/run/containerd/containerd.sock

3月 12 21:53:14 xu-Inspiron-3881 dockerd[31000]: time="2022-03-12T21:53:14.920899278+08:00" level=warning msg="Your kernel does not support CPU realti>
3月 12 21:53:14 xu-Inspiron-3881 dockerd[31000]: time="2022-03-12T21:53:14.920966589+08:00" level=warning msg="Your kernel does not support cgroup blk>
3月 12 21:53:14 xu-Inspiron-3881 dockerd[31000]: time="2022-03-12T21:53:14.920988547+08:00" level=warning msg="Your kernel does not support cgroup blk>
3月 12 21:53:14 xu-Inspiron-3881 dockerd[31000]: time="2022-03-12T21:53:14.921379094+08:00" level=info msg="Loading containers: start."
3月 12 21:53:15 xu-Inspiron-3881 dockerd[31000]: time="2022-03-12T21:53:15.415038447+08:00" level=info msg="Default bridge (docker0) is assigned with >
3月 12 21:53:15 xu-Inspiron-3881 dockerd[31000]: time="2022-03-12T21:53:15.553883257+08:00" level=info msg="Loading containers: done."
3月 12 21:53:15 xu-Inspiron-3881 dockerd[31000]: time="2022-03-12T21:53:15.741642643+08:00" level=info msg="Docker daemon" commit="20.10.7-0ubuntu5~20>
3月 12 21:53:15 xu-Inspiron-3881 dockerd[31000]: time="2022-03-12T21:53:15.741892264+08:00" level=info msg="Daemon has completed initialization"
3月 12 21:53:16 xu-Inspiron-3881 systemd[1]: Started Docker Application Container Engine.
3月 12 21:53:16 xu-Inspiron-3881 dockerd[31000]: time="2022-03-12T21:53:16.019919839+08:00" level=info msg="API listen on /run/docker.sock"
下面运行一下docker看看能否正常运行
xu@xu-Inspiron-3881:~$ docker run hello-world
docker: Got permission denied while trying to connect to the Docker daemon socket at unix:///var/run/docker.sock: Post "http://%2Fvar%2Frun%2Fdocker.sock/v1.24/containers/create": dial unix /var/run/docker.sock: connect: permission denied.
See 'docker run --help'.
发现不能正常运行,这时需要添加用户组
xu@xu-Inspiron-3881:~$ sudo groupadd docker

xu@xu-Inspiron-3881:~$ sudo usermod -aG docker $USER

xu@xu-Inspiron-3881:~$ newgrp docker
再一次运行hello-world
xu@xu-Inspiron-3881:~$ docker run hello-world
Unable to find image 'hello-world:latest' locally
latest: Pulling from library/hello-world
2db29710123e: Pull complete
Digest: sha256:4c5f3db4f8a54eb1e017c385f683a2de6e06f75be442dc32698c9bbe6c861edd
Status: Downloaded newer image for hello-world:latest

Hello from Docker!
This message shows that your installation appears to be working correctly.

To generate this message, Docker took the following steps:
 1. The Docker client contacted the Docker daemon.
 2. The Docker daemon pulled the "hello-world" image from the Docker Hub.
    (amd64)
 3. The Docker daemon created a new container from that image which runs the
    executable that produces the output you are currently reading.
 4. The Docker daemon streamed that output to the Docker client, which sent it
    to your terminal.

To try something more ambitious, you can run an Ubuntu container with:
 $ docker run -it ubuntu bash

Share images, automate workflows, and more with a free Docker ID:
 https://hub.docker.com/

For more examples and ideas, visit:
 https://docs.docker.com/get-started/
发现运行成功了,出现了Hello from Docker!这一行,说明docker没有问题了
这里我转述其他博主,需要注意:Docker的更新也比较频繁,经常会出现新版本安装不成功又禁用旧版本服务的情况,此时别慌,仅需以下几个命令即可解决:
xu@xu-Inspiron-3881:~$ service docker start
xu@xu-Inspiron-3881:~$ systemctl unmask docker.service
xu@xu-Inspiron-3881:~$ systemctl unmask docker.socket
xu@xu-Inspiron-3881:~$ systemctl start docker.service
xu@xu-Inspiron-3881:~$ service docker start
xu@xu-Inspiron-3881:~$ docker run hello-world
再次检查镜像也没问题,就是刚才hello-world的镜像
xu@xu-Inspiron-3881:~$ docker images
REPOSITORY    TAG       IMAGE ID       CREATED        SIZE
hello-world   latest    feb5d9fea6a5   5 months ago   13.3kB
当然如果是完全不懂docker的同学可以去b站搜下docker,然后看下狂神视频,你会有新收获
6安装docker上英伟达驱动,也就是Installing NVIDIA Container Toolkit
还是挺简单的
xu@xu-Inspiron-3881:~$ distribution=$(. /etc/os-release;echo $ID$VERSION_ID)

xu@xu-Inspiron-3881:~$ curl -s -L https://nvidia.github.io/nvidia-docker/gpgkey | sudo apt-key add -

xu@xu-Inspiron-3881:~$ curl -s -L https://nvidia.github.io/nvidia-docker/$distribution/nvidia-docker.list

xu@xu-Inspiron-3881:~$ sudo apt-get -y update

xu@xu-Inspiron-3881:~$ sudo apt-get install -y nvidia-docker2
如果显示这个,那就先安装一下curl哈,也很简单,按提示的这两条语句就可以
Command 'curl' not found, but can be installed with:

sudo snap install curl  # version 7.81.0, or
sudo apt  install curl  # version 7.68.0-1ubuntu2.8

See 'snap info curl' for additional versions.

gpg: no valid OpenPGP data found.
完成之后重新启动一下docker
sudo systemctl restart docker
7下载Apollo 6.0
终于要下载Apollo了,小激动~
大家可以参考官方文章
技术文档丨Apollo 6.0软件安装指南
文章地址:https://mp.weixin.qq.com/s/osxPIaOKnTYa9quvayr5vQ
不看的话那你直接:
git clone https://github.com/ApolloAuto/apollo.git
然后检查,Checkout the r6.0.0 branch:
cd apollo
git checkout r6.0.0
8启动Apollo开发Docker容器
bash docker/scripts/dev_start.sh
这时对网速开始有要求了哈~


显示以下你就启动成功了
Adding user `xu' ...
Adding new user `xu' (1000) with group `docker' ...
Creating home directory `/home/xu' ...
Copying files from `/etc/skel' ...
[ OK ] Congratulations! You have successfully finished setting up Apollo Dev Environment.
[ OK ] To login into the newly created apollo_dev_xu container, please run the following command:
[ OK ]   bash docker/scripts/dev_into.sh
[ OK ] Enjoy!
然后进入docker
bash docker/scripts/dev_into.sh
显示以下,用户名变成docker,你进入也成功了!
To run a command as administrator (user "root"), use "sudo <command>".
See "man sudo_root" for details.

[xu@in-dev-docker:/apollo]$
9编译apollo程序
参考文章:技术文档丨如何启动并运行Apollo
https://mp.weixin.qq.com/s/9K6TD-FqhUDpLLvLSz4ZYA
终于到了最关键的一步,还是激动~
当然这里,首先要检查确保您在开发Docker容器中。如果您想运行整个系统,请确保Nvidia GPU可用,并且您已经安装了适合的Nvidia驱动程序。当然如果Nvidia GPU不可用,用CPU将就一下也是可以的
1# Make sure you start up clean
2./apollo.sh clean
有GPU的话
./apollo.sh build_opt_gpu
没有GPU
./apollo.sh build_opt
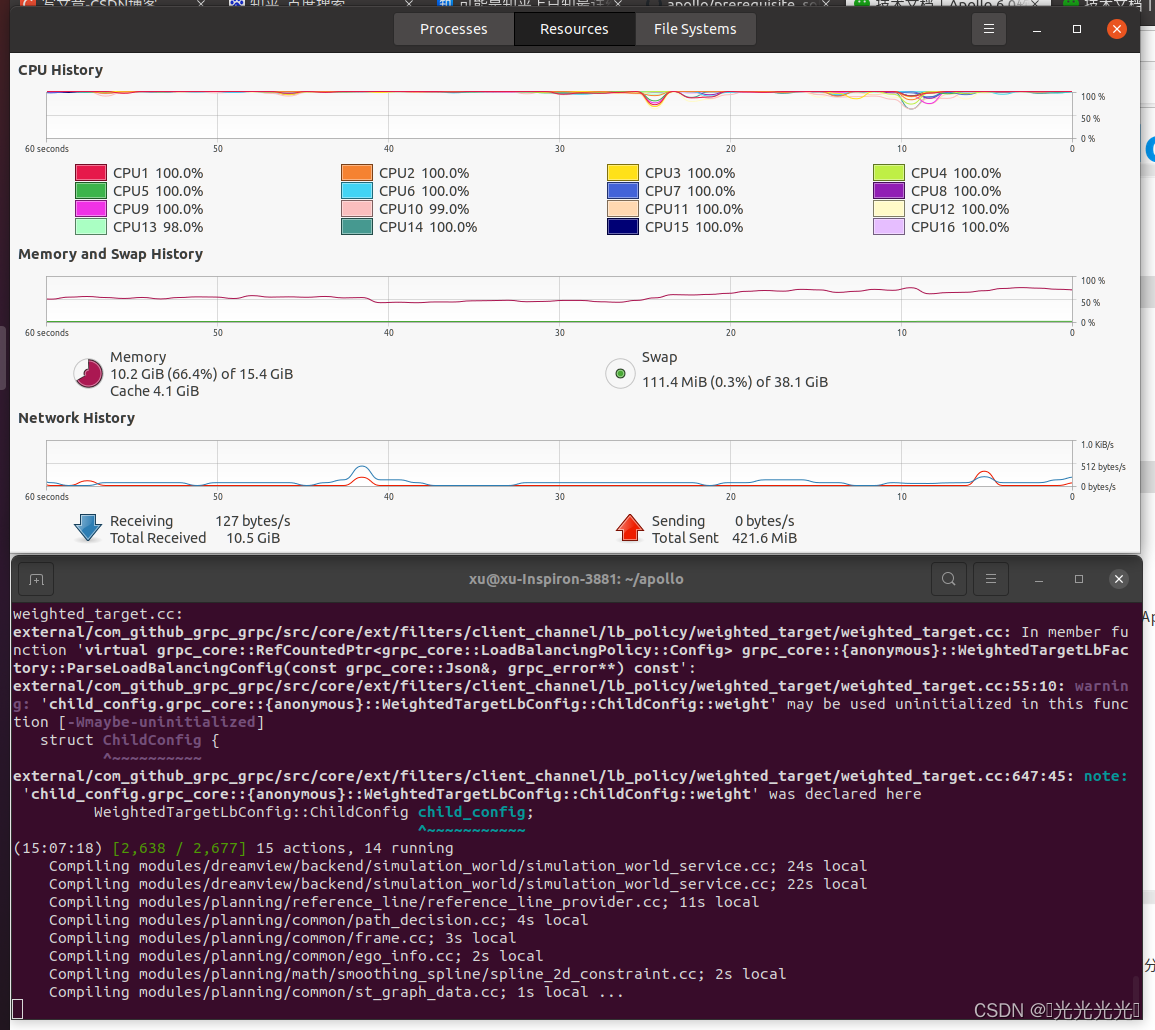
这里就是考验电脑性能的时候,放几张我在编译时候的图,大家来感受
刚开始编译的时候

 编译过程中
编译过程中
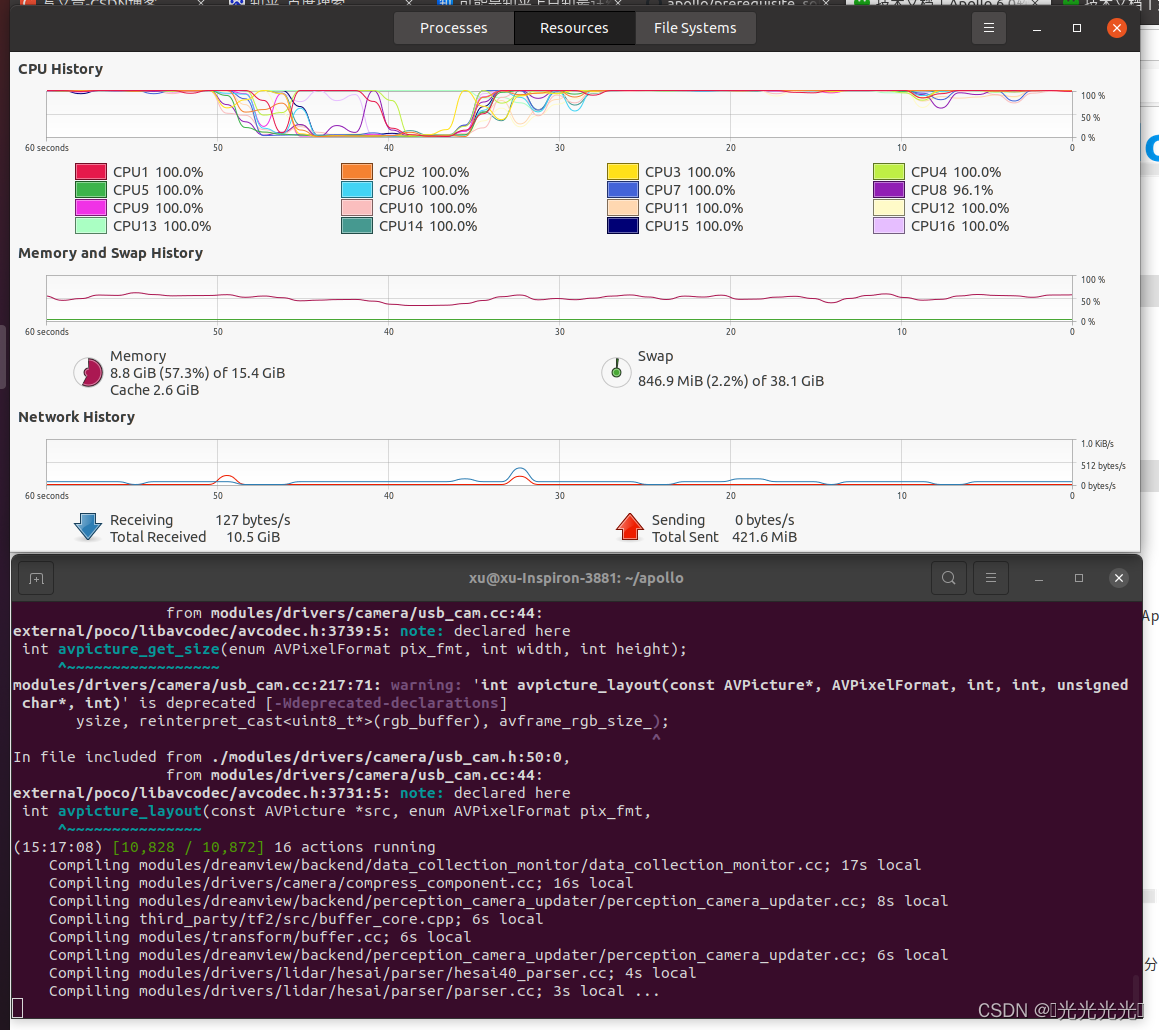
编译完成:

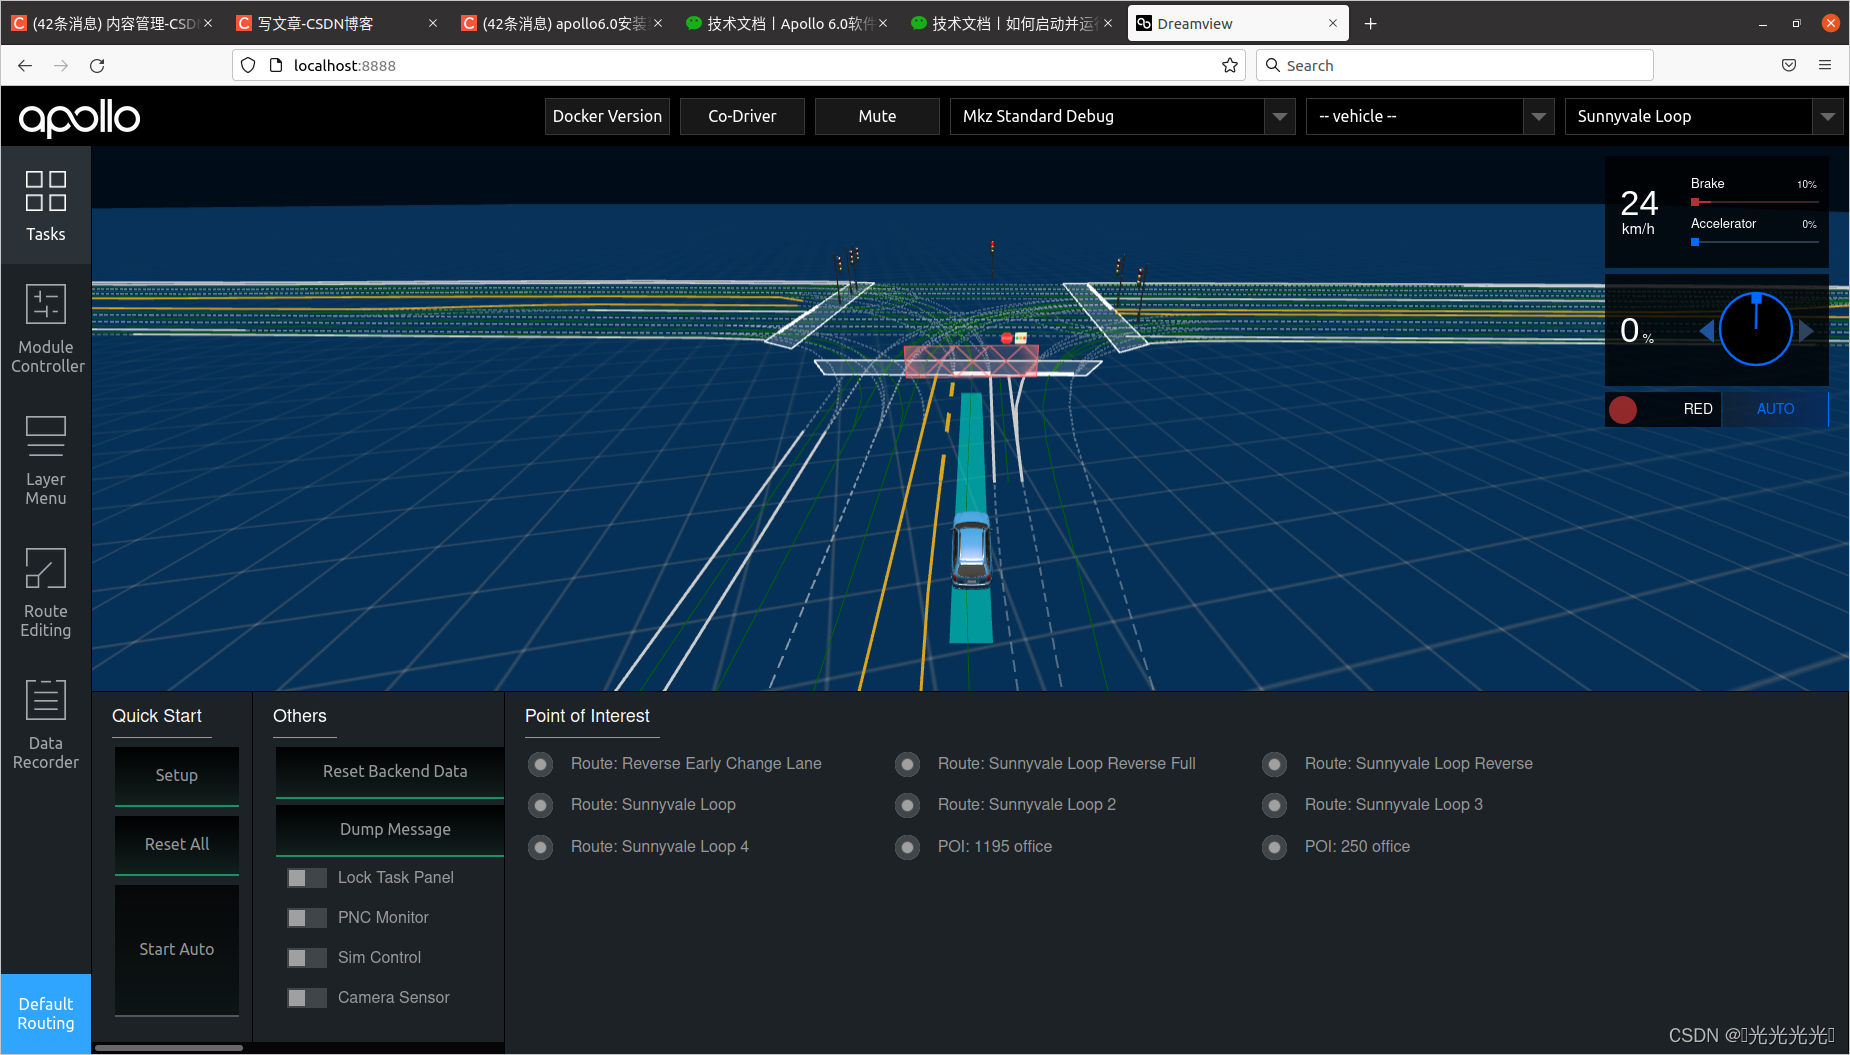
10启动Dreamview
运行scripts/bootstrap.sh将在启用监视模块的情况下启动Dreamview后端。
1# Startup modules monitor and dreamview, the default option is start.
2./scripts/bootstrap.sh [start | stop | restart]
在您喜欢的浏览器(例如Chrome)中打开,输入
http://localhost:8888/
您应该会看到此屏幕。但是,此刻,除监视器外,没有模块在后台运行。
 终于成功了,撒花庆祝!!!!
当然还有最后一步,播放事先录制好的数据
# You need to download the demo record using the following commands
cd docs/demo_guide/
python3 record_helper.py demo_3.5.record

# You can now replay this demo "record" in a loop with the '-l' flag
cd /apollo
cyber_recorder play -f docs/demo_guide/demo_3.5.record -l
此时占用的内存和CPU并不算多
 最后的界面
最后的界面
感谢大家!!!欢迎大家评论和互相交流!!!