Unity 简单背包系统(ScriptableObject)
实例演示:

说明
本项目是基于ScriptableObject做的背包系统,内容还算是简单,适合背包入门的人来学习。主要是来认知背包做的流程和大概功能。
ScriptableObject不了解的话就没必要看了,先去学习一下
该项目资源包供大家下载学习:点我下载❤。
- 功能1:数据存储不丢失
- 功能2:碰撞到物品可以添加到背包系统里。
- 功能3:物品可以拖动换位置
缺点: 因为此项目只是简单的学习了解背包的功能,所以性能等方面很粗糙,相当的消耗性能,不建议大家使用,或者大家可以改良一番。
代码逻辑: 代码逻辑的话挺粗糙的。。。所以我建议大家看这篇文章把代码的注释看一下。强烈建议把资源包下载使用观看
工作步骤开始
地图场景搭建
这里我就不赘述了。。。。
背包UI
这里我就不说怎么创建该UI了,希望大家去下载我的资源包。
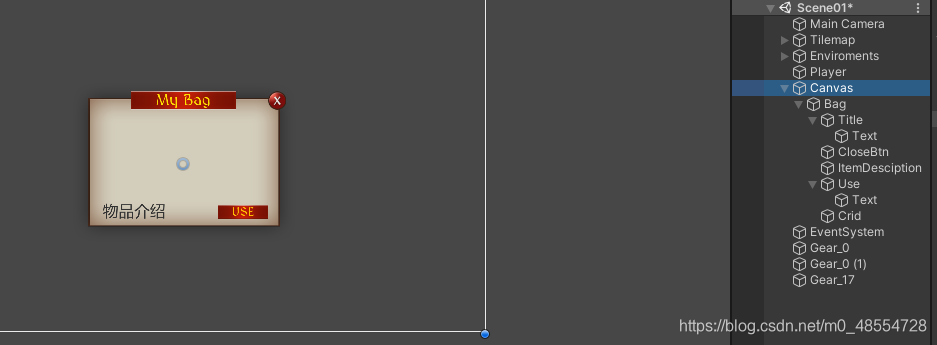
这里我说明一下Crid,他有个Grid Layout Group组件,让物品自适应排列
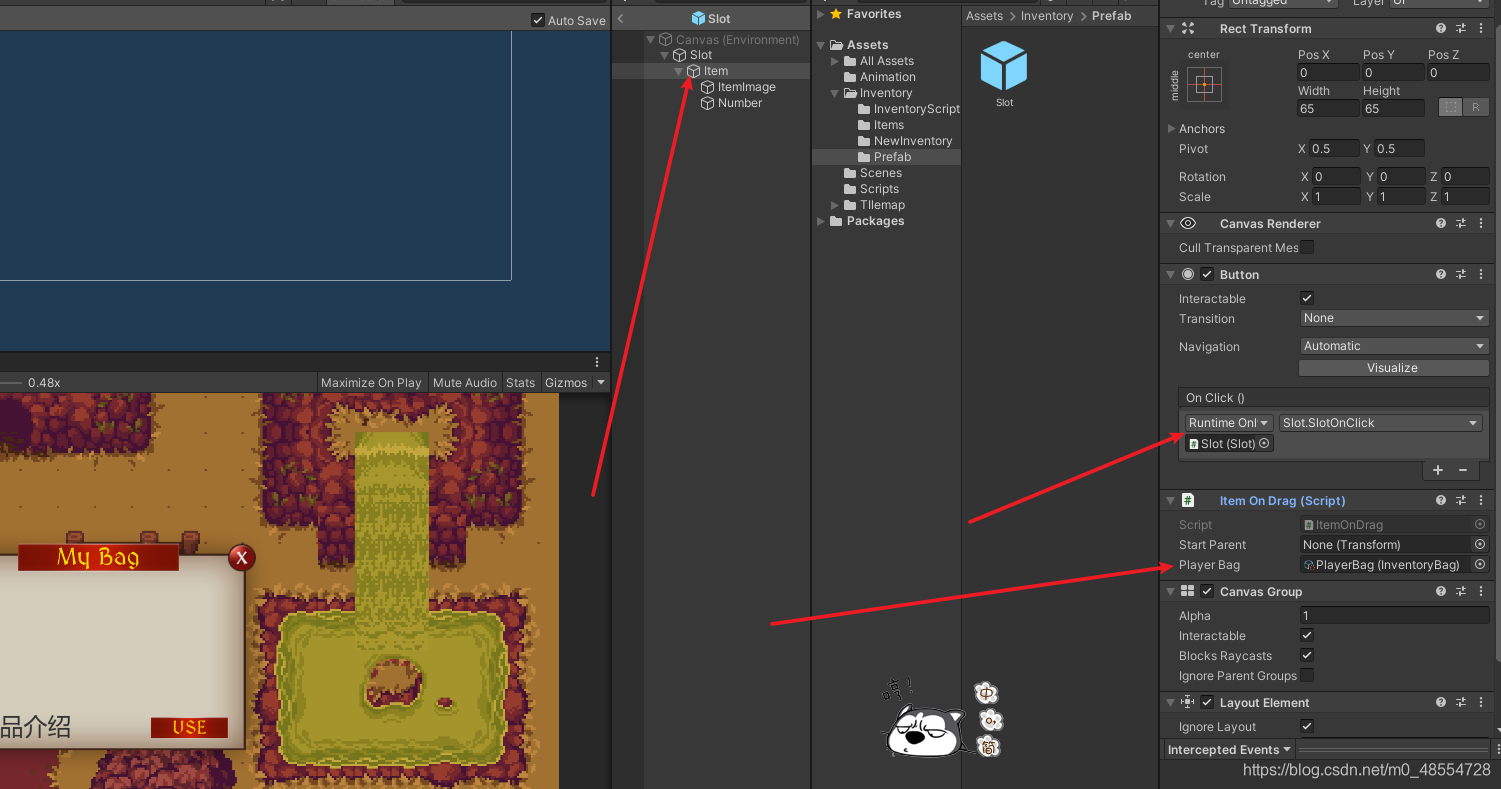
物品预制体

Slot的Image图片是物品栏的图片

Item是一个Button组件,删除Image组件,加上Canvas Group和Layout Element组件,并且将Layout Element的Lgnore Layout勾选上
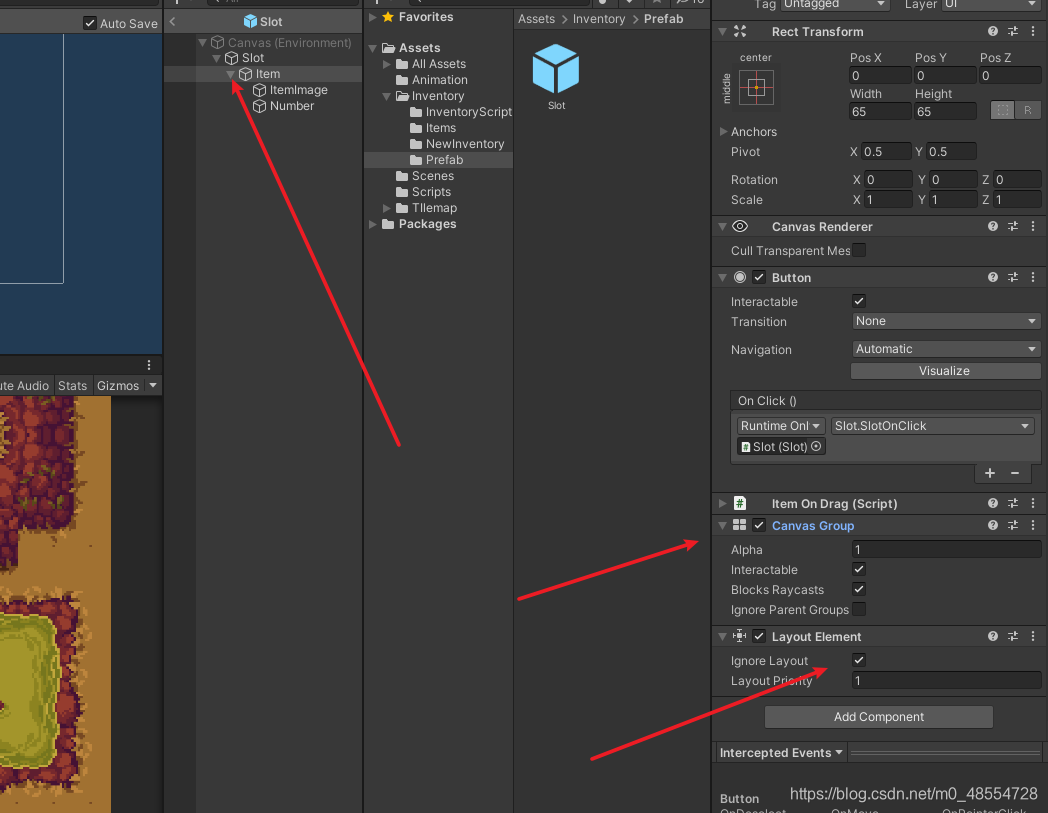
ItemImage作为物品的显示
Number是Item原有的Text,并调整他的位置,在左下角显示数量
脚本
1.创建物品类,背包类
物品类
using System.Collections;
using System.Collections.Generic;
using UnityEngine;

[CreateAssetMenu(fileName = "New Item", menuName = "Inventory/New Item")]
public class Item : ScriptableObject
{


    public string itemName;//物品名字
    public Sprite ItemSprite;//物品的照片
    public int itemHeld=1;//物品的数量,默认是一个,因为拾取第一个后直接为1,再拾取就直接+1即可
    [TextArea]//使text可以富文本进行多行书写
    public string itemInfo;//物品的介绍描述

}
//该脚本是一个物品的基础脚本
背包类
using System.Collections;
using System.Collections.Generic;
using UnityEngine;
[CreateAssetMenu(fileName = "New InventoryBag", menuName = "Inventory/New IventoryBag")]
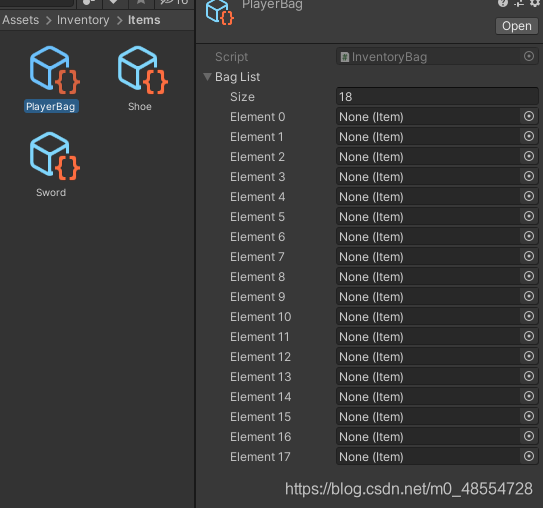
public class InventoryBag : ScriptableObject
{
/// <summary>
/// 玩家背包,因为储存多个物品,所以是一个集合
/// </summary>
public List<Item> bagList=new List<Item>();
}
//基于这样的情况我们还可以进行添加商店背包等等.......
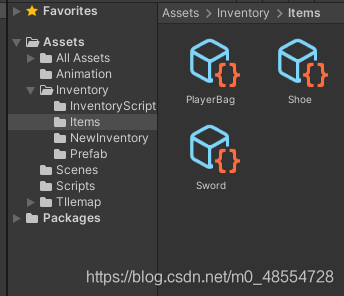
在该文件夹下我创建了两个物品,一个玩家背包
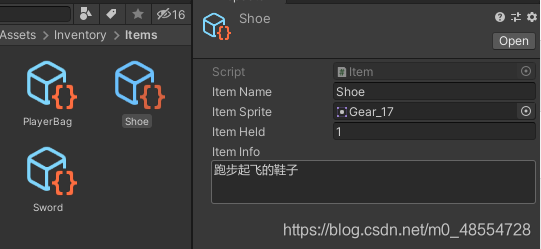
其中一个物品信息
玩家背包信息
2. 玩家控制代码
按下B键来打开关闭背包界面
using System.Collections;
using System.Collections.Generic;
using UnityEngine;
public class PlayerMovement : MonoBehaviour
{
Rigidbody2D rb;
Collider2D coll;
Animator anim;
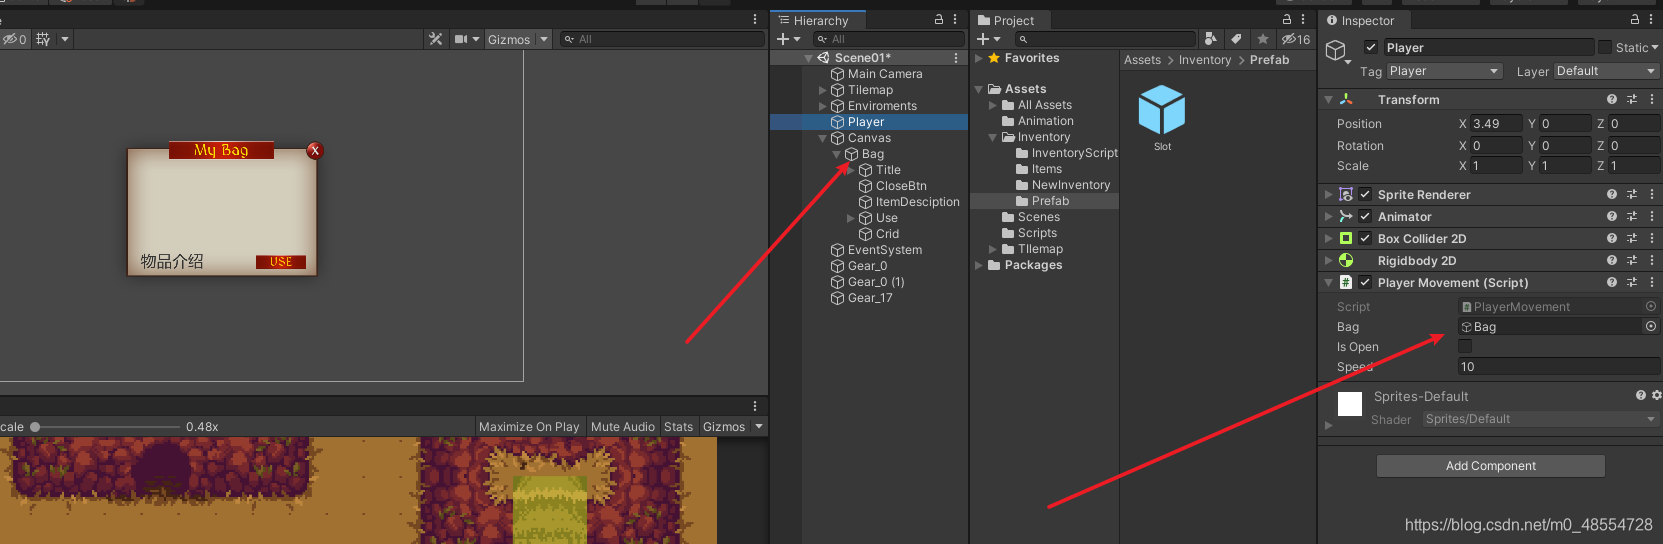
public GameObject Bag;//玩家的背包
public bool isOpen;
public float speed;
Vector2 movement;
private void Awake()
{
rb = GetComponent<Rigidbody2D>();
coll = GetComponent<Collider2D>();
anim = GetComponent<Animator>();
}
private void Update()
{
Movement();
SwitchAnim();
BagSet();
}
void Movement()//移动
{
movement.x = Input.GetAxisRaw("Horizontal");
movement.y = Input.GetAxisRaw("Vertical");
rb.MovePosition(rb.position + movement * speed * Time.deltaTime);
}
void SwitchAnim()//切换动画
{
if (movement != Vector2.zero)//保证Horizontal归0时,保留movment的值来切换idle动画的blend tree
{
anim.SetFloat("horizontal", movement.x);
anim.SetFloat("vertical", movement.y);
}
anim.SetFloat("speed", movement.magnitude);//magnitude 也可以用 sqrMagnitude 具体可以参考Api 默认返回值永远>=0
}
//点击B键进行背包的打开
void BagSet()
{
if (Input.GetKeyDown(KeyCode.B))
{
isOpen = !Bag.activeSelf;
Bag.SetActive(isOpen);
}
}
}
3.物品信息脚本
该脚本挂在到预制体身上,并且赋值如下图
using System;
using System.Collections;
using System.Collections.Generic;
using UnityEngine;
using UnityEngine.UI;

public class Slot : MonoBehaviour
{


    /// <summary>
    /// 装备栏的序号
    /// </summary>
    public int slotId;
    public Item slotItem;
    public Image slotIamge;//物品的图片
    public Text Num;//数量Text
    public string slotInfo;//物品信息
    public GameObject itemInSlot;//拖动的Item


    public void SlotOnClick()//注册物品点击事件
    {


        InventoryMannage.UpItemInfomation(slotInfo);//更新背包的描述信息栏的信息
    }

    //物品的信息初始化设置
    public void SetupSlot(Item item)
    {


        //这里就是没有物品的话就禁用
        if (item == null)
        {


            itemInSlot.SetActive(false);
            return;
        }

        slotIamge.sprite = item.ItemSprite;
        Num.text = item.itemHeld.ToString();
        slotInfo = item.itemInfo;

    }
}

4.物品管理脚本
该脚本挂在Canvas上面
using System;
using System.Collections;
using System.Collections.Generic;
using UnityEngine;
using UnityEngine.UI;

public class InventoryMannage : MonoBehaviour
{


    private static InventoryMannage instance;//设置成单例模式

    public InventoryBag playerBag;//玩家背包
    public GameObject slotGrid;//装备栏
    //public Slot slotPrefab;
    public GameObject emptslot;//物品预制体
    public Text itemInfomation;//物品描述的text

    public List<GameObject> slots=new List<GameObject>();//因为直接在装备栏生成18个装备,用一个集合来存储,并标记序号
    private void Awake()
    {


        if(instance!=null)
            Destroy(this);
        instance = this;
        itemInfomation.text = "";
    }

    private void OnEnable()
    {


        RestItem();
    }

    //这里的代码是直接增加在装备栏里一个装备,但是无法进行拖拽。。。。。这里直接跳过不用看,因为用该方法的话要变的东西很多这算是一个别的思路吧
    /*public static void CreatNewItem(Item item)
    {
        Slot newItem = Instantiate(instance.slotPrefab, instance.slotGrid.transform.position, Quaternion.identity);
        newItem.gameObject.transform.SetParent(instance.slotGrid.transform);
        newItem.slotItem = item;
        newItem.slotIamge.sprite = item.ItemSprite;
        newItem.Num.text = item.itemHeld.ToString();
    }*/

    /// <summary>
    /// 每一次刷新背包里面的内容都要先删除原先所有的物品,然后再重新生成添加
    /// 因为这样的操作所以是性能大大的降低......
    /// 根据玩家背包的数量来进行遍历操作
    /// </summary>
    public static void RestItem()
    {


        //删除所有的
        for (int i = 0; i < instance.slotGrid.transform.childCount; i++)
        {


            Destroy(instance.slotGrid.transform.GetChild(i).gameObject);
            instance.slots.Clear();
        }

        //添加
        for (int i = 0; i <instance.playerBag.bagList.Count; i++)
        {


            //CreatNewItem(instance.playerBag.bagList[i]);
            instance.slots.Add(Instantiate(instance.emptslot));//物品集合添加物品
            instance.slots[i].transform.SetParent(instance.slotGrid.transform);//让物品成为物品栏得到子集
            instance.slots[i].GetComponent<Slot>().slotId = i;//物品栏的物品序号初始化
            instance.slots[i].GetComponent<Slot>().SetupSlot(instance.playerBag.bagList[i]);//物品信息的初始化
        }
    }

    /// <summary>
    /// 进行物品描述信息的赋值
    /// </summary>
    /// <param name="info"></param>
    public static void UpItemInfomation(string info)
    {


        instance.itemInfomation.text = info;
    }
}
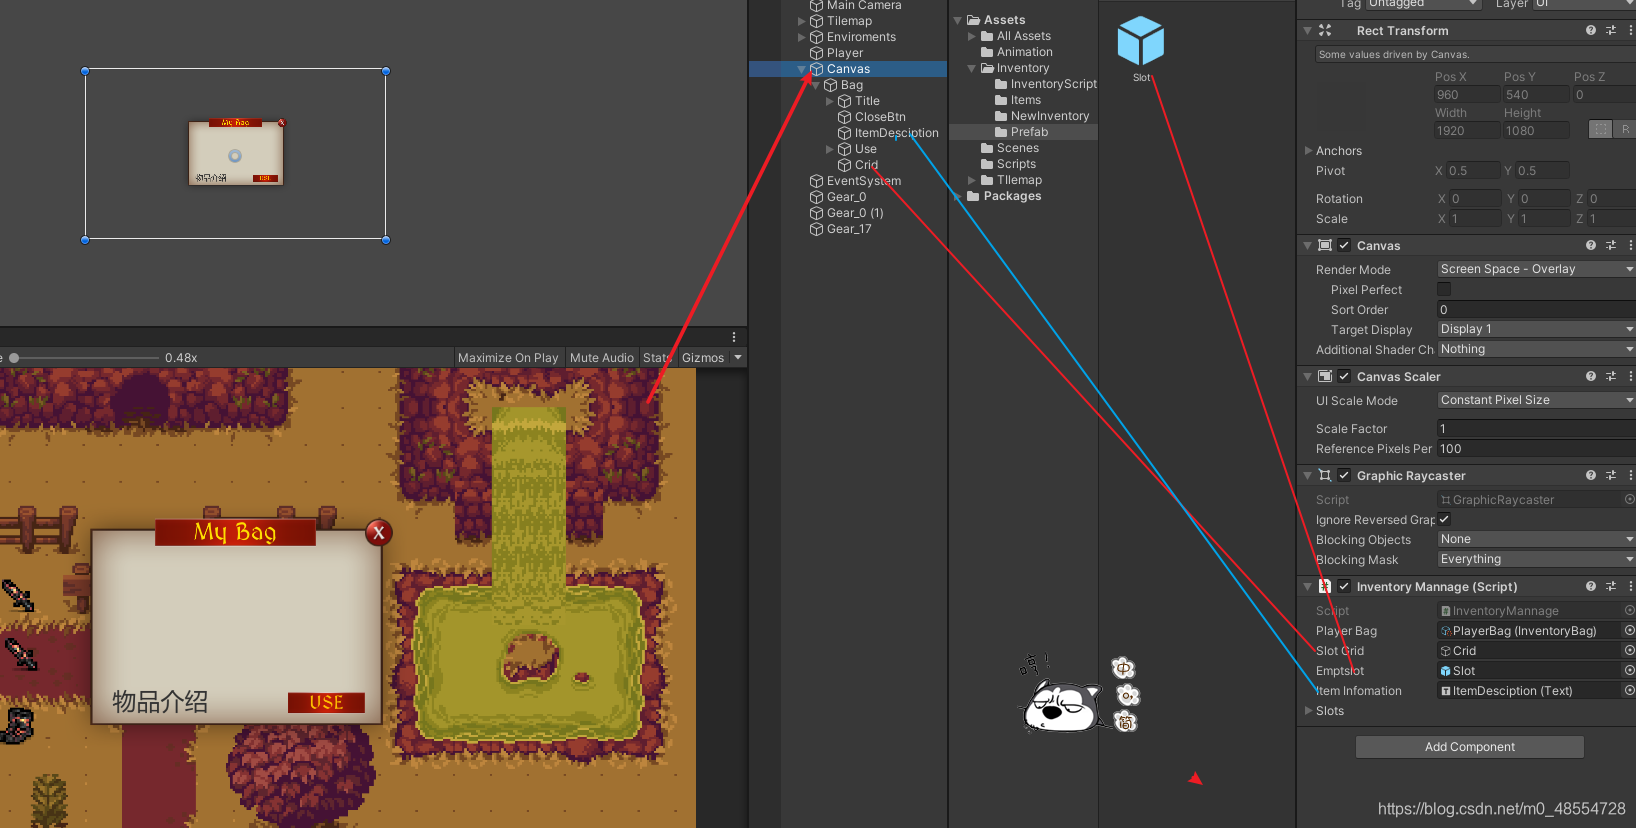
PlayerBag就是我们刚开始创建的背包。
5.碰撞物品脚本
这是挂在到游戏场景中物品的脚本
using System;
using System.Collections;
using System.Collections.Generic;
using UnityEngine;

//该脚本绑定到游戏场景中的物品下
public class AddInventory : MonoBehaviour
{


    public Item thisItem;//给物品注册该物品是哪一类的物品
    public InventoryBag thisBag;//玩家背包

    private void OnTriggerEnter2D(Collider2D other)
    {


        if (other.gameObject.CompareTag("Player"))
        {


            AddItem();
            Destroy(gameObject);
        }
    }

    void AddItem()
    {


        if (!thisBag.bagList.Contains(thisItem))
        {


            //thisBag.bagList.Add(thisItem);
            //遍历背包,如果为null的话就设置成该物品,因为我们直接给装备栏添加了18个物品,只是初始化都是null
            for (int i = 0; i < thisBag.bagList.Count; i++)
            {


                if (thisBag.bagList[i] == null)
                {


                    thisBag.bagList[i] = thisItem;
                    break;
                }
            }
        }
        else
        {


            thisItem.itemHeld += 1;//如果存在该物品,就将数量+1;
        }
        InventoryMannage.RestItem();//更新背包的数据
    }
}
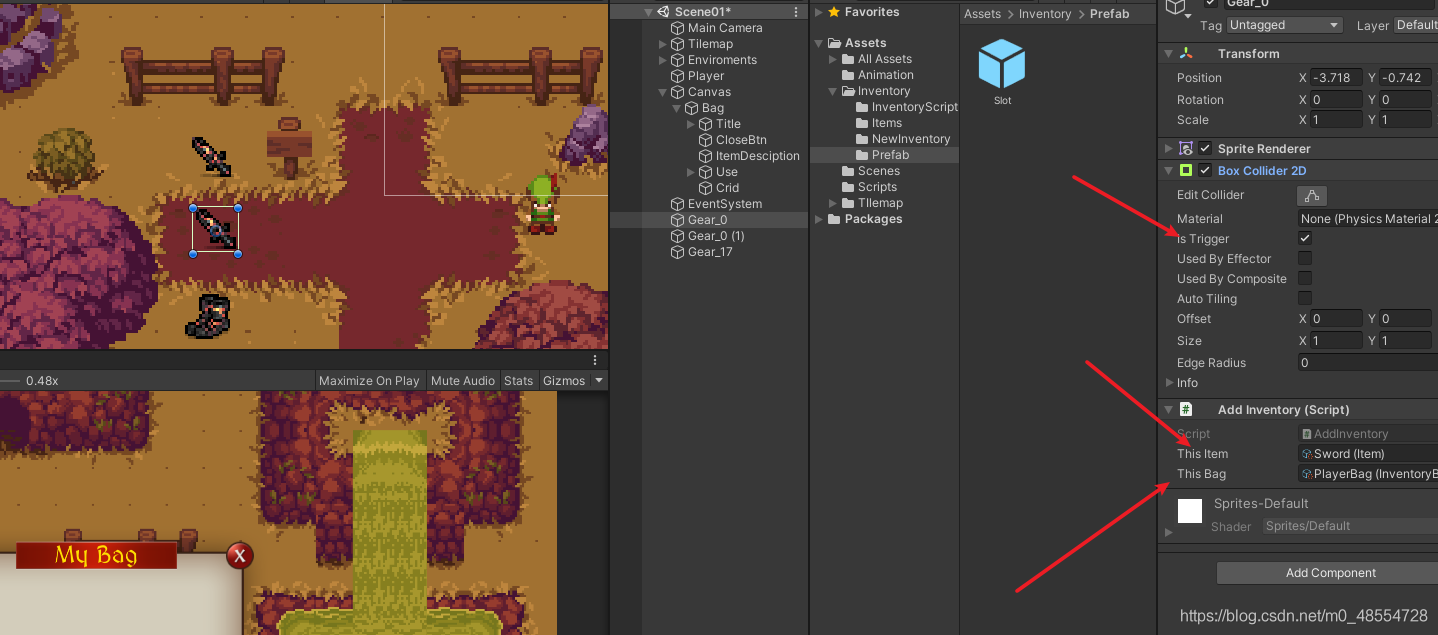
这里的ThisItem需要自己做出你游戏场景中对应的Item。并将碰撞器改为触发器
到这里我们就已经实现了游戏背包的核心功能,可以添加到背包里面了并存储
6.背包物品的移动
该脚本挂在到Item身上,并将Item的Button组件注册事件,上面的Slot脚本里面有
using System.Collections;
using System.Collections.Generic;
using UnityEngine;
using UnityEngine.EventSystems;
using UnityEngine.UIElements;

/// <summary>
/// 为了实现点击物品跟随鼠标移动,所以它添加上IBeginDragHandler,IDragHandler,IEndDragHandler三个事件
/// 注意添加这三个接口时添加头文件:using UnityEngine.EventSystems;
/// </summary>
public class ItemOnDrag : MonoBehaviour,IBeginDragHandler,IDragHandler,IEndDragHandler
{


    /// <summary>
    /// 记录原来的父级位置,因为可能进行物品交换位置,所以记录原先的父级
    /// 因为我们的层级关系是有两层的,该代码是在Item身上。
    /// Item层级关系:Slot(Clone)->Item,我们改变Item的位置所以找到Slot(Clone)
    /// </summary>
    public Transform startParent;
    public InventoryBag PlayerBag;//玩家的背包
    private int startID;//当前初始的序号,点击物品的刚开始序号,因为交换挪位置,所以也要记录下来

    public void OnBeginDrag(PointerEventData eventData)
    {


        startParent = transform.parent;
        startID = startParent.GetComponent<Slot>().slotId;
        transform.SetParent(transform.parent.parent);//我们点击物品后我们要脱离原来的父物体,这样物品就不会被装备栏覆盖掉不显示了
        transform.position = eventData.position;//物品跟随鼠标的位置
        GetComponent<CanvasGroup>().blocksRaycasts = false;//防止拖拽的物体挡住鼠标的射线检测
    }

    public void OnDrag(PointerEventData eventData)
    {


        transform.position = eventData.position;
        //Debug.Log(eventData.pointerCurrentRaycast.gameObject.name);
    }

    public void OnEndDrag(PointerEventData eventData)
    {


        if (eventData.pointerCurrentRaycast.gameObject != null)//这里判断鼠标拖动物体是否到场景中,如果在场景的话就直接返回原来的位置,不进行判断的话会报错
        {


            if (eventData.pointerCurrentRaycast.gameObject.name == "ItemImage")//判断下面物体的名字是:ItemImage 那么互换位置
            {


                transform.SetParent(eventData.pointerCurrentRaycast.gameObject.transform.parent.parent);//这里两个parent是因为第一时间检测到的是ItemImage,我们要找的是Slot,所以是两个parent
                transform.position = eventData.pointerCurrentRaycast.gameObject.transform.parent.parent.position;
                //bagList的物品存储位置改变,我们要改变背包里面的顺序,这样才不会挪动了位置不会保存,下面这里两个Item的进行调换
                var temp = PlayerBag.bagList[startID];
                PlayerBag.bagList[startID] =
                    PlayerBag.bagList[eventData.pointerCurrentRaycast.gameObject.GetComponentInParent<Slot>().slotId];
                PlayerBag.bagList[eventData.pointerCurrentRaycast.gameObject.GetComponentInParent<Slot>().slotId] = temp;


                //进行交换位置,改变父子级别
                eventData.pointerCurrentRaycast.gameObject.transform.parent.position = startParent.position;
                eventData.pointerCurrentRaycast.gameObject.transform.parent.SetParent(startParent);
                GetComponent<CanvasGroup>().blocksRaycasts = true;//当操作进行完后要把他设置成true,可以进行以后的射线检测
                return;
            }

            //下面的逻辑和上面的大致相同
            //这里是判断移动的位置是空位置的话就简单地移动位置即可,不用交换的操作
            if (eventData.pointerCurrentRaycast.gameObject.name == "Slot(Clone)")
            {


                transform.SetParent(eventData.pointerCurrentRaycast.gameObject.transform);
                transform.position = eventData.pointerCurrentRaycast.gameObject.transform.position;

                PlayerBag.bagList[eventData.pointerCurrentRaycast.gameObject.GetComponentInParent<Slot>().slotId] = PlayerBag
                    .bagList[startID];

                //这里的判断是当你移动该物品,最后又移动到原来的位置,如果移动两者前后序号一样就不用操作,如果不一样就设置原来的为空
                if(eventData.pointerCurrentRaycast.gameObject.GetComponent<Slot>().slotId!=startID)
                    PlayerBag.bagList[startID] = null;
                GetComponent<CanvasGroup>().blocksRaycasts = true;
                return;
            }
        }


        //其他任何位置都设置成原来的位置
        transform.SetParent(startParent);
        transform.position = startParent.position;
        GetComponent<CanvasGroup>().blocksRaycasts = true;
    }
}
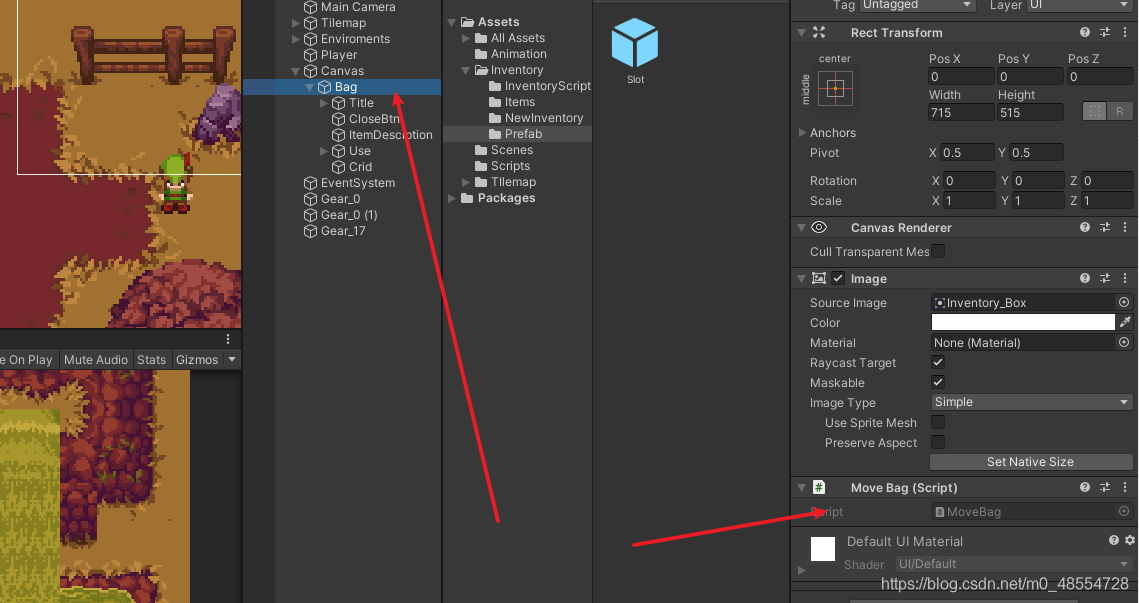
7.背包的移动
这里挂载到Bag上面
using System;
using System.Collections;
using System.Collections.Generic;
using UnityEngine;
using UnityEngine.EventSystems;

/// <summary>
/// 因为实现背包的移动,所以增加IDragHandler事件
/// 移动背包移动的是他的中心点,这样看起来平滑并且不会一下子移动很远
/// </summary>
public class MoveBag : MonoBehaviour,IDragHandler
{


    private RectTransform startRect;

    private void Awake()
    {


        startRect = GetComponent<RectTransform>();
    }

    public void OnDrag(PointerEventData eventData)
    {


        startRect.anchoredPosition += eventData.delta;//移动中心点
    }
}
总结
到现在我们已经把背包系统做好了,核心功能还有拖拽工作已经做好了。
但是性能的消耗大家应该也很清楚了就希望大家了解后创造出更优秀的背包系统