vue部分知识
大部分学习内容及代码在gitee仓库
生命周期
基本介绍
| 生命周期 | 描述 |
|---|---|
| beforeCreate | 组件实例被创建之初 |
| created | 组件实例已经完全创建 |
| beforeMount | 组件挂载之前 |
| mounted | 组件挂载到实例上去之后 |
| beforeUpdate | 组件数据发生变化,更新之前 |
| updated | 组件数据更新之后 |
| beforeDestroy | 组件实例销毁之前 |
| destroyed | 主键实例销毁之后 |
整体流程

vue-router
vue-router的基本学习使用
简单安装配置vue-router
-
安装vue-router
npm install vue-router --save -
新建router文件夹,router文件夹下新建
index.js文件index.js//配置路由相关的信息 import VueRouter from "vue-router"; import Vue from "vue"; //1.通过Vue.use(插件),安装插件 Vue.use(VueRouter); //2.创建VueRouter对象 const routes = [ ] const router = new VueRouter({ //配置路由和组件之间的应用关系 routes }) //3.将router对象传入到Vue实例 export default router -
main.js中引入vue-router的实例,以及Vue实例中挂载路由实例main.jsimport Vue from 'vue' import App from './App' import router from "./router/index"; Vue.config.productionTip = false /* eslint-disable no-new */ new Vue({ el: '#app', router, render: h => h(App) }) -
基本步骤完成
路由映射配置与呈现
组件中的内容会动态显示在
<router-view/>的位置,其作用就是充当占位
-
创建路由组件
Home.vue<template> <div>欢迎进入home界面</div> </template> <script> export default { name: "Home" } </script> <style scoped> </style>About.vue<template> <div>欢迎进入about界面</div> </template> <script> export default { name: "About" } </script> <style scoped> </style> -
配置路由映射
index.js//配置路由相关的信息 import VueRouter from "vue-router"; import Vue from "vue"; import HelloWorld from "../components/HelloWorld"; import Home from "../components/Home"; import About from "../components/About"; //1.通过Vue.use(插件),安装插件 Vue.use(VueRouter); //2.创建VueRouter对象 //配置路由映射 const routes = [ { path: "/home", component: Home }, { path: "/about", component: About } ] const router = new VueRouter({ //配置路由和组件之间的应用关系 routes }) //3.将router对象传入到Vue实例 export default router -
使用路由显示
点击首页或者点击关于,其组件中的信息就会显示在
<router-view/>的位置App.vue<template> <div id="app"> <router-link to="/home">首页</router-link> <router-link to="/about">关于</router-link> <router-view/> </div> </template> <script> export default { name: 'App' } </script> <style> #app { font-family: 'Avenir', Helvetica, Arial, sans-serif; -webkit-font-smoothing: antialiased; -moz-osx-font-smoothing: grayscale; text-align: center; color: #2c3e50; margin-top: 60px; } </style> -
显示测试
点击
首页
点击
关于
路由的默认值和修改为history
- 配置不需要点击路径,一进入页面就显示配置的路由页信息
- 修改url为history模式(比如默认url显示为:
/#/aaa,history模式下url显示为/aaa)
-
路由的默认值修改
会在进入页面时就显示
/home页的信息主要修改:
{


 //配置路由默认信息
 path: '/',
 redirect: '/home'
},
//配置路由相关的信息 import VueRouter from "vue-router"; import Vue from "vue"; import HelloWorld from "../components/HelloWorld"; import Home from "../components/Home"; import About from "../components/About"; //1.通过Vue.use(插件),安装插件 Vue.use(VueRouter); //2.创建VueRouter对象 //配置路由映射 const routes = [ { //配置路由默认信息 path: '/', redirect: '/home' }, { path: "/home", component: Home }, { path: "/about", component: About } ] const router = new VueRouter({ //配置路由和组件之间的应用关系 routes }) //3.将router对象传入到Vue实例 export default router -
history的修改
主要修改:
const router = new VueRouter({


//配置路由和组件之间的应用关系
routes,
//history模式修改
mode: 'history'
})
//配置路由相关的信息 import VueRouter from "vue-router"; import Vue from "vue"; import HelloWorld from "../components/HelloWorld"; import Home from "../components/Home"; import About from "../components/About"; //1.通过Vue.use(插件),安装插件 Vue.use(VueRouter); //2.创建VueRouter对象 //配置路由映射 const routes = [ { path: '/', redirect: '/home' }, { path: "/home", component: Home }, { path: "/about", component: About } ] const router = new VueRouter({ //配置路由和组件之间的应用关系 routes, 配置路由相关的信息 import VueRouter from "vue-router"; import Vue from "vue"; import HelloWorld from "../components/HelloWorld"; import Home from "../components/Home"; import About from "../components/About"; //1.通过Vue.use(插件),安装插件 Vue.use(VueRouter); //2.创建VueRouter对象 //配置路由映射 const routes = [ { path: '/', redirect: '/home' }, { path: "/home", component: Home }, { path: "/about", component: About } ] const router = new VueRouter({ //配置路由和组件之间的应用关系 routes, //history模式修改 mode: 'history' }) //3.将router对象传入到Vue实例 export default router mode: 'history' }) //3.将router对象传入到Vue实例 export default router修改完成后,url路径显示

router-link的其它属性补充
-
tag
默认是使用a标签,我们可以使用tag去修改
<router-link to="/home">首页</router-link>
<router-link to="/about" tag="button">关于</router-link>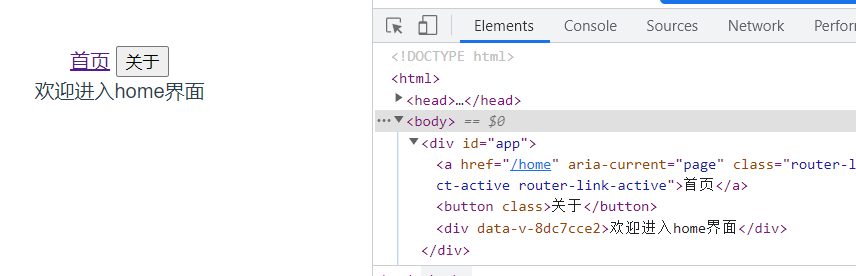
-
replace
用户点击了该路由标签后无法点击返回
<router-link to="/home" replace>首页</router-link>
<router-link to="/about" tag="button">关于</router-link>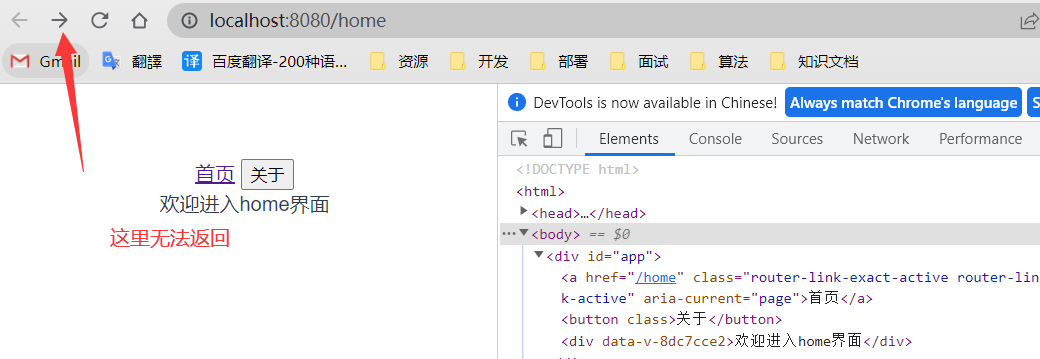
-
active-class
当用户点击
router-link的标签的时候,其标签中会出现如下class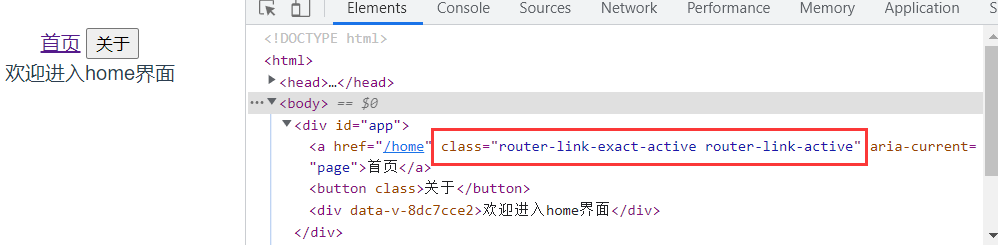
于是,我们可以通过设置这个class的名字的值去动态的改变我们选中的
router-link标签的样式建议使用方式三,前两种只是用来比较
-
方式一
直接在该vue的文件中创建style的,class的名字是
router-link-exact-active router-link-active<style> .router-link-exact-active router-link-active{ color: red; } </style> -
方式二
我们可以修改单个标签上的class的名字为我们指定的
<router-link to="/home" replace active-class="active">首页</router-link>
    <router-link to="/about" tag="button" active-class="active">关于</router-link>

<style>
.active{
  color: red;
}
</style>
这样后,我们在style中class的名字就可以是
active但是这样做有一个弊端,我们每条
router-link都需要手动去进行设置 -
方式三
在路由的
index.js文件中去进行修改const router = new VueRouter({ //配置路由和组件之间的应用关系 routes, //history模式修改 mode: 'history', //修改router-link-exact-active router-link-active的名字为active linkActiveClass: 'active' })这样就可以保证每条
router-link的router-link-exact-active router-link-active都修改为了active
最终效果
点击哪个router-link哪个就变红
-
点击首页

-
点击关于

-
通过代码跳转路由
不使用
router-link去进行路由跳转,使用@click去绑定方法,在javaScript的方法中进行路由跳转
<template>
<div id="app">
<!-- <router-link to="/home" replace active-class="active">首页</router-link>-->
<!-- <router-link to="/about" tag="button" active-class="active">关于</router-link>-->
<!-- <router-link to="/home" replace>首页</router-link>-->
<!-- <router-link to="/about" tag="button">关于</router-link>-->
<button @click="homeClick">首页</button>
<button @click="aboutClick">关于</button>
<router-view/>
</div>
</template>
<script>
export default {
name: 'App',
methods: {
homeClick(){
//通过代码的方式修改路由 vue-router
//push=> pushsState
//replace => replaceState
this.$router.push('/home');
console.log('homeClick');
},
aboutClick(){
//通过代码的方式修改路由 vue-router
this.$router.push('/about');
console.log('aboutClick');
}
}
}
</script>
<style>
#app {
font-family: 'Avenir', Helvetica, Arial, sans-serif;
-webkit-font-smoothing: antialiased;
-moz-osx-font-smoothing: grayscale;
text-align: center;
color: #2c3e50;
margin-top: 60px;
}
.active{
color: red;
}
</style>
vue-router的进阶使用
动态路由的使用
-
新建
User.vue界面使用计算属性获取url中传来的值info
<template> <div> <h2>我是用户界面</h2> <p>我是用户的相关信息</p> <p>{ {userInfo}}</p> </div> </template> <script> export default { name: "User", computed: { userInfo(){ return this.$route.params.info; } } } </script> <style scoped> </style> -
index.js中注册组件路由
注册的路由路径中绑定一个
:info,那么在点击路径的时候可以传值近进info,进入组件后也可以获取info绑定的值//配置路由相关的信息 import VueRouter from "vue-router"; import Vue from "vue"; import HelloWorld from "../components/HelloWorld"; import Home from "../components/Home"; import About from "../components/About"; import User from "../components/User"; //1.通过Vue.use(插件),安装插件 Vue.use(VueRouter); //2.创建VueRouter对象 //配置路由映射 const routes = [ { path: '/', redirect: '/home' }, { path: "/home", component: Home }, { path: "/about", component: About }, { path: "/user/:info", component: User } ] const router = new VueRouter({ //配置路由和组件之间的应用关系 routes, //history模式修改 mode: 'history', //修改router-link-exact-active router-link-active的名字为active linkActiveClass: 'active' }) //3.将router对象传入到Vue实例 export default router -
App.vue中写入链接
router-link中去绑定要写入组件路由路径要传入的值,那么访问路径就是
"'/user/'+userInfo.name"<template> <div id="app"> <!-- <router-link to="/home" replace active-class="active">首页</router-link>--> <!-- <router-link to="/about" tag="button" active-class="active">关于</router-link>--> <router-link to="/home">首页</router-link> <router-link to="/about" tag="button">关于</router-link> <!-- <button @click="homeClick">首页</button>--> <!-- <button @click="aboutClick">关于</button>--> <router-link :to="'/user/'+userInfo.name">用户</router-link> <router-view/> </div> </template> <script> export default { name: 'App', data(){ return({ userInfo:{ name: "lzj" } }) }, methods: { homeClick(){ //通过代码的方式修改路由 vue-router //push=> pushsState //replace => replaceState this.$router.push('/home'); console.log('homeClick'); }, aboutClick(){ //通过代码的方式修改路由 vue-router this.$router.push('/about'); console.log('aboutClick'); } } } </script> <style> #app { font-family: 'Avenir', Helvetica, Arial, sans-serif; -webkit-font-smoothing: antialiased; -moz-osx-font-smoothing: grayscale; text-align: center; color: #2c3e50; margin-top: 60px; } .active{ color: red; } </style> -
测试访问
-
访问路径
http://localhost:8080/user/lzj -
访问显示

-
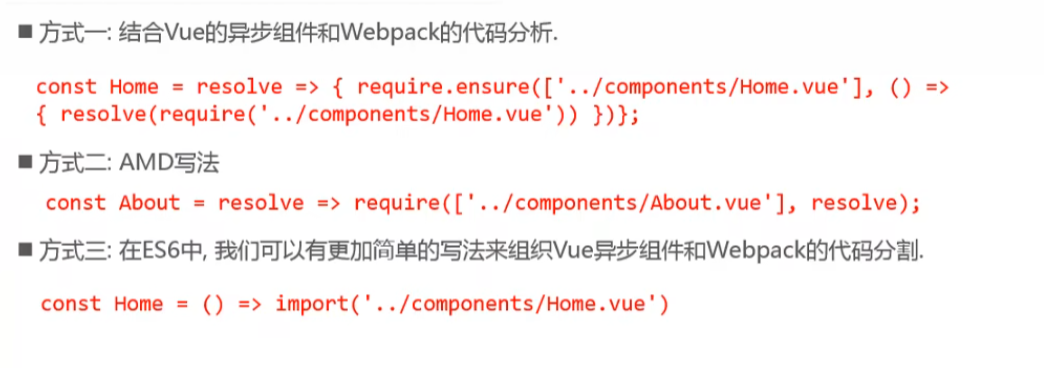
路由的懒加载
懒加载可以增强用户的体验,在访问页面时只加载需要使用到的js文件。
路由懒加载的主要作用就是将路由对应的组件打包成一个个的js代码块.一个懒加载变成一个js文件
使用懒加载的方式
使用懒加载的代码示例
//配置路由相关的信息
import VueRouter from "vue-router";
import Vue from "vue";
import HelloWorld from "../components/HelloWorld";
// import Home from "../components/Home";
// import About from "../components/About";
// import User from "../components/User";
//1.通过Vue.use(插件),安装插件
Vue.use(VueRouter);
//2.创建VueRouter对象
//配置路由映射
const routes = [
{
path: '/',
redirect: '/home'
},
{
path: "/home",
component: ()=> import('../components/Home')
},
{
path: "/about",
component: ()=> import('../components/About')
},
{
path: "/user/:info",
component: ()=> import('../components/User')
}
]
const router = new VueRouter({


  //配置路由和组件之间的应用关系
  routes,
  //history模式修改
  mode: 'history',
  //修改router-link-exact-active router-link-active的名字为active
  linkActiveClass: 'active'
})
//3.将router对象传入到Vue实例
export default router
路由懒加载的效果
[外链图片转存失败,源站可能有防盗链机制,建议将图片保存下来直接上传(img-wrulkZm6-1670513227461)(https://lzj-love-study.oss-cn-hangzhou.aliyuncs.com/blog/image-20221017193042856.png)]
嵌套路由
children
-
新建HomeNews.vue和HomeMessage.vue
HomeNews.vue<template> <div> <ul> <li>新闻1</li> <li>新闻2</li> <li>新闻3</li> <li>新闻4</li> </ul> </div> </template> <script> export default { name: "HomeNews" } </script> <style scoped> </style>HomeMessage.vue<template> <div> <ul> <li>消息1</li> <li>消息2</li> <li>消息3</li> <li>消息4</li> </ul> </div> </template> <script> export default { name: "HomeMessage" } </script> <style scoped> </style> -
编写index.js
- 使用children来配置嵌套路由
- 可以设置默认路由
//配置路由相关的信息 import VueRouter from "vue-router"; import Vue from "vue"; import HelloWorld from "../components/HelloWorld"; // import Home from "../components/Home"; // import About from "../components/About"; // import User from "../components/User"; //1.通过Vue.use(插件),安装插件 Vue.use(VueRouter); //2.创建VueRouter对象 //配置路由映射 const routes = [ { path: '/', redirect: '/home' }, { path: "/home", component: ()=> import('../components/Home'), children: [ { path: "/", redirect: "news" }, { path: "news", component: ()=> import('../components/HomeNews') }, { path: "message", component: ()=> import('../components/HomeMessage') } ] }, { path: "/about", component: ()=> import('../components/About') }, { path: "/user/:info", component: ()=> import('../components/User') } ] const router = new VueRouter({ //配置路由和组件之间的应用关系 routes, //history模式修改 mode: 'history', //修改router-link-exact-active router-link-active的名字为active linkActiveClass: 'active' }) //3.将router对象传入到Vue实例 export default router -
Home.vue
<template> <div> <p>欢迎进入home界面</p> <router-link to="/home/news">新闻</router-link> <router-link to="/home/message">消息</router-link> <router-view></router-view> </div> </template> <script> export default { name: "Home" } </script> <style scoped> </style> -
测试效果

路由参数传递
传递参数主要有两种方式
params和query
param的类型
配置路由格式:
/router/:id传递的方式:在path后面跟上对应的值,示例:
//userInfo为自己定义的对象 <router-link :to="'/user/'+userInfo.id">用户</router-link>传递后形成的路径:
/router/123获取值的方式:
$route.params.idquery的类型
配置路由格式:
router,也就是普通配置传递的方式:对象中使用query的key作为传递方式,示例:
//{path: '/profile',query: {name: 'lzj',age: 18}}可以放在data中 <router-link :to="{path: '/profile',query: {name: 'lzj',age: 18}}">档案</router-link>传递后形成的路径:
/router?id=123获取值的方式:
$route.query.id通过button使用方法的方式
路由跳转的方式采用普通button的方式
<button @click="userClick()" >用户</button>在methods中定义方法进行跳转传值
<script> export default { name: 'App', data() { return { userId: "lzj" } }, methods: { //这里也可以使用query的方式 userClick(){ this.$router.push('/user/'+this.userId) } } } </script>
param方式示例
-
新建User.vue
<template> <div> <h2>我是用户界面</h2> <p>我是用户的相关信息</p> <p>{ {userInfo}}</p> </div> </template> <script> export default { name: "User", computed: { userInfo(){ return this.$route.params.info; } } } </script> <style scoped> </style> -
index.js中注册组件路由
{ path: "/user/:info", component: ()=> import('../components/User') } -
app.vue中编写router-link
<router-link :to="'/user/'+userInfo.name">用户</router-link> <script> export default { name: 'App', data(){ return{ userInfo:{ name: "lzj" } } } } </script> -
测试效果

query方式示例
-
新建Profile.vue
<template> <div> <p>我是profile组件</p> <p>{ {$route.query.name}}</p> <p>{ {$route.query.age}}</p> </div> </template> <script> export default { name: "Profile" } </script> <style scoped> </style> -
index.js中注册组件路由
const Profile = ()=>import('../components/Profile'); { path: "/profile", component: Profile } -
app.vue中编写router-link
<router-link :to="{path: '/profile',query: {name: 'lzj',age: 18}}">档案</router-link> -
测试效果

全局导航守卫
前置守卫
**作用:**在进入路由前调用的钩子函数
重要代码示例:
const router = new VueRouter({


//配置路由和组件之间的应用关系
routes,
//history模式修改
mode: 'history',
//修改router-link-exact-active router-link-active的名字为active
linkActiveClass: 'active'
})
//前置守卫
router.beforeEach((to, from, next)=>{


//从from跳转到to,修改标题为meta中的数据
document.title = to.matched[0].meta.title;
console.log(to);
//next必须调用
next();
})
参数解析:
- to:即将要进入的目标的路由对象
- from:当前导航即将要离开的路由对象
- next:调用该方法后,才能进入下一个钩子
修改标题案例代码:
在路由配置中添加meta的数据
- meta:元数据
//配置路由相关的信息
import VueRouter from "vue-router";
import Vue from "vue";
import HelloWorld from "../components/HelloWorld";
// import Home from "../components/Home";
// import About from "../components/About";
// import User from "../components/User";

//1.通过Vue.use(插件),安装插件
Vue.use(VueRouter);

//2.创建VueRouter对象

const Profile = ()=>import('../components/Profile');

//配置路由映射
const routes = [
  {


    path: '/',
    redirect: '/home'
  },
  {


    path: "/home",
    component: ()=> import('../components/Home'),
    meta: {


      title : "首页"
    },
    children: [
      {


        path: "/",
        redirect: "news"
      },
      {


        path: "news",
        component: ()=> import('../components/HomeNews')
      },
      {


        path: "message",
        component: ()=> import('../components/HomeMessage')
      }
    ]
  },
  {


    path: "/about",
    component: ()=> import('../components/About'),
    meta: {


      title: "关于"
    }
  },
  {


    path: "/user/:info",
    component: ()=> import('../components/User')
  },
  {


    path: "/profile",
    component: Profile,
    meta: {


      title: "档案"
    }
  }
]

const router = new VueRouter({


  //配置路由和组件之间的应用关系
  routes,
  //history模式修改
  mode: 'history',
  //修改router-link-exact-active router-link-active的名字为active
  linkActiveClass: 'active'
})

//路由导航

router.beforeEach((to, from, next)=>{


  //从from跳转到to,修改标题为meta中的数据
  document.title = to.matched[0].meta.title;
  console.log(to);
  //next必须调用
  next();
})

//3.将router对象传入到Vue实例
export default router
点击首页,最终效果

后置守卫
**作用:**在进入路由后调用的钩子函数
重要代码示例:
const router = new VueRouter({


//配置路由和组件之间的应用关系
routes,
//history模式修改
mode: 'history',
//修改router-link-exact-active router-link-active的名字为active
linkActiveClass: 'active'
})
//后置守卫
router.afterEach((to, from)=>{


console.log("after");
})
参数解析:
- to:进入的目标的路由对象
- from:上一个离开的路由对象
路由独享守卫
**作用:**只有在进入指定路由才会触发
keep-alive
**作用:**keep-alive是Vue内置的一个组件,可以使被包含的组件保留状态,或避免重新渲染
使用方式示例:
<keep-alive>
 <router-view></router-view>
</keep-alive>
属性介绍:
- include:字符串或正则表达式,只有匹配的组件会被缓存
- exclude:字符串或正则表达式,任何匹配的组件都不会被缓存
**方法函数介绍:**只有该组件被
keep-alive标签包裹,才会生效
- activated(): 该组件进入活跃状态时执行函数
- deactivated(): 该组件从活跃状态改变时执行函数
使用文件路径的引用问题
在写项目的过程中,我们常常需要使用到文件的导入引用,而有时候路径又过于复杂和多,所以我们可以在配置文件中写入别名,来方便我们的开发
配置位置:
webpack.base.conf.js使用方式:
import引入方式:
import TabBar from "@/components/tabbar/TabBar";html标签引入方式示例(其路径前必须加
~):<img src="~@/assets/img/123.png">
-
进入build文件夹中的
webpack.base.conf.js这里有默认的
@别名来指代项目是src目录路径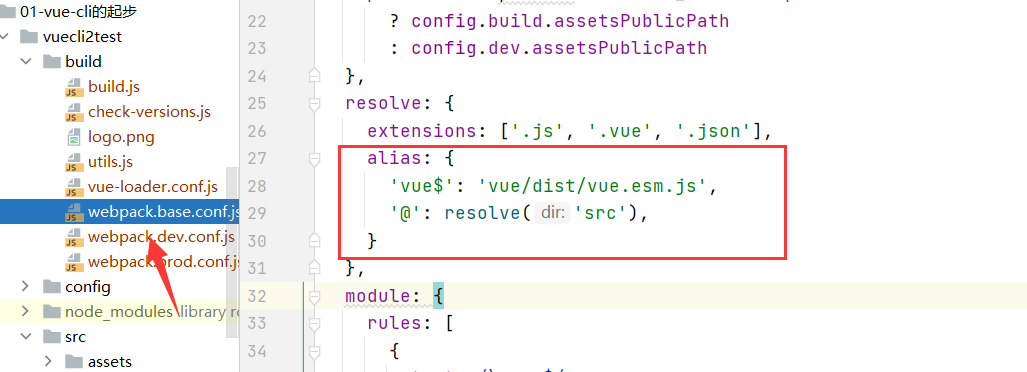
-
在
alias中写入我们自己定义的路径别名定义路径
src/assets的别名为assets'assets': resolve('src/assets') -
在vue文件中使用路径别名
注意,在html标签中使用时,其前面必须加
~-
import的方式
使用默认别名
@在javascript中引入src/components/tabbar/TabBarimport TabBar from "@/components/tabbar/TabBar"; -
在html的标签中使用
使用自定义的
assets在html的标签中引入src/assets/img/123.png<img src="~assets/img/123.png">使用默认别名
@在在html的标签中引入src/assets/img/123.png<img src="~@/assets/img/123.png">
-
Promise
Promise是异步编程的一种解决方案
基本代码示例:
//参数 -> 函数
//在执行传入的回调函数时,会传入两个参数:resolve, reject 本身他们又是函数
new Promise((resolve, reject)=>{


 //这个可以替换为网络请求
 setTimeout((data)=>{


     //成功的时候调用resolve
     resolve(data)

     //失败的时候调用reject,就不会进入then中了,会进入catch中
 },1000)

}).then((data)=>{


 //处理回调
 console.log(data)
}).catch((err)=>{


 console.log(err)
})
Promise的基本使用
一般处理方式
这里简单演示了下Promise如何去使用,只包含了
resolve的使用
<!DOCTYPE html>
<html lang="en">
<head>
    <meta charset="UTF-8">
    <title>Title</title>
</head>
<body>
<script>
    //1.使用setTimeout
    setTimeout(()=>{


        console.log("Hello World");
    },1000)

    //参数 -> 函数
    //resolve, reject 本身他们又是函数
    new Promise((resolve, reject)=>{


        //第一次请求代码
        setTimeout(()=>{


            resolve()
        },1000)
    }).then(()=>{


        //第一次拿到结果的处理代码
        console.log("Hello World");
        console.log("Hello World");
        console.log("Hello World");
        console.log("Hello World");

        //第二次请求代码
        new Promise((resolve, reject)=>{


            setTimeout(()=>{


                resolve()
            },1000)
        }).then(()=>{


            //第二次拿到结果的处理代码
            console.log("Hello Vuejs");
            console.log("Hello Vuejs");
            console.log("Hello Vuejs");
            console.log("Hello Vuejs");

            //第三次请求代码
            new Promise((resolve, reject)=>{


                setTimeout(()=>{


                    resolve()
                },1000)
            }).then(()=>{


                //第三次拿到结果的处理代码
                console.log("Hello Python");
                console.log("Hello Python");
                console.log("Hello Python");
                console.log("Hello Python");

            })
        })
    })
</script>
</body>
</html>
另外一种处理方式
这里包含了
resolve和reject的另外一种处理方式使用,不需要使用catch
<!DOCTYPE html>
<html lang="en">
<head>
    <meta charset="UTF-8">
    <title>Title</title>
</head>
<body>

<script>
    new Promise((resolve, reject)=>{


        setTimeout(()=>{


            resolve("Hello Vuejs");
            // reject("err message");
        },1000)
    }).then(data=>{


        console.log(data);
    },err=>{


        console.log(err);
    })

</script>

</body>
</html>
Promise三种状态
异步操作中会产生三种状态,分别是:
- pending:等待状态,比如正在进行网络请求,或者定时器没有到时间
- fulfill:满足状态,当我们主动回调了resolve时,就处于该状态,并且会回调
.then()- reject:拒绝状态,当我们主动回调了reject时,就处于该状态,并且会回调
.catch()
Promise链式调用
满足状态的调用和拒绝状态的调用都有简写语法
满足的状态的调用
-
方式1:
return new Promise((resolve, reject)=>{ resolve(data); }).then(data => { return new Promise((resolve, reject)=>{ resolve(data + "1"); }).then(data => { }) }) -
方式二
return new Promise((resolve, reject)=>{ resolve(data); }).then(data => { return Promise.resolve(data +"1") }).then(data => { return Promise.resolve(data +"2") }) -
方式三
return new Promise((resolve, reject)=>{


    resolve(data);
}).then(data => {


    return data +"1"
}).then(data => {


    return data +"2"
})
拒绝的状态的调用
-
方式一
return new Promise((resolve, reject)=>{ resolve(data); }).then(data => { return new Promise((resolve, reject)=>{ reject(err); }).then(data => { }) }).catch(err =>{ console.log(err) }) -
方式二
return new Promise((resolve, reject)=>{ resolve(data); }).then(data => { return Promise.reject(err) }).catch(err =>{ console.log(err) }) -
方式三
return new Promise((resolve, reject)=>{


    resolve(data);
}).then(data => {


    throw err
}).catch(err =>{


    console.log(err)
})
链式调用的三种方式示例
<!DOCTYPE html>
<html lang="en">
<head>
    <meta charset="UTF-8">
    <title>Title</title>
</head>
<body>

<script>
    //网络请求: aaa ->自己处理(10行)
    //处理: aaa+111 -> 自己处理(10行)
    //处理: aaa111222 ->自己处理

    //第一种方式
    new Promise((resolve, reject)=>{
        setTimeout(()=>{
            resolve("aaa")
        },1000)
    }).then(res =>{
        //1.自己处理10行代码
        console.log(res,"第一层的10行处理代码");

        //对结果进行第一次处理
        return new Promise((resolve, reject)=>{
            resolve(res + "111")
        }).then(res =>{
            console.log(res,"第二层的10行处理代码")

            //对结果进行第二次处理
            return new Promise((resolve, reject)=>{
                resolve(res + "222")
            }).then(res =>{
                console.log(res,"第三层的10行处理代码")


            })
        })
    })


    //第二种方式,使用return Promise.resolve

    new Promise((resolve, reject)=>{
        setTimeout(()=>{
            resolve("aaa")
        },1000)
    }).then(res => {
        //1.自己处理10行代码
        console.log(res, "第一层的10行处理代码");
        //对结果进行第一次处理
        // return Promise.resolve(res + "111")

        //如果抛出错误,则会进入catch
        return Promise.reject("err")

        //也可以使用这种方式抛出异常
        // throw "error message"
    }).then(res =>{
        console.log(res,"第二层的10行处理代码");

            //对结果进行第二次处理
        return Promise.resolve(res + "222")
    }).then(res =>{
                console.log(res,"第三层的10行处理代码");

    }).catch(err =>{
        console.log(err);
    })

    //第三种方式,省略掉Promise.resolve
    new Promise((resolve, reject)=>{
        setTimeout(()=>{
            resolve("aaa")
        },1000)
    }).then(res => {
        //1.自己处理10行代码
        console.log(res, "第一层的10行处理代码");

        //对结果进行第一次处理
        return res + "111"
    }).then(res =>{
        console.log(res,"第二层的10行处理代码");

        //对结果进行第二次处理
        return res + "222"
    }).then(res =>{
        console.log(res,"第三层的10行处理代码");

    })
</script>
</body>
</html>
Promise的all方法
如果有两个网络请求,我们需要在他们两个请求都完成后再进行相关操作,那么我们可以使用Promise的all方法。
简单示例:
Promise.all([]).then(result =>{

     })
简单示例:
<!DOCTYPE html>
<html lang="en">
<head>
    <meta charset="UTF-8">
    <title>Title</title>
</head>
<body>
<script>
    Promise.all([
        new Promise((resolve, reject)=>{


            setTimeout(()=>{


                resolve("data1")
            },1000)
        }),
        new Promise((resolve, reject)=>{


            setTimeout(()=>{


                resolve("data2")
            },2000)
        })
    ]).then(result =>{


        console.log(result);
        console.log(result[0]);
        console.log(result[1]);
    })


</script>

</body>
</html>
VueX
Vuex是一个专为Vue.js应用程序开发的状态管理模式,它是响应式的。
简单理解就是:将多个组件共享的变量全部存储在一个对象里面,每个组件都可以去使用和改变它
Vuex遵循State单一状态树
Vuex状态管理图例:

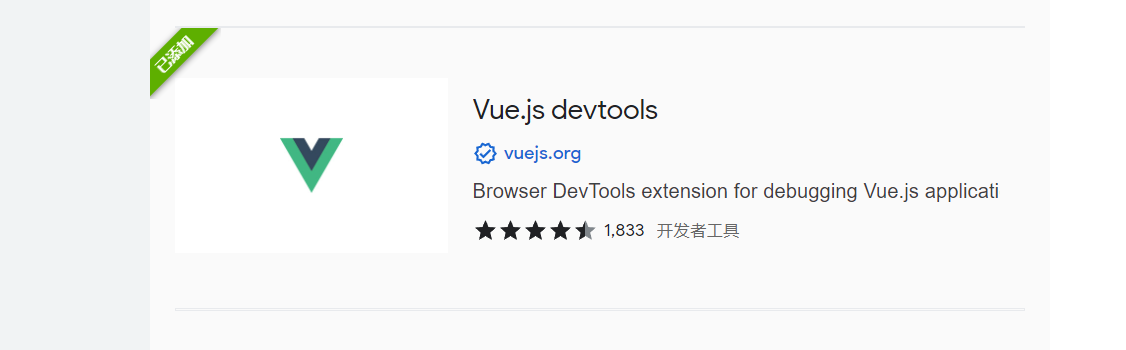
相关插件
devtools
在谷歌商店中搜索即可
简单使用Vuex
配置完成后可以在
.vue文件中使用$store来使用其数据
-
下载Vuex
npm install [email protected] --save -
配置Vuex
-
src目录下新建store目录
-
store目录中新建index.js
index.jsimport Vue from "vue"; import Vuex from "vuex"; //1.安装插件 Vue.use(Vuex); //2.创建对象 const store = new Vuex.Store({ //状态 state:{ }, mutations:{ }, actions:{ }, getters:{ }, modules:{ } }) //导出Store export default store -
main.js中引入store- import引入store
- Vue中注册store
import Vue from 'vue'
import App from './App'
import router from './router'
import store from "./store";

Vue.config.productionTip = false

/* eslint-disable no-new */
new Vue({


  el: '#app',
  router,
  store,
  render: h => h(App)
})
-
-
编写测试案例(计数案例)
-
编写store目录下的index.js
import Vue from "vue"; import Vuex from "vuex"; //1.安装插件 Vue.use(Vuex); //2.创建对象 const store = new Vuex.Store({ //状态 state:{ counter: 0 }, mutations:{ //方法 increment(state){ state.counter++; }, decrement(state){ state.counter--; } }, actions:{ }, getters:{ }, modules:{ } }) //导出Store export default store -
编写App.vue
使用
this.$store.commit()来获取我们定义的mutations<template> <div id="app"> <h2>{ {message}}</h2> <h2>{ {$store.state.counter}}</h2> <button @click="counterAdd()">+</button> <button @click="counterDue()">-</button> <hello-vuex></hello-vuex> <router-view/> </div> </template> <script> import HelloVuex from "@/components/HelloVuex"; export default { name: 'App', components: {HelloVuex}, data(){ return{ message: "我是App组件", } }, methods:{ counterAdd(){ this.$store.commit('increment'); }, counterDue(){ this.$store.commit('decrement'); } } } </script> <style> </style> -
新建HelloVuex.vue组件
<template>
  <div>
    <h2>{

       {$store.state.counter}}</h2>
  </div>
</template>

<script>
export default {
  name: "HelloVuex"
}
</script>

<style scoped>

</style>
-
-
结束
点击App.vue中的按钮,HelloVuex.vue中的
$store.state.counter也会进行改变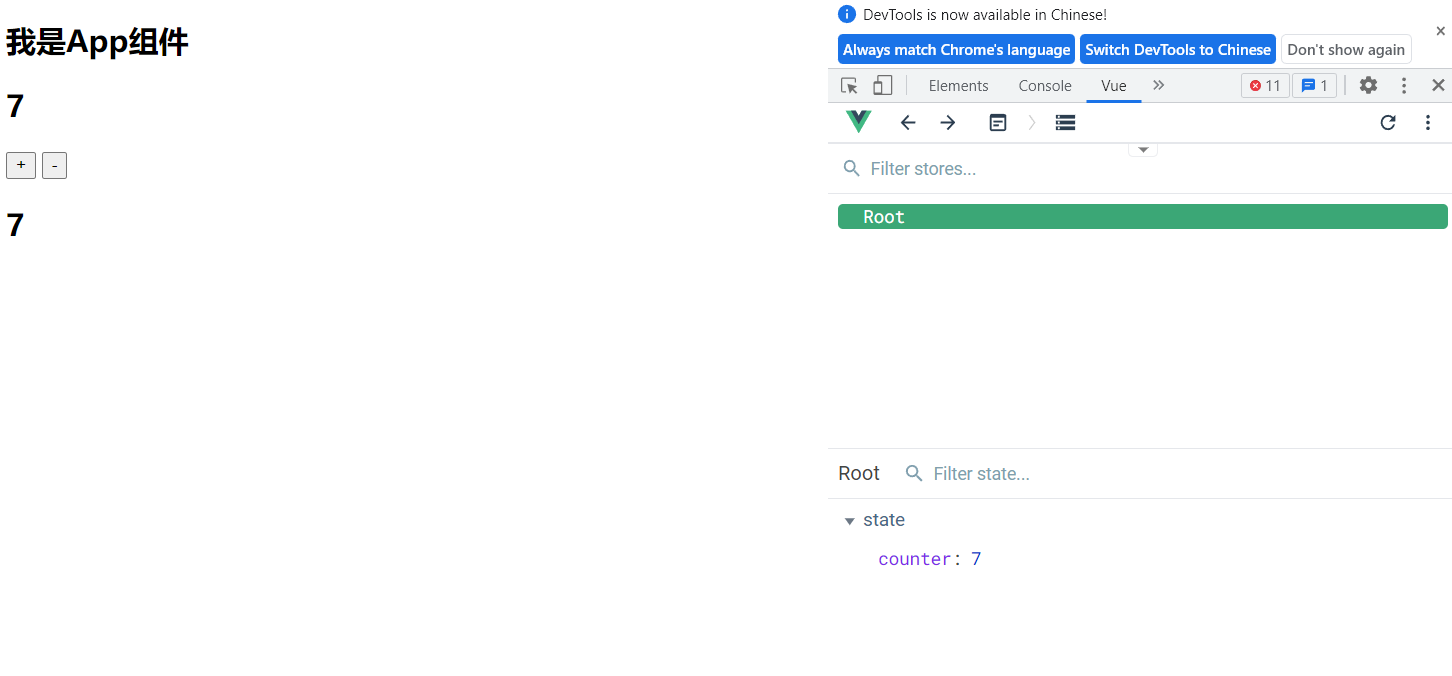
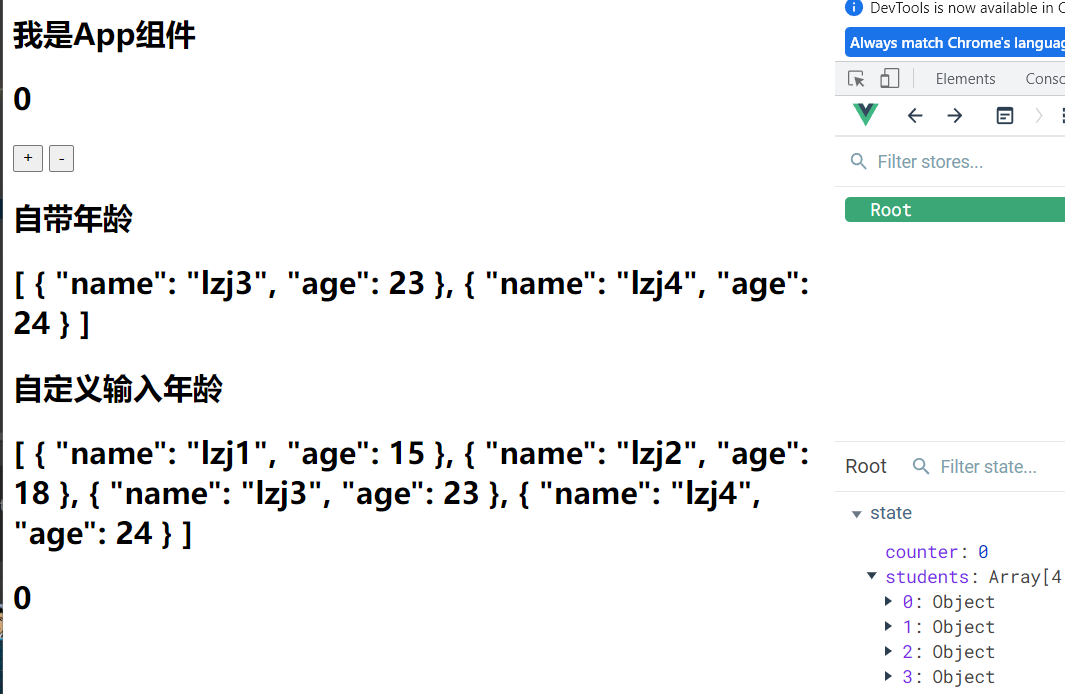
Getters
类似于vue中的计算属性
示例
获取年龄大于20岁的学生
- 在Getters中去获取,使用filter过滤
- 也可以让用户自定义输入年龄参数,那么我们需要使用到函数
index.js
import Vue from "vue";
import Vuex from "vuex";

//1.安装插件
Vue.use(Vuex);

//2.创建对象
const store = new Vuex.Store({


  //状态
  state:{


    counter: 0,
    students:[
      {

    name: "lzj1",age: 15},
      {

    name: "lzj2",age: 18},
      {

    name: "lzj3",age: 23},
      {

    name: "lzj4",age: 24},
    ]
  },
  mutations:{


    //方法
    increment(state){


      state.counter++;
    },
    decrement(state){


      state.counter--;
    }
  },
  actions:{


  },
  getters:{


    more20stu: state => {


      return state.students.filter(s => s.age >=20);
    },
    more20stu2: state => {


      return age =>{


        return state.students.filter(s => s.age >= age);
      }
    }
  },
  modules:{


  }
})

//导出Store
export default store
App.vue
<template>
  <div id="app">
    <h2>{

   {message}}</h2>
    <h2>{

   {$store.state.counter}}</h2>
    <button @click="counterAdd()">+</button>
    <button @click="counterDue()">-</button>

    <h2>自带年龄</h2>
    <h2>{

   {$store.getters.more20stu}}</h2>

    <h2>自定义输入年龄</h2>
    <h2>{

   {$store.getters.more20stu2(15)}}</h2>
    <hello-vuex></hello-vuex>

    <router-view/>
  </div>
</template>

<script>

import HelloVuex from "@/components/HelloVuex";

export default {
  name: 'App',
  components: {HelloVuex},
  data(){
    return{
      message: "我是App组件",
    }
  },
  methods:{
    counterAdd(){
      this.$store.commit('increment');
    },
    counterDue(){
      this.$store.commit('decrement');
    }
  }
}
</script>

<style>
</style>
Mutation
Vuex的store状态的唯一更新方式:提交Mutation
更改 Vuex 的 store 中的状态的唯一方法是提交 mutation。Vuex 中的 mutation 非常类似于事件:每个 mutation 都有一个字符串的 事件类型 (type) 和 一个 回调函数 (handler)。这个回调函数就是我们实际进行状态更改的地方,并且它会接受 state 作为第一个参数:
const store = new Vuex.Store({


  state: {


    count: 1
  },
  mutations: {


    increment (state) {


      // 变更状态
      state.count++
    }
  }
})
你不能直接调用一个 mutation handler。这个选项更像是事件注册:“当触发一个类型为 increment 的 mutation 时,调用此函数。”要唤醒一个 mutation handler,你需要以相应的 type 调用 store.commit 方法:
store.commit('increment')
提交载荷(Payload)
你可以向 store.commit 传入额外的参数,即 mutation 的 载荷(payload):
// ...
mutations: {


  increment (state, n) {


    state.count += n
  }
}
store.commit('increment', 10)
在大多数情况下,载荷应该是一个对象,这样可以包含多个字段并且记录的 mutation 会更易读:
// ...
mutations: {


  increment (state, payload) {


    state.count += payload.amount
  }
}
store.commit('increment', {


  amount: 10
})
对象风格的提交方式
提交 mutation 的另一种方式是直接使用包含 type 属性的对象:
store.commit({


  type: 'increment',
  amount: 10
})
当使用对象风格的提交方式,整个对象都作为载荷传给 mutation 函数,因此 handler 保持不变:
mutations: {


  increment (state, payload) {


    state.count += payload.amount
  }
}
Mutation 需遵守 Vue 的响应规则
既然 Vuex 的 store 中的状态是响应式的,那么当我们变更状态时,监视状态的 Vue 组件也会自动更新。这也意味着 Vuex 中的 mutation 也需要与使用 Vue 一样遵守一些注意事项:
- 最好提前在你的 store 中初始化好所有所需属性。
- 当需要在对象上添加新属性时,你应该
-
使用
Vue.set(obj, 'newProp', 123), 或者 -
以新对象替换老对象。例如,利用对象展开运算符 (opens new window)我们可以这样写:
state.obj = {

       ...state.obj, newProp: 123 }
使用常量替代Mutation事件类型
使用常量替代 mutation 事件类型在各种 Flux 实现中是很常见的模式。这样可以使 linter 之类的工具发挥作用,同时把这些常量放在单独的文件中可以让你的代码合作者对整个 app 包含的 mutation 一目了然:
mutation-types.js
// mutation-types.js
export const SOME_MUTATION = 'SOME_MUTATION'
store.js
// store.js
import Vuex from 'vuex'
import {

     SOME_MUTATION } from './mutation-types'

const store = new Vuex.Store({


  state: {

     ... },
  mutations: {


    // 我们可以使用 ES2015 风格的计算属性命名功能来使用一个常量作为函数名
    [SOME_MUTATION] (state) {


      // mutate state
    }
  }
})
用不用常量取决于你——在需要多人协作的大型项目中,这会很有帮助。但如果你不喜欢,你完全可以不这样做。
Mutation 必须是同步函数
一条重要的原则就是要记住 mutation 必须是同步函数。为什么?请参考下面的例子:
如果需要使用异步函数,则可以使用
Action
mutations: {


  someMutation (state) {


    api.callAsyncMethod(() => {


      state.count++
    })
  }
}
现在想象,我们正在 debug 一个 app 并且观察 devtool 中的 mutation 日志。每一条 mutation 被记录,devtools 都需要捕捉到前一状态和后一状态的快照。然而,在上面的例子中 mutation 中的异步函数中的回调让这不可能完成:因为当 mutation 触发的时候,回调函数还没有被调用,devtools 不知道什么时候回调函数实际上被调用——实质上任何在回调函数中进行的状态的改变都是不可追踪的。
在组件中提交 Mutation
你可以在组件中使用 this.$store.commit('xxx') 提交 mutation,或者使用 mapMutations 辅助函数将组件中的 methods 映射为 store.commit 调用(需要在根节点注入 store)。
import {

     mapMutations } from 'vuex'

export default {


  // ...
  methods: {


    ...mapMutations([
      'increment', // 将 `this.increment()` 映射为 `this.$store.commit('increment')`

      // `mapMutations` 也支持载荷:
      'incrementBy' // 将 `this.incrementBy(amount)` 映射为 `this.$store.commit('incrementBy', amount)`
    ]),
    ...mapMutations({


      add: 'increment' // 将 `this.add()` 映射为 `this.$store.commit('increment')`
    })
  }
}
Action
Action 类似于 mutation,不同在于:
- Action 提交的是 mutation,而不是直接变更状态。
- Action 可以包含任意异步操作。
让我们来注册一个简单的 action:
const store = new Vuex.Store({


  state: {


    count: 0
  },
  mutations: {


    increment (state) {


      state.count++
    }
  },
  actions: {


    increment (context) {


      context.commit('increment')
    }
  }
})
Action 函数接受一个与 store 实例具有相同方法和属性的 context 对象,因此你可以调用 context.commit 提交一个 mutation,或者通过 context.state 和 context.getters 来获取 state 和 getters。当我们在之后介绍到 Modules 时,你就知道 context 对象为什么不是 store 实例本身了。
实践中,我们会经常用到 ES2015 的 参数解构 (opens new window)来简化代码(特别是我们需要调用 commit 很多次的时候):
actions: {


  increment ({

      commit }) {


    commit('increment')
  }
}
分发 Action
Action 通过 store.dispatch 方法触发:
store.dispatch('increment')
乍一眼看上去感觉多此一举,我们直接分发 mutation 岂不更方便?实际上并非如此,还记得 mutation 必须同步执行这个限制么?Action 就不受约束!我们可以在 action 内部执行异步操作:
actions: {


  incrementAsync ({

      commit }) {


    setTimeout(() => {


      commit('increment')
    }, 1000)
  }
}
Actions 支持同样的载荷方式和对象方式进行分发:
// 以载荷形式分发
store.dispatch('incrementAsync', {


  amount: 10
})

// 以对象形式分发
store.dispatch({


  type: 'incrementAsync',
  amount: 10
})
来看一个更加实际的购物车示例,涉及到调用异步 API 和分发多重 mutation:
actions: {


  checkout ({

      commit, state }, products) {


    // 把当前购物车的物品备份起来
    const savedCartItems = [...state.cart.added]
    // 发出结账请求,然后乐观地清空购物车
    commit(types.CHECKOUT_REQUEST)
    // 购物 API 接受一个成功回调和一个失败回调
    shop.buyProducts(
      products,
      // 成功操作
      () => commit(types.CHECKOUT_SUCCESS),
      // 失败操作
      () => commit(types.CHECKOUT_FAILURE, savedCartItems)
    )
  }
}
注意我们正在进行一系列的异步操作,并且通过提交 mutation 来记录 action 产生的副作用(即状态变更)。
在组件中分发 Action
你在组件中使用 this.$store.dispatch('xxx') 分发 action,或者使用 mapActions 辅助函数将组件的 methods 映射为 store.dispatch 调用(需要先在根节点注入 store):
import {

     mapActions } from 'vuex'

export default {


  // ...
  methods: {


    ...mapActions([
      'increment', // 将 `this.increment()` 映射为 `this.$store.dispatch('increment')`

      // `mapActions` 也支持载荷:
      'incrementBy' // 将 `this.incrementBy(amount)` 映射为 `this.$store.dispatch('incrementBy', amount)`
    ]),
    ...mapActions({


      add: 'increment' // 将 `this.add()` 映射为 `this.$store.dispatch('increment')`
    })
  }
}
组合 Action
Action 通常是异步的,那么如何知道 action 什么时候结束呢?更重要的是,我们如何才能组合多个 action,以处理更加复杂的异步流程?
首先,你需要明白 store.dispatch 可以处理被触发的 action 的处理函数返回的 Promise,并且 store.dispatch 仍旧返回 Promise:
actions: {


  actionA ({

      commit }) {


    return new Promise((resolve, reject) => {


      setTimeout(() => {


        commit('someMutation')
        resolve()
      }, 1000)
    })
  }
}
现在你可以:
store.dispatch('actionA').then(() => {


  // ...
})
在另外一个 action 中也可以:
actions: {


  // ...
  actionB ({

      dispatch, commit }) {


    return dispatch('actionA').then(() => {


      commit('someOtherMutation')
    })
  }
}
最后,如果我们利用 async / await (opens new window),我们可以如下组合 action:
// 假设 getData() 和 getOtherData() 返回的是 Promise

actions: {


  async actionA ({

      commit }) {


    commit('gotData', await getData())
  },
  async actionB ({

      dispatch, commit }) {


    await dispatch('actionA') // 等待 actionA 完成
    commit('gotOtherData', await getOtherData())
  }
}
一个
store.dispatch在不同模块中可以触发多个 action 函数。在这种情况下,只有当所有触发函数完成后,返回的 Promise 才会执行。
Module
由于使用单一状态树,应用的所有状态会集中到一个比较大的对象。当应用变得非常复杂时,store 对象就有可能变得相当臃肿。
为了解决以上问题,Vuex 允许我们将 store 分割成模块(module)。每个模块拥有自己的 state、mutation、action、getter、甚至是嵌套子模块——从上至下进行同样方式的分割:
const moduleA = {


  state: () => ({

     ... }),
  mutations: {

     ... },
  actions: {

     ... },
  getters: {

     ... }
}

const moduleB = {


  state: () => ({

     ... }),
  mutations: {

     ... },
  actions: {

     ... }
}

const store = new Vuex.Store({


  modules: {


    a: moduleA,
    b: moduleB
  }
})

store.state.a // -> moduleA 的状态
store.state.b // -> moduleB 的状态
模块的局部状态
对于模块内部的 mutation 和 getter,接收的第一个参数是模块的局部状态对象。
const moduleA = {


  state: () => ({


    count: 0
  }),
  mutations: {


    increment (state) {


      // 这里的 `state` 对象是模块的局部状态
      state.count++
    }
  },

  getters: {


    doubleCount (state) {


      return state.count * 2
    }
  }
}
同样,对于模块内部的 action,局部状态通过 context.state 暴露出来,根节点状态则为 context.rootState:
const moduleA = {


  // ...
  actions: {


    incrementIfOddOnRootSum ({

      state, commit, rootState }) {


      if ((state.count + rootState.count) % 2 === 1) {


        commit('increment')
      }
    }
  }
}
对于模块内部的 getter,根节点状态会作为第三个参数暴露出来:
const moduleA = {


  // ...
  getters: {


    sumWithRootCount (state, getters, rootState) {


      return state.count + rootState.count
    }
  }
}
命名空间
默认情况下,模块内部的 action、mutation 和 getter 是注册在全局命名空间的——这样使得多个模块能够对同一 mutation 或 action 作出响应。
如果希望你的模块具有更高的封装度和复用性,你可以通过添加 namespaced: true 的方式使其成为带命名空间的模块。当模块被注册后,它的所有 getter、action 及 mutation 都会自动根据模块注册的路径调整命名。例如:
const store = new Vuex.Store({


  modules: {


    account: {


      namespaced: true,

      // 模块内容(module assets)
      state: () => ({

     ... }), // 模块内的状态已经是嵌套的了,使用 `namespaced` 属性不会对其产生影响
      getters: {


        isAdmin () {

     ... } // -> getters['account/isAdmin']
      },
      actions: {


        login () {

     ... } // -> dispatch('account/login')
      },
      mutations: {


        login () {

     ... } // -> commit('account/login')
      },

      // 嵌套模块
      modules: {


        // 继承父模块的命名空间
        myPage: {


          state: () => ({

     ... }),
          getters: {


            profile () {

     ... } // -> getters['account/profile']
          }
        },

        // 进一步嵌套命名空间
        posts: {


          namespaced: true,

          state: () => ({

     ... }),
          getters: {


            popular () {

     ... } // -> getters['account/posts/popular']
          }
        }
      }
    }
  }
})
启用了命名空间的 getter 和 action 会收到局部化的 getter,dispatch 和 commit。换言之,你在使用模块内容(module assets)时不需要在同一模块内额外添加空间名前缀。更改 namespaced 属性后不需要修改模块内的代码。
在带命名空间的模块内访问全局内容(Global Assets)
如果你希望使用全局 state 和 getter,rootState 和 rootGetters 会作为第三和第四参数传入 getter,也会通过 context 对象的属性传入 action。
若需要在全局命名空间内分发 action 或提交 mutation,将 { root: true } 作为第三参数传给 dispatch 或 commit 即可。
modules: {


  foo: {


    namespaced: true,

    getters: {


      // 在这个模块的 getter 中,`getters` 被局部化了
      // 你可以使用 getter 的第四个参数来调用 `rootGetters`
      someGetter (state, getters, rootState, rootGetters) {


        getters.someOtherGetter // -> 'foo/someOtherGetter'
        rootGetters.someOtherGetter // -> 'someOtherGetter'
      },
      someOtherGetter: state => {

     ... }
    },

    actions: {


      // 在这个模块中, dispatch 和 commit 也被局部化了
      // 他们可以接受 `root` 属性以访问根 dispatch 或 commit
      someAction ({

      dispatch, commit, getters, rootGetters }) {


        getters.someGetter // -> 'foo/someGetter'
        rootGetters.someGetter // -> 'someGetter'

        dispatch('someOtherAction') // -> 'foo/someOtherAction'
        dispatch('someOtherAction', null, {

     root: true }) // -> 'someOtherAction'

        commit('someMutation') // -> 'foo/someMutation'
        commit('someMutation', null, {

     root: true }) // -> 'someMutation'
      },
      someOtherAction (ctx, payload) {

     ... }
    }
  }
}
在带命名空间的模块注册全局 action
若需要在带命名空间的模块注册全局 action,你可添加 root: true,并将这个 action 的定义放在函数 handler 中。例如:
{


  actions: {


    someOtherAction ({

     dispatch}) {


      dispatch('someAction')
    }
  },
  modules: {


    foo: {


      namespaced: true,

      actions: {


        someAction: {


          root: true,
          handler (namespacedContext, payload) {

     ... } // -> 'someAction'
        }
      }
    }
  }
}
带命名空间的绑定函数
当使用 mapState, mapGetters, mapActions 和 mapMutations 这些函数来绑定带命名空间的模块时,写起来可能比较繁琐:
computed: {


  ...mapState({


    a: state => state.some.nested.module.a,
    b: state => state.some.nested.module.b
  })
},
methods: {


  ...mapActions([
    'some/nested/module/foo', // -> this['some/nested/module/foo']()
    'some/nested/module/bar' // -> this['some/nested/module/bar']()
  ])
}
对于这种情况,你可以将模块的空间名称字符串作为第一个参数传递给上述函数,这样所有绑定都会自动将该模块作为上下文。于是上面的例子可以简化为:
computed: {


  ...mapState('some/nested/module', {


    a: state => state.a,
    b: state => state.b
  })
},
methods: {


  ...mapActions('some/nested/module', [
    'foo', // -> this.foo()
    'bar' // -> this.bar()
  ])
}
而且,你可以通过使用 createNamespacedHelpers 创建基于某个命名空间辅助函数。它返回一个对象,对象里有新的绑定在给定命名空间值上的组件绑定辅助函数:
import {

     createNamespacedHelpers } from 'vuex'

const {

     mapState, mapActions } = createNamespacedHelpers('some/nested/module')

export default {


  computed: {


    // 在 `some/nested/module` 中查找
    ...mapState({


      a: state => state.a,
      b: state => state.b
    })
  },
  methods: {


    // 在 `some/nested/module` 中查找
    ...mapActions([
      'foo',
      'bar'
    ])
  }
}
给插件开发者的注意事项
如果你开发的插件(Plugin)提供了模块并允许用户将其添加到 Vuex store,可能需要考虑模块的空间名称问题。对于这种情况,你可以通过插件的参数对象来允许用户指定空间名称:
// 通过插件的参数对象得到空间名称
// 然后返回 Vuex 插件函数
export function createPlugin (options = {

     }) {


  return function (store) {


    // 把空间名字添加到插件模块的类型(type)中去
    const namespace = options.namespace || ''
    store.dispatch(namespace + 'pluginAction')
  }
}
模块动态注册
在 store 创建之后,你可以使用 store.registerModule 方法注册模块:
import Vuex from 'vuex'

const store = new Vuex.Store({

     /* 选项 */ })

// 注册模块 `myModule`
store.registerModule('myModule', {


  // ...
})
// 注册嵌套模块 `nested/myModule`
store.registerModule(['nested', 'myModule'], {


  // ...
})
之后就可以通过 store.state.myModule 和 store.state.nested.myModule 访问模块的状态。
模块动态注册功能使得其他 Vue 插件可以通过在 store 中附加新模块的方式来使用 Vuex 管理状态。例如,vuex-router-sync (opens new window)插件就是通过动态注册模块将 vue-router 和 vuex 结合在一起,实现应用的路由状态管理。
你也可以使用 store.unregisterModule(moduleName) 来动态卸载模块。注意,你不能使用此方法卸载静态模块(即创建 store 时声明的模块)。
注意,你可以通过 store.hasModule(moduleName) 方法检查该模块是否已经被注册到 store。
保留 state
在注册一个新 module 时,你很有可能想保留过去的 state,例如从一个服务端渲染的应用保留 state。你可以通过 preserveState 选项将其归档:store.registerModule('a', module, { preserveState: true })。
当你设置 preserveState: true 时,该模块会被注册,action、mutation 和 getter 会被添加到 store 中,但是 state 不会。这里假设 store 的 state 已经包含了这个 module 的 state 并且你不希望将其覆写。
模块重用
有时我们可能需要创建一个模块的多个实例,例如:
- 创建多个 store,他们公用同一个模块 (例如当
runInNewContext选项是false或'once'时,为了在服务端渲染中避免有状态的单例 (opens new window)) - 在一个 store 中多次注册同一个模块
如果我们使用一个纯对象来声明模块的状态,那么这个状态对象会通过引用被共享,导致状态对象被修改时 store 或模块间数据互相污染的问题。
实际上这和 Vue 组件内的 data 是同样的问题。因此解决办法也是相同的——使用一个函数来声明模块状态(仅 2.3.0+ 支持):
const MyReusableModule = {


  state: () => ({


    foo: 'bar'
  }),
  // mutation, action 和 getter 等等...
}
项目结构
Vuex 并不限制你的代码结构。但是,它规定了一些需要遵守的规则:
- 应用层级的状态应该集中到单个 store 对象中。
- 提交 mutation 是更改状态的唯一方法,并且这个过程是同步的。
- 异步逻辑都应该封装到 action 里面。
只要你遵守以上规则,如何组织代码随你便。如果你的 store 文件太大,只需将 action、mutation 和 getter 分割到单独的文件。
对于大型应用,我们会希望把 Vuex 相关代码分割到模块中。下面是项目结构示例:
├── index.html
├── main.js
├── api
│   └── ... # 抽取出API请求
├── components
│   ├── App.vue
│   └── ...
└── store
    ├── index.js          # 我们组装模块并导出 store 的地方
    ├── actions.js        # 根级别的 action
    ├── mutations.js      # 根级别的 mutation
    └── modules
        ├── cart.js       # 购物车模块
        └── products.js   # 产品模块
Axios
官方文档:https://axios-http.com/zh/docs/intro
Axios 是一个基于 promise 网络请求库,作用于
node.js和浏览器中。 它是 isomorphic 的(即同一套代码可以运行在浏览器和node.js中)。在服务端它使用原生 node.jshttp模块, 而在客户端 (浏览端) 则使用 XMLHttpRequests。
Axios的基本使用和功能介绍
安装和简单使用axios
-
运行下载命令
npm install axios --save -
简单使用axios
引入axios和使用axios
import Vue from 'vue'
import App from './App'
import router from './router'
import axios from "axios";

Vue.config.productionTip = false

/* eslint-disable no-new */
new Vue({


  el: '#app',
  router,
  render: h => h(App)
})

axios({


  // method: "get",
  url: "https://mockapi.eolink.com/4kerZSi97ab1195a22fd3d0e63f397de74e237788a9429a/info"
}).then(res =>{


  console.log(res);
})

axios({


  method: "post",
  url: "https://mockapi.eolink.com/4kerZSi97ab1195a22fd3d0e63f397de74e237788a9429a/list"
}).then(res =>{


  console.log(res);
})
axios实例
可以使用自定义配置新建一个实例。
axios.create([config])
const instance = axios.create({


  baseURL: 'https://some-domain.com/api/',
  timeout: 1000,
  headers: {

    'X-Custom-Header': 'foobar'}
});
以下是可用的实例方法。指定的配置将与实例的配置合并。
-
axios#request(config)
-
axios#get(url[, config])
-
axios#delete(url[, config])
-
axios#head(url[, config])
-
axios#options(url[, config])
-
axios#post(url[, data[, config]])
-
axios#put(url[, data[, config]])
-
axios#patch(url[, data[, config]])
-
axios#getUri([config])
请求配置
这些是创建请求时可以用的配置选项。只有 url 是必需的。如果没有指定 method,请求将默认使用 GET 方法。
{


  // `url` 是用于请求的服务器 URL
  url: '/user',

  // `method` 是创建请求时使用的方法
  method: 'get', // 默认值

  // `baseURL` 将自动加在 `url` 前面,除非 `url` 是一个绝对 URL。
  // 它可以通过设置一个 `baseURL` 便于为 axios 实例的方法传递相对 URL
  baseURL: 'https://some-domain.com/api/',

  // `transformRequest` 允许在向服务器发送前,修改请求数据
  // 它只能用于 'PUT', 'POST' 和 'PATCH' 这几个请求方法
  // 数组中最后一个函数必须返回一个字符串, 一个Buffer实例,ArrayBuffer,FormData,或 Stream
  // 你可以修改请求头。
  transformRequest: [function (data, headers) {


    // 对发送的 data 进行任意转换处理

    return data;
  }],

  // `transformResponse` 在传递给 then/catch 前,允许修改响应数据
  transformResponse: [function (data) {


    // 对接收的 data 进行任意转换处理

    return data;
  }],

  // 自定义请求头
  headers: {

    'X-Requested-With': 'XMLHttpRequest'},

  // `params` 是与请求一起发送的 URL 参数
  // 必须是一个简单对象或 URLSearchParams 对象
  params: {


    ID: 12345
  },

  // `paramsSerializer`是可选方法,主要用于序列化`params`
  // (e.g. https://www.npmjs.com/package/qs, http://api.jquery.com/jquery.param/)
  paramsSerializer: function (params) {


    return Qs.stringify(params, {

    arrayFormat: 'brackets'})
  },

  // `data` 是作为请求体被发送的数据
  // 仅适用 'PUT', 'POST', 'DELETE 和 'PATCH' 请求方法
  // 在没有设置 `transformRequest` 时,则必须是以下类型之一:
  // - string, plain object, ArrayBuffer, ArrayBufferView, URLSearchParams
  // - 浏览器专属: FormData, File, Blob
  // - Node 专属: Stream, Buffer
  data: {


    firstName: 'Fred'
  },

  // 发送请求体数据的可选语法
  // 请求方式 post
  // 只有 value 会被发送,key 则不会
  data: 'Country=Brasil&City=Belo Horizonte',

  // `timeout` 指定请求超时的毫秒数。
  // 如果请求时间超过 `timeout` 的值,则请求会被中断
  timeout: 1000, // 默认值是 `0` (永不超时)

  // `withCredentials` 表示跨域请求时是否需要使用凭证
  withCredentials: false, // default

  // `adapter` 允许自定义处理请求,这使测试更加容易。
  // 返回一个 promise 并提供一个有效的响应 (参见 lib/adapters/README.md)。
  adapter: function (config) {


    /* ... */
  },

  // `auth` HTTP Basic Auth
  auth: {


    username: 'janedoe',
    password: 's00pers3cret'
  },

  // `responseType` 表示浏览器将要响应的数据类型
  // 选项包括: 'arraybuffer', 'document', 'json', 'text', 'stream'
  // 浏览器专属:'blob'
  responseType: 'json', // 默认值

  // `responseEncoding` 表示用于解码响应的编码 (Node.js 专属)
  // 注意:忽略 `responseType` 的值为 'stream',或者是客户端请求
  // Note: Ignored for `responseType` of 'stream' or client-side requests
  responseEncoding: 'utf8', // 默认值

  // `xsrfCookieName` 是 xsrf token 的值,被用作 cookie 的名称
  xsrfCookieName: 'XSRF-TOKEN', // 默认值

  // `xsrfHeaderName` 是带有 xsrf token 值的http 请求头名称
  xsrfHeaderName: 'X-XSRF-TOKEN', // 默认值

  // `onUploadProgress` 允许为上传处理进度事件
  // 浏览器专属
  onUploadProgress: function (progressEvent) {


    // 处理原生进度事件
  },

  // `onDownloadProgress` 允许为下载处理进度事件
  // 浏览器专属
  onDownloadProgress: function (progressEvent) {


    // 处理原生进度事件
  },

  // `maxContentLength` 定义了node.js中允许的HTTP响应内容的最大字节数
  maxContentLength: 2000,

  // `maxBodyLength`(仅Node)定义允许的http请求内容的最大字节数
  maxBodyLength: 2000,

  // `validateStatus` 定义了对于给定的 HTTP状态码是 resolve 还是 reject promise。
  // 如果 `validateStatus` 返回 `true` (或者设置为 `null` 或 `undefined`),
  // 则promise 将会 resolved,否则是 rejected。
  validateStatus: function (status) {


    return status >= 200 && status < 300; // 默认值
  },

  // `maxRedirects` 定义了在node.js中要遵循的最大重定向数。
  // 如果设置为0,则不会进行重定向
  maxRedirects: 5, // 默认值

  // `socketPath` 定义了在node.js中使用的UNIX套接字。
  // e.g. '/var/run/docker.sock' 发送请求到 docker 守护进程。
  // 只能指定 `socketPath` 或 `proxy` 。
  // 若都指定,这使用 `socketPath` 。
  socketPath: null, // default

  // `httpAgent` and `httpsAgent` define a custom agent to be used when performing http
  // and https requests, respectively, in node.js. This allows options to be added like
  // `keepAlive` that are not enabled by default.
  httpAgent: new http.Agent({

     keepAlive: true }),
  httpsAgent: new https.Agent({

     keepAlive: true }),

  // `proxy` 定义了代理服务器的主机名,端口和协议。
  // 您可以使用常规的`http_proxy` 和 `https_proxy` 环境变量。
  // 使用 `false` 可以禁用代理功能,同时环境变量也会被忽略。
  // `auth`表示应使用HTTP Basic auth连接到代理,并且提供凭据。
  // 这将设置一个 `Proxy-Authorization` 请求头,它会覆盖 `headers` 中已存在的自定义 `Proxy-Authorization` 请求头。
  // 如果代理服务器使用 HTTPS,则必须设置 protocol 为`https`
  proxy: {


    protocol: 'https',
    host: '127.0.0.1',
    port: 9000,
    auth: {


      username: 'mikeymike',
      password: 'rapunz3l'
    }
  },

  // see https://axios-http.com/zh/docs/cancellation
  cancelToken: new CancelToken(function (cancel) {


  }),

  // `decompress` indicates whether or not the response body should be decompressed
  // automatically. If set to `true` will also remove the 'content-encoding' header
  // from the responses objects of all decompressed responses
  // - Node only (XHR cannot turn off decompression)
  decompress: true // 默认值

}
响应结构
一个请求的响应包含以下信息。
{


  // `data` 由服务器提供的响应
  data: {

    },

  // `status` 来自服务器响应的 HTTP 状态码
  status: 200,

  // `statusText` 来自服务器响应的 HTTP 状态信息
  statusText: 'OK',

  // `headers` 是服务器响应头
  // 所有的 header 名称都是小写,而且可以使用方括号语法访问
  // 例如: `response.headers['content-type']`
  headers: {

    },

  // `config` 是 `axios` 请求的配置信息
  config: {

    },

  // `request` 是生成此响应的请求
  // 在node.js中它是最后一个ClientRequest实例 (in redirects),
  // 在浏览器中则是 XMLHttpRequest 实例
  request: {

    }
}
当使用 then 时,您将接收如下响应:
axios.get('/user/12345')
  .then(function (response) {


    console.log(response.data);
    console.log(response.status);
    console.log(response.statusText);
    console.log(response.headers);
    console.log(response.config);
  });
当使用 catch,或者传递一个rejection callback作为 then 的第二个参数时,响应可以通过 error 对象被使用,正如在错误处理部分解释的那样。
默认配置
您可以指定默认配置,它将作用于每个请求。
全局 axios 默认值
axios.defaults.baseURL = 'https://api.example.com';
axios.defaults.headers.common['Authorization'] = AUTH_TOKEN;
axios.defaults.headers.post['Content-Type'] = 'application/x-www-form-urlencoded';
自定义实例默认值
// 创建实例时配置默认值
const instance = axios.create({


  baseURL: 'https://api.example.com'
});

// 创建实例后修改默认值
instance.defaults.headers.common['Authorization'] = AUTH_TOKEN;
配置的优先级
配置将会按优先级进行合并。它的顺序是:在lib/defaults.js中找到的库默认值,然后是实例的 defaults 属性,最后是请求的 config 参数。后面的优先级要高于前面的。下面有一个例子。
// 使用库提供的默认配置创建实例
// 此时超时配置的默认值是 `0`
const instance = axios.create();

// 重写库的超时默认值
// 现在,所有使用此实例的请求都将等待2.5秒,然后才会超时
instance.defaults.timeout = 2500;

// 重写此请求的超时时间,因为该请求需要很长时间
instance.get('/longRequest', {


  timeout: 5000
});
拦截器
在请求或响应被 then 或 catch 处理前拦截它们。
// 添加请求拦截器
axios.interceptors.request.use(function (config) {


    // 在发送请求之前做些什么
    return config;
  }, function (error) {


    // 对请求错误做些什么
    return Promise.reject(error);
  });

// 添加响应拦截器
axios.interceptors.response.use(function (response) {


    // 2xx 范围内的状态码都会触发该函数。
    // 对响应数据做点什么
    return response;
  }, function (error) {


    // 超出 2xx 范围的状态码都会触发该函数。
    // 对响应错误做点什么
    return Promise.reject(error);
  });
如果你稍后需要移除拦截器,可以这样:
const myInterceptor = axios.interceptors.request.use(function () {

    /*...*/});
axios.interceptors.request.eject(myInterceptor);
可以给自定义的 axios 实例添加拦截器。
const instance = axios.create();
instance.interceptors.request.use(function () {

    /*...*/});
错误处理
axios.get('/user/12345')
  .catch(function (error) {


    if (error.response) {


      // 请求成功发出且服务器也响应了状态码,但状态代码超出了 2xx 的范围
      console.log(error.response.data);
      console.log(error.response.status);
      console.log(error.response.headers);
    } else if (error.request) {


      // 请求已经成功发起,但没有收到响应
      // `error.request` 在浏览器中是 XMLHttpRequest 的实例,
      // 而在node.js中是 http.ClientRequest 的实例
      console.log(error.request);
    } else {


      // 发送请求时出了点问题
      console.log('Error', error.message);
    }
    console.log(error.config);
  });
使用 validateStatus 配置选项,可以自定义抛出错误的 HTTP code。
axios.get('/user/12345', {


  validateStatus: function (status) {


    return status < 500; // 处理状态码小于500的情况
  }
})
使用 toJSON 可以获取更多关于HTTP错误的信息。
axios.get('/user/12345')
  .catch(function (error) {


    console.log(error.toJSON());
  });
取消请求
AbortController
从 v0.22.0 开始,Axios 支持以 fetch API 方式—— AbortController 取消请求:
const controller = new AbortController();

axios.get('/foo/bar', {


   signal: controller.signal
}).then(function(response) {


   //...
});
// 取消请求
controller.abort()
CancelToken deprecated
您还可以使用 cancel token 取消一个请求。
Axios 的 cancel token API 是基于被撤销 cancelable promises proposal。
此 API 从
v0.22.0开始已被弃用,不应在新项目中使用。
可以使用 CancelToken.source 工厂方法创建一个 cancel token ,如下所示:
const CancelToken = axios.CancelToken;
const source = CancelToken.source();

axios.get('/user/12345', {


  cancelToken: source.token
}).catch(function (thrown) {


  if (axios.isCancel(thrown)) {


    console.log('Request canceled', thrown.message);
  } else {


    // 处理错误
  }
});

axios.post('/user/12345', {


  name: 'new name'
}, {


  cancelToken: source.token
})

// 取消请求(message 参数是可选的)
source.cancel('Operation canceled by the user.');
也可以通过传递一个 executor 函数到 CancelToken 的构造函数来创建一个 cancel token:
const CancelToken = axios.CancelToken;
let cancel;

axios.get('/user/12345', {


  cancelToken: new CancelToken(function executor(c) {


    // executor 函数接收一个 cancel 函数作为参数
    cancel = c;
  })
});

// 取消请求
cancel();
注意: 可以使用同一个 cancel token 或 signal 取消多个请求。
在过渡期间,您可以使用这两种取消 API,即使是针对同一个请求:
const controller = new AbortController();

const CancelToken = axios.CancelToken;
const source = CancelToken.source();

axios.get('/user/12345', {


  cancelToken: source.token,
  signal: controller.signal
}).catch(function (thrown) {


  if (axios.isCancel(thrown)) {


    console.log('Request canceled', thrown.message);
  } else {


    // 处理错误
  }
});

axios.post('/user/12345', {


  name: 'new name'
}, {


  cancelToken: source.token
})

// 取消请求 (message 参数是可选的)
source.cancel('Operation canceled by the user.');
// 或
controller.abort(); // 不支持 message 参数
axios模块封装
学习视频使用的封装
-
创建network目录
-
network目录下创建request.js文件
request.jsimport axios from "axios"; //方式1,直接返回instance export function request(config){ //1.创建axios的实例 const instance = axios.create({ baseURL: "https://mockapi.eolink.com/4kerZSi97ab1195a22fd3d0e63f397de74e237788a9429a", timeout: 5000 }) //返回的本身就是Promise对象 return instance(config) } //方式二:返回Promise对象 // export function request(config){ // return new Promise(((resolve, reject) => { // //1.创建axios的实例 // const instance = axios.create({ // baseURL: "https://mockapi.eolink.com/4kerZSi97ab1195a22fd3d0e63f397de74e237788a9429a", // timeout: 5000 // }) // // instance(config) // .then( res =>{ // resolve(res) // }).catch( err =>{ // reject(err) // }) // // // })) // // } //方式三:返回回调函数 // export function request(config){ // //1.创建axios的实例 // const instance = axios.create({ // baseURL: "https://mockapi.eolink.com/4kerZSi97ab1195a22fd3d0e63f397de74e237788a9429a", // timeout: 5000 // }) // instance(config.baseConfig) // .then( res =>{ // config.success(res); // }).catch( err =>{ // config.failure(err); // }) // // } -
其它文件中调用封装好的axios请求
//5.封装request模块
import {

      request} from "./network/request";

//封装方式三的调用方法
// request({


//   baseConfig: {


//     url: "/info"
//   },
//   success: res =>{


//     console.log(res);
//   },
//   failure: err=>{


//     console.log(err);
//   }
// })

//封装方式-、二的调用方式
request({


  url: "/info"
}).then(res =>{


  console.log(res);
}).catch(err =>{


  console.log(err);
})
自行进行封装
这个只是封装的模板,可以在基础上进行再封装
-
下载axios
npm install axios --save -
创建
./network/http.jshttp.jsimport axios from "axios"; //设置全局超时时间10s axios.defaults.timeout = 10000; //创建axios实例 const instance = axios.create({ baseURL: "", }) //http request 拦截器 instance.interceptors.request.use( config => { // const token = getCookie('名称');注意使用的时候需要引入cookie方法,推荐js-cookie config.data = JSON.stringify(config.data); config.headers = { 'Content-Type':'application/x-www-form-urlencoded' } // if(token){ // config.params = {'token':token} // } return config; }, error => { return Promise.reject(error); } ) //http response 拦截器 instance.interceptors.response.use( response => { // if(response.data.errCode ==2){ // router.push({ // path:"/login", // query:{redirect:router.currentRoute.fullPath}//从哪个页面跳转 // }) // } return response; }, error => { return Promise.reject(error) } ) /** * 封装get方法 * @param url * @param params * @returns {Promise} */ export function fetch(url,params={ }){ return new Promise((resolve,reject) => { instance.get(url,{ params:params }) .then(response => { resolve(response.data); }) .catch(err => { reject(err) }) }) } /** * 封装post请求 * @param url * @param data * @returns {Promise} */ export function post(url,data = { }){ return new Promise((resolve,reject) => { instance.post(url,data) .then(response => { resolve(response.data); },err => { reject(err) }) }) } /** * 封装patch请求 * @param url * @param data * @returns {Promise} */ export function patch(url,data = { }){ return new Promise((resolve,reject) => { instance.patch(url,data) .then(response => { resolve(response.data); },err => { reject(err) }) }) } /** * 封装put请求 * @param url * @param data * @returns {Promise} */ export function put(url,data = { }){ return new Promise((resolve,reject) => { instance.put(url,data) .then(response => { resolve(response.data); },err => { reject(err) }) }) } -
在
main.js中引入将方法放入Vue原型全局变量中
import { post,fetch,patch,put} from './network/http' //定义全局变量 Vue.prototype.$post=post; Vue.prototype.$fetch=fetch; Vue.prototype.$patch=patch; Vue.prototype.$put=put; -
在组件中进行使用
mounted() { this.$fetch("https://mockapi.eolink.com/4kerZSi97ab1195a22fd3d0e63f397de74e237788a9429a/info") .then(res =>{ console.log(res); }) } -
结果
api统一模块化管理
需求:
1.更加模块化
2.更方便多人开发,有效减少解决命名冲突
3.处理接口域名有多个情况
这里这里呢新建了一个api文件夹,里面有一个index.js和一个base.js,以及多个根据模块划分的接口js文件。index.js是一个api的出口,base.js管理接口域名,其他js则用来管理各个模块的接口。
-
新建
./api/index.jsindex.js是一个api接口的出口,这样就可以把api接口根据功能划分为多个模块,利于多人协作开发,比如一个人只负责一个模块的开发等,还能方便每个模块中接口的命名哦。
/** * api接口的统一出口 */ // 文章模块接口 import article from '@/api/article'; // 其他模块的接口…… // 导出接口 export default { article, // …… } -
新建
./api/base.js通过base.js来管理我们的接口域名,不管有多少个都可以通过这里进行接口的定义。即使修改起来,也是很方便的。
最后就是接口模块的说明,例如上面的article.js
/** * 接口域名的管理 */ const base = { sq: 'https://xxxx111111.com/api/v1', bd: 'http://xxxxx22222.com/api' } export default base -
新建
./api/acticle.js/** * article模块接口列表 */ import base from './base'; // 导入接口域名列表 import axios from '@/utils/http'; // 导入http中创建的axios实例 import qs from 'qs'; // 根据需求是否导入qs模块 const article = { // 新闻列表 articleList () { return axios.get(`${ base.sq}/topics`); }, // 新闻详情,演示 articleDetail (id, params) { return axios.get(`${ base.sq}/topic/${ id}`, { params: params }); }, // post提交 login (params) { return axios.post(`${ base.sq}/accesstoken`, qs.stringify(params)); } // 其他接口………… } export default article -
将api调用挂载到vue的原型上,在
main.js中import Vue from 'vue' import App from './App' import router from './router' // 导入路由文件 import store from './store' // 导入vuex文件 import api from './api' // 导入api接口 Vue.prototype.$api = api; // 将api挂载到vue的原型上复制代码 -
然后我们可以在页面中这样调用接口
methods: {


    onLoad(id) {


        this.$api.article.articleDetail(id, {


            api: 123
        }).then(res=> {


            // 执行某些操作
        })
    }
}