1.首先创建一个SunnyWeather项目
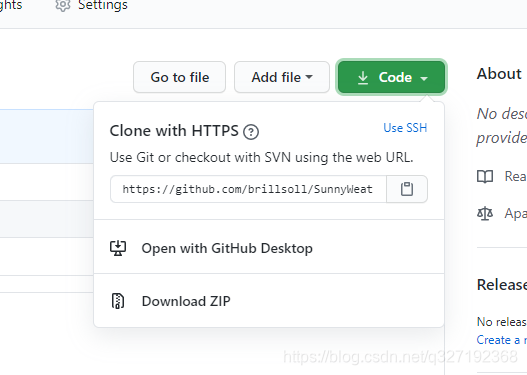
2.打开终端界面切换到Sunnyweather
git clone https://github.com/brillsoll/SunnyWeather.git

将所有文件添加到版本控制
git add .
在本地执行提交操作
git commit -m "First commit."
最后将提交的内容同步到远程版本库中
git push origin master
3.搭建MVVM项目框架
在com.sunnyweather.android包下新建几个包
    implementation 'androidx.recyclerview:recyclerview:1.0.0'
    implementation 'androidx.lifecycle:lifecycle-extensions:2.1.0'
    implementation 'androidx.lifecycle:lifecycle-livedata-ktx:2.2.0'
    implementation 'com.google.android.material:material:1.0.0'
    implementation 'com.squareup.retrofit2:retrofit:2.6.1'
    implementation 'org.jetbrains.kotlinx:kotlinx-coroutines-core:1.3.0'
    implementation 'org.jetbrains.kotlinx:kotlinx-coroutines-android:1.1.1'
     implementation 'com.squareup.retrofit2:converter-gson:2.6.1'
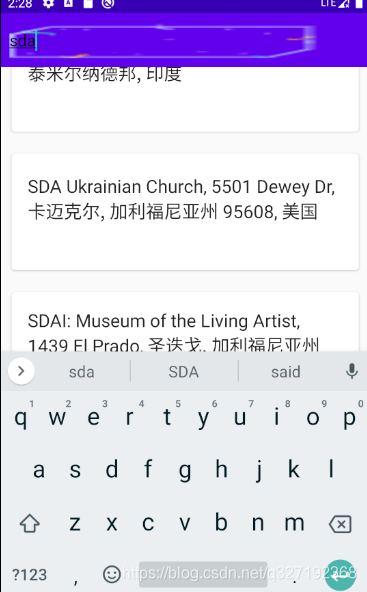
搜索全球城市数据功能
4.实现逻辑层代码
在com.sunnyweather.android包下新建一个SunnyWeatherAppliaction类获取全局Context
class SunnyWeatherApplication :Application(){
      companion object{
        //申请到的令牌值
        const val TOKEN = "1sULJEmdluVroyKW"
        @SuppressLint("StaticFieldLeak")
        lateinit var context: Context
    }
    override fun onCreate() {
        super.onCreate()
        context =applicationContext
    }
}
并且在AndroidManifest.xml中声明
 <application
        android:name=".SunnyWeatherApplication"                      <------------------
        android:allowBackup="true"
        android:icon="@mipmap/ic_launcher"
        android:label="@string/app_name"
        android:roundIcon="@mipmap/ic_launcher_round"
        android:supportsRtl="true"
        android:theme="@style/AppTheme">
      ...
    </application>
</manifest>
在logic/model包下新建PlaceResponse.kt文件,定义一下数据模型。
data class PlaceResponse(val status : String,val places : List<Place>)
data class Place(val name : String,val location : Location,
                 @SerializedName("formatted_adress") val address : String )
data class Location(val lng:String,val lat:String)
由于JSON中一些字段的命名可能与Kotlin的命名规范不太一致,因此这里使用了@SerializedName注解,让JSON字段和Kotlin字段之间建立关系。
接下来编写网络层相关的代码。定义一个用于访问彩云天气城市搜索API的Retrofit接口,在logic/network包下新建PlaceService接口。
interface PlaceService {
    @GET("v2/place?token=${SunnyWeatherApplication.TOKEN}&lang=zh_CN")
    fun searchPlaces(@Query("query") query: String) : Call<PlaceResponse>
}
返回值声明成Call< PlaceResponse>,这样Retrofit会将服务器返回的JSON数据自动解析成PlaaceResponse对象。
定义好了PlaceService接口,我们还得创建一个Retrofit构建器,在logic/network包下新建一个ServiceCreator单例类
object ServiceCreator {
    private const val BASE_URL = "https://api.caiyunapp.com/"
    private val retrofit = Retrofit.Builder()
        .baseUrl(BASE_URL)
        .addConverterFactory(GsonConverterFactory.create())
        .build()

    fun <T> create(serviceClass: Class<T>) :T = retrofit.create(serviceClass)
    inline fun <reified T> create(): T = create(T::class.java)
}
接下来还需要定义一个统一的网络数据源访问入口,对所有的网络请求的API进行封装。在logic/network包下新建一个SunnyWeatherNetwork单例类。
object SunnyWeatherNetwork {
    private val placeService = ServiceCreator.create(PlaceService::class.java)
    suspend fun searchPlaces (query : String) = placeService.searchPlaces(query).await()
    private suspend fun <T> Call<T>.await() : T{
        return suspendCoroutine {continuation ->
            enqueue(object  : Callback<T>{
                override fun onFailure(call: Call<T>, t: Throwable) {
                    continuation.resumeWithException(t)
                }

                override fun onResponse(call: Call<T>, response: Response<T>) {
                    val body =response.body()
                    if (body !=null) continuation.resume(body)
                    else continuation.resumeWithException(
                        RuntimeException(response body is null"))
                }
            }

            )
        }
    }

}
接下来编写仓库层代码,仓库层主要判断调用方请求的函数应该从本地数据源获取还是从网络数据源中获取,这里不实现本地缓存的实现。在logic包下新建一个Repository单例类
object Respository {
    fun searchPlaces(query : String) = liveData(Dispatchers.IO){
        val result = try {
            val placeResponse = SunnyWeatherNetwork.searchPlaces(query)
            if (placeResponse.status=="ok"){
                val places = placeResponse.places
                Result.success(places)
            }else{
                Result.failure(RuntimeException("response status is ${placeResponse.status}"))
            }
        }catch (e : Exception){
            Result.failure<List<Place>>(e)
        }
        emit(result as Result<List<Place>>)
    }
}
我们可以在LiveDtaat()函数代码中的调用任意的挂起函数。
上述代码中我们还将liveData()函数的线程参数类型指定成了Dispatchers.IO,这样代码块中所有代码都能运行在子线程中。众所周知,Android是不允许在主线程中进行网络请求,所以很有必要在仓库层进行一次转换
实现逻辑层只剩最后一步,定义ViewModel层。ViewModel相当逻辑层和UI层之间的一个桥梁。
class PlaceViewModel : ViewModel(){
    private val searchLiveData = MutableLiveData<String>()

    val placeList = ArrayList<Place>()
    val placeLiveData = Transformations.switchMap(searchLiveData) {query ->
        Repository.searchPlaces(query)
    }
    fun searchPlaces(query : String){
        searchLiveData.value=query
    }
}
PlaceViewModel中使用Transfrotmations的switchMap()方法来观察这个对象,否则仓库层返回的LiveData对象将无法进行观察。
5.实现UI层代码
在res/layout目录新建fragment_place.xml
<RelativeLayout
    xmlns:android="http://schemas.android.com/apk/res/android" android:layout_width="match_parent"
    android:layout_height="match_parent"
    android:background="?android:windowBackground">
    <ImageView
        android:id="@+id/bgImageView"
        android:layout_width="match_parent"
        android:layout_height="wrap_content"
        android:layout_alignParentBottom="true"
        android:src="@drawable/bg_place"
        ></ImageView>
    <FrameLayout
        android:id="@+id/actionBarLayout"
        android:layout_width="match_parent"
        android:layout_height="60dp"
        android:background="@color/colorPrimary"
        >
        <EditText
            android:id="@+id/searchPlaceEdit"
            android:layout_width="match_parent"
            android:layout_height="40dp"
            android:layout_gravity="center_vertical"
            android:layout_marginStart="10dp"
            android:layout_marginEnd="10dp"
            android:hint="输入地址"
            android:background="@drawable/bg_search"
            ></EditText>
    </FrameLayout>
    <androidx.recyclerview.widget.RecyclerView
        android:layout_width="match_parent"
        android:layout_height="match_parent"
        android:layout_below="@id/actionBarLayout"
        android:visibility="gone"
        ></androidx.recyclerview.widget.RecyclerView>
</RelativeLayout>
我们需要为RecyclerView创建子项布局,在layout目录下新建一个place_item.xml文件
<com.google.android.material.card.MaterialCardView xmlns:android="http://schemas.android.com/apk/res/android"
    android:layout_width="match_parent"
    android:layout_height="130dp"
    xmlns:app="http://schemas.android.com/apk/res-auto"
    android:layout_margin="12dp"
    app:cardCornerRadius="4dp">
    <LinearLayout
        android:orientation="vertical"
        android:layout_width="match_parent"
        android:layout_height="wrap_content"
        android:layout_margin="18dp"
        android:layout_gravity="center_vertical"
        >
        <TextView
            android:id="@+id/placeName"
            android:layout_width="match_parent"
            android:layout_height="wrap_content"
            android:textColor="?android:attr/textColorPrimary"
            android:textSize="20sp"
            ></TextView>
        <TextView
            android:id="@+id/placeAddress"
            android:layout_width="wrap_content"
            android:layout_marginTop="10dp"
            android:layout_height="wrap_content"
            android:textColor="?android:attr/textColorPrimary"
            android:textSize="14sp"
            ></TextView>

    </LinearLayout>
</com.google.android.material.card.MaterialCardView>
在ui/place包下新建一个PlaceAdapter类
class PlaceAdapter(private val fragment:Fragment,private val placeList:List<Place>) : RecyclerView.Adapter<PlaceAdapter.ViewHolder>(){
    inner class ViewHolder(view : View) : RecyclerView.ViewHolder(view){
        val placeName : TextView = view.findViewById(R.id.placeName)
        val placeAddress : TextView =view.findViewById(R.id.placeAddress)
    }

    override fun onCreateViewHolder(parent: ViewGroup, viewType: Int): ViewHolder {
        val view=LayoutInflater.from(parent.context).inflate(R.layout.place_item,parent,false)
        return ViewHolder(view)
    }

    override fun onBindViewHolder(holder: ViewHolder, position: Int) {
        val place = placeList[position]
        holder.placeName.text = place.name
        holder.placeAddress.text=place.address
    }

    override fun getItemCount() = placeList.size

}
接下来时对Fragment
class PlaceFragment : Fragment(){

    val viewModel by lazy { ViewModelProviders.of(this).get(PlaceViewModel::class.java) }
    private lateinit var adapter: PlaceAdapter
    override fun onCreateView(
        inflater: LayoutInflater,
        container: ViewGroup?,
        savedInstanceState: Bundle?
    ): View? {
        return super.onCreateView(inflater, container, savedInstanceState)
    }

    override fun onActivityCreated(savedInstanceState: Bundle?) {
        super.onActivityCreated(savedInstanceState)
        val layoutManager =LinearLayoutManager(activity)
        recyclerView.layoutManager=layoutManager
        adapter = PlaceAdapter(this,viewModel.placeList)
        recyclerView.adapter=adapter
        searchPlaceEdit.addTextChangedListener { editable ->
            val content = editable.toString()
            if(content.isNotEmpty()){
                viewModel.searchPlaces(content)
            }else{
                recyclerView.visibility = View.GONE
                bgImageView.visibility = View.VISIBLE
                viewModel.placeList.clear()
                adapter.notifyDataSetChanged()
            }
        }
        viewModel.placeLiveData.observe(this, Observer { result ->
            val places =result.getOrNull()
            if(places != null){
                recyclerView.visibility = View.VISIBLE
                bgImageView.visibility=View.GONE
                viewModel.placeList.clear()
                viewModel.placeList.addAll(places)
                adapter.notifyDataSetChanged()
            }else{
                Toast.makeText(activity,"未能查寻到任何地点",Toast.LENGTH_SHORT).show()
                result.exceptionOrNull()?.printStackTrace()
            }
        })
    }
}
我们先将Fragment添加到Activity中,修改activity_main.xml代码
<FrameLayout xmlns:android="http://schemas.android.com/apk/res/android"
    xmlns:app="http://schemas.android.com/apk/res-auto"
    xmlns:tools="http://schemas.android.com/tools"
    android:layout_width="match_parent"
    android:layout_height="match_parent"
    tools:context=".MainActivity">

    <fragment
        android:id="@+id/placeFragment"
        android:name="com.example.sunnyweather.ui.place.PlaceFragment"
        android:layout_width="match_parent"
        android:layout_height="match_parent"
        ></fragment>

</FrameLayout>
修改res/values/styles.xml中代码,取消原生ActionBar
<resources>

    <!-- Base application theme. -->
    <style name="AppTheme" parent="Theme.AppCompat.Light.NoActionBar">    <------------------修改这里
        <!-- Customize your theme here. -->
        <item name="colorPrimary">@color/colorPrimary</item>
        <item name="colorPrimaryDark">@color/colorPrimaryDark</item>
        <item name="colorAccent">@color/colorAccent</item>
    </style>

</resources>
最后在AndroidManifest.xml中添加权限
<uses-permission android:name="android.permission.INTERNET"></uses-permission>
到此第一阶段完成。
显示天气信息
6.逻辑代码层根据获取实时天气信息接口所返回的JSON数据格式,在logic/model包下新建一个RealtimeResponse.kt文件
data class RealtimeResponse(val status : String, val result : Result){
    data class  Result(val realtime : Realtime)
    data class Realtime(val temperature : Float,val skycon : String,@SerializedName("air_quality") val airQuality : AirQuality)
    data class AirQuality(val aqi : AQI)
    data class AQI(val chn:Float)
}
根据获取未来几天天气信息接口返回的JSON数据格式,在logic/model包下新建一个DailyResponse.kt文件
data class DailyResponse(val status : String,val result: Result){
    data class Result(val daily : Daily)
    data class Daily(val temperature : List<Temperature>,val skycon : List<Skycon>
                     ,@SerializedName("life_index") val lifeIndex : LifeIndex)
    data class Temperature(val max :Float,val min : Float)
    data class Skycon(val value : String, val date : Date)
    data class LifeIndex(val coldRisk :List<LifeDescription>,val carWashing : LifeDescription,
                        val ultraviolet : LifeDescription,val dressing : LifeDescription)
    data class LifeDescription(val desc : String)
}
另外我们还需要在logic/model包下再定义一个Weather类,用于将Realtime和Daily对象封装起来。
class Weather (val realtime : RealtimeResponse.Realtime,val daily: DailyResponse.Daily)
现在定义一个访问天气信息API的Retrofit接口,在logic/network包下新建WeatherService接口
interface WeatherService {
    @GET("v2.5/${SunnyWeatherApplication.TOKEN}/{lng},{lat}/realtime.json")
    fun getRealtimeWeather(@Path("lng") lng:String,@Path("lat") lat:String) :Call<RealtimeResponse>

    @GET("v2.5/${SunnyWeatherApplication.TOKEN}/{lng},{lat}/daily.json")
    fun getDailyWeather(@Path("lng") lng : String,@Path("lat") lat: String) : Call<DailyResponse>
}
修改SunnyWeatherNetwork中的代码
object SunnyWeatherNetwork {
    private val weatherService = ServiceCreator.create(WeatherService::class.java)
    suspend fun getDailyWeather(lng : String,lat : String) = weatherService.getDailyWeather(lng,lat).await()
    suspend fun getRealtimeWeather(lng: String,lat: String) = weatherService.getRealtimeWeather(lng,lat).await()
...
}
修改Repository中的代码
object Repository {
    ...
    fun refreshWeather(lng : String,lat : String) = liveData(Dispatchers.IO) {
        val result = try {
            coroutineScope {
                val deferredRealtime = async {
                    SunnyWeatherNetwork.getRealtimeWeather(lng, lat)
                }
                val deferredDaily = async {
                    SunnyWeatherNetwork.getDailyWeather(lng, lat)
                }
                val realtimeResponse = deferredRealtime.await()
                val dailyResponse = deferredDaily.await()
                if (realtimeResponse.status == "ok" && dailyResponse.status == "ok") {
                    val weather =
                        Weather(realtimeResponse.result.realtime, dailyResponse.result.daily)
                    Result.success(weather)
                } else {
                    Result.failure(
                        RuntimeException(
                            "realtime response status is ${realtimeResponse.status}" +
                                    "daily response status is ${dailyResponse.status}"
                        )
                    )
                }
            }
        }catch (e :Exception){
            Result.failure<Weather>(e)
            }
        emit(result as Result<Weather>)
        }
    }
但是我们还可以继续优化,在某个统一入口函数进行封装,使的只要进行一次try catch就行。
object Repository {
    fun searchPlaces(query : String) = fire(Dispatchers.IO) {     <-----------------
            val placeResponse = SunnyWeatherNetwork.searchPlaces(query)
            if (placeResponse.status == "ok") {
                val places = placeResponse.places
                Result.success(places)
            } else {
                failure(RuntimeException("response status is ${placeResponse.status}"))
            }
    }
    fun refreshWeather(lng : String,lat : String) = fire(Dispatchers.IO) {      <---------
            coroutineScope {
                val deferredRealtime = async {
                    SunnyWeatherNetwork.getRealtimeWeather(lng, lat)
                }
                val deferredDaily = async {
                    SunnyWeatherNetwork.getDailyWeather(lng, lat)
                }
                val realtimeResponse = deferredRealtime.await()
                val dailyResponse = deferredDaily.await()
                if (realtimeResponse.status == "ok" && dailyResponse.status == "ok") {
                    val weather =
                        Weather(realtimeResponse.result.realtime, dailyResponse.result.daily)
                    Result.success(weather)
                } else {
                    Result.failure(
                        RuntimeException(
                            "realtime response status is ${realtimeResponse.status}" +
                                    "daily response status is ${dailyResponse.status}"
                        )
                    )
                }
            }
        }

    private fun<T>fire (context : CoroutineContext,block : suspend() -> Result<T>)=          <--------------
        liveData<Result<T>>(context) {
            val result = try {
                block()
            }catch (e:Exception){
                Result.failure<T>(e)
            }
            emit(result)
        }
    }
最后定义ViewModel层,在ui/weather包下新建一个WeatherViewModel
class WeatherViewModel : ViewModel(){
    private val locationLiveData = MutableLiveData<Location>()

    var locationLng = ""
    var locationLat =""
    var placeName = ""
    val weatherLiveData = Transformations.switchMap(locationLiveData){ location ->
        Repository.refreshWeather(location.lng,location.lat)
    }
    fun refreshWeather(lng:String,lat:String){
        locationLiveData.value=Location(lng,lat)
    }
}
我们在WeatherViewModel中定义了locationLng,locationLat和placeNaame这3个变量,他们都是和界面相关的数据,放到ViewModel中可以保证他们在手机屏幕发生旋转的时候不会丢失。
7.UI层代码
右击ui/weather包->New->Activity->Empty Activity,创建一个WeatherActivity
右击res/layout->New->Layout resource file,新建一个now.xml作为当前天气信息的布局
<RelativeLayout
    xmlns:android="http://schemas.android.com/apk/res/android"
    android:id="@+id/nowLayout"
    android:layout_width="match_parent"
    android:layout_height="530dp"
    android:orientation="vertical">
    <FrameLayout
        android:id="@+id/titleLayout"
        android:layout_width="match_parent"
        android:layout_height="70dp"
        >
        <TextView
            android:id="@+id/placeName"
            android:layout_width="wrap_content"
            android:layout_height="wrap_content"
            android:layout_marginStart="60dp"
            android:layout_marginEnd="60dp"
            android:layout_gravity="center"
            android:singleLine="true"
            android:ellipsize="middle"
            android:textColor="#fff"
            android:textSize="22sp"
            ></TextView>
    </FrameLayout>
    <LinearLayout
        android:id="@+id/bodyLayout"
        android:layout_width="match_parent"
        android:layout_height="wrap_content"
        android:layout_centerInParent="true"
        android:orientation="vertical"
        >
        <TextView
            android:id="@+id/currentTemp"
            android:layout_width="wrap_content"
            android:layout_height="wrap_content"
            android:layout_gravity="center_horizontal"
            android:textColor="#fff"
            android:textSize="70sp"
            ></TextView>
        <LinearLayout
            android:layout_width="wrap_content"
            android:layout_height="wrap_content"
            android:layout_gravity="center_horizontal"
            android:layout_marginTop="20dp"
            >
            <TextView
            android:id="@+id/currentSky"
            android:layout_width="wrap_content"
            android:layout_height="wrap_content"
            android:textColor="#fff"
            android:textSize="18sp"
            ></TextView>
            <TextView
                android:layout_width="wrap_content"
                android:layout_height="wrap_content"
                android:textColor="#fff"
                android:textSize="18sp"
                android:layout_marginTop="13dp"
                android:text="|"
                ></TextView>
            <TextView
                android:id="@+id/currentAPI"
                android:layout_width="wrap_content"
                android:layout_height="wrap_content"
                android:textColor="#fff"
                android:layout_marginTop="13dp"
                android:textSize="18sp"
                ></TextView>
        </LinearLayout>
    </LinearLayout>
</RelativeLayout>
然后新建forecast.xml作为未来几天天气信息的布局,
<com.google.android.material.card.MaterialCardView xmlns:android="http://schemas.android.com/apk/res/android"
    android:layout_width="match_parent"
    android:layout_height="wrap_content"
    xmlns:app="http://schemas.android.com/apk/res-auto"
    android:layout_marginLeft="15dp"
    android:layout_marginRight="15dp"
    android:layout_marginTop="15dp"
    app:cardCornerRadius="4dp">
    <LinearLayout
        android:orientation="vertical"
        android:layout_width="match_parent"
        android:layout_height="wrap_content"
        >
        <TextView
            android:layout_width="wrap_content"
            android:layout_height="wrap_content"
            android:layout_marginStart="15dp"
            android:layout_marginTop="20dp"
            android:layout_marginBottom="20dp"
            android:text="预报"
            android:textColor="?android:attr/textColorPrimary"
            android:textSize="20sp"
            ></TextView>
        <LinearLayout
            android:layout_width="match_parent"
            android:layout_height="wrap_content"
            android:id="@+id/forecastLayout"
            android:orientation="vertical"
            ></LinearLayout>
    </LinearLayout>
</com.google.android.material.card.MaterialCardView>
我们再定义一个未来天气信息的子项布局,创建forecast_item文件
<LinearLayout
    xmlns:android="http://schemas.android.com/apk/res/android"
    android:layout_width="match_parent"
    android:layout_height="match_parent"
    android:layout_margin="15dp">
    <TextView
        android:id="@+id/dateInfo"
        android:layout_width="0dp"
        android:layout_height="wrap_content"
       android:layout_weight="4"
        android:layout_gravity="center_vertical"
        ></TextView>
    <ImageView
        android:id="@+id/skyIcon"
        android:layout_width="20dp"
        android:layout_height="20dp"
        ></ImageView>
    <TextView
        android:id="@+id/skyInfo"
        android:layout_width="0dp"
        android:layout_height="wrap_content"
        android:layout_gravity="center_vertical"
        android:layout_weight="3"
        ></TextView>
    <TextView
        android:id="@+id/temperatureInfo"
        android:layout_width="0dp"
        android:layout_height="wrap_content"
        android:layout_gravity="center_vertical"
        android:layout_weight="3"
        android:gravity="end"
        ></TextView>
</LinearLayout>
然后创建life_index.xml作为生活指数的布局
<com.google.android.material.card.MaterialCardView xmlns:android="http://schemas.android.com/apk/res/android"
    android:layout_width="match_parent"
    android:layout_height="wrap_content"
    xmlns:app="http://schemas.android.com/apk/res-auto"
    android:layout_margin="15dp"
    app:cardCornerRadius="4dp">
    <LinearLayout
        android:orientation="vertical"
        android:layout_width="match_parent"
        android:layout_height="wrap_content"
        >
        <TextView
            android:layout_width="wrap_content"
            android:layout_height="wrap_content"
            android:layout_marginStart="15dp"
            android:layout_marginTop="20dp"
            android:text="生活指数"
            android:textColor="?android:attr/textColorPrimary"
            android:textSize="20sp"
            ></TextView>
        <LinearLayout
            android:layout_width="match_parent"
            android:layout_height="wrap_content"
            android:layout_marginTop="20dp"
            >
            <RelativeLayout
                android:layout_width="0dp"
                android:layout_height="wrap_content"
                android:layout_weight="1"
                >
                <ImageView
                    android:id="@+id/coldRiskImg"
                    android:layout_width="wrap_content"
                    android:layout_height="wrap_content"
                    android:layout_centerVertical="true"
                    android:layout_marginStart="20dp"
                    android:src="@drawable/cold"
                    ></ImageView>
                <LinearLayout
                    android:layout_width="wrap_content"
                    android:layout_height="wrap_content"
                    android:layout_centerVertical="true"
                    android:layout_toEndOf="@+id/coldRiskImg"
                    android:layout_marginStart="20dp"
                    android:orientation="vertical"
                    >
                    <TextView
                        android:layout_width="wrap_content"
                        android:layout_height="wrap_content"
                        android:textSize="12sp"
                        android:text="感冒"
                        ></TextView>
                    <TextView
                        android:id="@+id/coldRiskText"
                        android:layout_width="wrap_content"
                        android:layout_height="wrap_content"
                        android:layout_marginTop="4dp"
                        android:textSize="16sp"
                        android:textColor="?android:attr/textColorPrimary"
                        ></TextView>
                </LinearLayout>
            </RelativeLayout>
            <RelativeLayout
                android:layout_width="0dp"
                android:layout_height="60dp"
                android:layout_weight="1"
                >
                <ImageView
                    android:id="@+id/dressingImg"
                    android:layout_width="wrap_content"
                    android:layout_height="wrap_content"
                    android:src="@drawable/dressing"
                    android:layout_centerVertical="true"
                    android:layout_marginTop="20dp"
                    ></ImageView>
                <LinearLayout
                    android:layout_width="wrap_content"
                    android:layout_height="wrap_content"
                    android:layout_centerVertical="true"
                    android:layout_toEndOf="@+id/dressingImg"
                    android:layout_marginStart="20dp"
                    android:orientation="vertical"
                    >
                    <TextView
                        android:layout_width="wrap_content"
                        android:layout_height="wrap_content"
                        android:textSize="12sp"
                        android:text="穿衣"
                        ></TextView>
                    <TextView
                        android:id="@+id/dressingText"
                        android:layout_width="wrap_content"
                        android:layout_height="wrap_content"
                        android:layout_marginTop="4dp"
                        android:textSize="16sp"
                        android:textColor="?android:attr/textColorPrimary"
                        ></TextView>
                </LinearLayout>
            </RelativeLayout>
        </LinearLayout>
        <LinearLayout
            android:layout_width="match_parent"
            android:layout_height="wrap_content"
            android:layout_marginTop="20dp"
            >
            <RelativeLayout
                android:layout_width="0dp"
                android:layout_height="wrap_content"
                android:layout_weight="1"
                >
                <ImageView
                    android:id="@+id/ultravioletImg"
                    android:layout_width="wrap_content"
                    android:layout_height="wrap_content"
                    android:layout_centerVertical="true"
                    android:layout_marginStart="20dp"
                    android:src="@drawable/ultravioletintensity"
                    ></ImageView>
                <LinearLayout
                    android:layout_width="wrap_content"
                    android:layout_height="wrap_content"
                    android:layout_centerVertical="true"
                    android:layout_toEndOf="@+id/ultravioletImg"
                    android:layout_marginStart="20dp"
                    android:orientation="vertical"
                    >
                    <TextView
                        android:layout_width="wrap_content"
                        android:layout_height="wrap_content"
                        android:textSize="12sp"
                        android:text="实时紫外线"
                        ></TextView>
                    <TextView
                        android:id="@+id/ultravioletText"
                        android:layout_width="wrap_content"
                        android:layout_height="wrap_content"
                        android:layout_marginTop="4dp"
                        android:textSize="16sp"
                        android:textColor="?android:attr/textColorPrimary"
                        ></TextView>
                </LinearLayout>
            </RelativeLayout>
            <RelativeLayout
                android:layout_width="0dp"
                android:layout_height="60dp"
                android:layout_weight="1"
                >
                <ImageView
                    android:id="@+id/carWashingImg"
                    android:layout_width="wrap_content"
                    android:layout_height="wrap_content"
                    android:src="@drawable/washCar"
                    android:layout_centerVertical="true"
                    android:layout_marginTop="20dp"
                    ></ImageView>
                <LinearLayout
                    android:layout_width="wrap_content"
                    android:layout_height="wrap_content"
                    android:layout_centerVertical="true"
                    android:layout_toEndOf="@+id/carWashingImg"
                    android:layout_marginStart="20dp"
                    android:orientation="vertical"
                    >
                    <TextView
                        android:layout_width="wrap_content"
                        android:layout_height="wrap_content"
                        android:textSize="12sp"
                        android:text="洗车"
                        ></TextView>
                    <TextView
                        android:id="@+id/carWashingText"
                        android:layout_width="wrap_content"
                        android:layout_height="wrap_content"
                        android:layout_marginTop="4dp"
                        android:textSize="16sp"
                        android:textColor="?android:attr/textColorPrimary"
                        ></TextView>
                </LinearLayout>
            </RelativeLayout>
        </LinearLayout>
    </LinearLayout>
</com.google.android.material.card.MaterialCardView>
接下来我们将他们引入activity_weather.xml
<ScrollView xmlns:android="http://schemas.android.com/apk/res/android"
    xmlns:app="http://schemas.android.com/apk/res-auto"
    xmlns:tools="http://schemas.android.com/tools"
    android:layout_width="match_parent"
    android:layout_height="match_parent"
    tools:context=".ui.weather.WeatherActivity">
    <LinearLayout
        android:orientation="vertical"
        android:layout_width="match_parent"
        android:layout_height="wrap_content"
        >
        <include layout="@layout/now"></include>
        <include layout="@layout/forecast"></include>
        <include layout="@layout/life_index"></include>
    </LinearLayout>
</ScrollView>
我们需要编写一个额外的转换函数,在logic/model包下新建一个Sky.kt文件,代码如下
private val sky = mapOf(
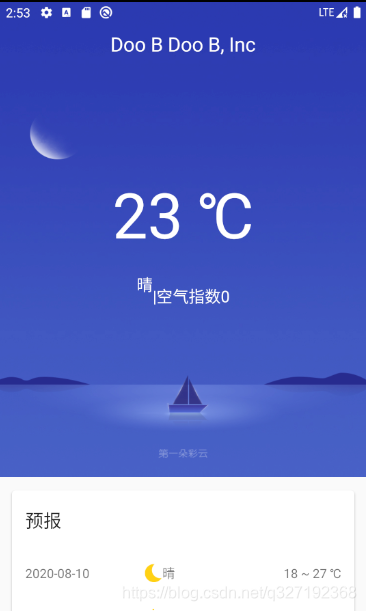
"CLEAR_DAY" to Sky("晴", R.drawable.ic_clear_day, R.drawable.bg_clear_day),
"CLEAR_NIGHT" to Sky("晴", R.drawable.ic_clear_night, R.drawable.bg_clear_night),
"PARTLY_CLOUDY_DAY" to Sky("多云", R.drawable.ic_partly_cloud_day, R.drawable.bg_partly_cloudy_day),
"PARTLY_CLOUDY_NIGHT" to Sky("多云", R.drawable.ic_partly_cloud_night, R.drawable.bg_partly_cloudy_night),
"CLOUDY" to Sky("阴", R.drawable.ic_cloudy, R.drawable.bg_cloudy),
"WIND" to Sky("大风", R.drawable.ic_cloudy, R.drawable.bg_wind),
"LIGHT_RAIN" to Sky("小雨", R.drawable.ic_light_rain, R.drawable.bg_rain),
"MODERATE_RAIN" to Sky("中雨", R.drawable.ic_moderate_rain, R.drawable.bg_rain),
"HEAVY_RAIN" to Sky("大雨", R.drawable.ic_heavy_rain, R.drawable.bg_rain),
"STORM_RAIN" to Sky("暴雨", R.drawable.ic_storm_rain, R.drawable.bg_rain),
"THUNDER_SHOWER" to Sky("雷阵雨", R.drawable.ic_thunder_shower, R.drawable.bg_rain),
"SLEET" to Sky("雨夹雪", R.drawable.ic_sleet, R.drawable.bg_rain),
"LIGHT_SNOW" to Sky("小雪", R.drawable.ic_light_snow, R.drawable.bg_snow),
"MODERATE_SNOW" to Sky("中雪", R.drawable.ic_moderate_snow, R.drawable.bg_snow),
"HEAVY_SNOW" to Sky("大雪", R.drawable.ic_heavy_snow, R.drawable.bg_snow),
"STORM_SNOW" to Sky("暴雪", R.drawable.ic_heavy_snow, R.drawable.bg_snow),
"HAIL" to Sky("冰雹", R.drawable.ic_hail, R.drawable.bg_snow),
"LIGHT_HAZE" to Sky("轻度雾霾", R.drawable.ic_light_haze, R.drawable.bg_fog),
"MODERATE_HAZE" to Sky("中度雾霾", R.drawable.ic_moderate_haze, R.drawable.bg_fog),
"HEAVY_HAZE" to Sky("重度雾霾", R.drawable.ic_heavy_haze, R.drawable.bg_fog),
"FOG" to Sky("雾", R.drawable.ic_fog, R.drawable.bg_fog),
"DUST" to Sky("浮尘", R.drawable.ic_fog, R.drawable.bg_fog)
)
fun getSky(skycon: String): Sky {
return sky[skycon] ?: sky["CLEAR_DAY"]!!
}
修改WeatherAcitvity中的代码
class WeatherActivity : AppCompatActivity() {
val viewModel by lazy { ViewModelProviders.of(this).get(WeatherViewModel::class.java) }
override fun onCreate(savedInstanceState: Bundle?) {
super.onCreate(savedInstanceState)
setContentView(R.layout.activity_weather)
if(viewModel.locationLng.isEmpty()){
viewModel.locationLng=intent.getStringExtra("location_lng") ?:""
}
if (viewModel.locationLat.isEmpty()){
viewModel.locationLat = intent.getStringExtra("location_lat") ?:""
}
if (viewModel.placeName.isEmpty()){
viewModel.placeName = intent.getStringExtra("place_name") ?:""
}
viewModel.weatherLiveData.observe(this, Observer {result->
val weather = result.getOrNull()
if(weather!=null){
showWeatherInfo(weather)
}else{
Toast.makeText(this,"无法获取天气信息",Toast.LENGTH_SHORT).show()
result.exceptionOrNull()?.printStackTrace()
}
})
viewModel.refreshWeather(viewModel.locationLng,viewModel.locationLat)
}
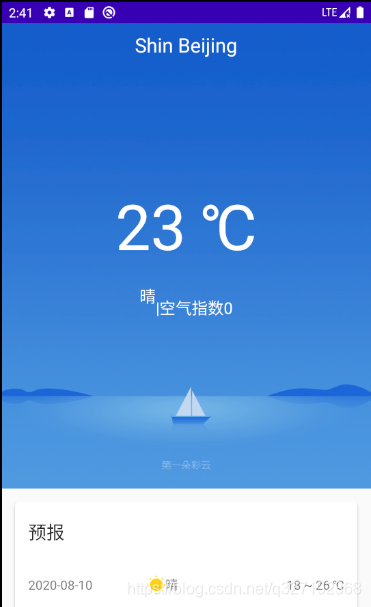
private fun showWeatherInfo(weather : Weather){
placeName.text=viewModel.placeName
val realtime = weather.realtime
val daily = weather.daily
//填充now.xml布局中的数据
val currentTempText = "${realtime.temperature.toInt()} ℃"
currentTemp.text=currentTempText
currentSky.text= getSky(realtime.skycon).info
val currentPM25Text="空气指数${realtime.airQuality.aqi.chn.toInt()}"
currentAQI.text =currentPM25Text
nowLayout.setBackgroundResource(getSky(realtime.skycon).bg)
//填充forecast.xml布局中的数据
forecastLayout.removeAllViews()
val days = daily.skycon.size
for (i in 0 until days){
val skycon = daily.skycon[i]
val temperature = daily.temperature[i]
val view =LayoutInflater.from(this).inflate(R.layout.forecast_item,forecastLayout,false)
val dateInfo = view.findViewById(R.id.dateInfo) as TextView
val skyIcon = view.findViewById(R.id.skyIcon) as ImageView
val skyInfo = view.findViewById(R.id.skyInfo) as TextView
val temperatureInfo = view.findViewById(R.id.temperatureInfo) as TextView
val simpleDateFormat =SimpleDateFormat("yyyy-MM-dd",Locale.getDefault())
dateInfo.text = simpleDateFormat.format(skycon.date)
val sky= getSky(skycon.value)
skyIcon.setImageResource(sky.icon)
skyInfo.text=sky.info
val tempText = "${temperature.min.toInt()} ~ ${temperature.max.toInt()} ℃"
temperatureInfo.text=tempText
forecastLayout.addView(view)
}
//填充 life_index.xml布局中的数据
val lifeIndex = daily.lifeIndex
coldRiskText.text = lifeIndex.coldRisk[0].desc
dressingText.text = lifeIndex.dressing[0].desc
ultravioletText.text =lifeIndex.ultraviolet[0].desc
carWashingText.text = lifeIndex.carWashing[0].desc
weatherLayout.visibility=View.VISIBLE
}
}
修改PlaceAdapter中的代码
class PlaceAdapter(private val fragment:Fragment,private val placeList:List<Place>) : RecyclerView.Adapter<PlaceAdapter.ViewHolder>(){
...
    override fun onCreateViewHolder(parent: ViewGroup, viewType: Int): ViewHolder {
        val view=LayoutInflater.from(parent.context).inflate(R.layout.place_item,parent,false)
        val holder =ViewHolder(view)
        holder.itemView.setOnClickListener {
            val position =holder.adapterPosition
            val place =placeList[position]
            val intent = Intent(parent.context,WeatherActivity::class.java).apply {
                putExtra("location_lng",place.location.lng)
                putExtra("location_lat",place.location.lat)
                putExtra("place_name",place.name)
            }
            fragment.startActivity(intent)
        }
        return holder
    }
背景图没有和状态栏融合到一起,修改WeatherActivity中的代码
 override fun onCreate(savedInstanceState: Bundle?) {
        super.onCreate(savedInstanceState)
        val decorView = window.decorView
        decorView.systemUiVisibility = View.SYSTEM_UI_FLAG_LAYOUT_FULLSCREEN or View.SYSTEM_UI_FLAG_LAYOUT_STABLE
        window.statusBarColor = Color.TRANSPARENT
        setContentView(R.layout.activity_weather)
        ...
        }
我们调用fetWindow().getDecorView()方法拿到当前Activity的DecorView,再调用它的setSystemUiVisibility()方法来改变系统UI的显示,这里传入View.SYSTEM_UI_FLAAG_LAAAYOUT_FULLSCREEN和View.SYSTEM_UI_FLAG_LAYOUT_STAABLE表示Activity布局会显示在状态栏上面,最后调用setStatusBarColor()方法将状态栏设置成透明色
修改now.xml中代码
<RelativeLayout
    xmlns:android="http://schemas.android.com/apk/res/android"
    android:id="@+id/nowLayout"
    android:layout_width="match_parent"
    android:layout_height="530dp"
    android:orientation="vertical">
    <FrameLayout
        android:id="@+id/titleLayout"
        android:layout_width="match_parent"
        android:layout_height="70dp"
        android:fitsSystemWindows="true"      <------修改这里
        >
        ...
</RelativeLayout>
借助fitsSystemWindow属性,设置为true,表示会为系统栏留出控件。
记录选中的城市
在logic/dao包下新建一个PlaceDao单例类
object PlaceDao {
    fun savePlace(place:Place){
        sharedPreferences().edit{
            putString("place",Gson().toJson(place))
        }
    }
    fun getSavedPlace() : Place{
        val placeJson = sharedPreferences().getString("place","")
        return Gson().fromJson(placeJson,Place::class.java)
    }
    fun isPlaceSaved() = sharedPreferences().contains("place")
    private fun sharedPreferences() = SunnyWeatherApplication.context.getSharedPreferences("sunny_weather",Context.MODE_PRIVATE)
}
我们通过GSON将Place对象转换成一个Json字符串,然后通过字符串的方式保存数据
将PlaceDao封装后,接下来我们可以在仓库层进行实现,修改Repository中的代码
在这里插入代码片
object Repository {
    fun savePlace(place : Place) = PlaceDao.savePlace(place)
    fun getSavedPlace() = PlaceDao.getSavedPlace()
    fun isPlaceSaved() = PlaceDao.isPlaceSaved()
    ...
    }
我们还得在PlaceViewModel中再进行一层封装才行
class PlaceViewModel : ViewModel(){
    ...
    fun savePlace(place: Place) = Repository.savePlace(place)
    fun getSavedPlace(place: Place) = Repository.getSavedPlace()
    fun isPlaceSaved() =Repository.isPlaceSaved()
}
接下来可以进行具体的功能实现,首先修改PlaceAdapter中的代码。
class PlaceAdapter(private val fragment:PlaceFragment,private val placeList:List<Place>) : <-----修改了PlaceFragment
RecyclerView.Adapter<PlaceAdapter.ViewHolder>(){

    override fun onCreateViewHolder(parent: ViewGroup, viewType: Int): ViewHolder {
      ...
            fragment.viewModel.savePlace(place)    <-----------------------
            fragment.startActivity(intent)
            fragment.activity?.finish()
        }
        return holder
    }
修改PlaceFragment中的代码
   override fun onActivityCreated(savedInstanceState: Bundle?) {
        super.onActivityCreated(savedInstanceState)
        if (viewModel.isPlaceSaved()){
            val place = viewModel.getSavedPlace()
            val intent = Intent(context,WeatherActivity::class.java).apply {
                putExtra("location_lng",place.location.lng)
                putExtra("location_lat",place.location.lat)
                putExtra("place_name",place.name)
            }
            startActivity(intent)
            activity?.finish()
            return
        }
     ...
        }
手动刷新天气
首先修改activity_main中的代码
<androidx.swiperefreshlayout.widget.SwipeRefreshLayout                              <-----------
    xmlns:android="http://schemas.android.com/apk/res/android"
    xmlns:app="http://schemas.android.com/apk/res-auto"
    xmlns:tools="http://schemas.android.com/tools"
    android:id="@+id/swipeRefresh"
    android:layout_width="match_parent"
    android:layout_height="match_parent">
<ScrollView
    android:layout_width="match_parent"
    android:layout_height="match_parent"
    tools:context=".ui.weather.WeatherActivity"
    android:id="@+id/weatherLayout"
    android:overScrollMode="never"
    android:visibility="invisible">
    ...
</ScrollView>
</androidx.swiperefreshlayout.widget.SwipeRefreshLayout>
然后修改WeatherActivity中的代码
class WeatherActivity : AppCompatActivity() {
...
    override fun onCreate(savedInstanceState: Bundle?) {
       ...
        viewModel.weatherLiveData.observe(this, Observer {result->
           ...
            swipeRefresh.isRefreshing = false
        })
        swipeRefresh.setColorSchemeResources(R.color.colorPrimary)
        refreshWeather()
        swipeRefresh.setOnRefreshListener {
            refreshWeather()
        }
        viewModel.refreshWeather(viewModel.locationLng,viewModel.locationLat)
    }
    fun refreshWeather(){
        viewModel.refreshWeather(viewModel.locationLng,viewModel.locationLat)
        swipeRefresh.isRefreshing = true
    }
    }
切换城市
需要在头布局中加入一个切换城市的按钮,修改now.xml代码。
<RelativeLayout
    xmlns:android="http://schemas.android.com/apk/res/android"
    android:id="@+id/nowLayout"
    android:layout_width="match_parent"
    android:layout_height="530dp"
    android:orientation="vertical">
    <FrameLayout
        android:id="@+id/titleLayout"
        android:layout_width="match_parent"
        android:layout_height="70dp"
        android:fitsSystemWindows="true"
        >
        <Button
            android:id="@+id/navBtn"
            android:layout_width="30dp"
            android:layout_height="30dp"
            android:layout_marginStart="15dp"
            android:layout_gravity="center_vertical"
            android:background="@drawable/home"
            ></Button>
            ...
                <FrameLayout/>
                ...
            <RelativeLayout/>
接着修改activity_weather.xml布局来加入滑动菜单功能
<androidx.drawerlayout.widget.DrawerLayout xmlns:android="http://schemas.android.com/apk/res/android"
    android:id="@+id/drawerLayout"
    android:layout_width="match_parent"
    android:layout_height="match_parent">
...
    <FrameLayout
        android:layout_width="match_parent"
        android:layout_height="match_parent"
        android:layout_gravity="start"
        android:clickable="true"
        android:focusable="true"
        android:background="@color/colorPrimary"
        >
        <fragment
            android:id="@+id/placeFragment"
            android:name="com.example.sunnyweather.ui.place.PlaceFragment"
            android:layout_width="match_parent"
            android:layout_height="match_parent"
            android:layout_marginTop="25dp"
            ></fragment>
    </FrameLayout>
</androidx.drawerlayout.widget.DrawerLayout>
修改WeatherActivity中的代码
 override fun onCreate(savedInstanceState: Bundle?) {
       ...
        //滑动菜单
        navBtn.setOnClickListener {
            drawerLayout.openDrawer(GravityCompat.START)
        }
        drawerLayout.addDrawerListener(object : DrawerLayout.DrawerListener{
            override fun onDrawerStateChanged(newState: Int) { }

            override fun onDrawerSlide(drawerView: View, slideOffset: Float) {   }

            override fun onDrawerOpened(drawerView: View) { }

            override fun onDrawerClosed(drawerView: View) {
                val manager = getSystemService(Context.INPUT_METHOD_SERVICE) as InputMethodManager
                manager.hideSoftInputFromWindow(drawerView.windowToken,InputMethodManager.HIDE_NOT_ALWAYS)
            }
        })
    }
在切换城市按钮的点击事件中调用DrawerLayout的openDrawer()方法来打开滑动菜单。
监听DrawerLayout的状态,当滑动菜单被隐藏的时候,同时也要隐藏输入法。
修改PlaceFragment中的代码
 override fun onActivityCreated(savedInstanceState: Bundle?) {
        super.onActivityCreated(savedInstanceState)
        if (activity is MainActivity &&viewModel.isPlaceSaved()){			<-----------
            val place = viewModel.getSavedPlace()
            val intent = Intent(context,WeatherActivity::class.java).apply {
                putExtra("location_lng",place.location.lng)
                putExtra("location_lat",place.location.lat)
                putExtra("place_name",place.name)
            }
            startActivity(intent)
            activity?.finish()
            return
        }
        }
最后修改一些PlaceAdapter中的代码
  override fun onCreateViewHolder(parent: ViewGroup, viewType: Int): ViewHolder {
        val view=LayoutInflater.from(parent.context).inflate(R.layout.place_item,parent,false)
        val holder =ViewHolder(view)
        holder.itemView.setOnClickListener {
            val position =holder.adapterPosition
            val place =placeList[position]
            val activity = fragment.activity
            if(activity is WeatherActivity){
                activity.drawerLayout.closeDrawers()
                activity.viewModel.locationLng=place.location.lng
                activity.viewModel.locationLat=place.location.lat
                activity.viewModel.placeName=place.name
                activity.refreshWeather()
            }else{
                val intent = Intent(parent.context,WeatherActivity::class.java).apply {
                    putExtra("location_lng",place.location.lng)
                    putExtra("location_lat",place.location.lat)
                    putExtra("place_name",place.name)
                }
                fragment.startActivity(intent)
               activity?.finish()
            }
            fragment.viewModel.savePlace(place)
        }
        return holder
    }
制作APP图标
右键app文件->New->Image Asset