上一篇文章给大家介绍了java如何根据IP地址定位地理位置,文章里也提到了我做过的一个天气预报,
那么这篇文章将给大家介绍:java如何实现天气预报。
开始之前还是先给大家看看我做的天气预报效果吧。
下面这个是我用exe4j已经打包成的exe文件,在桌面上可以直接双击运行
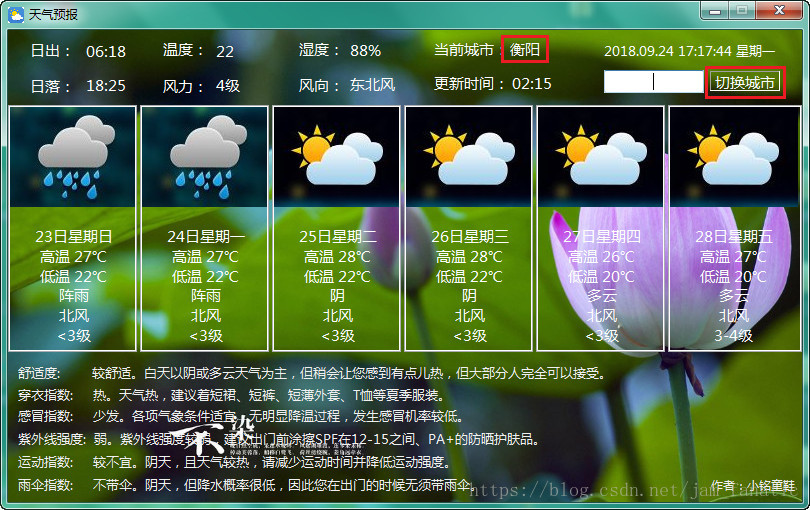
双击运行 "天气预报",运行效果如下图,当前城市已经自动定位到我所在的城市:衡阳,当然了,这里的查询城市是可以进行手动切换的
想要实现如上功能,你需要掌握以下三个知识点:
1.swt编程(界面编程)
2.天气接口的调用
3.json或者xml数据的解析
第一点我就不多说了,感兴趣的同学可以去研究研究,说一下第二点和第三点
第二点:天气接口的调用:
像这种天气数据,我们自己是没办法生成的,只能通过接口的调用来拿数据,我说下我是如何调用天气接口的,网上天气接口很多,大家随便就可以找到很多。这些接口一般返回的数据分为json和xml格式,我调用的是:
https://www.sojson.com/open/api/weather/xml.shtml 这个接口
下面是调用接口的代码:
package com.yc.weather;

import java.io.InputStream;
import java.io.StringReader;
import java.net.URL;
import java.net.URLConnection;
import java.net.URLEncoder;

import org.apache.commons.io.IOUtils;
import org.jdom.Document;
import org.jdom.input.SAXBuilder;
import org.xml.sax.InputSource;

/**
 * 天气预报接口
 *
 * @author Administrator
 *
 */
public class WeatherApi {
	/**
	 * 以Json返回
	 *
	 * @param City
	 * @throws Exception
	 */
	public static void json(String City) throws Exception {
		// 参数url化
		String city = URLEncoder.encode(City, "utf-8");
		// 拼地址
		String apiUrl = String.format("https://www.sojson.com/open/api/weather/json.shtml?city=%s", city);
		// 开始请求
		URL url = new URL(apiUrl);
		URLConnection open = url.openConnection();
		InputStream input = open.getInputStream();
		// 这里转换为String
		String result = IOUtils.toString(input, "utf-8");
		// 输出
		System.out.println(result);
	}

	/**
	 * 以xml返回
	 *
	 * @param City
	 * @return
	 * @throws Exception
	 */
	public static Document xml(String City) throws Exception {
		// 参数url化
		String city = URLEncoder.encode(City, "utf-8");
		// 拼地址
		String apiUrl = String.format("https://www.sojson.com/open/api/weather/xml.shtml?city=%s", city);
		// 开始请求
		URL url = new URL(apiUrl);
		URLConnection open = url.openConnection();
		InputStream input = null;
		try {
			input = open.getInputStream();
		} catch (Exception e) {
			e.printStackTrace();
		}
		// 这里转换为String
		String result = IOUtils.toString(input, "utf-8");
		// 输出
		System.out.println(result);
		StringReader sr = new StringReader(result);
		InputSource is = new InputSource(sr);
		Document doc = (new SAXBuilder()).build(is);
		return doc;
	}

	/**
	 * 测试一下
	 *
	 * @param args
	 * @throws Exception
	 */
	public static void main(String[] args) throws Exception {
		xml("衡阳");
		json("衡阳");
	}

}
该接口有两种返回数据:json和xml,我用的是xml格式的数据,并用Jdom进行数据解析。
第三点:json或者xml数据的解析
下面是利用Jdom进行xml数据解析的核心代码:
package com.yc.weather;

import java.util.ArrayList;
import java.util.List;

import org.jdom.Document;
import org.jdom.Element;
import org.jdom.input.SAXBuilder;
/**
 * 天气数据xml解析
 * @author Administrator
 *
 */
public class WeatherJdom {

	public static Weather xml(String City) throws Exception {

		Weather weather = new Weather();
		// 使用的是sax遍历
		SAXBuilder builder = new SAXBuilder();
		// builder返回值是一个document类型的值,给出需要解析的xml的路径,可能会抛异常
		Document document = null;
		try {
			document = WeatherApi.xml(City);
		} catch (Exception e) {
			e.printStackTrace();
		}
		// 获取根节点,返回值是一个元素类型的值
		Element resp = document.getRootElement();
		// 获取根节点下的子节点,返回类型为List类型的值
		Element city = resp.getChild("city");// 获得city元素
		weather.setCity(city.getText());

		Element updatetime = resp.getChild("updatetime");
		weather.setUpdatetime(updatetime.getText());

		Element wendu = resp.getChild("wendu");
		weather.setWendu(wendu.getText());

		Element fengli = resp.getChild("fengli");
		weather.setFengli(fengli.getText());

		Element shidu = resp.getChild("shidu");
		weather.setShidu(shidu.getText());

		Element fengxiang = resp.getChild("fengxiang");
		weather.setFengxiang(fengxiang.getText());

		Element sunrise = resp.getChild("sunrise_1");
		weather.setSunrise(sunrise.getText());

		Element sunset = resp.getChild("sunset_1");
		weather.setSunset(sunset.getText());

		Element yesterday = resp.getChild("yesterday");
		Element date_1 = yesterday.getChild("date_1");
		weather.setYesterday_date(date_1.getText());

		Element high_1 = yesterday.getChild("high_1");
		weather.setYesterday_high(high_1.getText());

		Element low_1 = yesterday.getChild("low_1");
		weather.setYesterday_low(low_1.getText());

		Element day_1 = yesterday.getChild("day_1");
		Element type_1 = day_1.getChild("type_1");
		weather.setYesterday_day_type(type_1.getText());

		Element fx_1 = day_1.getChild("fx_1");
		weather.setYesterday_day_fx(fx_1.getText());

		Element fl_1 = day_1.getChild("fl_1");
		weather.setYesterday_day_fl(fl_1.getText());

		Element night_1 = yesterday.getChild("night_1");
		Element night_type_1 = night_1.getChild("type_1");
		weather.setYesterday_night_type(night_type_1.getText());

		Element night_fx_1 = night_1.getChild("fx_1");
		weather.setYesterday_night_fx(night_fx_1.getText());

		Element night_fl_1 = night_1.getChild("fl_1");
		weather.setYesterday_night_fl(night_fl_1.getText());

		Element forecast = resp.getChild("forecast");
		List weather_list = forecast.getChildren();

		weather.list_weather = new ArrayList<ForecastWeather>();

		for (int i = 0; i < weather_list.size(); i++) {

			Element Weather = (Element) weather_list.get(i);
			ForecastWeather ForecastWeather = new ForecastWeather();

			ForecastWeather.setDate(Weather.getChildText("date"));
			ForecastWeather.setHigh(Weather.getChildText("high"));
			ForecastWeather.setLow(Weather.getChildText("low"));

			Element weather_day = Weather.getChild("day");
			ForecastWeather.setDay_type(weather_day.getChildText("type"));
			ForecastWeather.setDay_fengxiang(weather_day.getChildText("fengxiang"));
			ForecastWeather.setDay_fengli(weather_day.getChildText("fengli"));

			Element weather_night = Weather.getChild("night");
			ForecastWeather.setNight_type(weather_night.getChildText("type"));
			ForecastWeather.setNight_fengxiang(weather_night.getChildText("fengxiang"));
			ForecastWeather.setNight_fengli(weather_night.getChildText("fengli"));

			weather.list_weather.add(ForecastWeather);
		}

		Element zhishu = resp.getChild("zhishus");
		List zhishu_list = zhishu.getChildren();

		weather.list_zhishu = new ArrayList<Zhishu>();
		for (int j = 0; j < zhishu_list.size(); j++) {

			Element Zhishu = (Element) zhishu_list.get(j);
			Zhishu ZH = new Zhishu();

			ZH.setName(Zhishu.getChildText("name"));
			ZH.setValue(Zhishu.getChildText("value"));
			ZH.setDetail(Zhishu.getChildText("detail"));

			weather.list_zhishu.add(ZH);
		}

		System.out.println(weather);
		System.out.println(weather.list_weather);

		return weather;
	}

	/**
	 * 测试一下
	 * @param args
	 * @throws Exception
	 */
	public static void main(String[] args) throws Exception {
		xml("衡阳");
	}
}
另外还有两个辅助解析的实体类:
第一个,天气预报实体类
package com.yc.weather;

/**
 * 天气预报实体类
 * @author Administrator
 *
 */
public class ForecastWeather {

	private String date="";
	private String high="";
	private String low="";
	// day
	private String day_type="";
	private String day_fengxiang="";
	private String day_fengli="";
	// night
	private String night_type="";
	private String night_fengxiang="";
	private String night_fengli="";

	public String getDate() {
		return date;
	}

	public void setDate(String date) {
		this.date = date;
	}

	public String getHigh() {
		return high;
	}

	public void setHigh(String high) {
		this.high = high;
	}

	public String getLow() {
		return low;
	}

	public void setLow(String low) {
		this.low = low;
	}

	public String getDay_type() {
		return day_type;
	}

	public void setDay_type(String day_type) {
		this.day_type = day_type;
	}

	public String getDay_fengxiang() {
		return day_fengxiang;
	}

	public void setDay_fengxiang(String day_fengxiang) {
		this.day_fengxiang = day_fengxiang;
	}

	public String getDay_fengli() {
		return day_fengli;
	}

	public void setDay_fengli(String day_fengli) {
		this.day_fengli = day_fengli;
	}

	public String getNight_type() {
		return night_type;
	}

	public void setNight_type(String night_type) {
		this.night_type = night_type;
	}

	public String getNight_fengxiang() {
		return night_fengxiang;
	}

	public void setNight_fengxiang(String night_fengxiang) {
		this.night_fengxiang = night_fengxiang;
	}

	public String getNight_fengli() {
		return night_fengli;
	}

	public void setNight_fengli(String night_fengli) {
		this.night_fengli = night_fengli;
	}

	@Override
	public String toString() {
		return "ForecastWeather [date=" + date + ", high=" + high + ", low=" + low + ", day_type=" + day_type
				+ ", day_fengxiang=" + day_fengxiang + ", day_fengli=" + day_fengli + ", night_type=" + night_type
				+ ", night_fengxiang=" + night_fengxiang + ", night_fengli=" + night_fengli + "]";
	}

}
第二个:天气指数类
package com.yc.weather;

/**
 * 天气指数类
 * @author Administrator
 *
 */
public class Zhishu {

	private String name="";
	private String value="";
	private String detail="";
	public String getName() {
		return name;
	}
	public void setName(String name) {
		this.name = name;
	}
	public String getValue() {
		return value;
	}
	public void setValue(String value) {
		this.value = value;
	}
	public String getDetail() {
		return detail;
	}
	public void setDetail(String detail) {
		this.detail = detail;
	}
	@Override
	public String toString() {
		return "Zhishu [name=" + name + ", value=" + value + ", detail=" + detail + "]";
	}


}
解析天气数据,我们还需要导两个jar包:org.jdom 和 org.apache.commons.io 这两个包,大家可以在网上找到。
下面是测试结果:

这样子,我们就拿到了天气数据了,这个接口可以展示最近一周内的天气,经本人测试,准确率90%左右,还挺不错。
拿到天气数据后,接下来就是对数据进行展示了,这个就很简单了,我就不多说了,再配合之前我们讲过的:根据IP自动定位,拿到地理位置后,传到该接口拉取天气数据,然后进行展示,这样就可以实现天气预报功能了。
好了,关于java实现天气预报的经验分享到此,谢谢大家的参阅。
文章属原创,如需引用,请注明出处。