【设计模式】之 创建型模式
设计模式就是在某些场景下,针对某类问题的某种通用的解决方案。
使用设计模式可以使得代码可复用、让代码更容易被他人理解、保证代码可靠性。
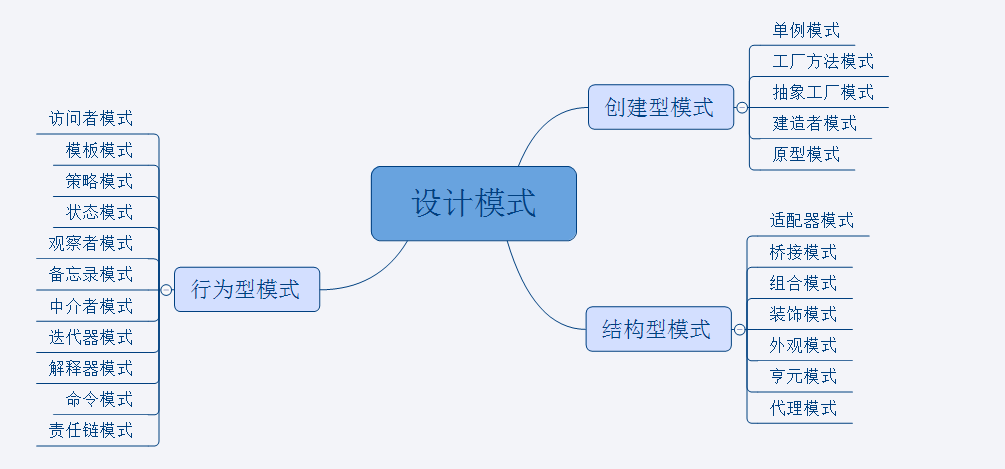
设计模式总体被分为三类:
- 创建型模式:对象实例化的模式,创建型模式用于解耦对象的实例化过程
- 行为型模式:类和对象如何交互,及划分责任和算法
- 结构型模式:把类或对象结合在一起形成一个更大的结构
本文将讲述创建型模式的使用总结。
创建型模式
单例模式
单例模式属于创建型模式,是 Java 中最简单的设计模式之一。
该模式有一下几个特点:
- 单例类只能有一个实例。
- 单例类必须自己创建自己的唯一实例。
- 单例类必须给所有其他对象提供这一实例。
优点
- 内存里只有一个实例,减少了内存的开销
- 避免对资源的多重占用
缺点
- 没有接口,无法被继承
- 违背单一职责原则冲突,一个类应该只关心内部逻辑,而不关心外面怎么样来实例化
单例模式的几种实现方式:
- 懒汉式,线程不安全
- 懒汉式,线程安全
- 饿汉式
- 双重检查锁(DCL,double-checked locking)
- 登记式/静态内部类
- 枚举
下面来看看代码演示。
1、懒汉式,线程不安全
这种方式是最基本的单例实现方式,这种实现最大的问题就是不支持多线程。
因为没有加锁 synchronized,所以严格意义上它并不算单例模式。
这种方式 lazy loading 很明显,第一次调用才初始化,避免内存浪费。
它是线程安全的,支持 lazy loading 。
// java 实现
public class Singleton {


    private static Singleton instance;

    private Singleton() {

     }

    public static Singleton getInstance() {


        if (instance == null) {


            instance = new Singleton();
        }
        return instance;
    }
}

// kotlin 实现
class Singleton private constructor() {


    companion object {


        private var instance: Singleton? = null
            get() {


                if (field == null) {


                    field = Singleton()
                }
                return field
            }

        fun get(): Singleton {


            return instance!!
        }
    }
}
2、懒汉式,线程安全
这种懒汉式实现方式能够在多线程中很好的工作,但是因为加了 synchronized 关键字,效率较低。
它是线程安全的,支持 lazy loading 。
// java 实现
public class Singleton {


    private static Singleton instance;

    private Singleton() {

     }

    public static synchronized Singleton getInstance() {


        if (instance == null) {


            instance = new Singleton();
        }
        return instance;
    }
}

// kotlin 实现
class Singleton private constructor() {


    companion object {


        private var instance: Singleton? = null
            get() {


                if (field == null) {


                    field = Singleton()
                }
                return field
            }

        @Synchronized
        fun get(): Singleton {


            return instance!!
        }
    }
}
3、饿汉式
饿汉式是线程安全的单例创建方式,并且没有加锁,执行效率较高。
但这种方式在类加载时就初始化,浪费了内存,容易产生垃圾对象。
它基于 classloader 机制避免了多线程的同步问题,这时候初始化 instance 显然没有达到 lazy loading 的效果。
它是线程安全的,不支持 lazy loading 。
// java 实现
public class Singleton {


    private static Singleton instance = new Singleton();

    private Singleton() {

     }

    public static Singleton getInstance() {


        return instance;
    }
}

// Kotlin 实现
object Singleton
4、双重检查锁(DCL,double-checked locking)
这种方式采用双锁机制,安全且在多线程情况下能保持高性能,因为 synchronized 并不会每次调用 getSingleton 方法都会执行到。
它是线程安全的,且支持 lazy loading 。
// java 实现
public class Singleton {


    private volatile static Singleton singleton;

    private Singleton() {

     }

    public static Singleton getSingleton() {


        if (singleton == null) {


            synchronized (Singleton.class) {


                if (singleton == null) {


                    singleton = new Singleton();
                }
            }
        }
        return singleton;
    }
}

// Kotlin 实现
class Singleton private constructor() {


    companion object {


        val instance: Singleton by lazy(mode = LazyThreadSafetyMode.SYNCHRONIZED) {


            Singleton()
        }
    }
}

// 注意:kotlin实现中,lazy函数默认就是线程安全的,所以我们并不需要显示的设置 mode = LazyThreadSafetyMode.SYNCHRONIZED
class Singleton private constructor() {


    companion object {


        val instance: Singleton by lazy {


            Singleton()
        }
    }
}

// 另外,kotlin 实现中,如果我们想在获取单例对象时传入一个参数,那么可以这么写
class Singleton private constructor(private val property: Int) {


    companion object {


        @Volatile
        private var instance: Singleton? = null

        fun getInstance(property: Int) = instance ?: synchronized(this) {


            instance ?: Singleton(property).also {


                instance = it
            }
        }
    }
}
5、静态内部类
这种方式能达到双检锁方式一样的功效,但实现更简单。
对静态域使用延迟初始化,应使用这种方式而不是双检锁方式。
这种方式只适用于静态域的情况,双检锁方式可在实例域需要延迟初始化时使用。
这种方式同样利用了 classloader 机制来保证初始化 instance 时只有一个线程,它跟饿汉式不同的是:
饿汉式只要 Singleton 类被装载了,那么 instance 就会被实例化(没有达到 lazy loading 效果),
而这种方式是 Singleton 类被装载了,instance 不一定被初始化。因为 SingletonHolder 类没有被主动使用,只有通过显式调用 getInstance 方法时,才会显式装载 SingletonHolder 类,从而实例化 instance。
它是线程安全的,且支持 lazy loading 。
// java 实现
public class Singleton {


    private static class SingletonHolder {


        private static final Singleton INSTANCE = new Singleton();
    }

    private Singleton() {

     }

    public static final Singleton getInstance() {


        return SingletonHolder.INSTANCE;
    }
}

// Kotlin 实现
class Singleton private constructor() {


    private object SingletonHolder {


        val INSTANCE = Singleton()
    }

    companion object {


        val instance = SingletonHolder.INSTANCE
    }
}
6、枚举
由于 JDK1.5 之后才加入 enum 特性,用这种方式写不免让人感觉生疏,在实际工作中,也很少用。因此这种方式还没有被广泛采用,但这是实现单例模式的最佳方法。
它更简洁,自动支持序列化机制,绝对防止多次实例化。
它不仅能避免多线程同步问题,而且还自动支持序列化机制,防止反序列化重新创建新的对象,绝对防止多次实例化。
它是线程安全的,不支持 lazy loading 。
public enum Singleton {


    INSTANCE;
	// 在这定义自己的业务方法
    public void whateverMethod() {

     }
}
总结:一般情况下,不建议使用第 1 种和第 2 种懒汉方式,建议使用第 3 种饿汉方式。只有在要明确实现 lazy loading 效果时,才会使用第 5 种登记方式。如果涉及到反序列化创建对象时,可以尝试使用第 6 种枚举方式。如果有其他特殊的需求,可以考虑使用第 4 种双检锁方式。
工厂模式
工厂模式属于创建型模式,是 Java 中最常用的设计模式之一。
作为一种创建类模式,在任何需要生成复杂对象的地方,都可以使用工厂方法模式。
有一点需要注意的地方就是复杂对象适合使用工厂模式,而简单对象,特别是只需要通过 new 就可以完成创建的对象,无需使用工厂模式。
如果使用工厂模式,就需要引入一个工厂类,会增加系统的复杂度。
在工厂模式中,我们在创建对象时不会对客户端暴露创建逻辑,
并且是通过使用一个共同的接口来指向新创建的对象。
优点:
- 创建一个对象,只要知道名称就可以了。
- 扩展性高,如果想增加一个产品,只要扩展一个工厂类就可以
- 屏蔽产品的具体实现,调用者只需关心产品的接口
缺点:
每次增加一个产品时,都需要增加一个具体类和对象实现工厂,使得系统中类的个数成倍增加。
代码演示
步骤一:首先定义一个接口。
/**
 * 绘制形状的接口
 */
interface Shape {


    fun draw()
}
步骤二:定义实现该接口的实体类。
/**
 * 长方形
 */
class Rectangle : Shape {


    override fun draw() {


        println("Rectangle:Shape")
    }
}

/**
 * 正方形
 */
class Square : Shape {


    override fun draw() {


        println("Square:Shape")
    }
}

/**
 * 圆形
 */
class Circle : Shape {


    override fun draw() {


        println("Circle:Shape")
    }
}
步骤三:创建一个工厂,生成基于给定信息的实体类的对象。
class ShapeFactory {


    fun getShape(shapeType: String): Shape? {


        return when (shapeType) {


            "CIRCLE" -> {


                Circle()
            }
            "RECTANGLE" -> {


                Rectangle()
            }
            "SQUARE" -> {


                Square()
            }
            else -> null
        }
    }
}
步骤四:测试代码。
@JvmStatic
fun main(args: Array<String>) {


    val shapeFactory = ShapeFactory()

    val shape2: Shape? = shapeFactory.getShape("RECTANGLE")
    shape2?.draw()

    val shape3: Shape? = shapeFactory.getShape("SQUARE")
    shape3?.draw()

    val shape1: Shape? = shapeFactory.getShape("CIRCLE")
    shape1?.draw()
}

// 最终输出结果如下:
System.out: Rectangle:Shape
System.out: Square:Shape
System.out: Circle:Shape
抽象工厂模式
抽象工厂模式是围绕一个超级工厂创建其他工厂,该超级工厂又称为其他工厂的工厂。
在抽象工厂模式中,接口是负责创建一个相关对象的工厂,不需要显式指定它们的类。每个生成的工厂都能按照工厂模式提供对象。
代码演示
步骤一:定义两个接口类
// 接口1
interface Shape {


    fun draw()
}

// 接口2
interface Color {


    fun fill()
}
步骤二:创建实现以上接口的实体类
// 实现 Shape 接口
class Rectangle : Shape {


    override fun draw() {


        println("Rectangle::draw()")
    }
}

class Square : Shape {


    override fun draw() {


        println("Square::draw()")
    }
}

class Circle : Shape {


    override fun draw() {


        println("Circle::draw()")
    }
}

// 实现 Color 接口
class Red : Color {


    override fun fill() {


        println("Inside Red::fill() method.")
    }
}

class Green : Color {


    override fun fill() {


        println("Inside Green::fill() method.")
    }
}

class Blue : Color {


    override fun fill() {


        println("Inside Blue::fill() method.")
    }
}
步骤三:创建抽象工厂类,以便于获取 Color 和 Shape 对象
// 为 Color 和 Shape 对象创建抽象类来获取工厂。
abstract class AbstractFactory {


    abstract fun getColor(color: String?): Color?
    abstract fun getShape(shape: String?): Shape?
}
步骤四:继承 AbstractFactory 的工厂类,基于给定的信息生成实体类的对象
// ShapeFactory 继承 AbstractFactory 的工厂类,重写其 getShape 方法
class ShapeFactory : AbstractFactory() {


    override fun getShape(shapeType: String?): Shape? {


        if (shapeType == null) {


            return null
        }
        return when (shapeType) {


            "CIRCLE" -> {


                Circle()
            }
            "RECTANGLE" -> {


                Rectangle()
            }
            "SQUARE" -> {


                Square()
            }
            else -> null
        }
    }

    override fun getColor(color: String?): Color? {


        return null
    }
}

// ColorFactory 继承 AbstractFactory 的工厂类,重写其 getColor 方法
class ColorFactory : AbstractFactory() {


    override fun getShape(shapeType: String?): Shape? {


        return null
    }

    override fun getColor(color: String?): Color? {


        if (color == null) {


            return null
        }
        return when (color) {


            "RED" -> {


                Red()
            }
            "GREEN" -> {


                Green()
            }
            "BLUE" -> {


                Blue()
            }
            else -> null
        }
    }
}
步骤五:创建工厂构造器,通过传递形状或颜色信息来获取工厂
object FactoryProducer {


    // return 一个抽象工厂
    fun getFactory(choice: String): AbstractFactory? {


        return when (choice) {


            "SHAPE" -> {


                ShapeFactory()
            }
            "COLOR" -> {


                ColorFactory()
            }
            else -> null
        }
    }
}
步骤六:测试代码
fun main(args: Array<String>) {


    // 获取形状工厂
    val shapeFactory = FactoryProducer.getFactory("SHAPE")
    // 获取对象
    val shape1 = shapeFactory?.getShape("CIRCLE")
    shape1?.draw()
    val shape2 = shapeFactory?.getShape("RECTANGLE")
    shape2?.draw()
    val shape3 = shapeFactory?.getShape("SQUARE")
    shape3?.draw()

    //获取颜色工厂
    val colorFactory = FactoryProducer.getFactory("COLOR")
    // 获取对象
    val color1 = colorFactory?.getColor("RED")
    color1?.fill()
    val color2 = colorFactory?.getColor("GREEN")
    color2?.fill()
    val color3 = colorFactory?.getColor("BLUE")
    color3?.fill()
}

// 输出结果如下:
Inside Circle::draw() method.
Inside Rectangle::draw() method.
Inside Square::draw() method.
Inside Red::fill() method.
Inside Green::fill() method.
Inside Blue::fill() method.
建造者模式
有时候我们会面临 一个复杂对象 的创建工作,其通常由各个部分的子对象用一定的算法构成。由于需求的变化,这个复杂对象的各个部分经常面临着剧烈的变化,但是将它们组合在一起的算法却相对稳定。
建造者模式使用多个简单的对象一步一步构建成一个复杂的对象。
一个 Builder 类会一步一步构造最终的对象。该 Builder 类是独立于其他对象的。
使用场景:
- 需要生成的对象具有复杂的内部结构。
- 需要生成的对象内部属性本身相互依赖。
与工厂模式的区别是:建造者模式更加关注与零件装配的顺序。
代码演示
步骤一:定义一个 Computer 类,同时定义一个子类 Builder 以便于构建对象。
/**
 * 私有构造函数,仅能通过建造者方式来创建对象
 */
class Computer private constructor(builder: Builder) {


    // 成员变量
    val mCpu: String = builder.getCpu()
    val mKeyboard: String = builder.getDisplay()
    val mDisplay: String = builder.getKeyboard()

    class Builder {


        private var cpu: String = ""
        private var display: String = ""
        private var keyboard: String = ""

        fun setCpu(cpu: String): Builder {


            this.cpu = cpu
            return this
        }

        fun setDisplay(display: String): Builder {


            this.display = display
            return this
        }

        fun setKeyboard(keyboard: String): Builder {


            this.keyboard = keyboard
            return this
        }

        fun getCpu(): String = cpu
        fun getDisplay(): String = display
        fun getKeyboard(): String = keyboard

        fun build(): Computer {


            return Computer(this)
        }
    }
}
步骤二:测试代码。
val computer = Computer.Builder()
                .setCpu("M1")
                .setDisplay("好的显示器")
                .setKeyboard("好的键盘")
                .build()
原型模式
原型模式是用于创建重复的对象,同时又能保证性能。
利用已有的一个原型对象,快速地生成和原型对象一样的实例。
原型模式实现了一个原型接口,该接口用于创建当前对象的克隆。当直接创建对象的代价比较大时,则可以采用这种模式。采用该模式创建对象,可以提高性能, 逃避构造函数的约束。
例如,一个对象需要在一个高代价的数据库操作之后被创建。我们可以缓存该对象,在下一个请求时返回它的克隆,在需要的时候更新数据库,以此来减少数据库调用。
在实际项目中,原型模式很少单独出现,一般是和工厂方法模式一起出现,通过 clone 的方法创建一个对象,然后由工厂方法提供给调用者。
代码演示
步骤一:创建一个实现了 Cloneable 接口的抽象类
abstract class Shape : Cloneable {


    var id: String? = null
    var type: String? = null
        protected set

    abstract fun draw()

    public override fun clone(): Any {


        var clone: Any? = null
        try {


            clone = super.clone()
        } catch (e: CloneNotSupportedException) {


            e.printStackTrace()
        }
        return clone!!
    }
}
步骤二:创建三个继承了 Shape 类的具体类
class Rectangle : Shape() {


    override fun draw() {


        println("Inside Rectangle::draw() method.")
    }

    init {


        type = "Rectangle"
    }
}

class Square : Shape() {


    override fun draw() {


        println("Inside Square::draw() method.")
    }

    init {


        type = "Square"
    }
}

class Circle : Shape() {


    override fun draw() {


        println("Inside Circle::draw() method.")
    }

    init {


        type = "Circle"
    }
}
步骤三:创建一个类,从数据库获取实体类,并把它们存储在一个 Hashtable 中
object ShapeCache {


    private val shapeMap = Hashtable<String, Shape>()
    fun getShape(shapeId: String?): Shape {


        val cachedShape: Shape = shapeMap[shapeId]!!
        return cachedShape.clone() as Shape
    }

    fun loadCache() {


        val circle = Circle()
        circle.id = "1"
        shapeMap[circle.id] = circle

        val square = Square()
        square.id = "2"
        shapeMap[square.id] = square

        val rectangle = Rectangle()
        rectangle.id = "3"
        shapeMap[rectangle.id] = rectangle
    }
}
步骤四:测试代码
fun main(args: Array<String>) {


    loadCache()
    println("Shape : " + getShape("1").type)
    println("Shape : " + getShape("2").type)
    println("Shape : " + getShape("3").type)
}

// 代码输出结果
Shape : Circle
Shape : Square
Shape : Rectangle