本文的介绍主要基于cyber/examples/common_component_example中的例子.
| 目录 | 说明 |
|---|---|
| README.md | 介绍了如何编译运行该例子 |
| common.launch | 启动文件 |
| common.dag | 配置 |
| common_component_example.cc | 定义了一个组件 |
| common_component_example.h | |
| channel_test_writer.cc | |
| channel_prediction_writer.cc | |
| BUILD |
README.md
CyberRT框架的通用组件示例
如何编译
- 方法一:
cd /apollo
./apollo.sh build cyber
- 方法二:
bazel build //cyber/examples/common_component_example/...
如何运行
配置环境
- 打开cyber/setup.bash文件, 修改
GLOG_alsologtostderr为1,日志将会输出到stderr - 运行
source cyber/setup.bash
启动组件
- 方法一(推荐):使用 Launch 文件启动
cyber_launch start cyber/examples/common_component_example/common.launch
- 方法二:使用 DAG 文件启动
mainboard -d cyber/examples/common_component_example/common.dag
使用 DAG 文件启动
再打开两个终端,分别运行以下命令。
source cyber/setup.bash
export GLOG_alsologtostderr=1
/apollo/bazel-bin/cyber/examples/common_component_example/channel_test_writer
source cyber/setup.bash
export GLOG_alsologtostderr=1
/apollo/bazel-bin/cyber/examples/common_component_example/channel_prediction_writer
这时,如果成功,你会看到第一个终端有如下的输出:
I0331 16:49:34.736016 1774773 common_component_example.cc:25] [mainboard]Start common component Proc [1094] [766]
I0331 16:49:35.069005 1774775 common_component_example.cc:25] [mainboard]Start common component Proc [1095] [767]
I0331 16:49:35.402289 1774783 common_component_example.cc:25] [mainboard]Start common component Proc [1096] [768]
实现
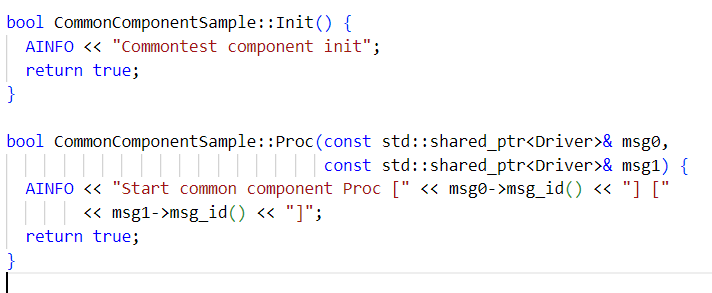
common_component_example是一个简单的module,仅包含一个component CommonComponentSample, 定义在common_component_example.cc中。初始化的时候Init函数会被框架调用,Proc是消息回调函数,客户端发送的消息到达的时候会被框架自动调用。
common.launch
这是一个launch启动文件,可以配合cyber_launch 一起使用
- name:组件的名字
- dag_conf:配置dag文件的路径
- process_name:运行组件时的进程名
<cyber>
    <module>
        <name>common</name>
        <dag_conf>/apollo/cyber/examples/common_component_example/common.dag</dag_conf>
        <process_name>common</process_name>
    </module>
</cyber>
指定了一个配置文件
common.dag
- 内容如下:
# Define all coms in DAG streaming.
module_config {
module_library : "/apollo/bazel-bin/cyber/examples/common_component_example/libcommon_component_example.so"
components {
class_name : "CommonComponentSample"
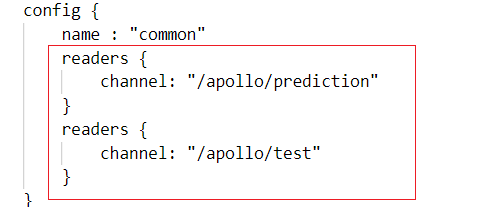
config {
name : "common"
readers {
channel: "/apollo/prediction"
}
readers {
channel: "/apollo/test"
}
}
}
}
- 从下面common_component_example.cpp可以看到,common_component_example.cc中并没有main函数。没错,它并不是一个完整的可执行程序,编译出来的成果物是动态库libcommon_component_example.so。 通过下面的命令可以启动该动态库:
mainbooard -d cyber/examples/common_component_example/common.dag
- Dag文件是module的配置文件,由protocolbuffers文件cyber/proto/dag_conf.proto定义,每个module都要有一个配套的dag文件,启动本module时使用。这里:module_library指明了要加载的动态库。
common_component_example.h
如何实现
- 继承 Component 类

- 定义自己的 Init 和 Proc 函数。Proc 需要指定输入数椐类型。

- 使用CYBER_REGISTER_COMPONENT宏定义把组件类注册成全局可用。

在这里要特别强调的是:
- 你创建的component是继承其他模块的,比如这边写的是Component
- 那么这个Proc的参数类型也要一一对应各个通道的定义类型。

- 具体对应通道是哪里来的,则要看 apollo/cyber/examples/common_component_example/common.dag,这里面的两个readers 就代表着输入的两个通道信息
再比如PlanningComponent 组件

-
那么component中的内容怎么来的呢,首先是根据你当前模块的驱动源,比如你是图像感知处理,没有图像你这模块就不能工作,那么其中就必须有drivers驱动层中camera
-
另外,这个变量要怎么写呢,这得到你通道定义变量的proto中去看。比如你传的是类型,那你先找到对应的proto,即/apollo/modules/prediction/proto/prediction_obstacle.proto
-
进入你可以看到:
syntax = "proto2";
package apollo.prediction;
message PredictionObstacles {


 ···
}
-
看到package是apollo.prediction,那么你写的时候就是< prediction::PredictionObstacles>
-
当然,你如果已经包含了proto的头文件,理论上你只要写< PredictionObstacles>,但是如果你包含头文件中有同样的变量,这时候就需要具体指定了。
common_component_example.cc
实现了 Init 和 Proc
原理
Cyber RT由dag指定配置文件
Cyber RT的模块加载机制主要分为两部分:
- 编译期进行模块注册
- 运行期加载模块并初始化
编译期工作
common_component_example.h中调用CYBER_REGISTER_COMPONENT(CommonComponentSample)注册component。
将宏CYBER_REGISTER_COMPONENT逐步展开后的代码如下(cyber\class_loader\class_loader_register_macro.h),其中:
- 模板参数Derived的值为CommonComponentSample,即本component对应的类名
- 模板参数Base的值为apollo::cyber::ComponentBase,是CommonComponentSample的间接基类
- UniqueID是一个唯一的整数,由编译期宏__COUNTER__实现
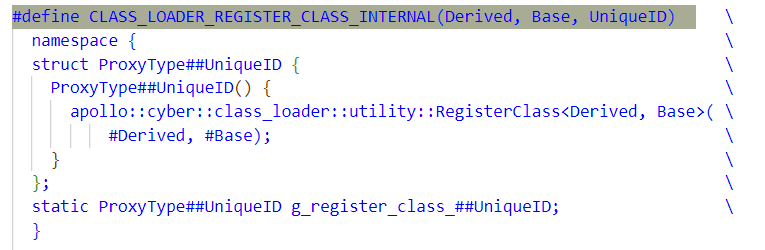
上面的宏定义了一个名为ProxyType##UniqueID的结构体,UniqueID保证了该结构体是全局唯一的,然后用这个结构体定义了一个静态全局变量
运行期工作
运行期主要负责加载动态库libcommon_component_example.so,然后创建类CommonComponentSample的实例对象并初始化。
可执行程序mainboard通过dag文件加载对应的component,入口为cyber/mainboard/mainboard.cc中的main函数。类ModuleController负责加载动态库并初始化各component的实例。
bool ModuleController::LoadModule(const DagConfig& dag_config) {


  const std::string work_root = common::WorkRoot();

  for (auto module_config : dag_config.module_config()) {


    ...
    // 1. 加载动态库libcommon_component_example.so
    class_loader_manager_.LoadLibrary(load_path);

    // 2. 根据配置信息初始化各个component实例
    for (auto& component : module_config.components()) {


      const std::string& class_name = component.class_name();
      std::shared_ptr<ComponentBase> base =
          class_loader_manager_.CreateClassObj<ComponentBase>(class_name);
      if (base == nullptr || !base->Initialize(component.config())) {


        return false;
      }
      component_list_.emplace_back(std::move(base));
    }
    ...
  }

  return true;
}