背景:若依移动端Ruoyi-App没有通知公告内容,本文基于uview2开发通知公告列表及详情及界面前端,不改变后端内容。
1. 引入uview2.0 参照
若依移动端Ruoyi-App——引入uview2.0开发项目_鲸鱼姐的博客-CSDN博客_ruoyi-app
2. 新建通知公告列表页面
在RuoYi-App-master根目录的pages下新建项目目录如“whalesystem”,然后在whalesystem下新建notice目录,并新建list_notice.vue页面
<template>
	 <view class="page-notification">
	    <view>
	      <u-search placeholder="请输入查询内容" v-model="params.noticeTitle" height="60rpx" @search="searchData" @custom="searchData"></u-search>
	    </view>
	    <view>
	      <u-list v-if="noticeList.length > 0" @scrolltolower="scrolltolower" >
			<u-list-item v-for="(item, index) in noticeList" :key="index" class="notice-item"  >
	          <view  @click="navTo(item)">
			    <view><text style="color: #606266;"></text><text>{

   {item.noticeTitle}}</text></view>
	            <view class="article-meta">
	         	<span>{

   {item.noticeId}}</span><span>{

   {item.createBy}}</span> <span style="font-size: 26rpx;color: #999999;padding-left: 10px;">{

   {item.createTime}}</span></text>
	            </view>
			 </view>
		   	</u-list-item>
	      </u-list>
	      <u-empty v-else></u-empty>
        <!-- 	触底显示加载状态 -->
        <uni-load-more :status="status"> </uni-load-more>
	    </view>

	  </view>
</template>
<script>
import { getNoticelist } from "@/api/notice/notice"

export default {

	data() {
		return {
			 params: {
			        pageNum: 0,
			        pageSize: 20,
			        title: ''
			      },
			noticeList: [],
			total:0,
      		status: "more",
		};
	},
	onLoad() {
	  	this.params.pageNum = 1
	  	this.getNoticeData();
		},

	methods: {
		getNoticeData(){
			this.status="loading"
			const app = this
				getNoticelist(app.params).then(res => {
				 this.noticeList = this.noticeList.concat(res.rows);
				 this.total=res.total
					if (res.code == '200' || res.code == '401')
				       this.$modal.msgSuccess(res.code)
				});
			this.status="more"
		},
		 // 查询按钮动作
		searchData () {
		  this.params.pageNum = 1
		  this.total=0
		  this.noticeList = []
		  this.getNoticeData();
	 },
		// 滚动分页加载数据
	scrolltolower ()
	{
		console.log("scrolltolower=="+this.params.pageNum+"==="+this.params.pageSize+"==="+this.total)

           if(this.params.pageNum * this.params.pageSize >= this.total)
			{

				this.status="noMore"
				this.$modal.msgSuccess('scrolltolower没有更多数据了')
			}
			else
			{
				this.$modal.msgSuccess('scroll=getNoticeData')
				this.params.pageNum += 1;
				   this.getNoticeData();
			}

	},

	navTo(row) {
			let noticeId = 0;
			if (row != 0) {
			    noticeId = row.noticeId
			}

			this.$tab.navigateTo('/pages/feedback/list_notice/notice?noticeId='+noticeId)
		}
	}

};

</script>
<style lang="scss">
.notice-item {
	  padding: 15rpx 0;
}
page {
	background-color: #ffffff;
}

.article-meta {
	padding: 10rpx 10rpx 10rpx;
	color: #999999;
	border-bottom: 0.5px solid #ededed;
}
.page-notification{
	padding: 40rpx;
	height: calc(100vh - 88rpx);
	overflow: hidden;
	.u-list{
		height: calc(100vh - 268rpx)!important;
	}
}

</style>
3. 新建通知公告详情界面
在notice目录下新建notice.vue页面
<template>
	<view class="wrap">
		<view class="article-title">{

   {notice.noticeTitle}}</view>
		<view class="article-meta">
			<span>{

   {notice.createBy}}</span> <span style="font-size: 26rpx;color: #999999;padding-left: 10px;">{

   {notice.createTime}}</span></text>
		</view>
		<view class="article-content">
			   <u-parse :content="notice.noticeContent"></u-parse>
		</view>
		<view class="article-foot"></view>
	</view>
</template>
<script>
import { getNoticeData } from "@/api/notice/notice"

export default {
	data() {
		return {
			noticeId: undefined,
			notice : {},
		};
	},
	onLoad(option) {
		// 获取设备信息
		const app = this
		app.noticeId = option.noticeId;
		getNoticeData(app.noticeId).then(res => {
		 console.log(res.data)
		  app.notice = res.data
		})
	},
	methods: {

	}
};
</script>
<style lang="scss">

page {
	background-color: #ffffff;
}
.article-title {
	font-size: 35rpx;
	font-weight: 400;
	text-align: left;
	padding-bottom: 10rpx;
	font-weight: bold;
	margin: 30rpx 30rpx 0;
	color: #333333;
}
.article-meta {
	padding: 10rpx 30rpx 30rpx;
	color: #999999;
	border-bottom: 1px solid #ededed;
}

.article-content {
	padding: 30rpx 30rpx 0rpx;
	font-size: 30rpx;
}

.article-foot{
	padding:0 30rpx 20rpx;
	font-size: 26rpx;
	color: #999999;
}


</style>
4. 增加api
在RuoYi-App-master根目录的api目录下新建notice目录,并新建notice.js
import request from '@/utils/request'


// 查询所有通知公告
export function getNoticelist(data) {
  return request({
    url: '/system/notice/list',
    method: 'get',
    data: data
  })
}
// 查询通知公告详情
export function getNoticeData(noticeId) {
  return request({
    url: '/system/notice/'+noticeId,
    method: 'get'
  })
}
5.增加路由配置
在RuoYi-App-master根目录的pages.json文件里路由,新增如下
    {
		"path": "pages/whalesystem/notice/list_notice",
		"style": {
			"navigationBarTitleText": "通知公告"
		}
		}
	,
	{
		"path": "pages/whalesystem/notice/notice",
		"style": {
			"navigationBarTitleText": "公告内容"
	    }
	}
6.后端代码不改变
后端代码对应的是SysNoticeController下的list()和getInfo()
  /**
     * 获取通知公告列表
     */
    @PreAuthorize("@ss.hasPermi('system:notice:list')")
    @GetMapping("/list")
    public TableDataInfo list(SysNotice notice)
    {
        startPage();
        List<SysNotice> list = noticeService.selectNoticeList(notice);
        return getDataTable(list);
    }

    /**
     * 根据通知公告编号获取详细信息
     */
    @PreAuthorize("@ss.hasPermi('system:notice:query')")
    @GetMapping(value = "/{noticeId}")
    public AjaxResult getInfo(@PathVariable Long noticeId)
    {
        return AjaxResult.success(noticeService.selectNoticeById(noticeId));
    }
7. 并运行如下
显示出通知公告,但是公告内容的图片无法显示。


8. 修改manifest.json的源码视图如下,解决富文本文件图片预览的问题
没有此配置,预览的图片的路径是/dev-api/profile/upload/2022/11/11/list1_1
配置参照如下完成后,一定要重新编译!!!!!!!
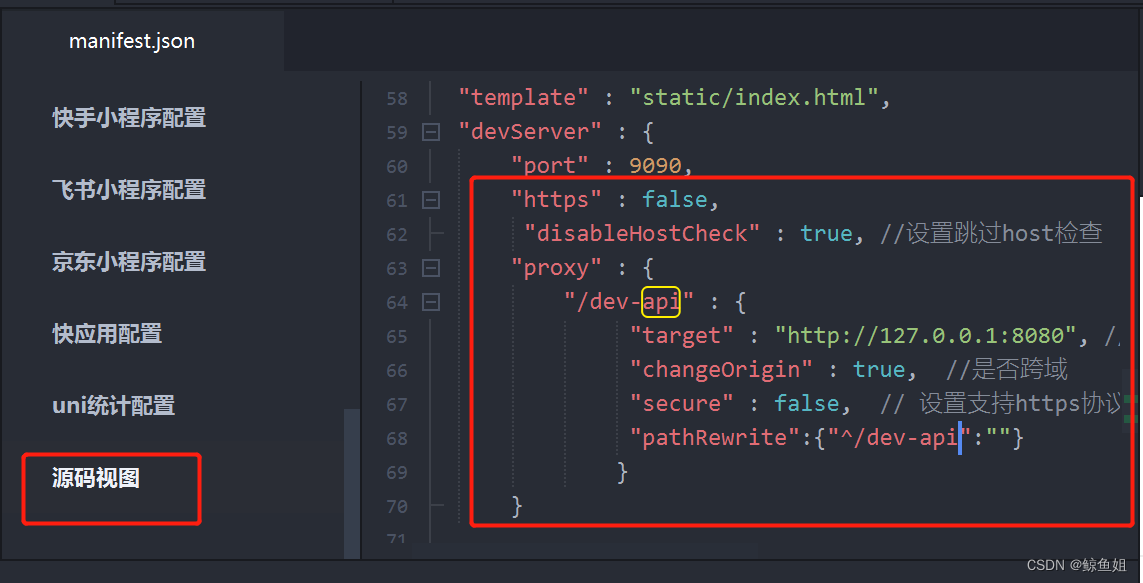
"devServer" : {
            "port" : 9090,
            "https" : false,
			 "disableHostCheck" : true, //设置跳过host检查
			"proxy" : {
				"/dev-api" : {
				     "target" : "http://127.0.0.1:8080", //目标接口域名
				     "changeOrigin" : true,  //是否跨域
				     "secure" : false,  // 设置支持https协议的代理
				     "pathRewrite":{"^/dev-api":""}
				    }
			}
配置完成后,一定要重新编译!!!!!!!
注意 target地址是后端的8080地址,pathRewrite里也是写/dev-api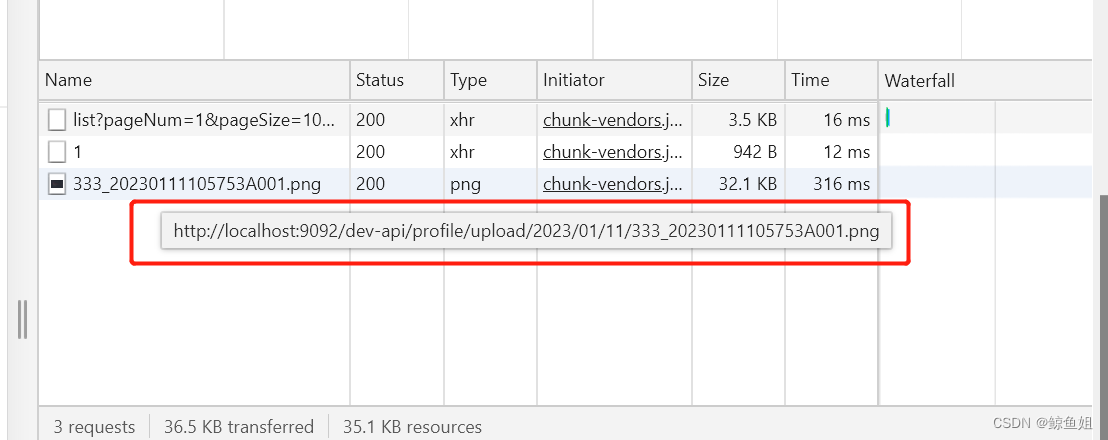
示例:
http://localhost:9092/dev-api/profile/upload/2023/01/11/222.png
经过代理转为
http://127.0.0.1:8080/profileupload/2023/01/11/222.png
9. 编译完重新运行公告结果如下,显示正常
![]()

图片解析的地址如下
10 本文移动端的上下滑动滚动使用scrolltolower
	// 滚动分页加载数据
	scrolltolower ()
	{
		console.log("scrolltolower=="+this.params.pageNum+"==="+this.params.pageSize+"==="+this.total)

           if(this.params.pageNum * this.params.pageSize >= this.total)
			{

				this.status="noMore"
				this.$modal.msgSuccess('scrolltolower没有更多数据了')
			}
			else
			{
				this.$modal.msgSuccess('scroll=getNoticeData')
				this.params.pageNum += 1;
				   this.getNoticeData();
			}

	},
11.如果要在小程序或者app运行,请查看下一篇文章