近期项目里有一个特殊的需求,对图片进行旋转放大,并且要求图片放大的角度正好覆盖裁剪框对角线的区域,然后使用opencv对图片进行裁剪,具体实现效果如下:
待插入视频
思路如下:
一 根据图片的旋转角度关系,计算出放大图片的倍数,图片实例如下:
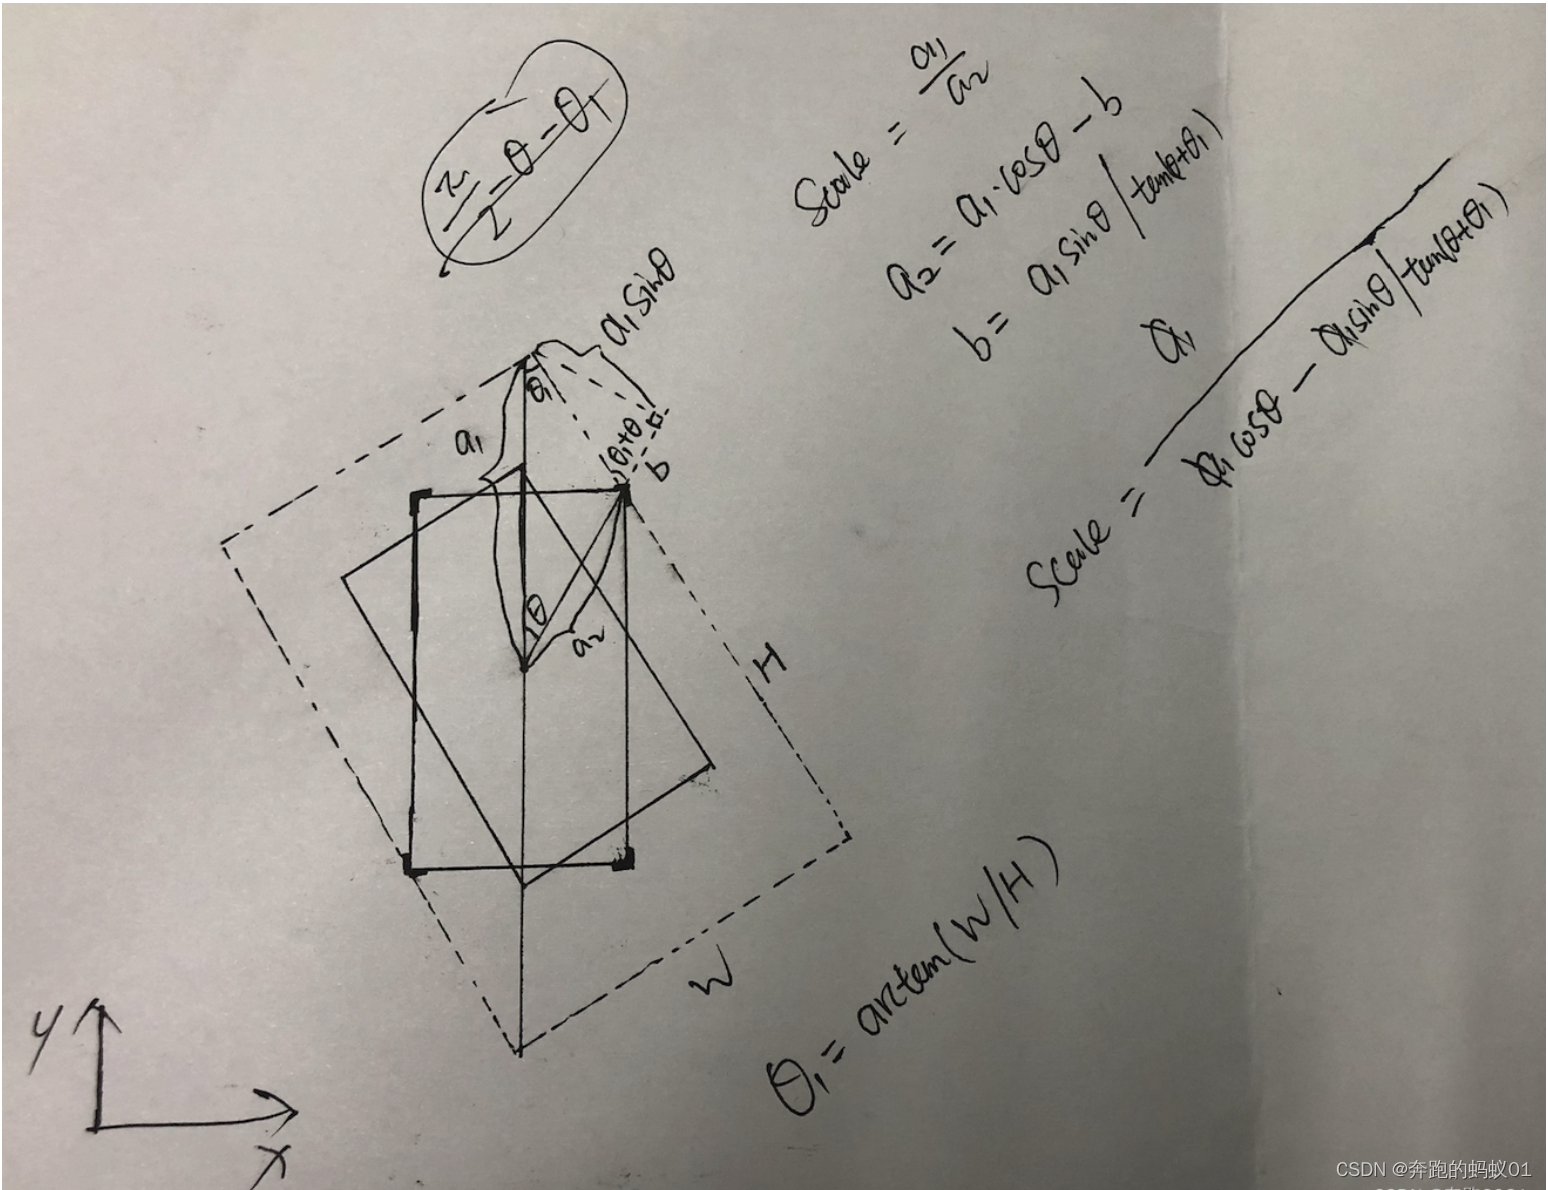
图片引用于(https://blog.csdn.net/liushuo19920327/article/details/126172379#comments_24864918)
获取放大倍数代码如下:
//通过旋转角度获取放大倍数,这里的角度都是弧度
- (CGFloat)getZoomScaleByAngleValue:(CGFloat)angleValue {
    CGFloat θ = fabs(angleValue);
    //裁剪框的frame
    //判断一下图片宽高 宽/高 || 高/宽
    CGRect cropFrame = self.shadowV.frame;
    CGFloat θ1 = atanf(cropFrame.size.height/cropFrame.size.width);
    if(cropFrame.size.height > cropFrame.size.width){
        θ1 = atanf(cropFrame.size.width/cropFrame.size.height);
    }

    CGFloat scale = 1 / (cosf(θ) - sinf(θ)/tanf(θ+θ1));
    return scale;
}
二 使用opencv对图片进行裁剪
根据旋转角度,计算出缩放倍数,根据显示的image当前的缩放倍数,以及图片原尺寸和图片显示尺寸的缩放比例,以及旋转角度,计算得出最终在原图像素单位尺寸上的裁剪区域(旋转后的区域),最终根据opencv的透视变换矩阵,获取到最终的旋转后的图片,裁剪代码如下,计算过程的思路请参照代码
+(UIImage*)clipImageWithImage:(UIImage*)inputImage clipRect:(CGRect)outRect angle:(CGFloat)angle{    Mat img;
    UIImageToMat(inputImage,img,true);

    Mat g_dstImage=Mat::zeros(img.size(),img.type());

    // 定义旋转矩形区域的中心点、宽度、高度和旋转角度
    Point2f center(outRect.origin.x + outRect.size.width/2, outRect.origin.y + outRect.size.height/2);

    float width = outRect.size.width;
    float height = outRect.size.height;
    angle = angle;

    // 计算旋转矩形的四个顶点坐标
    float radians = angle * CV_PI / 180.0;
    float cos_angle = cos(radians);
    float sin_angle = sin(radians);

    vector<Point2f> src_pts;
    src_pts.push_back(Point2f(-width / 2, -height / 2));
    src_pts.push_back(Point2f(width / 2, -height / 2));
    src_pts.push_back(Point2f(width / 2, height / 2));
    src_pts.push_back(Point2f(-width / 2, height / 2));
    for (int i = 0; i < 4; i++) {
        float x = src_pts[i].x * cos_angle - src_pts[i].y * sin_angle + center.x;
        float y = src_pts[i].x * sin_angle + src_pts[i].y * cos_angle + center.y;
        if (x < 0 || y < 0 || x >= img.cols || y >= img.rows) {
            std::cout << "vertex point out of range.";
            return nil;
        }
        src_pts[i] = Point2f(x, y);
    }

    // 定义裁剪后输出的图像大小
    int output_width = outRect.size.width;
    int output_height = outRect.size.height;

    // 定义目标图像的四个点
    vector<Point2f> dst_pts;
    dst_pts.push_back(Point2f(0, 0));
    dst_pts.push_back(Point2f(output_width - 1, 0));
    dst_pts.push_back(Point2f(output_width - 1, output_height - 1));
    dst_pts.push_back(Point2f(0, output_height - 1));

    // 计算透视变换矩阵
    Mat M = getPerspectiveTransform(src_pts, dst_pts);

    // 应用透视变换
    Mat output_img;
    warpPerspective(img, output_img, M, cvSize(output_width, output_height));

    return MatToUIImage(output_img);
}
三 对图片进行90度旋转
一个小方法,可以方便的使用opencv对图片进行90度旋转
+(UIImage*)rotate90WithImage:(UIImage*)inputImage{

    Mat src =  [CVTools cvMatFromUIImage:inputImage];

    Mat temp,dst;
    transpose(src, temp);
    flip(temp,dst,1);
    return [CVTools UIImageFromCVMat:dst];
}
四 对图片根据给定区域进行裁剪
// 裁剪图片 像素点
// - Parameters:
//   - inputImage: 原图片
//   - outRect: 裁剪区域
+(UIImage*)clipImageWithImage:(UIImage*)inputImage clipRect:(CGRect)outRect{
    Mat img;
    UIImageToMat(inputImage,img,true);

    Mat cropped_image = img(Range(outRect.origin.y,outRect.size.height + outRect.origin.y), Range(outRect.origin.x,outRect.size.width + outRect.origin.x));

    return MatToUIImage(cropped_image);
}
源代码下载地址在此:源码下载