1. 配置app.json
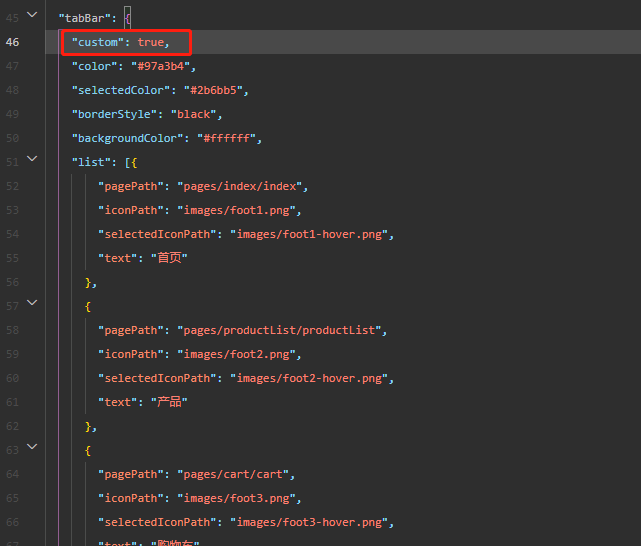
在app.json中配置"tabBar" 属性
将custom 属性开启,声明是自定义tabBar。color、selectedColor、borderStyle、backgroundColor 在custom为true时并不会渲染组件。list定义tabbar组件切换的页面,在之后使用wx.switchTab方法导航到tabbar组件页面的时候是来查询这个字段的页面。
这里要一旦将page页面定义成tabBar组件页面,就不能使用类似wx.navigateTo、wx.redirectTo方法进行页面跳转。会提示找不到页面。错误提示如下:

2. 创建tabBar组件
在项目根目录创建组件

在微信开发者工具中可以右键文件夹后 >> 点击新建Component 工具会自动帮你建立组件。
配置Index.json
{
  "component": true,
  "usingComponents": {}
}
配置Index.js
Component({
    /**
     * 组件的属性列表
     */
    properties: {

    },
    /**
     * 组件的初始数据
     */
    data: {
        selected: 0,
        color: "#7A7E83",
        selectedColor: "#2b6bb5",
        list: [{
                "pagePath": "/pages/index/index",
                "iconPath": "/images/foot1.png",
                "selectedIconPath": "/images/foot1-hover.png",
                "text": "首页"
            },
            {
                "pagePath": "/pages/productList/productList",
                "iconPath": "/images/foot2.png",
                "selectedIconPath": "/images/foot2-hover.png",
                "text": "产品"
            },
            {
                "pagePath": "/pages/cart/cart",
                "iconPath": "/images/foot3.png",
                "selectedIconPath": "/images/foot3-hover.png",
                "text": "购物车"
            },
            {
                "pagePath": "/pages/user/user",
                "iconPath": "/images/foot4.png",
                "selectedIconPath": "/images/foot4-hover.png",
                "text": "我的"
            }
        ]
    },

    /**
     * 组件的方法列表
     */
    methods: {
        switchTab(e) {
            const data = e.currentTarget.dataset
            const url = data.path
            if (data.index == 2 || data.index == 3) {
                wx.getStorage({
                    key: 'userInfo',
                    success: function () {
                        wx.switchTab({url})
                    },
                    fail: function () {
                        wx.redirectTo({
                            url: '/pages/login/login',
                        })
                    }
                })
            } else {
                wx.switchTab({url})
            }
        }
    }
})
配置Index.wxml
扫描二维码关注公众号,回复:
15533481 查看本文章

<cover-view class="tab-bar">
  <cover-view class="tab-bar-border"></cover-view>
  <cover-view wx:for="{

   {list}}" wx:key="index" class="tab-bar-item" data-path="{

   {item.pagePath}}" data-index="{

   {index}}" bindtap="switchTab">
    <cover-image src="{

   {selected === index ? item.selectedIconPath : item.iconPath}}"></cover-image>
    <cover-view style="color: {

   {selected === index ? selectedColor : color}}">{

   {item.text}}</cover-view>
  </cover-view>
</cover-view>
配置Index.wxss
.tab-bar {
  position: fixed;
  bottom: 0;
  left: 0;
  right: 0;
  height: 48px;
  background: white;
  display: flex;
  padding-bottom: env(safe-area-inset-bottom);
}

.tab-bar-border {
  background-color: rgba(0, 0, 0, 0.33);
  position: absolute;
  left: 0;
  top: 0;
  width: 100%;
  height: 1px;
  transform: scaleY(0.5);
}
.tab-bar-item {
  flex: 1;
  text-align: center;
  display: flex;
  justify-content: center;
  align-items: center;
  flex-direction: column;
}

.tab-bar-item cover-image {
  width: 27px;
  height: 27px;
}

.tab-bar-item cover-view {
  font-size: 10px;
}
最后在每一个tabBar页面的json文件中添加
"usingComponents": {}js文件的onShow中添加
if (typeof this.getTabBar === 'function' && this.getTabBar()) {
    this.getTabBar().setData({
      selected: 0
    })
}