接上一篇:银河麒麟服务器v10 sp1 安装 nginx_csdn_aspnet的博客-CSDN博客
设置开机自启动
定义服务启动文件内容:
[Unit]
Description=nginx - high performance web server
After=network.target remote-fs.target nss-lookup.target
[Service]
Type=forking
ExecStart=/usr/local/nginx/sbin/nginx -c /usr/local/nginx/conf/nginx.conf
ExecReload=/usr/local/nginx/sbin/nginx -s reload
ExecStop=/usr/local/nginx/sbin/nginx -s stop
[Install]
WantedBy=multi-user.target
将上面内容定义文件名为:nginx.service,文件执行路径根据自己的目录进行修改即可:
[Unit]:服务的说明
Description: 服务的简单描述
After: 依赖,仅当依赖的服务启动之后再启动自定义的服务单元
[Service] 服务运行参数的设置
Type=forking 是后台运行的形式
ExecStart 为服务的具体运行命令
ExecReload 为重启命令
ExecStop 为停止命令
注意:启动、重启、停止命令全部要求使用绝对路径
[Install] 服务安装的相关设置,可设置为多用户
文件定义好以后,上传至服务器,可以直接上传至服务器的 /lib/systemd/system 目录,如果不是,请使用命令复制到该目录:
xzx@xxx-pc:~$ cp /home/xxx/nginx.service /lib/systemd/system
如果提示权限不够:

使用 sudo su - 提示输入正确密码后,获取root权限即可,继续执行:
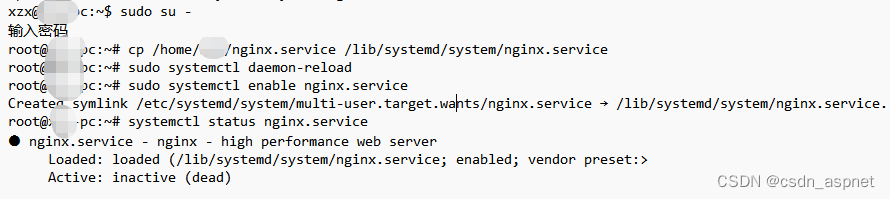
root@xxx-pc:~# cp /home/xxx/nginx.service /lib/systemd/system/nginx.service #复制文件到指定目录
root@xxx-pc:~# sudo systemctl daemon-reload #重新加载
root@xxx-pc:~# sudo systemctl enable nginx.service #服务开机自启动
root@xxx-pc:~# sudo systemctl status nginx.service #查看服务的状态
上面的截图中,明显nginx是没有启动的,执行启动命令:
root@xxx-pc:~# sudo systemctl start nginx.service #启动
root@xxx-pc:~# sudo systemctl status nginx.service #查看服务的状态

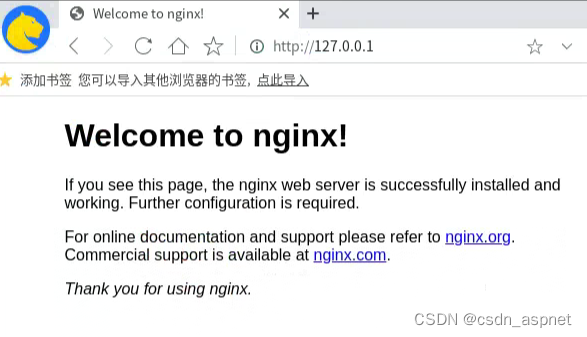
看到上图显示,说明nginx启动成功了,访问nginx默认监听端口,本文nginx默认80端口:
本文实际使用的服务文件内容如下:
[Unit]
Description=nginx - high performance web server
After=network.target remote-fs.target nss-lookup.target
[Service]
Type=forking
ExecStart=/bin/bash -c '/usr/local/nginx/sbin/nginx -c /usr/local/nginx-1.25.1/conf/nginx.conf'
ExecReload=/bin/bash -c '/usr/local/nginx/sbin/nginx -s reload'
ExecStop=/bin/bash -c '/usr/local/nginx/sbin/nginx -s stop'
[Install]
WantedBy=multi-user.target
使用了/bin/bash -c命令执行,如果上述配置你可以启动成功,可忽略本文实际使用的服务文件内容。