- 线性布局 LinearLayout
- 相对布局 RelativeLayout
- 表格布局 TableLayout
- 绝对布局 AbsoluteLayout
- 网格布局 GridLayout
- 帧布局 FrameLayout
布局通用属性
| 属性名称 | 功能描述 |
| android:id | 设置布局的标识 |
| android:layout_width | 设置布局的宽度 |
| android:layout_height | 设置布局的高度 |
| android:background | 设置布局的背景 |
| android:layout_margin | 设置当前布局与屏幕边界或与周围控件的距离 |
| android:padding | 设置当前布局与该布局中控件的距离 |
| android:minWidth | 设置视图最小宽度 |
| android:minHeight | 设置视图最小高度 |
(一)线性布局 (LinearLayput)
线性布局是最常用的布局方式,可分为水平线性布局盒垂直线性布局
当垂直布局时,每一行就只有一个元素,多个元素一次垂直往下
当水平布局时,只有一行,没一个元素一次向右排列
特点:以水平或垂直方向排列
常用属性:
| 控件属性 | 功能描述 |
| android:oriientation | 布局中组件的排列方式 (有horizontal水平布局和vertical垂直布局) |
| android:gravity | 控制该组件在父容器里的对齐方式 |
| android:layout_gravity | 控制该组件咋父容器里的对齐方式 |
| android:layout_weight | 权重,用来等比例划分区域 |
| android:divider | 分割线 |
| android:showDividers | 设置分割线所在的位置none(无) beginning(开始) end(结束) minddle(每两个组件间) |
| android:dividerPadding | 设置分割线的padding |
案例:

代码:
<?xml version="1.0" encoding="utf-8"?>
<LinearLayout xmlns:android="http://schemas.android.com/apk/res/android"
xmlns:tools="http://schemas.android.com/tools"
xmlns:app="http://schemas.android.com/apk/res-auto"
android:layout_width="match_parent"
android:layout_height="match_parent"
android:orientation="vertical"
tools:context=".MainActivity">
<LinearLayout
android:layout_width="match_parent"
android:layout_height="wrap_content">
<TextView
android:layout_width="0dp"
android:layout_height="50dp"
android:layout_weight="1"
android:text="权重1"
android:gravity="center"
android:background="#afdfe4"/>
<TextView
android:layout_width="0dp"
android:layout_height="50dp"
android:layout_weight="1"
android:text="权重2"
android:gravity="center"
android:background="#94d6da"/>
<TextView
android:layout_width="0dp"
android:layout_height="50dp"
android:layout_weight="1"
android:text="权重3"
android:gravity="center"
android:background="#78cdd1"/>
</LinearLayout>
<LinearLayout
android:layout_width="match_parent"
android:layout_height="50dp"
android:gravity="center"
android:background="#cde6c7">
<TextView
android:layout_width="wrap_content"
android:layout_height="wrap_content"
android:text="第一个线性布局" />
</LinearLayout>
<LinearLayout
android:layout_width="match_parent"
android:layout_height="50dp"
android:gravity="center"
android:background="#84bf96">
<TextView
android:layout_width="wrap_content"
android:layout_height="wrap_content"
android:text="第二个线性布局"/>
</LinearLayout>
<LinearLayout
android:layout_width="match_parent"
android:layout_height="50dp"
android:gravity="center"
android:background="#abc88b">
<TextView
android:layout_width="wrap_content"
android:layout_height="wrap_content"
android:text="第三个线性布局"/>
</LinearLayout>
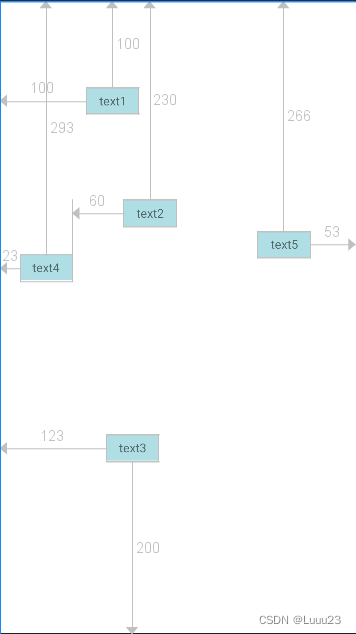
</LinearLayout>(二)相对布局 (RelativeLayout)
相对布局可以理解为某一个元素为参照物来定位的布局方式
即是以其他控件或父容器为参照物设置位置的。
特点:通过相对定位排列
常用属性:
| 类别 | 控件属性 | 功能描述 |
| 根据父容器定位 |
android:layout_centerInParent | 设置当前控件位于父布局的中央位置 |
| android:layout_centerVertical | 设置当前控件位于父布局的垂直居中位置 | |
| android:layout_centerHorizontal | 设置当前控件位于父控件的水平居中位置 | |
| android:layout_alignParentTop | 设置当前控件是否与父控件顶部对齐 | |
| android:layout_alignParentLeft | 设置当前控件是否与父控件左对齐 | |
| android:layout_alignParentRight | 设置当前控件是否与父控件右对齐 | |
| android:layout_alignParentBottom | 设置当前控件是否与父控件底部对齐 | |
| 根据兄弟组件定位 | android:layout_above | 设置当前控件位于某控件上方 |
| android:layout_below | 设置当前控件位于某控件下方 | |
| android:layout_toLeftOf | 设置当前控件位于某控件左侧 | |
| android:layout_toRightOf | 设置当前控件位于某控件右侧 | |
| android:layout_alignTop | 设置当前控件的上边界与某控件的上边界对齐 | |
| android:layout_alignBottom | 设置当前控件的上边界与某控件的下边界对齐 | |
| android:layout_alignLeft | 设置当前控件的上边界与某控件的左边界对齐 | |
| android:layout_alignRight | 设置当前控件的上边界与某控件的右边界对齐 |
案例:
代码:
<RelativeLayout xmlns:android="http://schemas.android.com/apk/res/android"
    android:layout_width="match_parent"
    android:layout_height="match_parent">

    <TextView
        android:id="@+id/text1"
        android:layout_width="60dp"
        android:layout_height="30dp"
        android:layout_alignParentStart="true"
        android:layout_alignParentTop="true"
        android:layout_marginStart="100dp"
        android:layout_marginTop="100dp"
        android:text="text1"
        android:background="#afdfe4"
        android:gravity="center"/>
    <TextView
        android:id="@+id/text2"
        android:layout_width="60dp"
        android:layout_height="30dp"
        android:layout_alignParentTop="true"
        android:layout_marginStart="60dp"
        android:layout_marginTop="230dp"
        android:layout_toEndOf="@+id/text4"
        android:text="text2"
        android:background="#afdfe4"
        android:gravity="center"/>
    <TextView
        android:id="@+id/text3"
        android:layout_width="60dp"
        android:layout_height="30dp"
        android:layout_alignParentStart="true"
        android:layout_alignParentBottom="true"
        android:layout_marginStart="123dp"
        android:layout_marginBottom="200dp"
        android:text="text3"
        android:background="#afdfe4"
        android:gravity="center"/>

    <TextView
        android:id="@+id/text4"
        android:layout_width="60dp"
        android:layout_height="30dp"
        android:layout_alignParentStart="true"
        android:layout_alignParentTop="true"
        android:layout_marginStart="23dp"
        android:layout_marginTop="293dp"
        android:text="text4"
        android:background="#afdfe4"
        android:gravity="center"/>

    <TextView
        android:id="@+id/text5"
        android:layout_width="60dp"
        android:layout_height="30dp"
        android:layout_alignParentTop="true"
        android:layout_alignParentEnd="true"
        android:layout_marginTop="266dp"
        android:layout_marginEnd="53dp"
        android:text="text5"
        android:background="#afdfe4"
        android:gravity="center"/>


</RelativeLayout>
(三)表格布局(TableLayout)
一个tableLayout由许多个tableRow组成,每一个tableLayout里面有表格行tableRow,TableRow里面可以具体定义没一个元素。
特点:表格形式排列
常用属性:
| 布局属性 | 功能描述 |
| android:stretchColumns | 设置该列被拉伸 |
| android:shrinkColumns | 设置该列被收缩 |
| android:collapseColumns | 设置该列被隐藏 |
| 控件属性 | 功能描述 |
| android:layout_column | 设置该单元格显示位置 |
| android:layout_span | 设置该单元格占据几行,默认为1行 |
案例:
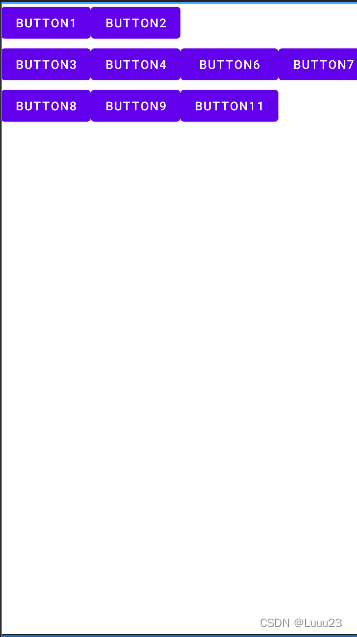
代码:
<?xml version="1.0" encoding="utf-8"?>
<TableLayout xmlns:android="http://schemas.android.com/apk/res/android"
    android:layout_width="match_parent"
    android:layout_height="match_parent"
    android:stretchColumns="1"
    android:collapseColumns="2">

    <TableRow
        android:layout_width="match_parent"
        android:layout_height="match_parent">
        <Button
            android:layout_width="wrap_content"
            android:layout_height="wrap_content"
            android:text="button1"/>
        <Button
            android:layout_width="wrap_content"
            android:layout_height="wrap_content"
            android:text="button2"/>

    </TableRow>
    <TableRow
        android:layout_width="match_parent"
        android:layout_height="match_parent">
        <Button
            android:layout_width="wrap_content"
            android:layout_height="wrap_content"
            android:text="button3"/>
        <Button
            android:layout_width="wrap_content"
            android:layout_height="wrap_content"
            android:text="button4"/>
        <Button
            android:layout_width="wrap_content"
            android:layout_height="wrap_content"
            android:text="button5"/>
        <Button
            android:layout_width="wrap_content"
            android:layout_height="wrap_content"
            android:text="button6"/>
        <Button
            android:layout_width="wrap_content"
            android:layout_height="wrap_content"
            android:text="button7"/>
    </TableRow>
    <TableRow
        android:layout_width="match_parent"
        android:layout_height="match_parent">
        <Button
            android:layout_width="wrap_content"
            android:layout_height="wrap_content"
            android:text="button8"/>
        <Button
            android:layout_width="wrap_content"
            android:layout_height="wrap_content"
            android:text="button9"/>
        <Button
            android:layout_width="wrap_content"
            android:layout_height="wrap_content"
            android:text="button10"/>
        <Button
            android:layout_width="wrap_content"
            android:layout_height="wrap_content"
            android:text="button11"/>
    </TableRow>
</TableLayout>
(四)绝对布局(AbsoluteLayout)
绝对布局用X,Y坐标来指定元素的位置,此布局比较简单,但是在屏幕旋转时往往会出现问题,而且多个元素的时候计算比较麻烦
常用属性:
| 布局属性 | 功能描述 |
| android:layout_x | 设置view的横坐标 |
| android:layout_y | 设置view的纵坐标 |
案例:
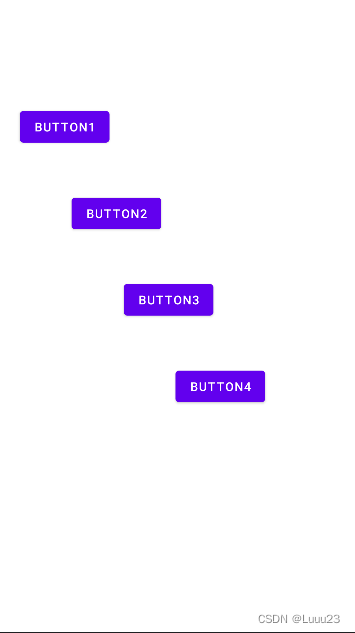
代码:
<?xml version="1.0" encoding="utf-8"?>
<AbsoluteLayout xmlns:android="http://schemas.android.com/apk/res/android"
    android:layout_width="match_parent"
    android:layout_height="match_parent">
    <Button
        android:id="@+id/button1"
        android:layout_width="wrap_content"
        android:layout_height="wrap_content"
        android:layout_x="23dp"
        android:layout_y="123dp"
        android:text="Button1" />
    <Button
        android:id="@+id/button2"
        android:layout_width="wrap_content"
        android:layout_height="wrap_content"
        android:layout_x="83dp"
        android:layout_y="223dp"
        android:text="Button2" />
    <Button
        android:id="@+id/button3"
        android:layout_width="wrap_content"
        android:layout_height="wrap_content"
        android:layout_x="143dp"
        android:layout_y="323dp"
        android:text="Button3" />
    <Button
        android:id="@+id/button4"
        android:layout_width="wrap_content"
        android:layout_height="wrap_content"
        android:layout_x="203dp"
        android:layout_y="423dp"
        android:text="Button4" />
</AbsoluteLayout>
(五)网格布局 (GridLayout)
网格布局是用一组无限细的直线讲绘图区域分成行、列和单元,并指定控件的显示区域和控件在该区域的显示方式。
特点:实现了控件的交错显示
常用属性:
| 控件属性 | 功能描述 |
| android:columnCount | 每行列总数 |
| android:rowCount | 每列行总数 |
| android:layout_column | 在网格的第几列 |
| android:layout_row | 在网格的第几行 |
| android:layout_columnSpan | 跨列 |
| android:layout_rowSpan | 跨行 |
| android:layout_gravity | 在一个网格中的重心位置layout_gravity=fill时标识可填充 |
案例:
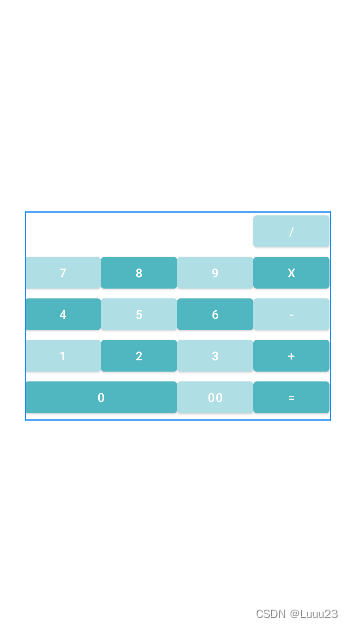
代码:
<?xml version="1.0" encoding="utf-8"?>
<GridLayout xmlns:android="http://schemas.android.com/apk/res/android"
    android:layout_width="wrap_content"
    android:layout_height="wrap_content"
    android:layout_gravity="center"
    android:columnCount="4"
    android:orientation="horizontal"
    >
    <Button android:text="/"
        android:layout_column="3"
        android:backgroundTint="#afdfe4"/>
    <Button android:text="7"
        android:backgroundTint="#afdfe4"/>
    <Button android:text="8"
        android:backgroundTint="#50b7c1"/>
    <Button android:text="9"
        android:backgroundTint="#afdfe4"/>
    <Button android:text="x"
        android:backgroundTint="#50b7c1"/>
    <Button android:text="4"
        android:backgroundTint="#50b7c1"/>
    <Button android:text="5"
        android:backgroundTint="#afdfe4"/>
    <Button android:text="6"
        android:backgroundTint="#50b7c1"/>
    <Button android:text="-"
        android:backgroundTint="#afdfe4"/>
    <Button android:text="1"
        android:backgroundTint="#afdfe4"/>
    <Button android:text="2"
        android:backgroundTint="#50b7c1"/>
    <Button android:text="3"
        android:backgroundTint="#afdfe4"/>
    <Button android:text="+"
        android:backgroundTint="#50b7c1"/>
    <Button android:text="0"
        android:layout_columnSpan="2"
        android:layout_gravity="fill"
        android:backgroundTint="#50b7c1"/>
    <Button android:text="00"
        android:backgroundTint="#afdfe4"/>
    <Button android:text="="
        android:backgroundTint="#50b7c1"/>
</GridLayout>
(六)帧布局(FrameLayout)
帧布局用于在屏幕上创建一块空白区域,添加到该区域中的每个子控件占一帧,所有帧依次都放在左上角,会重叠,此布局比较简单,也只能放一点比较简单的东西。
特点:开辟空白区域,帧里的控件层叠加
常用属性:
| 控件属性 | 功能描述 |
| android:foreground | 设置帧布局容器的前景布局 |
| android:foregroundGravity | 设置前景图像显示位置 |
备注:前景图像永远处于帧布局最上面,直接面对用户的图像,不会被覆盖的图片
案例:

<?xml version="1.0" encoding="utf-8"?>
<FrameLayout xmlns:android="http://schemas.android.com/apk/res/android"
    android:layout_width="match_parent"
    android:layout_height="match_parent"
    android:foreground="@mipmap/ic_launcher"
    android:foregroundGravity="left">
    <TextView
        android:layout_width="250dp"
        android:layout_height="250dp"
        android:background="#afdfe4" />
    <TextView
        android:layout_width="200dp"
        android:layout_height="200dp"
        android:background="#78cdd1" />
    <TextView
        android:layout_width="150dp"
        android:layout_height="150dp"
        android:background="#50b7c1" />
    <TextView
        android:layout_width="100dp"
        android:layout_height="100dp"
        android:background="#00a6ac" />
</FrameLayout>