一、LVS-IP TUN集群概述
DR方式是通过MAC,规模是一个交换网络。而TUN方式,是通过给数据包加上新的IP头部来实现,这个可以跨整个广域网。TUN模式可以解决DR模式下不能跨网段的问题,甚至可以跨公网进行
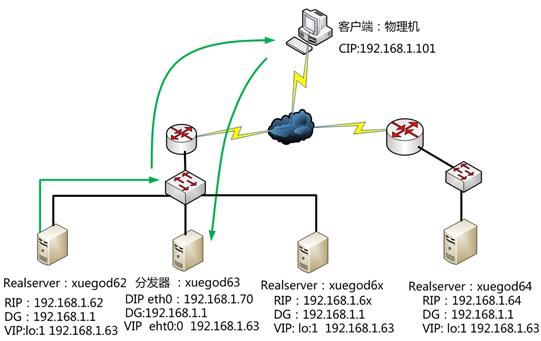
如图:
异地机房的好处: 容灾
但是是否可以保证 边界 最近访问到对应的real server呢? 不能,这是最大的问题
DNS view功能实现 边界最近访问。 智能DNS 大家nslookup www.baidu.com 每个人地方的ip都是不一样的
二、实战:配置LVS-IP TUN集群
精简版实验拓扑图:

A、xuegod63 配置成 Director:
1 配置网络:
eth0 DIP
eth0:1 VIP
[root@xuegod63 ~]#ifconfig eth0 192.168.1.70
[root@xuegod63 ~]#ifconfig eth0:1 192.168.1.63
[root@xuegod63 ~]#ifconfig
[root@xuegod63 ~]# echo 1 > /proc/sys/net/ipv4/ip_forward
#该文件表示是否打开IP转发。0表示禁止,1表示转发
2 配置 LVS TUN模式
[root@xuegod63 ~]# rpm -ivh /mnt/Packages/ipvsadm-1.25-9.el6.x86_64.rpm
[root@xuegod63 ~]# ipvsadm -C
[root@xuegod63 ~]# ipvsadm -A -t 192.168.1.63:80 -s rr
[root@xuegod63 ~]# ipvsadm -a -t 192.168.1.63:80 -r 192.168.1.62 -i
[root@xuegod63 ~]# ipvsadm -a -t 192.168.1.63:80 -r 192.168.1.64 -i
# -i 隧道模式
[root@xuegod63 ~]# ipvsadm -L -n
IP Virtual Server version 1.2.1 (size=4096)
Prot LocalAddress:Port Scheduler Flags
-> RemoteAddress:Port Forward Weight ActiveConn InActConn
TCP 192.168.1.63:80 rr
-> 192.168.1.62:80 Tunnel 1 0 0
-> 192.168.1.64:80 Tunnel 1 0 0
B、RealServer: xuegod62
1 配置IP:
配置 eth0的 RIP为: 192.168.1.62
[root@xuegod62 ~] # lsmod | grep ipip 查看
[root@xuegod62 ~]# modprobe ipip #在加载好ipip模块后就会有默认的tunl0隧道。
注,如果没有在此处手动加载,那么使用ifconfig tunl0 时,会自动加载ipip隧道模块。
使用 ifconfig查看。没有tun0 ,加参数-a 时,查看可以看到tun0
[root@xuegod62 ~]# ifconfig -a #查看。
eth0 Link encap:Ethernet HWaddr 00:0C:29:48:80:95
。。。
lo Link encap:Local Loopback
。。。
tunl0 Link encap:IPIP Tunnel HWaddr
NOARP MTU:1480 Metric:1
RX packets:0 errors:0 dropped:0 overruns:0 frame:0
TX packets:0 errors:0 dropped:0 overruns:0 carrier:0
collisions:0 txqueuelen:0
RX bytes:0 (0.0 b) TX bytes:0 (0.0 b)
[root@xuegod62 ~]# lsmod | grep ipip
ipip 8435 0
tunnel4 2943 1 ipip
C、配置VIP:
1. 生成ifcfg-tunl0配置文件:
[root@xuegod62 network-scripts]# ifconfig tunl0 192.168.1.63 netmask 255.255.255.255 up
[root@xuegod62 network-scripts]# service network restart
Shutting down interface eth0: [ OK ]
Shutting down interface tunl0: [ OK ]
Shutting down loopback interface: [ OK ]
Bringing up loopback interface: [ OK ]
Bringing up interface eth0: [ OK ]
Bringing up interface tunl0: [ OK ]
D、 关闭ARP转发。
echo '0' > /proc/sys/net/ipv4/ip_forward
echo '1' > /proc/sys/net/ipv4/conf/tunl0/arp_ignore
echo '2' > /proc/sys/net/ipv4/conf/tunl0/arp_announce
echo '1' > /proc/sys/net/ipv4/conf/all/arp_ignore
echo '2' > /proc/sys/net/ipv4/conf/all/arp_announce
echo '0' > /proc/sys/net/ipv4/conf/tunl0/rp_filter
echo '0' > /proc/sys/net/ipv4/conf/all/rp_filter
# tunl0/rp_filter 默认为1 , 需要改为0,关闭此功能。Linux的rp_filter用于实现反向过滤技术,也即uRPF,它验证反向数据包的流向,以避免伪装IP攻击 。 然而,在LVS TUN 模式中,我们的数据包是有问题的,因为从realserver eth0 出去的IP数据包的源IP地址应该为192.168.1.62,而不是VIP地址。所以必须关闭这一项功能。 DR和TUN在 网络层实际上使用了一个伪装IP数据包的功能。让client收到数据包后,返回的请求再次转给分发器。
echo '0' > /proc/sys/net/ipv4/conf/all/rp_filter #这个值默认就是0,此功能就是关闭的。所以在LVS DR模式中,不需要修改这一样内核参数。
永久生效:
[root@xuegod62 ~]# vim /etc/sysctl.conf #以文件最后添加以下内容
net.ipv4.conf.tunl0.arp_ignore = 1
net.ipv4.conf.tunl0.arp_announce = 2
net.ipv4.conf.all.arp_ignore = 1
net.ipv4.conf.all.arp_announce = 2
net.ipv4.conf.tunl0.rp_filter = 0
net.ipv4.conf.all.rp_filter = 0
[root@xuegod62 ~]# sysctl -p
E、 配置web服务器
[root@xuegod62 ~]# yum install httpd
[root@xuegod62 ~]# echo 192.168.1.65 > /var/www/html/index.html
[root@xuegod62 ~]# service httpd restart
RealServer: xuegod64
1,配置IP地址:
配置eth0 RIP 192.168.1.64
[root@xuegod62 ~]# modprobe ipip
#在加载好ipip模块后就会有默认的tunl0隧道
配置VIP:
[root@xuegod64 ~]# ifconfig tunl0 192.168.1.63 netmask 255.255.255.255
查看:
[root@xuegod64 ~]# ifconfig
eth0 Link encap:Ethernet HWaddr 00:0C:29:EF:3A:EF
。。。
tunl0 Link encap:IPIP Tunnel HWaddr
inet addr:192.168.1.63 Mask:255.255.255.255
UP RUNNING NOARP MTU:1480 Metric:1
生成ifcfg-tunl0配置文件:
[root@xuegod64 network-scripts]# cp ifcfg-lo ifcfg-tunl0
[root@xuegod64 network-scripts]# cat ifcfg-tunl0 #写入以下内容
DEVICE=tunl0
IPADDR=192.168.1.63
NETMASK=255.255.255.0
# If you're having problems with gated making 127.0.0.0/8 a martian,
# you can change this to something else (255.255.255.255, for example)
ONBOOT=yes
NAME=tunl0
[root@xuegod64 network-scripts]# service network restart
关闭ARP转发。
echo '0' > /proc/sys/net/ipv4/ip_forward
echo '1' > /proc/sys/net/ipv4/conf/tunl0/arp_ignore
echo '2' > /proc/sys/net/ipv4/conf/tunl0/arp_announce
echo '1' > /proc/sys/net/ipv4/conf/all/arp_ignore
echo '2' > /proc/sys/net/ipv4/conf/all/arp_announce
echo '0' > /proc/sys/net/ipv4/conf/tunl0/rp_filter
echo '0' > /proc/sys/net/ipv4/conf/all/rp_filter
永久生效:
[root@xuegod62 ~]# vim /etc/sysctl.conf #以文件最后添加以下内容
net.ipv4.conf.tunl0.arp_ignore = 1
net.ipv4.conf.tunl0.arp_announce = 2
net.ipv4.conf.all.arp_ignore = 1
net.ipv4.conf.all.arp_announce = 2
net.ipv4.conf.tunl0.rp_filter = 0
net.ipv4.conf.all.rp_filter = 0
[root@xuegod62 ~]# sysctl -p
配置web服务器
[root@xuegod64 ~]# yum install httpd
[root@xuegod64 network-scripts]# echo 192.168.1.64 > /var/www/html/index.html [root@xuegod64 ~]# service httpd restart
测试:
先测试realserver:
正常打开
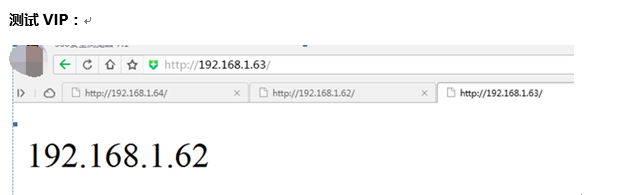
注:不能在分发器上直接测试,需要去其他机器上测试
[root@xuegod65 ~]# elinks 192.168.1.63 –dump
F、NAT/DR/TUN比较
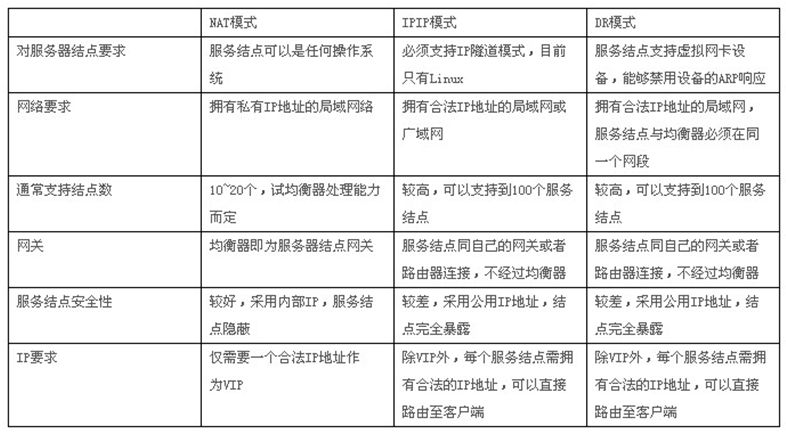
| 比较 |
TUN |
NAT |
DR |
| 配置复杂度 |
复杂 |
简单 |
复杂 |
| 拓展性 |
很好 |
差 |
好 |
| 支持数量 |
>100 |
<20 |
>100 |
| 特点 |
封装IP |
地址转化 |
修改MAC |
| 支持OS |
需要支持IPIP隧道 |
Any |
大部分 |
三种模式下的简单压力测试
简单的压力测试采用Apache ab命令,500并发用户,10w的请求总数。
[root@xuegod62 ~]# rpm -qf `which ab`
httpd-tools-2.2.15-15.el6.x86_64
结果如下:
LVS模式 总耗时(s) TPS(#/sec) TPS(Transaction Per Second)每秒系统处理事务的数量
NAT 22.480 4448.34
TUNNEL 10.707 9339.80
DR 10.177 9825.68
可以看出NAT性能要比后两种差一倍。
三、实战2:使用webbench测试网站性能
网站压力测试工具-Webbench
一.webbench简介:
Webbench是有名的网站压力测试工具,它是由 Lionbridge公司(http://www.lionbridge.com)开发的网站压力测试工具,它能测试处在相同硬件上,不同服务的性能以及不同硬件上同一个服务的运行状况。webbench不但能具有便准静态页面的测试能力,还能对动态页面(ASP,PHP,JAVA,CGI)进行测试的能力。
官网:http://www.lionbridge.com
二.在xuegod64上下载并安装webbench:
[root@xuegod64~]# wget http://www.ha97.com/code/webbench-1.5.tar.gz
[root@xuegod64 webbench-1.5]#tar zxvf webbench-1.5.tar.gz
[root@xuegod64 webbench-1.5]#cd webbench-1.5
[root@xuegod64 webbench-1.5]#make
[root@xuegod64 webbench-1.5]# mkdir -p /usr/local/man/man1 #不创建这个执行make install报错:
install: cannot create regular file `/usr/local/man/man1': No such file or directory
make: *** [install] Error 1
[root@xuegod64 webbench-1.5]#make install
install -s webbench /usr/local/bin
install -m 644 webbench.1 /usr/local/man/man1
install -d /usr/local/share/doc/webbench
install -m 644 debian/copyright /usr/local/share/doc/webbench
install -m 644 debian/changelog /usr/local/share/doc/webbench
三.进行压力测试:在xuegod64上进行测试
[root@xuegod64 webbench-1.5]# webbench -h
测试参数解释:
-c为客户端数,-t为时间(秒)
实战:当为1个客户端时,持续访问1秒。
[root@xuegod64 ~]# webbench -c 1 -t 1 http://192.168.1.63/index.html
Webbench - Simple Web Benchmark 1.5
Copyright (c) Radim Kolar 1997-2004, GPL Open Source Software.
Benchmarking: GET http://192.168.1.63/index.html
1 client, running 1 sec.
Speed=38219 pages/min, 178080 bytes/sec.
#当只有一个客户端时,一分钟可以响应38219个页面,1秒可以传输178080字节
Requests: 637 susceed, 0 failed.
#1个客户端,1秒产生了637个请求,0个失败。
实战:使用20个客户端并发访问并持续访问10秒
[root@xuegod64 ~]# webbench -c 20 -t 10 http://192.168.1.63/index.html
Webbench - Simple Web Benchmark 1.5
Copyright (c) Radim Kolar 1997-2004, GPL Open Source Software.
Benchmarking: GET http://192.168.1.63/index.html
20 clients, running 10 sec.
Speed=397356 pages/min, 1854384 bytes/sec.
Requests: 66226 susceed, 0 failed.
同时查看xuegod64上机器性能:
[root@xuegod64 ~]# vmstat 1 20
procs -----------memory---------- ---swap-- -----io---- --system-- -----cpu-----
r b swpd free buff cache si so bi bo in cs us sy id wa st
0 0 0 537392 105636 356068 0 0 21 2 20 16 0 0 99 0 0
0 0 0 537368 105636 356068 0 0 0 0 42 39 0 0 100 0 0
0 0 0 537368 105636 356068 0 0 0 0 45 61 0 0 100 0 0
0 0 0 535796 105636 356068 0 0 0 0 126 101 0 1 99 0 0
9 0 0 535400 105636 356068 0 0 0 4 520 799 1 9 90 0 0
9 0 0 532896 105636 356124 0 0 0 0 6361 18112 14 84 2 0 0
15 0 0 528772 105636 356640 0 0 0 0 7470 23536 23 76 1 0 0
11 0 0 523508 105636 357360 0 0 0 0 7622 25163 21 79 0 0 0
25 0 0 515344 105636 358160 0 0 0 0 7974 27589 15 84 1 0 0
0 0 0 499788 105652 362472 0 0 0 0 122 42 0 0 100 0 0
1 0 0 500416 105652 362472 0 0 0 0 61 42 0 0 100 0 0
例:
当并发为800时:
webbench -c 800 -t 60 http://192.168.1.63/index.html
Webbench - Simple Web Benchmark 1.5
Copyright (c) Radim Kolar 1997-2004, GPL Open Source Software.
Benchmarking: GET http://www.linuxidc.com/index.php
800 clients, running 60 sec.
Speed=39571 pages/min, 33104224 bytes/sec.
Requests: 38576 susceed, 995 failed.
四.测试注意事项:
1.压力测试工作应该放到产品上线之前,而不是上线以后;
2.webbench 做压力测试时,该软件自身也会消耗CPU和内存资源,为了测试准确,请将 webbench 安装在别的服务器上;
3.测试时尽量跨公网进行,而不是内网; 如果带宽不够时,可以内网测试。
4.测试时并发应当由小逐渐加大,观察一下网站负载及打开是否流畅,直到网站打开缓慢甚至网站完全打不开; 可以一边在linux测试,一个在浏览上打开,查看是否流畅。
5.应尽量进行单元测试,如B2C网站可以着重测试购物车、推广页面等,因为这些页面占整个网站访问量比重较大。