背景介绍
在初次部署 kubesphere 时选择了 openebs 作为默认存储,后续希望将后端存储切换为NFS,在 Kubernetes 中跨 StorageClass 迁移存储完全指南 这篇文章中介绍了一种手动迁移存储的方案,不过整体流程较为复杂。
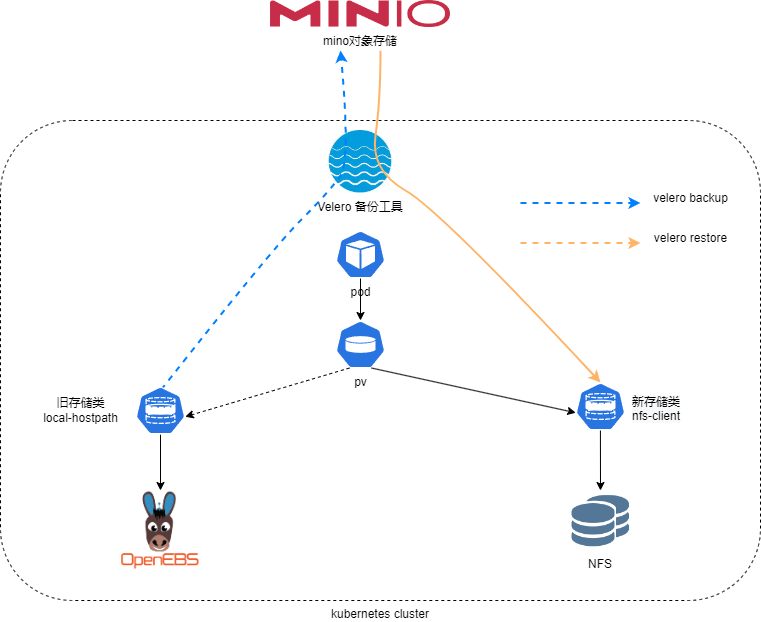
这里介绍使用velero工具快速完成kubesphere后端存储切换。基本迁移流程如下图所示:
集群现状
当前集群的存储现状如下,其中local-hostpath为openebs提供的存储类,而nfs-client为新部署的存储类。
root@node1:~# kubectl get sc
NAME                       PROVISIONER                                     RECLAIMPOLICY   VOLUMEBINDINGMODE      ALLOWVOLUMEEXPANSION   AGE
local-hostpath (default)   openebs.io/local                                Delete          WaitForFirstConsumer   false                  7h21m
nfs-client                 cluster.local/nfs-subdir-external-provisioner   Delete          Immediate              true                   131m
查看pv卷,kubesphere 所有 pv 卷都指向了local-hostpath存储类,本次的目标是在数据不丢失的情况下将这些pv卷迁移到nfs-client存储类。
root@node1:~# kubectl get pv
NAME                                       CAPACITY   ACCESS MODES   RECLAIM POLICY   STATUS   CLAIM                                                              STORAGECLASS     REASON   AGE
pvc-06aea69b-8354-465b-853d-4fe15f7dfd73   20Gi       RWO            Delete           Bound    kubesphere-monitoring-system/prometheus-k8s-db-prometheus-k8s-0    local-hostpath            3h35m
pvc-4b4a10ec-51c2-44a2-a01e-92b0192cb611   8Gi        RWO            Delete           Bound    kubesphere-devops-system/devops-jenkins                            local-hostpath            121m
pvc-58fd2deb-2080-4aea-8fe7-6090edd030a0   20Gi       RWO            Delete           Bound    kubesphere-logging-system/data-elasticsearch-logging-data-0        local-hostpath            125m
pvc-ad44f47f-e3fe-45e7-aa9b-e70a9524947f   2Gi        RWO            Delete           Bound    kubesphere-system/openldap-pvc-openldap-0                          local-hostpath            125m
pvc-b9a64414-edf1-4c0e-85b6-8f9878dcc0be   20Gi       RWO            Delete           Bound    kubesphere-monitoring-system/prometheus-k8s-db-prometheus-k8s-1    local-hostpath            3h35m
pvc-bb5ddf3c-dd48-465e-bf29-561df34d6de1   20Gi       RWO            Delete           Bound    kubesphere-logging-system/data-elasticsearch-logging-data-1        local-hostpath            123m
pvc-c557b86f-5349-4413-9e55-6d39614aa418   4Gi        RWO            Delete           Bound    kubesphere-logging-system/data-elasticsearch-logging-discovery-0   local-hostpath            125m
pvc-ffe74b94-4789-4894-98eb-3214920807a4   20Gi       RWO            Delete           Bound    kubesphere-system/minio                                            local-hostpath            125m
Velero 备份工具配置
参考:https://velero.io/docs/main/restore-reference/
velero的安装部署不在赘述,具体可参考kubernetes容灾备份工具velero这篇文章,这里已在kubesphere所在集群安装velero,并在集群外部署minio对象存储作为备份目标存储位置。
root@node1:~# kubectl -n velero get pods
NAME                      READY   STATUS    RESTARTS   AGE
restic-jb9cn              1/1     Running   0          82m
restic-wqpr6              1/1     Running   0          82m
velero-7649b7488b-cnvtc   1/1     Running   0          82m

root@node1:~# velero backup-location get
NAME      PROVIDER   BUCKET/PREFIX    PHASE       LAST VALIDATED                  ACCESS MODE   DEFAULT
default   aws        velero-backups   Available   2022-09-28 18:59:06 +0800 CST   ReadWrite     true
velero本身是一个kubernetes集群容灾备份工具,可以借助 Velero 支持在恢复期间更改持久卷的存储类别和持久卷声明这一特性,来完成kubesphere底层存储迁移。
使用该特性需要执行一个额外配置,需要在 Velero 命名空间中创建一个存储类映射,如下所示:
root@node1:~# cat velero-sc.yaml
apiVersion: v1
kind: ConfigMap
metadata:
  name: change-storage-class-config
  namespace: velero
  labels:
    velero.io/plugin-config: ""
    velero.io/change-storage-class: RestoreItemAction
data:
  local-hostpath: nfs-client
kubectl apply -f velero-sc.yaml
主要配置data部分的local-hostpath: nfs-client字段:
- local-hostpath,为备份时的旧存储类名称
- nfs-client,为恢复时的新存储类名称
这样在恢复前删除掉旧的pvc和pv,然后执行恢复操作,velero会将存储类更改为新的nfs-client存储类,从而将备份的pvc和pv 平滑迁移到新的后端存储上。
执行备份
前置要求:将所有挂载持久卷的应用副本数减少到0,防止在迁移过程中有新数据写入。
1、为防止副本数被刷新,可先将ks-installer的副本数scale到0,停止其运行:
root@node1:~# kubectl -n kubesphere-system  scale deployment.apps/ks-installer --replicas=0
deployment.apps/ks-installer scaled
不必一次迁移所有应用,可以尝试逐个迁移,验证没问题后在继续迁移其他应用。
2、以devops-jenkins为例,查看当前pvc和pv,映射的存储类都为local-hostpath:
root@node1:~# kubectl -n kubesphere-devops-system get pvc
NAME             STATUS   VOLUME                                     CAPACITY   ACCESS MODES   STORAGECLASS   AGE
devops-jenkins   Bound    pvc-7fe6d572-2254-44ee-9806-947d54642feb   8Gi        RWO            local-hostpath     52m

root@zhangwei-01:~# kubectl -n kubesphere-devops-system get pv |grep devops-jenkins
pvc-7fe6d572-2254-44ee-9806-947d54642feb   8Gi        RWO            Delete           Bound    kubesphere-devops-system/devops-jenkins                            local-hostpath                52m
3、将devops-jenkins pod副本缩为0
root@node1:~# kubectl -n kubesphere-devops-system scale deployment.apps/devops-jenkins --replicas=0
4、使用velero备份devops-jenkins应用所对应的pvc和pv:
velero backup create devops-jenkins --include-resources pvc,pv \
  --include-namespaces kubesphere-devops-system --default-volumes-to-restic
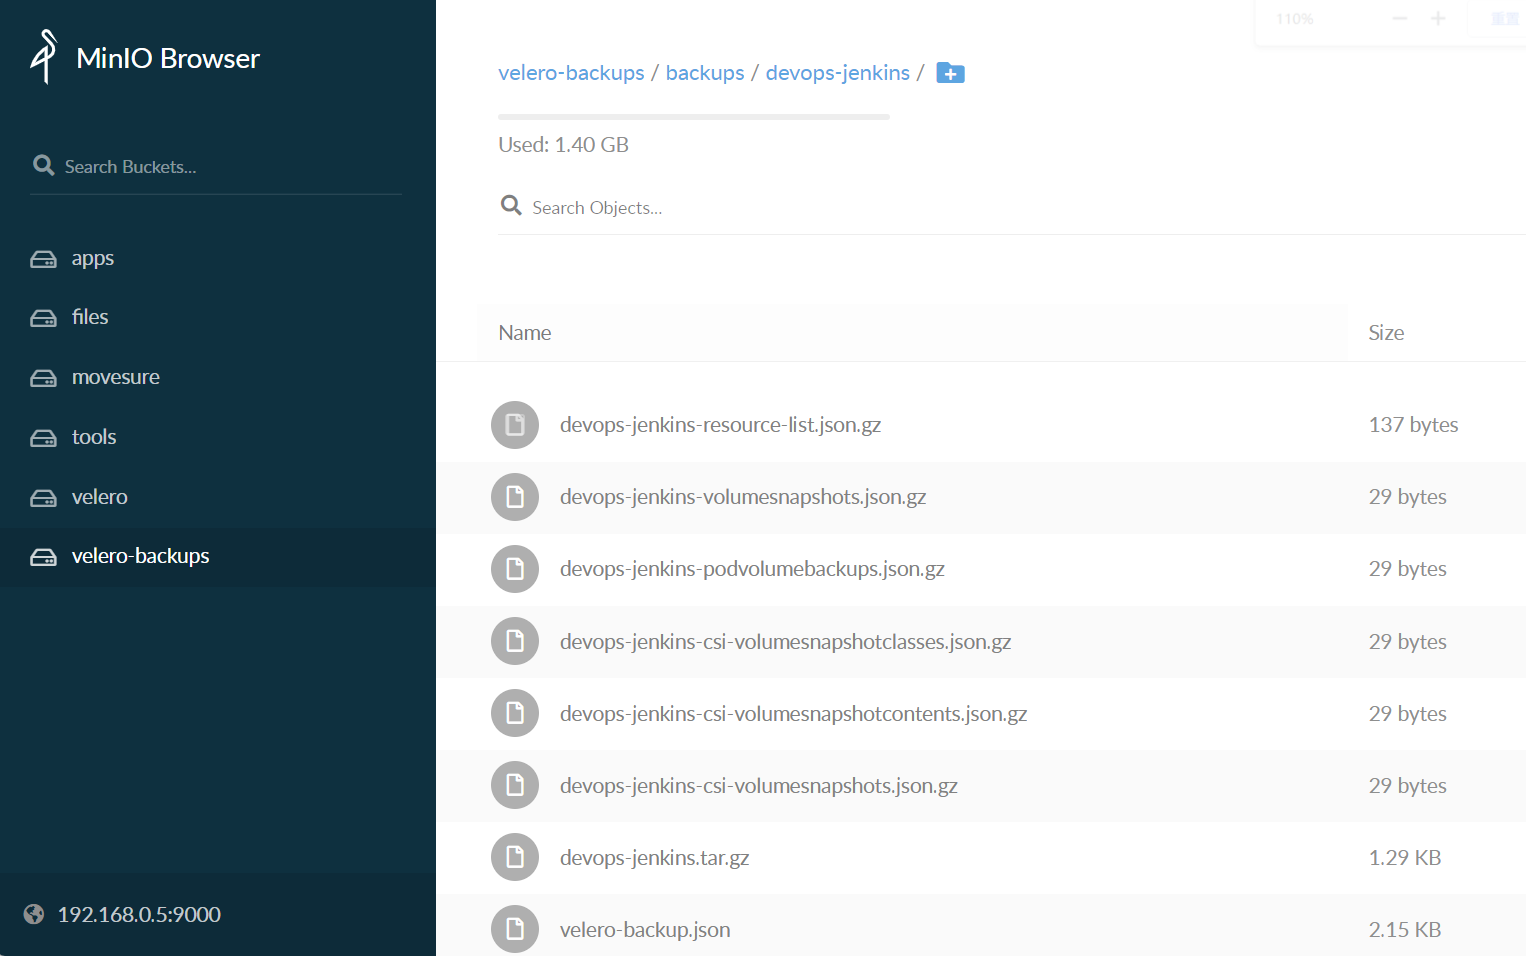
5、在minio对象存储桶中可以看到备份的持久卷数据
6、删除devops-jenkins应用所对应的pvc和pv
如果集群已存在同名pvc和pv,velero不会执行恢复动作,由于默认的pv回收策略为delete,因此我们只需删除pvc,对应的pv也会自动删除。
root@node1:~# kubectl -n kubesphere-devops-system delete pvc devops-jenkins
执行恢复
1、使用velero恢复pvc和pv
root@node1:~# velero restore create --from-backup devops-jenkins
2、查看恢复的pvc和pv,pvc处于Bound状态,对应的storage-class已改为nfs-client
root@node1:~# kubectl -n kubesphere-devops-system get pvc
NAME             STATUS   VOLUME                                     CAPACITY   ACCESS MODES   STORAGECLASS   AGE
devops-jenkins   Bound    pvc-7fe6d572-2254-44ee-9806-947d54642feb   8Gi        RWO            nfs-client     45s

root@node1:~# kubectl -n kubesphere-devops-system get pv |grep devops
pvc-7fe6d572-2254-44ee-9806-947d54642feb   8Gi        RWO            Delete           Bound    kubesphere-devops-system/devops-jenkins                            nfs-client                56s
查看jenkins数据,也恢复到了NFS存储中
[root@nfs-server ~]# ll /data/nfs_share/kubesphere-devops-system-devops-jenkins-pvc-7fe6d572-2254-44ee-9806-947d54642feb/
total 192
drwxr-xr-x   2 root root  4096 Sep 28 17:53 casc_configs
-rw-r--r--   1 root root  4995 Sep 28 18:48 cloudbees-disk-usage-simple.xml
-rw-r--r--   1 root root  3283 Sep 28 17:59 com.cloudbees.jenkins.support.filter.ContentMappings.xml
-rw-r--r--   1 root root 30018 Sep 28 18:09 config.xml
-rw-r--r--   1 root root   105 Sep 28 17:53 copy_reference_file.log
-rw-r--r--   1 root root   861 Sep 28 17:55 credentials.xml
drwxr-xr-x   2 root root  4096 Sep 28 17:55 deadlocks
-rw-r--r--   1 root root   156 Sep 28 17:55 hudson.model.UpdateCenter.xml
-rw-r--r--   1 root root   370 Sep 28 17:55 hudson.plugins.git.GitTool.xml
-rw-r--r--   1 root root   311 Sep 28 17:55 hudson.plugins.sonar.SonarGlobalConfiguration.xml
-rw-r--r--   1 root root   481 Sep 28 17:55 hudson.tasks.Mailer.xml
-rw-------   1 root root  1712 Sep 28 17:55 identity.key.enc
drwxr-xr-x   2 root root  4096 Sep 28 17:53 init.groovy.d
-rw-r--r--   1 root root   251 Sep 28 18:09 io.jenkins.plugins.casc.CasCGlobalConfig.xml
-rw-r--r--   1 root root   291 Sep 28 18:09 io.jenkins.plugins.generic.event.EventGlobalConfiguration.xml
-rw-r--r--   1 root root   537 Sep 28 18:09 io.jenkins.plugins.gitlabserverconfig.servers.GitLabServers.xml
-rw-r--r--   1 root root   410 Sep 28 18:09 io.kubesphere.jenkins.devops.auth.KubesphereTokenAuthGlobalConfiguration.xml
-rw-r--r--   1 root root    94 Sep 28 17:53 jenkins.CLI.xml
-rw-r--r--   1 root root     7 Sep 28 17:55 jenkins.install.InstallUtil.lastExecVersion
-rw-r--r--   1 root root     7 Sep 28 17:55 jenkins.install.UpgradeWizard.state
-rw-r--r--   1 root root   264 Sep 28 18:09 jenkins.model.JenkinsLocationConfiguration.xml
-rw-r--r--   1 root root   171 Sep 28 17:55 jenkins.telemetry.Correlator.xml
drwxr-xr-x   3 root root  4096 Sep 28 18:01 jobs
drwxr-xr-x   4 root root  4096 Sep 28 18:07 logs
-rw-r--r--   1 root root   907 Sep 28 17:55 nodeMonitors.xml
drwxr-xr-x   2 root root  4096 Sep 28 17:55 nodes
-rw-r--r--   1 root root  1049 Sep 28 17:55 org.jenkinsci.plugins.prometheus.config.PrometheusConfiguration.xml
drwxr-xr-x 154 root root 16384 Sep 28 17:55 plugins
-rw-r--r--   1 root root    64 Sep 28 17:54 secret.key
-rw-r--r--   1 root root     0 Sep 28 17:54 secret.key.not-so-secret
drwxr-xr-x   4 root root  4096 Sep 28 17:55 secrets
drwxr-xr-x   2 root root  4096 Sep 28 17:55 slow-requests
drwxr-xr-x   2 root root  4096 Sep 28 17:58 support
drwxr-xr-x   2 root root  4096 Sep 28 17:56 updates
drwxr-xr-x   2 root root  4096 Sep 28 17:55 userContent
drwxr-xr-x   3 root root  4096 Sep 28 17:55 users
drwxr-xr-x  11 root root  4096 Sep 28 17:53 war
drwxr-xr-x   2 root root  4096 Sep 28 17:55 workflow-libs
3、重新启动devops-jenkins应用,将副本数还原到与原来一致
root@node1:~# kubectl -n kubesphere-devops-system scale deployment.apps/devops-jenkins --replicas=1
确认devops-jenkins应用正常运行
root@node1:~# kubectl -n kubesphere-devops-system get pods
NAME                                 READY   STATUS      RESTARTS   AGE
devops-27739290-j929s                0/1     Completed   0          87m
devops-27739320-6dq9g                0/1     Completed   0          57m
devops-27739350-kppzb                0/1     Completed   0          27m
devops-apiserver-86c598df47-bqq9f    1/1     Running     0          4h24m
devops-controller-6c85d69dd5-xwzzx   1/1     Running     0          4h24m
devops-jenkins-58c6d9d868-5h9fl      1/1     Running     0          64m
s2ioperator-0                        1/1     Running     0          4h24m
查看devops组件状态:
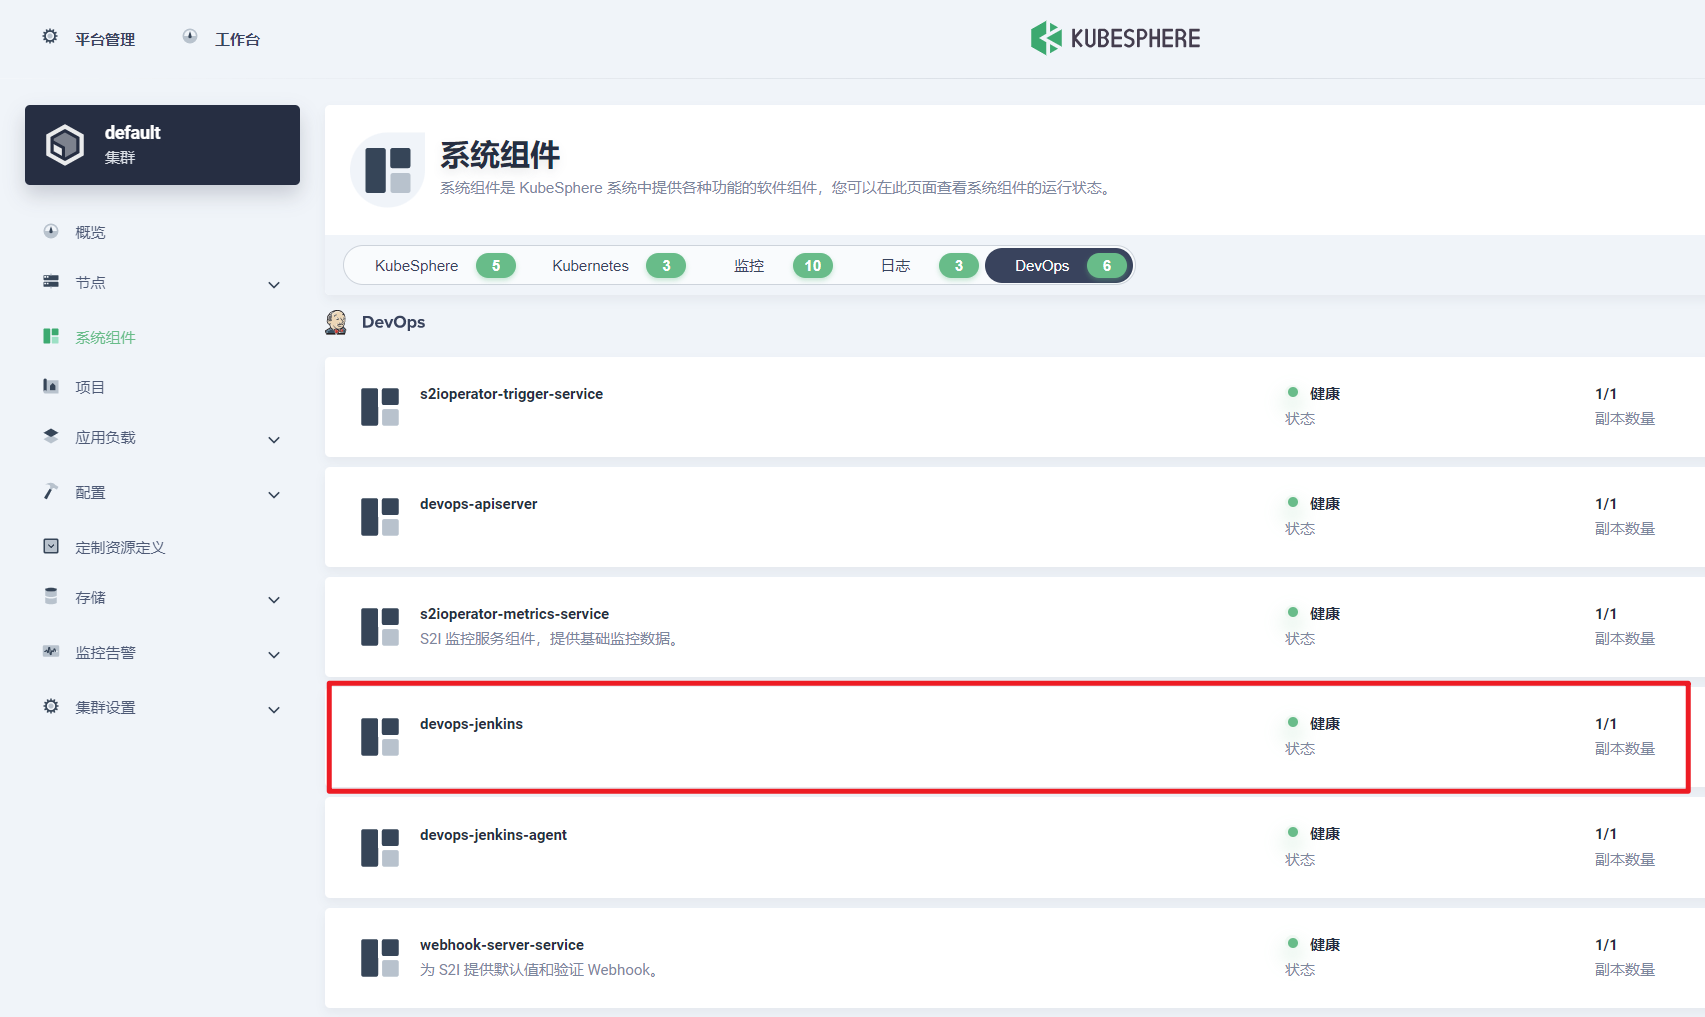
其他组件持久卷迁移操作相同,如果想简单,可以一次备份整个集群的pvc和pv,再执行恢复。