我这里主要说轮播图和无缝滚动的实现思路,就采用最简单的轮播图了,当然实现的思路有很多种,我这也只是其中一种。
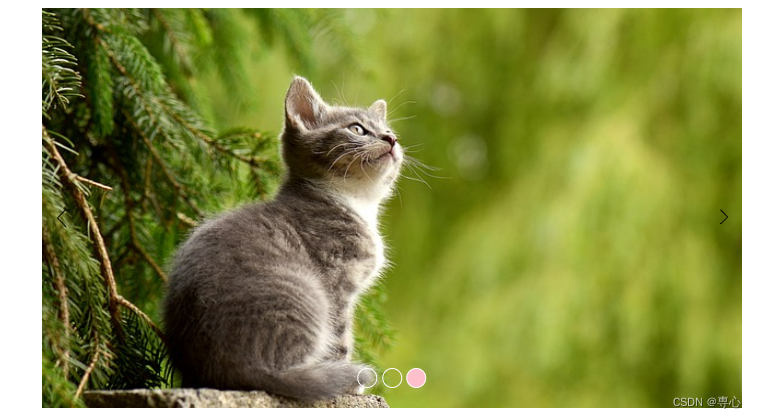
简单轮播图的大概结构是这样的,中间是图片,二边是箭头可以用来切换图片,下面的小圆点也可以用来切换图片。

1.简易的轮播图效果
先搭出html结构
这里的左右箭头我采用的是svg图标
  <div class="container">
    <div class="carousel">
      <div class="item"><a href=""><img src="./3.jpg" alt=""></a></div>
      <div class="item"><a href=""><img src="./2.jpg" alt=""></a></div>
      <div class="item"><a href=""><img src="./1.jpg" alt=""></a></div>
    </div>
    <div class="left">
      <svg t="1693569521007" class="icon" viewBox="0 0 1024 1024" version="1.1" xmlns="http://www.w3.org/2000/svg"
        p-id="4000" width="20" height="20">
        <path
          d="M729.6 931.2l-416-425.6 416-416c9.6-9.6 9.6-25.6 0-35.2-9.6-9.6-25.6-9.6-35.2 0l-432 435.2c-9.6 9.6-9.6 25.6 0 35.2l432 441.6c9.6 9.6 25.6 9.6 35.2 0C739.2 956.8 739.2 940.8 729.6 931.2z"
          p-id="4001"></path>
      </svg>
    </div>
    <div class="right">
      <svg t="1693569535119" class="icon" viewBox="0 0 1024 1024" version="1.1" xmlns="http://www.w3.org/2000/svg"
        p-id="4245" width="16" height="16">
        <path
          d="M761.6 489.6l-432-435.2c-9.6-9.6-25.6-9.6-35.2 0-9.6 9.6-9.6 25.6 0 35.2l416 416-416 425.6c-9.6 9.6-9.6 25.6 0 35.2s25.6 9.6 35.2 0l432-441.6C771.2 515.2 771.2 499.2 761.6 489.6z"
          p-id="4246"></path>
      </svg>
    </div>
    <div class="indicator">
      <span class="active"></span>
      <span></span>
      <span></span>
    </div>
  </div>
然后是css样式
  * {
      margin: 0;
      padding: 0;
      box-sizing: border-box;
    }

    .container {
      width: 700px;
      height: 400px;
      margin: 10px auto;
      overflow: hidden;
      position: relative;
    }

    .container .carousel {
      width: 100%;
      height: 100%;
      display: flex;
    }

    .container .carousel .item img {
      width: 700px;
      height: 400px;
    }

    .container .indicator {
      height: 30px;
      position: absolute;
      bottom: 10px;
      left: 50%;
      transform: translateX(-50%);
    }

    .container .indicator span {
      border: 1px solid #fff;
      width: 20px;
      height: 20px;
      border-radius: 50%;
      display: inline-block;
    }

    .container .indicator span.active {
      background-color: pink;
    }

    .container .left {
      position: absolute;
      left: 10px;
      top: 50%;
    }

    .container .right {
      position: absolute;
      right: 10px;
      top: 50%;
    }
css的关键代码是overflow:hidden,我这里开启的flex弹性盒,使用它可以将多出来的图片进行隐藏,然后其中的一个圆圈元素加上了active
下面是js代码
我们首先要获取到所有的dom元素
  var doms = {
    carousel: document.querySelector('.carousel'),
    indicator: document.querySelectorAll('.indicator span'),
    left: document.querySelector('.left'),
    right: document.querySelector('.right')
  }
最重要的就是轮播的函数
var curIndex = 0  //用于记录当前是第几个元素
function moveTo(index) {
    //加上动画效果
    doms.carousel.style.transition = 'transform .5s'
    doms.carousel.style.transform = `translateX(-${index}00%)`
    //去除效果
    var active = document.querySelector('.indicator span.active')
    active.classList.remove('active')
    //选中当前效果
    doms.indicator[index].classList.add('active')
    curIndex = index
  }
我这里采用的是transform的translateX(-100%)来实现的轮播切换,也可以使用margin-left来控制都可以。
接下来可以给加上一个定时器来控制它进行自动轮播
 //添加图片自动轮播
  let timer = setInterval(() => {
    if (curIndex === doms.indicator.length - 1) {
      moveTo(0)
    } else (
      moveTo(curIndex + 1)
    )
  }, 2000)
也可以给下面的小圆圈和左右箭头加上对应的点击事件
  //添加点击事件
  doms.indicator.forEach((item, index) => {
    item.addEventListener('click', () => {
      moveTo(index)
    })
  })
  //添加点击事件
  doms.left.addEventListener('click', () => {
    moveTo(curIndex-1)
  })
  doms.right.addEventListener('click', () => {
     moveTo(curIndex+1)
  })
到这里其实已经实现的简易轮播图的基本功能,但是还并不完美,会存在防抖以及无法无缝滚动的效果
2.无缝滚动及防抖
无缝滚动的实现思路就是采用克隆的功能及改变动画效果来实现的

就像这样,将最后一张复制出来放到最前面,但是展示的还是1.jpg,第一张复制放到最后面
在切换到最后一张或者第一张时,首先将过度动画关掉切换,然后迅速开启过度动画轮播下一张,这样眼睛是无法察觉出来的,因为其速度很快。
首先是克隆
  //克隆图片,实现无缝滚动
  function clone() {
    var first = doms.carousel.firstElementChild.cloneNode(true);
    //复制最后一张
    var last = doms.carousel.lastElementChild.cloneNode(true);
    //插入到最后
    doms.carousel.appendChild(first);
    //插入到最前
    doms.carousel.insertBefore(last, doms.carousel.firstElementChild)
    //将复制的第一张的位置调整
    last.style.position = 'absolute';
    last.style.transform = `translateX(-100%)`
  }
  clone()
克隆的关键在于要将克隆的第一张图片改变一下位置
然后实现右边箭头的无缝滚动
  //实现右边的无缝滚动
  var count = doms.indicator.length
  function rightMove() {
    //首先去除动画效果
    if (curIndex === count - 1) {
      doms.carousel.style.transform = `translateX(100%)`;
      doms.carousel.style.transition = 'none';
      //强制渲染,否则可能不会执行
      doms.carousel.clientHeight;
      moveTo(0)
    } else {
      moveTo(curIndex + 1)
    }
  }
右边实现后左边就很简单了
  //实现左边的无缝滚动
  function leftMove() {

    if (curIndex === 0) {
      doms.carousel.style.transform = `translateX(-${count}00%)`;
      doms.carousel.style.transition = 'none';
      //强制渲染
      doms.carousel.clientHeight;
      moveTo(count - 1)
    } else {
      moveTo(curIndex - 1)
    }
  }
然后我们的定时器就需要进行一下改变,让他往右边轮播‘
  //添加图片自动轮播
  let timer = setInterval(() => {
    rightMove()
  }, 2000)
然后在需要防抖的地方进行一下防抖,其实我这种很简单的防抖就是将定时器关闭掉,在点击任务完成后再开启定时器。
 //添加点击事件
  doms.indicator.forEach((item, index) => {
    item.addEventListener('click', () => {
      //关闭定时器
      clearInterval(timer)
      moveTo(index)
      //执行完后开启定时器
      timer = setInterval(() => {
        rightMove()
      }, 2000)
    })
  })
左右箭头的点击事件
  //添加点击事件
  doms.left.addEventListener('click', () => {
    //关闭定时器
    clearInterval(timer)
    leftMove()
    //开启定时器
    timer = setInterval(() => {
      rightMove()
    }, 2000)
  })
  doms.right.addEventListener('click', () => {
    //关闭定时器
    clearInterval(timer)
    rightMove()
    //开启定时器
    timer = setInterval(() => {
      rightMove()
    }, 2000)
  })
到这里就实现了简单的轮播图效果
整体代码:
<!DOCTYPE html>
<html lang="en">

<head>
  <meta charset="UTF-8">
  <meta name="viewport" content="width=device-width, initial-scale=1.0">
  <title>Document</title>
  <style>
    * {
      margin: 0;
      padding: 0;
      box-sizing: border-box;
    }

    .container {
      width: 700px;
      height: 400px;
      margin: 10px auto;
      overflow: hidden;
      position: relative;
    }

    .container .carousel {
      width: 100%;
      height: 100%;
      display: flex;

      /* transition: .5s; */
    }

    .container .carousel .item img {
      width: 700px;
      height: 400px;
    }

    .container .indicator {
      height: 30px;
      position: absolute;
      bottom: 10px;
      left: 50%;
      transform: translateX(-50%);
    }

    .container .indicator span {
      /* background-color: #fff; */
      border: 1px solid #fff;
      width: 20px;
      height: 20px;
      border-radius: 50%;
      display: inline-block;
    }

    .container .indicator span.active {
      background-color: pink;
    }

    .container .left {
      position: absolute;
      left: 10px;
      top: 50%;
    }

    .container .right {
      position: absolute;
      right: 10px;
      top: 50%;
    }
  </style>
</head>

<body>
  <div class="container">
    <div class="carousel">
      <div class="item"><a href=""><img src="./3.jpg" alt=""></a></div>
      <div class="item"><a href=""><img src="./2.jpg" alt=""></a></div>
      <div class="item"><a href=""><img src="./1.jpg" alt=""></a></div>
    </div>
    <div class="left">
      <svg t="1693569521007" class="icon" viewBox="0 0 1024 1024" version="1.1" xmlns="http://www.w3.org/2000/svg"
        p-id="4000" width="20" height="20">
        <path
          d="M729.6 931.2l-416-425.6 416-416c9.6-9.6 9.6-25.6 0-35.2-9.6-9.6-25.6-9.6-35.2 0l-432 435.2c-9.6 9.6-9.6 25.6 0 35.2l432 441.6c9.6 9.6 25.6 9.6 35.2 0C739.2 956.8 739.2 940.8 729.6 931.2z"
          p-id="4001"></path>
      </svg>
    </div>
    <div class="right">
      <svg t="1693569535119" class="icon" viewBox="0 0 1024 1024" version="1.1" xmlns="http://www.w3.org/2000/svg"
        p-id="4245" width="16" height="16">
        <path
          d="M761.6 489.6l-432-435.2c-9.6-9.6-25.6-9.6-35.2 0-9.6 9.6-9.6 25.6 0 35.2l416 416-416 425.6c-9.6 9.6-9.6 25.6 0 35.2s25.6 9.6 35.2 0l432-441.6C771.2 515.2 771.2 499.2 761.6 489.6z"
          p-id="4246"></path>
      </svg>
    </div>
    <div class="indicator">
      <span class="active"></span>
      <span></span>
      <span></span>
    </div>
  </div>
</body>
<script>
  var doms = {
    carousel: document.querySelector('.carousel'),
    indicator: document.querySelectorAll('.indicator span'),
    left: document.querySelector('.left'),
    right: document.querySelector('.right')
  }
  var curIndex = 0
  function moveTo(index) {
    //加上动画效果
    doms.carousel.style.transition = 'transform .5s'
    doms.carousel.style.transform = `translateX(-${index}00%)`
    //去除效果
    var active = document.querySelector('.indicator span.active')
    active.classList.remove('active')
    //选中当前效果
    doms.indicator[index].classList.add('active')
    curIndex = index
  }
  //添加点击事件
  doms.indicator.forEach((item, index) => {
    item.addEventListener('click', () => {
      //关闭定时器
      clearInterval(timer)
      moveTo(index)
      //执行完后开启定时器
      timer = setInterval(() => {
        rightMove()
      }, 2000)
    })
  })
  //添加图片自动轮播
  let timer = setInterval(() => {
    rightMove()
  }, 2000)

  //克隆图片,实现无缝滚动
  function clone() {
    var first = doms.carousel.firstElementChild.cloneNode(true);
    //复制最后一张
    var last = doms.carousel.lastElementChild.cloneNode(true);
    //插入到最后
    doms.carousel.appendChild(first);
    //插入到最前
    doms.carousel.insertBefore(last, doms.carousel.firstElementChild)
    //将复制的第一张的位置调整
    last.style.position = 'absolute';
    last.style.transform = `translateX(-100%)`
  }
  clone()

  //实现右边的无缝滚动
  var count = doms.indicator.length
  function rightMove() {
    //首先去除动画效果
    if (curIndex === count - 1) {
      doms.carousel.style.transform = `translateX(100%)`;
      doms.carousel.style.transition = 'none';
      //强制渲染
      doms.carousel.clientHeight;
      moveTo(0)
    } else {
      moveTo(curIndex + 1)
    }
  }
  //实现左边的无缝滚动
  function leftMove() {

    if (curIndex === 0) {
      doms.carousel.style.transform = `translateX(-${count}00%)`;
      doms.carousel.style.transition = 'none';
      //强制渲染
      doms.carousel.clientHeight;
      moveTo(count - 1)
    } else {
      moveTo(curIndex - 1)
    }
  }

  //添加点击事件
  doms.left.addEventListener('click', () => {
    //关闭定时器
    clearInterval(timer)
    leftMove()
    //开启定时器
    timer = setInterval(() => {
      rightMove()
    }, 2000)
  })
  doms.right.addEventListener('click', () => {
    //关闭定时器
    clearInterval(timer)
    rightMove()
    //开启定时器
    timer = setInterval(() => {
      rightMove()
    }, 2000)
  })
</script>

</html>