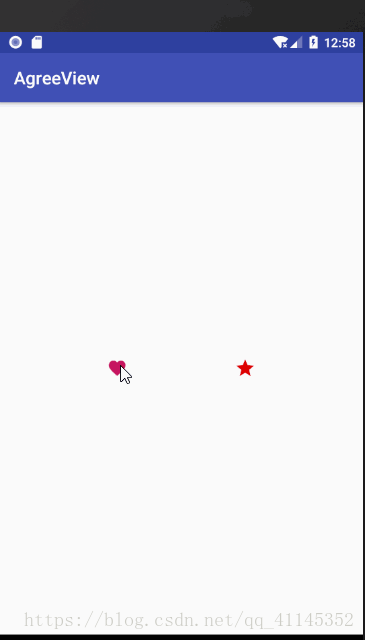
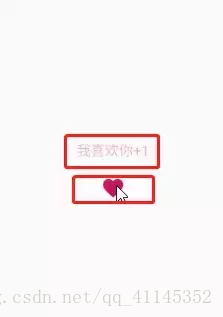
效果图如下
我们可以通过attrs自定义的属性,拿到图片的Drawable,通过调用drawable.draw(canvas)方法直接画出来。
- 上方显示的动画部分
第二部分最开始我想到的是直接在上方画一个TextView,然后设置属性动画 达到我们的效果,后来思考这种效果最好不增加自身控件的大小,假如在上方直接添加TextView那么必然怎么整个控件的高度,很多这种点赞的效果是放在列表中,高度有限。所以我最后想的是使用PopupWindow来实现,然后设置属性动画。
自定义View部分
我们需要定义的属性有:
<?xml version="1.0" encoding="utf-8"?>
<resources>
   <declare-styleable name="AgreeView">
       <!--动画移动最终距离-->
       <attr name="distance" format="integer"/>
       <!--动画起始位置-->
       <attr name="from_y" format="integer"/>
       <!--动画开始透明度-->
       <attr name="from_alpha" format="float"/>
       <!--动画结束透明度-->
       <attr name="to_alpha" format="float"/>
       <!--持续时间-->
       <attr name="duration" format="integer"/>
       <!--动画显示的文字-->
       <attr name="text" format="string"/>
       <!--动画文字大小-->
       <attr name="text_size" format="integer"/>
       <!--动画颜色-->
       <attr name="text_color" format="color"/>
       <!--点赞图片-->
       <attr name="img" format="reference"/>
       <!--动画图片-->
       <attr name="animation_img" format="reference"/>
       <!--动画选择是图片还是文字-->
       <attr name="animation" format="enum">
           <enum name="text" value="0"/>
           <enum name="img" value="1"/>
       </attr>
   </declare-styleable>
</resources>
2.我们在构造方法中获取对应属性,然后初始化PopupWidow:
/**
    * 初始化popupWindow
    */
   private void initPopupWindow() {
       mPopupWindow = new PopupWindow();
       //PopupWindow创建相对布局
       RelativeLayout layout = new RelativeLayout(mContext);
       //布局参数
       RelativeLayout.LayoutParams layoutParams = new RelativeLayout.LayoutParams(ViewGroup.LayoutParams.WRAP_CONTENT,
               ViewGroup.LayoutParams.WRAP_CONTENT);
       layoutParams.addRule(RelativeLayout.CENTER_HORIZONTAL);
       layoutParams.addRule(RelativeLayout.ALIGN_PARENT_BOTTOM);
       tvAnimation = new AppCompatTextView(mContext);
       tvAnimation.setIncludeFontPadding(false);
       tvAnimation.setTextSize(TypedValue.COMPLEX_UNIT_DIP, text_size);
       tvAnimation.setTextColor(text_color);
       if (animationMode == ANIMATION_MODE_TEXT) {
           tvAnimation.setText(text);
       } else {
           tvAnimation.setText("");
           tvAnimation.setBackgroundDrawable(animalDrawable);
       }
       tvAnimation.setLayoutParams(layoutParams);
       layout.addView(tvAnimation);
       mPopupWindow.setContentView(layout);

       //量测我们的动画的宽高
       int w = MeasureSpec.makeMeasureSpec(0, MeasureSpec.UNSPECIFIED);
       int h = MeasureSpec.makeMeasureSpec(0, MeasureSpec.UNSPECIFIED);
       tvAnimation.measure(w, h);
       mPopupWindow.setWidth(tvAnimation.getMeasuredWidth());
       Log.e(TAG, "distance==== " + distance);
       mPopupWindow.setHeight(distance + tvAnimation.getMeasuredHeight());
       mPopupWindow.setBackgroundDrawable(new ColorDrawable(Color.TRANSPARENT));
       mPopupWindow.setFocusable(false);
       mPopupWindow.setTouchable(false);
       mPopupWindow.setOutsideTouchable(false);
   }
这里面要注意的是我们要计算PopupWidow的高度和宽度,我们将 RelativeLayout作为ViewGroup,用 AppCompatTextView作为动画控件,如果是图片则直接设置背景图片。
3.设置我们点赞View上方的动画:
/**
    * 动画组合
    */
   private void setPopAnimation() {
       mAnimationSet = new AnimationSet(true);
       TranslateAnimation translateAnim = new TranslateAnimation(0, 0, from_y, -to_y);
       AlphaAnimation alphaAnim = new AlphaAnimation(from_alpha, to_alpha);
       mAnimationSet.addAnimation(translateAnim);
       mAnimationSet.addAnimation(alphaAnim);
       mAnimationSet.setDuration(duration);
       mAnimationSet.setAnimationListener(new Animation.AnimationListener() {
           @Override
           public void onAnimationStart(Animation animation) {
           }

           @Override
           public void onAnimationEnd(Animation animation) {
               if (mPopupWindow != null && mPopupWindow.isShowing()) {
                   new Handler().post(new Runnable() {
                       @Override
                       public void run() {
                           mPopupWindow.dismiss();
                       }
                   });
               }
           }

           @Override
           public void onAnimationRepeat(Animation animation) {
           }
       });
   }
4.设置我们点赞图片的动画效果:
/**
    * 缩放动画
    */
   private void setScaleAnimation() {
       ObjectAnimator scaleX = ObjectAnimator.ofFloat(this, "scaleX", 1f, 0.8f, 1.2f, 1f);
       ObjectAnimator scaleY = ObjectAnimator.ofFloat(this, "scaleY", 1f, 0.8f, 1.2f, 1f);
       scaleX.setDuration(duration);
       scaleY.setDuration(duration);
       scaleX.setInterpolator(new AccelerateDecelerateInterpolator());
       scaleY.setInterpolator(new AccelerateDecelerateInterpolator());
       AnimatorSet animatorSet = new AnimatorSet();
       animatorSet.play(scaleX).with(scaleY);
       animatorSet.start();
   }
5.我们onDraw()方法之前我们还需要量测一下我们控件的大小,假如我们不量测宽高,我们在XML中引用我们的控件我们自己设定一个宽高,比实际的图片的宽高要大,最终显示的图片还是原图片大小,不会按照XML中设定的值放大或者缩小。
/**
    * 量测点击控件的大小
    *
    * @param widthMeasureSpec
    * @param heightMeasureSpec
    */
   @Override
   protected void onMeasure(int widthMeasureSpec, int heightMeasureSpec) {
       super.onMeasure(widthMeasureSpec, heightMeasureSpec);
       int width;
       int height;
       int w_mode = MeasureSpec.getMode(widthMeasureSpec);
       int w_size = MeasureSpec.getSize(widthMeasureSpec);

       int h_mode = MeasureSpec.getMode(heightMeasureSpec);
       int h_size = MeasureSpec.getSize(heightMeasureSpec);

       if (w_mode == MeasureSpec.AT_MOST || w_mode == MeasureSpec.UNSPECIFIED) {
           width = agreeDrawable.getIntrinsicWidth();
       } else {
           width = w_size;
       }

       if (h_mode == MeasureSpec.AT_MOST || h_mode == MeasureSpec.UNSPECIFIED) {
           height = agreeDrawable.getIntrinsicHeight();
       } else {
           height = h_size;
       }
       setMeasuredDimension(width, height);

       //根据量测的宽高,设置我们画的Drawable的大小
       @SuppressLint("DrawAllocation")
       Rect rect = new Rect(0, 0, width, height);
       agreeDrawable.setBounds(rect);
   }
6.画我们的图片:
@Override
   protected void onDraw(Canvas canvas) {
       //将我们的Drawable画到画布
       agreeDrawable.draw(canvas);
   }
7.当我们点击图片的时候触发动画:
@Override
   public void onClick(View v) {
       if (mPopupWindow != null && !mPopupWindow.isShowing()) {
           int offsetY = -getHeight() - mPopupWindow.getHeight();
           mPopupWindow.showAsDropDown(this, getWidth() / 2 - mPopupWindow.getWidth() / 2, offsetY);
           mPopupWindow.update();
           if (mAnimationSet == null) {
               setPopAnimation();
           }
           tvAnimation.startAnimation(mAnimationSet);
           setScaleAnimation();
           //外部点击事件
           if (clickListener != null) {
               clickListener.onAgreeClick(v);
           }
       }
   }
这里自定义了一个View的点击事件方法,供外部调用。
MainActivity中添加自定义控件和属性
<?xml version="1.0" encoding="utf-8"?>
<android.support.constraint.ConstraintLayout
   xmlns:android="http://schemas.android.com/apk/res/android"
   xmlns:agreeview="http://schemas.android.com/apk/res-auto"
   xmlns:tools="http://schemas.android.com/tools"
   android:layout_width="match_parent"
   android:layout_height="match_parent"
   tools:context="com.lt.agreeview.MainActivity">

   <com.lt.agreeview.AgreeView
       android:id="@+id/agreeView4"
       android:layout_width="wrap_content"
       android:layout_height="wrap_content"
       android:layout_marginBottom="8dp"
       android:layout_marginTop="8dp"
       agreeview:animation="text"
       agreeview:animation_img="@drawable/ic_favorite_black_24dp"
       agreeview:distance="100"
       agreeview:from_y="60"
       agreeview:layout_constraintBottom_toBottomOf="parent"
       agreeview:layout_constraintEnd_toStartOf="@+id/agreeView3"
       agreeview:layout_constraintHorizontal_bias="0.5"
       agreeview:layout_constraintStart_toStartOf="parent"
       agreeview:layout_constraintTop_toTopOf="parent"
       agreeview:text="我喜欢你+1"
       agreeview:text_color="@color/text_color">
   </com.lt.agreeview.AgreeView>

   <com.lt.agreeview.AgreeView
       android:id="@+id/agreeView3"
       android:layout_width="wrap_content"
       android:layout_height="wrap_content"
       agreeview:animation="img"
       agreeview:animation_img="@drawable/ic_grade_black_24dp"
       agreeview:distance="100"
       agreeview:from_y="60"
       agreeview:layout_constraintBottom_toBottomOf="@+id/agreeView4"
       agreeview:layout_constraintEnd_toEndOf="parent"
       agreeview:layout_constraintHorizontal_bias="0.5"
       agreeview:img="@drawable/ic_grade_black_24dp"
       agreeview:layout_constraintStart_toEndOf="@+id/agreeView4"
       agreeview:layout_constraintTop_toTopOf="@+id/agreeView4"
       agreeview:text_color="@color/text_color">
   </com.lt.agreeview.AgreeView>

   <android.support.constraint.Group
       android:id="@+id/group"
       android:layout_width="wrap_content"
       android:layout_height="wrap_content"/>

</android.support.constraint.ConstraintLayout>至此我们的自定义点赞效果就完成了,源码我已经上传到Github上面,如果有需要的可以自行下载Github(https://github.com/scorpioLt/AgreeView)
作者:程序圈LT
链接:https://juejin.im/post/5b1ddcc26fb9a01e670671b3
来源:掘金
著作权归作者所有。商业转载请联系作者获得授权,非商业转载请注明出处。