目录
一. 前言
上一篇已经完成了流水线的搭建,本篇要完成的是:1. 事件中心的修改;2. 机械臂的DoTween运动改造;
本篇是在事件中心2和机械臂场景的基础上建立的,需要先了解与之相关的基本知识,了解机械臂和机械爪的控制以及机械臂逆向解的控制等,本篇会在这些基础上修改代码。
二. 事件中心修改
1. EventType.cs
在EventType的枚举中增加传送带、机械臂和手爪的事件类型:
using UnityEngine;

public enum EventType
{
    //其他事件类型先省略了
    //…………
    OnConveyerCtrl,
    OnArmCtrl,
    OnClawCtrl
}
2. EventDataBase.cs
扫描二维码关注公众号,回复:
16758225 查看本文章

在EventDataBase中增加机械臂和手爪控制时需要传输的数据:(篇幅有限,仅展示本篇需要的类)
using System.Collections;
using System.Collections.Generic;
using UnityEngine;
//管理委托要传入的参数
public class EventDataBase
{//父类

}

public class EventDataConveyer:EventDataBase
{//传送带需要传入移动或停止状态
    public EConveyerType conveyerType;
}

public class EventDataArm:EventDataBase
{
    public EArmMoveType armType;  //机械臂的运动类型
    public Transform target;      //机械臂抓取目标,由传感器传入
    public EClawType clawType;    //如果需要的话,发送手爪状态命令
    public float waitTime;        //发送手爪命令时,同时发送让手爪等待的时间

}

public class EventDataClaw:EventDataBase
{
    public EClawType clawType;   //发送手爪命令
    public Transform target;     //手爪的目标,一般不太需要用到
    public float waitTime;
}

public enum EConveyerType
{
    Move,Stop
}
public enum EArmMoveType
{
    Get,Up,Put,Home    //机械臂的状态:取东西,抬起,放东西,回零
}
public enum EClawType
{
    Open,Close
}
有了这些事件类型和数据的定义,接下来可以使用事件发送来控制机械臂和手爪的运动。
三. 机械臂加入DoTween的运动
之前的机械臂运动都是硬切,最多加了个插值运算,但是运行得也是颤颤巍巍的,这里加一个DoTween插件,扩展Transform的Rotate方法,使用DoTween曲线运动得丝滑一些:
使用DoTween中四元素旋转API来实现绕不同坐标轴的旋转
public static TweenerCore<Quaternion, Quaternion, NoOptions> DOLocalRotateQuaternion(this Transform target, Quaternion endValue, float duration);Transform扩展代码如下:
using UnityEngine;
using DG.Tweening;//别忘记调用DoTween
using System;

public static class TransformExt
{
    public static void RotateX(this Transform transform, float x, float time, Action action)
    {
        transform.DOLocalRotateQuaternion(Quaternion.AngleAxis(x, Vector3.right), time).OnComplete(() => action());
    }
    public static void RotateY(this Transform transform, float y, float duration, Action action)
    {
        transform.DOLocalRotateQuaternion(Quaternion.AngleAxis(y, Vector3.up), time).OnComplete(() => action());
    }
    public static void RotateZ(this Transform transform, float z, float duration, Action action)
    {
        transform.DOLocalRotateQuaternion(Quaternion.AngleAxis(z, Vector3.forward), time).OnComplete(() => action());
    }
}
四. 机械臂关节的控制
1. 先放关节旋转的代码:(这里参考了机械臂控制(二)的文章)
using System;
using System.Collections;
using System.Collections.Generic;
using UnityEngine;
//机械臂单个关节点的旋转控制
//把它挂在每一个关节节点上,并选择关节的旋转方向
public enum RotateAxis
{
x,y,z
}
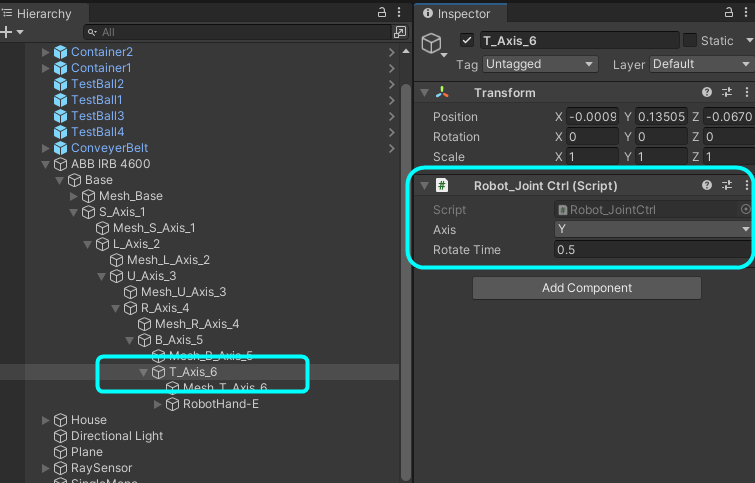
public class Robot_JointCtrl : MonoBehaviour
{
public RotateAxis axis;
public float rotateTime;
public float currentAngle=0; //记录角度
public void SetAngle(float angle, Action action)
{
if(currentAngle==angle)
{
action();
}
else
{
switch (axis)
{
case RotateAxis.x:
transform.RotateX(angle, rotateTime, action);
currentAngle = transform.rotation.eulerAngles.x;
break;
case RotateAxis.y:
transform.RotateY(angle, rotateTime, action);
currentAngle = transform.rotation.eulerAngles.y;
break;
case RotateAxis.z:
transform.RotateZ(angle, rotateTime, action);
currentAngle = transform.rotation.eulerAngles.y;
break;
}
}
}将这个脚本挂在每一个需要控制旋转的机械臂关节上,并旋转旋转轴和旋转时间:
2. 测试一下试试(不需要测试的话,2、3步可以跳过)
机械臂的控制代码Test.cs,将挂了Robot_JointCtrl脚本的关节都遍历执行一遍:
public class Test : MonoBehaviour
{
    public Robot_JointCtrl[] joints;
    //旋转的数据
    float[] home = { 0, 0, 0, 0, 0};     //回零动作
    float[] get = { -42.7, 9.12, -115, 90,0 }; //抓取动作
    float[] put = { 50, 40, -118, -90, 0 };  // 放置动作

    public void MoveJoints(float[] angle, int i)
    {//遍历所有活动关节
        joints[i].SetAngle(angle[i], () =>
        {
            Debug.Log(i + "关节已经完成移动");
            if (i == joints.Length-1)
            {
                Debug.Log("所有关节完成旋转");
                return ;
            }
            i++;
            MoveJoints(angle, i);
        });
    }

    void Update()
    {//测试MoveJoints方法
        if (Input.GetKeyDown(KeyCode.A))
        {
             MoveJoints(get,0);
        }
        if (Input.GetKeyDown(KeyCode.B))
        {
            MoveJoints(put,0);
        }
        if (Input.GetKeyDown(KeyCode.C))
        {
            MoveJoints(home,0);
        }
    }
}
3. 把上面的测试脚本挂在机械臂的根节点上,并且将对应的旋转关节放进数组即可。旋转结果就不放了。

(本篇有测试Demo下载)
关于机械臂的事件发送和IK自动运行将放在下一篇分段写,不然代码的篇幅太长了。