转自:https://blog.csdn.net/Koala_Tree/article/details/78021375
一、TFRecord输入数据格式
TensorFlow读取数据,总共有三种方法:
- 供给数据(Feeding):在TensorFlow程序运行的过程中,使用Python代码来供给数据;
- 从文件读取数据:在TensorFlow图的起始,让一个输入管线从文件中读取数据;
- 预加载数据:在TensorFlow图中定义常量或者变量来保存所有数据(仅适用于数据量比较小的情况)。
对于数据量较小的情况下,一般选择直接将数据加载进内存,然后再分batch输入网络进行训练。但是,如果数据量较大,这样的方法太耗内存,这时最好使用tensorflow提供的队列queue,也就是第二种方法从文件读取数据。
1. 输入保存为TFRecord文件
TFRecords文件包含了tf.train.Example 协议内存块(protocol buffer)(协议内存块包含了字段 Features)。
过程:
- 获取需要保存的数据;
- 将数据填入到Example协议内存块(protocol buffer);
- 将协议内存块序列化为一个字符串;
- 通过
tf.python_io.TFRecordWriter写入到TFRecords文件。
其中,一个Example中包含Features,Features里包含Feature的字典,Feature里包含有一个FloatList或ByteList或Int64List。
例程:
import tensorflow as tf
from tensorflow.examples.tutorials.mnist import input_data
import numpy as np

# 定义函数转化变量类型。
def _int64_feature(value):
    return tf.train.Feature(int64_list=tf.train.Int64List(value=[value]))

def _bytes_feature(value):
    return tf.train.Feature(bytes_list=tf.train.BytesList(value=[value]))

# 读取mnist数据。
mnist = input_data.read_data_sets("../../datasets/MNIST_data",dtype=tf.uint8, one_hot=True)
images = mnist.train.images
labels = mnist.train.labels
pixels = images.shape[1]
num_examples = mnist.train.num_examples

# 输出TFRecord文件的地址。
filename = "Records/output.tfrecords"
writer = tf.python_io.TFRecordWriter(filename)
for index in range(num_examples):
    image_raw = images[index].tostring()

    example = tf.train.Example(features=tf.train.Features(feature={
        'pixels': _int64_feature(pixels),
        'label': _int64_feature(np.argmax(labels[index])),
        'image_raw': _bytes_feature(image_raw)
    }))
    writer.write(example.SerializeToString())
writer.close()
print "TFRecord文件已保存。"- 1
- 2
- 3
- 4
- 5
- 6
- 7
- 8
- 9
- 10
- 11
- 12
- 13
- 14
- 15
- 16
- 17
- 18
- 19
- 20
- 21
- 22
- 23
- 24
- 25
- 26
- 27
- 28
- 29
- 30
- 31
- 32
2. 读取TFRecord文件
在生成了TFRecords文件后,为了高效地读取数据,在TensorFlow中使用队列(queue)读取数据。
过程:
- 使用tf.train.string_input_producer获取tfrecords文件;
- 使用tf.TFRecordReader对文件进行读取;
- 利用tf.parse_single_example解析器对数据例进行解析;
- 对feature进行解析;
- 启动多线程处理输入数据
这个操作可以将Example协议内存块(protocol buffer)解析为张量。
例程:
# 读取文件。
reader = tf.TFRecordReader()
filename_queue = tf.train.string_input_producer(["Records/output.tfrecords"])
_,serialized_example = reader.read(filename_queue)

# 解析读取的样例。
features = tf.parse_single_example(
    serialized_example,
    features={
        'image_raw':tf.FixedLenFeature([],tf.string),
        'pixels':tf.FixedLenFeature([],tf.int64),
        'label':tf.FixedLenFeature([],tf.int64)
    })

images = tf.decode_raw(features['image_raw'],tf.uint8)
labels = tf.cast(features['label'],tf.int32)
pixels = tf.cast(features['pixels'],tf.int32)

sess = tf.Session()

# 启动多线程处理输入数据。
coord = tf.train.Coordinator()
threads = tf.train.start_queue_runners(sess=sess,coord=coord)

for i in range(10):
image, label, pixel = sess.run([images, labels, pixels])- 1
- 2
- 3
- 4
- 5
- 6
- 7
- 8
- 9
- 10
- 11
- 12
- 13
- 14
- 15
- 16
- 17
- 18
- 19
- 20
- 21
- 22
- 23
- 24
- 25
- 26
二、图像预处理
1. 图像编码处理
彩色图片不是直接存储三维矩阵的数字,而是记录经过压缩编码后的结果,所以如果想要将一张图像还原成一个三维矩阵,需要解码的过程。
TensorFlow提供了对jpeg和png格式图像的编码/解码函数。
图片读取
import matplotlib.pyplot as plt
import tensorflow as tf
import numpy as np

image_raw_data = tf.gfile.FastGFile("datasets/cat.jpg", 'r').read()

with tf.Session() as sess:
    img_data = tf.image.decode_jpeg(image_raw_data)

    # 输出解码之后的三维矩阵
    print(img_data.eval())

    # 打印图片
    plt.imshow(img_data.eval())
plt.show()- 1
- 2
- 3
- 4
- 5
- 6
- 7
- 8
- 9
- 10
- 11
- 12
- 13
- 14
- 15

图片转存
将一张图片的三维矩阵重新按照jpeg格式编码并存入指定的文件中。
with tf.Session() as sess:
    # 将图像数据重新编码存储
    encoded_image = tf.image.encode_jpeg(img_data)
    with tf.gfile.GFile("output/1restore_cat.jpg", "wb") as f:
f.write(encoded_image.eval())- 1
- 2
- 3
- 4
- 5
2. 图片大小调整
将载入的图片调整为制定的大小。
第一种:使用算法调整图片大小,并尽量保存原始图像上的所有信息。
with tf.Session() as sess:
    resized = tf.image.resize_images(img_data, [300, 300], method=0)

    # TensorFlow的函数处理图片后存储的数据是float32格式的,需要转换成uint8才能正确打印图片。
    print "Digital type: ", resized.dtype
    cat = np.asarray(resized.eval(), dtype='uint8')
    # tf.image.convert_image_dtype(rgb_image, tf.float32)
    plt.imshow(cat)
plt.show()- 1
- 2
- 3
- 4
- 5
- 6
- 7
- 8
- 9

其中,tf.image.resize_images函数的method参数取值对应的图像大小调整算法。
| Method取值 | 图像大小调整算法 |
|---|---|
| 0 | 双线性插值法(Bilinear interpolation) |
| 1 | 最近邻居法(Nearest neighbor interpolation) |
| 2 | 双三次插值法(Bicubic interpolation) |
| 3 | 面积插值法(Area interpolation) |
第二种:通过API对图像进行剪裁或者填充进行图片大小调整。
通过tf.image.resize_image_with_crop_or_pad函数来调整图像大小。
- 如果原始图像的尺寸大于目标图像,那么这个函数就会自动截取原始图像中居中的部分;
- 如果目标图像大于原始图像,那么这个函数会自动在原始图像的四周填充全0背景。
with tf.Session() as sess:
    croped = tf.image.resize_image_with_crop_or_pad(img_data, 1000, 1000)
    padded = tf.image.resize_image_with_crop_or_pad(img_data, 2000, 2000)
    plt.imshow(croped.eval())
    plt.show()
    plt.imshow(padded.eval())
plt.show()- 1
- 2
- 3
- 4
- 5
- 6
- 7


利用
tf.image.central_crop
来截取中间50%的图片。
with tf.Session() as sess:
    central_cropped = tf.image.central_crop(img_data, 0.5)
    plt.imshow(central_cropped.eval())
plt.show()- 1
- 2
- 3
- 4

3. 图像翻转
with tf.Session() as sess:
    # 上下翻转
    #flipped1 = tf.image.flip_up_down(img_data)
    # 左右翻转
    #flipped2 = tf.image.flip_left_right(img_data)

    #对角线翻转
    transposed = tf.image.transpose_image(img_data)
    plt.imshow(transposed.eval())
    plt.show()

    # 以一定概率上下翻转图片。
    #flipped = tf.image.random_flip_up_down(img_data)
    # 以一定概率左右翻转图片。
#flipped = tf.image.random_flip_left_right(img_data)- 1
- 2
- 3
- 4
- 5
- 6
- 7
- 8
- 9
- 10
- 11
- 12
- 13
- 14
- 15

4. 图像色彩调整
在训练神经网络的模型时,可以随机调整训练图像的属性,如亮度、对比度、饱和度和色相等,从而使得训练得到的模型尽可能小地受到无关因素的影响。
- 以下代码为调整图像的亮度
with tf.Session() as sess:
    # 将图片的亮度-0.5。
    #adjusted = tf.image.adjust_brightness(img_data, -0.5)

    # 将图片的亮度-0.5
    #adjusted = tf.image.adjust_brightness(img_data, 0.5)

    # 在[-max_delta, max_delta)的范围随机调整图片的亮度。
    adjusted = tf.image.random_brightness(img_data, max_delta=0.5)

    # 将图片的对比度-5
    #adjusted = tf.image.adjust_contrast(img_data, -5)

    # 将图片的对比度+5
    #adjusted = tf.image.adjust_contrast(img_data, 5)

    # 在[lower, upper]的范围随机调整图的对比度。
    #adjusted = tf.image.random_contrast(img_data, lower, upper)

    plt.imshow(adjusted.eval())
plt.show()- 1
- 2
- 3
- 4
- 5
- 6
- 7
- 8
- 9
- 10
- 11
- 12
- 13
- 14
- 15
- 16
- 17
- 18
- 19
- 20
- 21

- 以下代码为调整图像的色相和饱和度
with tf.Session() as sess:
    adjusted = tf.image.adjust_hue(img_data, 0.1)
    #adjusted = tf.image.adjust_hue(img_data, 0.3)
    #adjusted = tf.image.adjust_hue(img_data, 0.6)
    #adjusted = tf.image.adjust_hue(img_data, 0.9)

    # 在[-max_delta, max_delta]的范围随机调整图片的色相。max_delta的取值在[0, 0.5]之间。
    #adjusted = tf.image.random_hue(image, max_delta)

    # 将图片的饱和度-5。
    #adjusted = tf.image.adjust_saturation(img_data, -5)
    # 将图片的饱和度+5。
    #adjusted = tf.image.adjust_saturation(img_data, 5)
    # 在[lower, upper]的范围随机调整图的饱和度。
    #adjusted = tf.image.random_saturation(img_data, lower, upper)

    # 将代表一张图片的三维矩阵中的数字均值变为0,方差变为1。
    #adjusted = tf.image.per_image_whitening(img_data)

    plt.imshow(adjusted.eval())
plt.show()- 1
- 2
- 3
- 4
- 5
- 6
- 7
- 8
- 9
- 10
- 11
- 12
- 13
- 14
- 15
- 16
- 17
- 18
- 19
- 20
- 21

5. 处理标注框
给图像中需要关注的物体加标注框,利用tf.image.draw_bounding_boxes函数。
with tf.Session() as sess:

    # 给出图片的所有标注框,一个标注框有四个数字,分别代表[ymin,xmin,ymax,xmax]
    # 这里给出的都是凸显的相对位置。如在180X267大小的图像中,
    # [0.35, 0.47, 0.5, 0.56] 代表从(63,125)到(90,150)的图像。
    boxes = tf.constant([[[0.05, 0.05, 0.9, 0.7], [0.35, 0.47, 0.5, 0.56]]])

    begin, size, bbox_for_draw = tf.image.sample_distorted_bounding_box(
        tf.shape(img_data), bounding_boxes=boxes)


    batched = tf.expand_dims(tf.image.convert_image_dtype(img_data, tf.float32), 0)
    image_with_box = tf.image.draw_bounding_boxes(batched, bbox_for_draw)

    distorted_image = tf.slice(img_data, begin, size)
    plt.imshow(distorted_image.eval())
plt.show()- 1
- 2
- 3
- 4
- 5
- 6
- 7
- 8
- 9
- 10
- 11
- 12
- 13
- 14
- 15
- 16
- 17

三、多线程输入数据处理框架
1. 队列与多线程
创建队列
import tensorflow as tf

# 创建一个先进先出的队列,制定队列中最多可以保存两个元素,并制定元素的类型为整数
q = tf.FIFOQueue(2, "int32")

# 对队列中的元素进行初始化
init = q.enqueue_many(([0, 10],))

#将队列中的第一个元素出队列
x = q.dequeue()

# 加入新值入队列
y = x + 1
q_inc = q.enqueue([y])

with tf.Session() as sess:
    init.run()
    for _ in range(5):
        v, _ = sess.run([x, q_inc])
        print v

output:
0
10
1
11
2- 1
- 2
- 3
- 4
- 5
- 6
- 7
- 8
- 9
- 10
- 11
- 12
- 13
- 14
- 15
- 16
- 17
- 18
- 19
- 20
- 21
- 22
- 23
- 24
- 25
- 26
- 27
- FIFOQueue:实现一个先进先出的队列;
- RandomShuffleQueue:从队列中随机选择一个元素;
创建启动并退出多线程
tf.Coordinator主要用于协同多个线程一起停止。
import tensorflow as tf
import numpy as np
import threading
import time

def MyLoop(coord, worker_id):
    while not coord.should_stop():
        # 随机停止所有线程
        if np.random.rand()<0.1:
            print "Stoping from id: %d\n" % worker_id,
            coord.request_stop()
        else:
            print "Working on id: %d\n" % worker_id,
        time.sleep(1)

coord = tf.train.Coordinator()
threads = [threading.Thread(target=MyLoop, args=(coord, i, )) for i in range(5)]
for t in threads:t.start()
coord.join(threads)

oytput:
Working on id: 0
Working on id: 1
Working on id: 2
Working on id: 3
Working on id: 4
Working on id: 4
Working on id: 3
Working on id: 2
Working on id: 1
Stoping from id: 0- 1
- 2
- 3
- 4
- 5
- 6
- 7
- 8
- 9
- 10
- 11
- 12
- 13
- 14
- 15
- 16
- 17
- 18
- 19
- 20
- 21
- 22
- 23
- 24
- 25
- 26
- 27
- 28
- 29
- 30
- 31
多线程队列操作
import tensorflow as tf

queue = tf.FIFOQueue(100,"float")
enqueue_op = queue.enqueue([tf.random_normal([1])])

# tf.train.QueueRunner创建多个线程运行队列的入队操作。这里启动5个线程,每个线程中运行的是enqueue_op操作。
qr = tf.train.QueueRunner(queue, [enqueue_op] * 5)
tf.train.add_queue_runner(qr)
out_tensor = queue.dequeue()

with tf.Session() as sess:
    coord = tf.train.Coordinator()
    threads = tf.train.start_queue_runners(sess=sess, coord=coord)
    for _ in range(3): print sess.run(out_tensor)[0]
    coord.request_stop()
    coord.join(threads)

output:
0.747078
-1.50487
0.209827- 1
- 2
- 3
- 4
- 5
- 6
- 7
- 8
- 9
- 10
- 11
- 12
- 13
- 14
- 15
- 16
- 17
- 18
- 19
- 20
- 21
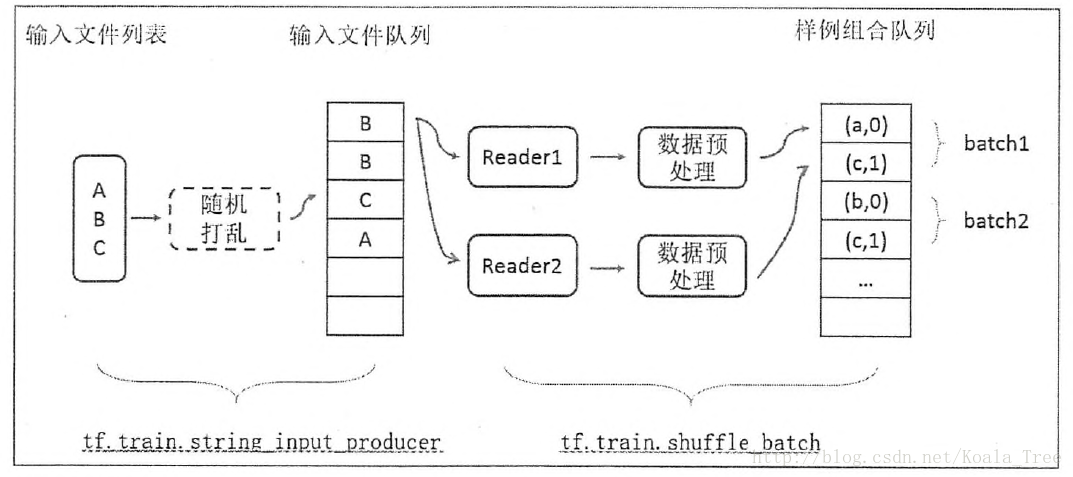
2. 输入文件队列
tf.train.string_input_producer函数会使用初始化时提供的文件列表创建一个输入队列,输入队列中原始的元素为文件列表中的所有文件。
生成文件存储样例数据
import tensorflow as tf

def _int64_feature(value):
    return tf.train.Feature(int64_list=tf.train.Int64List(value=[value]))
num_shards = 2
instances_per_shard = 2
for i in range(num_shards):
    filename = ('Records/data.tfrecords-%.5d-of-%.5d' % (i, num_shards))
    # 将Example结构写入TFRecord文件。
    writer = tf.python_io.TFRecordWriter(filename)
    for j in range(instances_per_shard):
    # Example结构仅包含当前样例属于第几个文件以及是当前文件的第几个样本。
        example = tf.train.Example(features=tf.train.Features(feature={
            'i': _int64_feature(i),
            'j': _int64_feature(j)}))
        writer.write(example.SerializeToString())
writer.close()- 1
- 2
- 3
- 4
- 5
- 6
- 7
- 8
- 9
- 10
- 11
- 12
- 13
- 14
- 15
- 16
- 17
运行程序后,在Records文件夹下生成两个文件:
读取文件
files = tf.train.match_filenames_once("Records/data.tfrecords-*")
filename_queue = tf.train.string_input_producer(files, shuffle=False)
reader = tf.TFRecordReader()
_, serialized_example = reader.read(filename_queue)
features = tf.parse_single_example(
      serialized_example,
      features={
          'i': tf.FixedLenFeature([], tf.int64),
          'j': tf.FixedLenFeature([], tf.int64),
      })
with tf.Session() as sess:
    tf.global_variables_initializer().run()
    print(sess.run(files))
    coord = tf.train.Coordinator()
    threads = tf.train.start_queue_runners(sess=sess, coord=coord)
    for i in range(6):
        print(sess.run([features['i'], features['j']]))
    coord.request_stop()
    coord.join(threads)

output:
['Records/data.tfrecords-00000-of-00002'
 'Records/data.tfrecords-00001-of-00002']
[0, 0]
[0, 1]
[1, 0]
[1, 1]
[0, 0]
[0, 1]- 1
- 2
- 3
- 4
- 5
- 6
- 7
- 8
- 9
- 10
- 11
- 12
- 13
- 14
- 15
- 16
- 17
- 18
- 19
- 20
- 21
- 22
- 23
- 24
- 25
- 26
- 27
- 28
- 29
组合训练数据
将输入样例组织成一个batch传输给神经网络可以提高模型训练的效率。
- tf.train.batch:顺序打batch;
- tf.train.shuffle_batch:将数据顺序打乱。
example, label = features['i'], features['j']
batch_size = 2

# 设置队列的大小和每个batch大小相关
capacity = 1000 + 3 * batch_size
example_batch, label_batch = tf.train.batch([example, label], batch_size=batch_size, capacity=capacity)

with tf.Session() as sess:
    tf.global_variables_initializer().run()
    coord = tf.train.Coordinator()
    threads = tf.train.start_queue_runners(sess=sess, coord=coord)
    for i in range(3):
        cur_example_batch, cur_label_batch = sess.run([example_batch, label_batch])
        print(cur_example_batch, cur_label_batch)
    coord.request_stop()
    coord.join(threads)

output:
[0 0] [0 1]
[1 1] [0 1]
[0 0] [0 1]- 1
- 2
- 3
- 4
- 5
- 6
- 7
- 8
- 9
- 10
- 11
- 12
- 13
- 14
- 15
- 16
- 17
- 18
- 19
- 20
- 21
3. 输入数据处理框架
展示一个处理输入数据的完整框架流程程序。
import tensorflow as tf

# 创建文件列表,通过文件列表创建输入文件队列,读取文件为“一、TFRecord输入数据格式”创建的文件。
files = tf.train.match_filenames_once("Records/output.tfrecords")
filename_queue = tf.train.string_input_producer(files, shuffle=False)

# 解析TFRecord文件里的数据

# 读取文件
reader = tf.TFRecordReader()
_,serialized_example = reader.read(filename_queue)

# 解析读取的样例
features = tf.parse_single_example(
    serialized_example,
    features={
        'image_raw':tf.FixedLenFeature([],tf.string),
        'pixels':tf.FixedLenFeature([],tf.int64),
        'label':tf.FixedLenFeature([],tf.int64)
    })

decoded_images = tf.decode_raw(features['image_raw'],tf.uint8)
retyped_images = tf.cast(decoded_images, tf.float32)
labels = tf.cast(features['label'],tf.int32)
#pixels = tf.cast(features['pixels'],tf.int32)
images = tf.reshape(retyped_images, [784])

# 将文件以100个为一组打包
min_after_dequeue = 10000
batch_size = 100
capacity = min_after_dequeue + 3 * batch_size

image_batch, label_batch = tf.train.shuffle_batch([images, labels],
                                                    batch_size=batch_size,
                                                    capacity=capacity,
                                                    min_after_dequeue=min_after_dequeue)

# 训练模型
def inference(input_tensor, weights1, biases1, weights2, biases2):
        layer1 = tf.nn.relu(tf.matmul(input_tensor, weights1) + biases1)
        return tf.matmul(layer1, weights2) + biases2

# 模型相关的参数
INPUT_NODE = 784
OUTPUT_NODE = 10
LAYER1_NODE = 500
REGULARAZTION_RATE = 0.0001
TRAINING_STEPS = 5000

weights1 = tf.Variable(tf.truncated_normal([INPUT_NODE, LAYER1_NODE], stddev=0.1))
biases1 = tf.Variable(tf.constant(0.1, shape=[LAYER1_NODE]))

weights2 = tf.Variable(tf.truncated_normal([LAYER1_NODE, OUTPUT_NODE], stddev=0.1))
biases2 = tf.Variable(tf.constant(0.1, shape=[OUTPUT_NODE]))

y = inference(image_batch, weights1, biases1, weights2, biases2)

# 计算交叉熵及其平均值
cross_entropy = tf.nn.sparse_softmax_cross_entropy_with_logits(logits=y, labels=label_batch)
cross_entropy_mean = tf.reduce_mean(cross_entropy)

# 损失函数的计算
regularizer = tf.contrib.layers.l2_regularizer(REGULARAZTION_RATE)
regularaztion = regularizer(weights1) + regularizer(weights2)
loss = cross_entropy_mean + regularaztion

# 优化损失函数
train_step = tf.train.GradientDescentOptimizer(0.01).minimize(loss)

# 初始化回话并开始训练过程。
with tf.Session() as sess:
    tf.global_variables_initializer().run()
    coord = tf.train.Coordinator()
    threads = tf.train.start_queue_runners(sess=sess, coord=coord)
    # 循环的训练神经网络。
    for i in range(TRAINING_STEPS):
        if i % 1000 == 0:
            print("After %d training step(s), loss is %g " % (i, sess.run(loss)))

        sess.run(train_step)
    coord.request_stop()
    coord.join(threads)


output:
After 0 training step(s), loss is 367.683
After 1000 training step(s), loss is 2.29646
After 2000 training step(s), loss is 2.09075
After 3000 training step(s), loss is 1.95369
After 4000 training step(s), loss is 1.91504- 1
- 2
- 3
- 4
- 5
- 6
- 7
- 8
- 9
- 10
- 11
- 12
- 13
- 14
- 15
- 16
- 17
- 18
- 19
- 20
- 21
- 22
- 23
- 24
- 25
- 26
- 27
- 28
- 29
- 30
- 31
- 32
- 33
- 34
- 35
- 36
- 37
- 38
- 39
- 40
- 41
- 42
- 43
- 44
- 45
- 46
- 47
- 48
- 49
- 50
- 51
- 52
- 53
- 54
- 55
- 56
- 57
- 58
- 59
- 60
- 61
- 62
- 63
- 64
- 65
- 66
- 67
- 68
- 69
- 70
- 71
- 72
- 73
- 74
- 75
- 76
- 77
- 78
- 79
- 80
- 81
- 82
- 83
- 84
- 85
- 86
- 87
- 88
- 89
- 90
下图展示了一个输入数据处理流程的示意图:
下面是一个动态解释图:
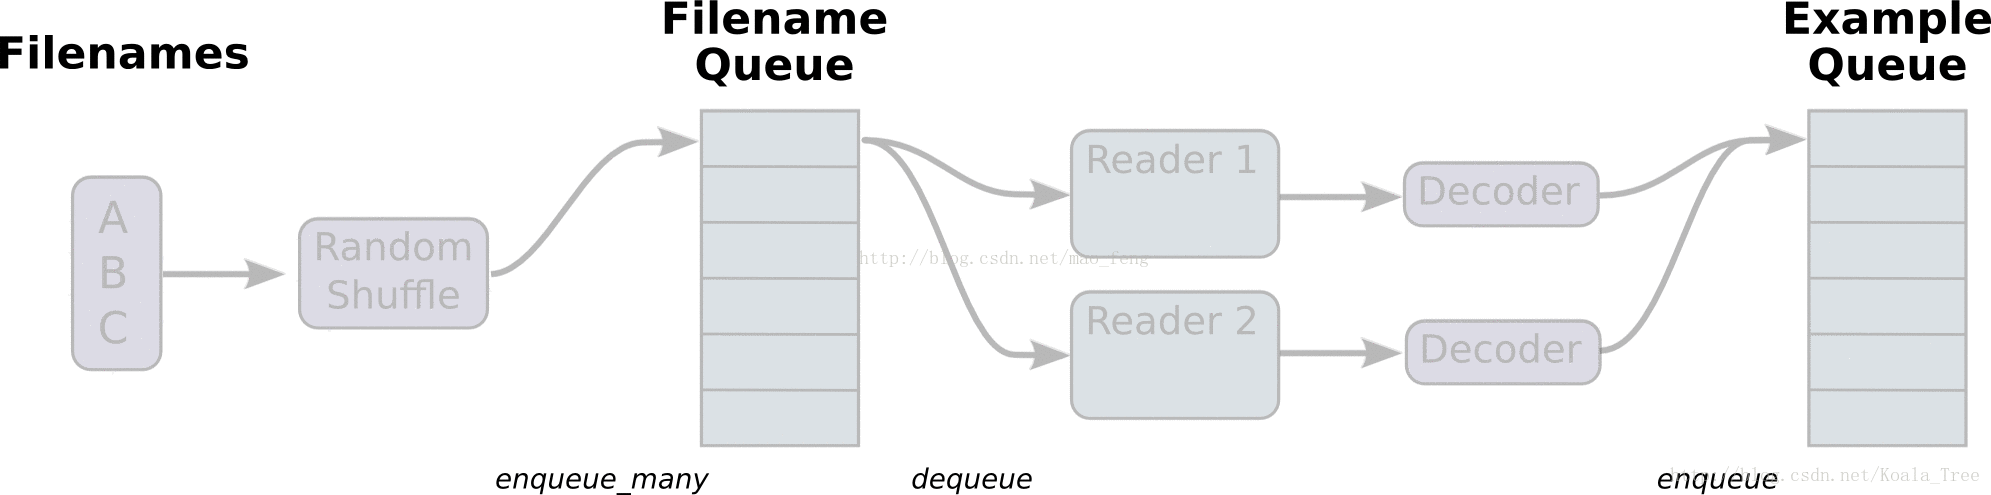
首先,我们先创建数据流图,这个数据流图由一些流水线的阶段组成,阶段间用队列连接在一起。第一阶段将生成文件名,我们读取这些文件名并且把他们排到文件名队列中。第二阶段从文件中读取数据(使用Reader),产生样本,而且把样本放在一个样本队列中。根据你的设置,实际上也可以拷贝第二阶段的样本,使得他们相互独立,这样就可以从多个文件中并行读取。在第二阶段的最后是一个排队操作,就是入队到队列中去,在下一阶段出队。因为我们是要开始运行这些入队操作的线程,所以我们的训练循环会使得样本队列中的样本不断地出队。