最近对yolov5-7.0的学习有所深入,感觉官方代码也比较易读,所以对网络结构的理解更进一步,其中对锚框生成这块没太看明白细节,也想弄明白这块,于是前前后后好好看了代码。现在把我的学习收获做一下记录。个人见解,如有问题欢迎指正
1、梳理一下锚框机制
锚框(anchors),先验框,预选框,说的都是一个玩意,就是在输入数据经过特征提取阶段,一般都是做下采样降低数据量得到高层特征图,再在这些高层特征图上预设锚框与标签ground truth进行损失计算,根据梯度反向传播更新网络的参数,逐渐迭代使网络的参数可以直接识别出目标的位置和类别,最后把更新的具有最好识别效果的参数进行保存就得到了网络对识别某类目标的网络权重文件。
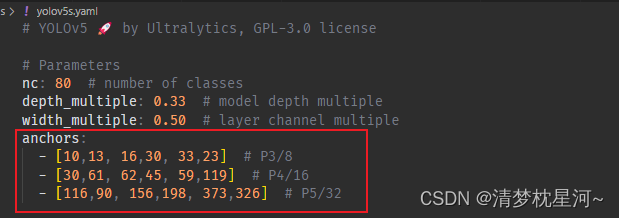
所以,锚框的预设一般在特征提取的末个阶段,这个阶段生成低分辨率的特征图,在yolov5s中,就是最后一层Detect生成的80 x 80, 40 x 40, 20 x 20的特征图,随后在特征图的基础上预设锚框。关于锚框,可以直接看到的信息是yolov5s.yaml中的
2、锚框具体是如何作用的
那这个锚框具体是如何作用的呢?下面看一下提取特征的最后一个阶段Detect的代码(models/yolo.py)
class Detect(nn.Module):
    # YOLOv5 Detect head for detection models
    stride = None  # strides computed during build
    dynamic = False  # force grid reconstruction
    export = False  # export mode

    def __init__(self, nc=80, anchors=(), ch=(), inplace=True):  # detection layer
        super().__init__()
        self.nc = nc  # number of classes
        self.no = nc + 5  # number of outputs per anchor
        self.nl = len(anchors)  # number of detection layers
        self.na = len(anchors[0]) // 2  # number of anchors
        self.grid = [torch.empty(0) for _ in range(self.nl)]  # init grid
        self.anchor_grid = [torch.empty(0) for _ in range(self.nl)]  # init anchor grid
        self.register_buffer('anchors', torch.tensor(anchors).float().view(self.nl, -1, 2))  # shape(nl,na,2)
        self.m = nn.ModuleList(nn.Conv2d(x, self.no * self.na, 1) for x in ch)  # output conv
        self.inplace = inplace  # use inplace ops (e.g. slice assignment)

    def forward(self, x):
        z = []  # inference output
        for i in range(self.nl):
            x[i] = self.m[i](x[i])  # conv
            bs, _, ny, nx = x[i].shape  # x(bs,255,20,20) to x(bs,3,20,20,85)
            x[i] = x[i].view(bs, self.na, self.no, ny, nx).permute(0, 1, 3, 4, 2).contiguous()

            if not self.training:  # inference
                if self.dynamic or self.grid[i].shape[2:4] != x[i].shape[2:4]:
                    self.grid[i], self.anchor_grid[i] = self._make_grid(nx, ny, i)

                if isinstance(self, Segment):  # (boxes + masks)
                    xy, wh, conf, mask = x[i].split((2, 2, self.nc + 1, self.no - self.nc - 5), 4)
                    xy = (xy.sigmoid() * 2 + self.grid[i]) * self.stride[i]  # xy
                    wh = (wh.sigmoid() * 2) ** 2 * self.anchor_grid[i]  # wh
                    y = torch.cat((xy, wh, conf.sigmoid(), mask), 4)
                else:  # Detect (boxes only)
                    xy, wh, conf = x[i].sigmoid().split((2, 2, self.nc + 1), 4)
                    xy = (xy * 2 + self.grid[i]) * self.stride[i]  # xy
                    wh = (wh * 2) ** 2 * self.anchor_grid[i]  # wh
                    y = torch.cat((xy, wh, conf), 4)
                z.append(y.view(bs, self.na * nx * ny, self.no))

        return x if self.training else (torch.cat(z, 1),) if self.export else (torch.cat(z, 1), x)

    def _make_grid(self, nx=20, ny=20, i=0, torch_1_10=check_version(torch.__version__, '1.10.0')):
        d = self.anchors[i].device
        t = self.anchors[i].dtype
        shape = 1, self.na, ny, nx, 2  # grid shape
        y, x = torch.arange(ny, device=d, dtype=t), torch.arange(nx, device=d, dtype=t)
        yv, xv = torch.meshgrid(y, x, indexing='ij') if torch_1_10 else torch.meshgrid(y, x)  # torch>=0.7 compatibility
        grid = torch.stack((xv, yv), 2).expand(shape) - 0.5  # add grid offset, i.e. y = 2.0 * x - 0.5
        anchor_grid = (self.anchors[i] * self.stride[i]).view((1, self.na, 1, 1, 2)).expand(shape)
        return grid, anchor_grid
可以看见Detect类有anchors参数输入,说明anchors的 信息在这个类进行了利用,类中与anchors相关的代码一个是
self.register_buffer('anchors', torch.tensor(anchors).float().view(self.nl, -1, 2)) # shape(nl,na,2)
另一个是forward函数下的_make_grid函数。但是forward函数在训练阶段并不执行这个函数,所以这就不太能看明白锚框是怎么在特征图上生成的。
if not self.training:  # inference
    if self.dynamic or self.grid[i].shape[2:4] != x[i].shape[2:4]:
    	self.grid[i], self.anchor_grid[i] = self._make_grid(nx, ny, i)
那么Detect类训练阶段执行的代码就是:
class Detect(nn.Module):
    # YOLOv5 Detect head for detection models
    stride = None  # strides computed during build
    dynamic = False  # force grid reconstruction
    export = False  # export mode

    def __init__(self, nc=80, anchors=(), ch=(), inplace=True):  # detection layer
        super().__init__()
        self.nc = nc  # number of classes
        self.no = nc + 5  # number of outputs per anchor
        self.nl = len(anchors)  # number of detection layers
        self.na = len(anchors[0]) // 2  # number of anchors
        self.grid = [torch.empty(0) for _ in range(self.nl)]  # init grid
        self.anchor_grid = [torch.empty(0) for _ in range(self.nl)]  # init anchor grid
        self.register_buffer('anchors', torch.tensor(anchors).float().view(self.nl, -1, 2))  # shape(nl,na,2)
        self.m = nn.ModuleList(nn.Conv2d(x, self.no * self.na, 1) for x in ch)  # output conv
        self.inplace = inplace  # use inplace ops (e.g. slice assignment)

    def forward(self, x):
        z = []  # inference output
        for i in range(self.nl):
            x[i] = self.m[i](x[i])  # conv
            bs, _, ny, nx = x[i].shape  # x(bs,255,20,20) to x(bs,3,20,20,85)
            x[i] = x[i].view(bs, self.na, self.no, ny, nx).permute(0, 1, 3, 4, 2).contiguous()

        return x if self.training else (torch.cat(z, 1),) if self.export else (torch.cat(z, 1), x)
这就不得不说这个register_buffer()函数,这里只有他和 anchors亲密接触了,此前我后续看了把Detect类包含起来的BaseModel和DetectionModel类,都没有看出涉及铺设锚框的操作。
3、register_buffer()函数
原来,register_buffer()函数可以把 anchors 作为参数固定到网络中,并且该函数传入的参数不随训练迭代改变,而且在网络训练结束时随模型保存输出。这可以看看register_buffer()函数和register_parameter()函数、nn.Parameter()、model.state_dict()以及model.parameters()、model.buffers()的功能和区别。可见Pytorch模型中的parameter与buffer
我调试做的记录如下:
class Detect(nn.Module):
    # YOLOv5 Detect head for detection models
    stride = None  # strides computed during build
    dynamic = False  # force grid reconstruction
    export = False  # export mode

    def __init__(self, nc=80, anchors=(), ch=(), inplace=True):  # detection layer
        super().__init__()
        self.nc = nc  # number of classes
        self.no = nc + 5  # number of outputs per anchor
        self.nl = len(anchors)  # number of detection layers
        self.na = len(anchors[0]) // 2  # number of anchors
        self.grid = [torch.empty(0) for _ in range(self.nl)]  # init grid
        self.anchor_grid = [torch.empty(0) for _ in range(self.nl)]  # init anchor grid
        self.register_buffer('anchors', torch.tensor(anchors).float().view(self.nl, -1, 2))  # shape(nl,na,2)
        """anchors"""
        """ register_buffer的参数不参与梯度更新,最终随模型保存输出,此处把传入的anchors参数的数据通过register_buffer传入到网络中,"""
        """torch.tensor(anchors).float()
                tensor([[ 10.,  13.,  16.,  30.,  33.,  23.],
                        [ 30.,  61.,  62.,  45.,  59., 119.],
                        [116.,  90., 156., 198., 373., 326.]])
                ipdb> torch.tensor(anchors).float().view(self.nl, -1, 2)
                tensor([[[ 10.,  13.],
                        [ 16.,  30.],
                        [ 33.,  23.]],

                        [[ 30.,  61.],
                        [ 62.,  45.],
                        [ 59., 119.]],

                        [[116.,  90.],
                        [156., 198.],
                        [373., 326.]]])
                ipdb> self.anchor_grid
                [tensor([]), tensor([]), tensor([])]
                ipdb> anchors
                [[10, 13, 16, 30, 33, 23], [30, 61, 62, 45, 59, 119], [116, 90, 156, 198, 373, 326]]
                """
        # import ipdb;ipdb.set_trace()
        self.m = nn.ModuleList(nn.Conv2d(x, self.no * self.na, 1) for x in ch)  # output conv
        self.inplace = inplace  # use inplace ops (e.g. slice assignment)

        """ Detect层对输入的三个下采样倍数的数据分别采用三个全连接层输出
        self.m=
            ModuleList(
            (0): Conv2d(128, 18, kernel_size=(1, 1), stride=(1, 1))
            (1): Conv2d(256, 18, kernel_size=(1, 1), stride=(1, 1))
            (2): Conv2d(512, 18, kernel_size=(1, 1), stride=(1, 1))
            )
            其中输出维度 self.no * self.na,即此处的 18,表示每个维度三种尺度的锚框 x ( 类别 + xywh + score) = 3 x 6
        """

    def forward(self, x):
        """self.state_dict()
                anchors
                m.0.weight
                m.0.bias
                m.1.weight
                m.1.bias
                m.2.weight
                m.2.bias
        """

        """对应8,16,32倍下采样输出的特征图
            x:  x[0].shape
                torch.Size([1, 128, 32, 32])
                ipdb> x[1].shape
                torch.Size([1, 256, 16, 16])
                ipdb> x[2].shape
                torch.Size([1, 512, 8, 8])
        """
        z = []  # inference output
        import ipdb;ipdb.set_trace()
        for i in range(self.nl):
            x[i] = self.m[i](x[i])  # conv
            """经过全连接层后数据维度
            x[0].shape
                        = torch.Size([1, 18, 32, 32])
                x[1].shape
                        = torch.Size([1, 18, 16, 16])
                x[2].shape
                        = torch.Size([1, 18, 8, 8])
            """
            bs, _, ny, nx = x[i].shape  # x(bs,255,20,20) to x(bs,3,20,20,85)
            x[i] = x[i].view(bs, self.na, self.no, ny, nx).permute(0, 1, 3, 4, 2).contiguous()

            """训练阶段 对应8,16,32倍下采样输出的特征图在Detect类输出的数据维度
                x:x[0].shape
                        torch.Size([1, 3, 32, 32, 6])
                        ipdb> x[1].shape
                        torch.Size([1, 3, 16, 16, 6])
                        ipdb> x[2].shape
                        torch.Size([1, 3, 8, 8, 6])
            """

            if not self.training:  # inference
                if self.dynamic or self.grid[i].shape[2:4] != x[i].shape[2:4]:
                    self.grid[i], self.anchor_grid[i] = self._make_grid(nx, ny, i)

                if isinstance(self, Segment):  # (boxes + masks)
                    xy, wh, conf, mask = x[i].split((2, 2, self.nc + 1, self.no - self.nc - 5), 4)
                    xy = (xy.sigmoid() * 2 + self.grid[i]) * self.stride[i]  # xy
                    wh = (wh.sigmoid() * 2) ** 2 * self.anchor_grid[i]  # wh
                    y = torch.cat((xy, wh, conf.sigmoid(), mask), 4)
                else:  # Detect (boxes only)
                    xy, wh, conf = x[i].sigmoid().split((2, 2, self.nc + 1), 4)
                    """推断流程预测xywh"""
                    xy = (xy * 2 + self.grid[i]) * self.stride[i]  # xy
                    wh = (wh * 2) ** 2 * self.anchor_grid[i]  # wh
                    y = torch.cat((xy, wh, conf), 4)
                z.append(y.view(bs, self.na * nx * ny, self.no))

        return x if self.training else (torch.cat(z, 1),) if self.export else (torch.cat(z, 1), x)

    def _make_grid(self, nx=20, ny=20, i=0, torch_1_10=check_version(torch.__version__, '1.10.0')):
        d = self.anchors[i].device
        t = self.anchors[i].dtype
        shape = 1, self.na, ny, nx, 2  # grid shape
        y, x = torch.arange(ny, device=d, dtype=t), torch.arange(nx, device=d, dtype=t)
        yv, xv = torch.meshgrid(y, x, indexing='ij') if torch_1_10 else torch.meshgrid(y, x)  # torch>=0.7 compatibility
        grid = torch.stack((xv, yv), 2).expand(shape) - 0.5  # add grid offset, i.e. y = 2.0 * x - 0.5
        anchor_grid = (self.anchors[i] * self.stride[i]).view((1, self.na, 1, 1, 2)).expand(shape)
        return grid, anchor_grid
上面的调试情况也可以充分说明锚框通过参数形式注册到网络中,在forward()函数中,我看了self,即该Detect类结构的参数情况,其中self.state_dict() ------> anchors, m.0.weight, m.0.bias, m.1.weight, m.1.bias, m.2.weight, m.2.bias就包含了anchors。
4、锚框的具体生成
那么锚框的具体生成就是:
def forward(self, x):
"""输入x是进入Detect的三个尺度的特征图"""
        z = []  # inference output
        for i in range(self.nl):
        """self.nl=3表示Detect对应三个尺度用以处理三层特征图的网络结构,
        	self.m是对应三个尺度特征图的网络结构,对应不同的输入数据维度,输出维度都是18,其中输出维度 self.no * self.na,即此处的 18,表示每个维度三种尺度的锚框 x ( 类别 + xywh + score) = 3 x 6
        	self.m=
            ModuleList(
            (0): Conv2d(128, 18, kernel_size=(1, 1), stride=(1, 1))
            (1): Conv2d(256, 18, kernel_size=(1, 1), stride=(1, 1))
            (2): Conv2d(512, 18, kernel_size=(1, 1), stride=(1, 1))
            )"""
            x[i] = self.m[i](x[i])  # conv
            """对应的输入特征图在对应的m的网络结构中进行计算
            	x[0].shape
                        = torch.Size([1, 18, 32, 32])
                x[0].shape
                        = torch.Size([1, 18, 16, 16])
                x[2].shape
                        = torch.Size([1, 18, 8, 8])"""
            bs, _, ny, nx = x[i].shape  # x(bs,255,20,20) to x(bs,3,20,20,85)
            x[i] = x[i].view(bs, self.na, self.no, ny, nx).permute(0, 1, 3, 4, 2).contiguous()
            """改变数据输出维度便于后续处理
            	x:x[0].shape
                        torch.Size([1, 3, 32, 32, 6])
                        ipdb> x[1].shape
                        torch.Size([1, 3, 16, 16, 6])
                        ipdb> x[2].shape
                        torch.Size([1, 3, 8, 8, 6])
                 维度变换:1表示batch_size;3表示3种尺度的锚框;32,32表示特征图维度;6表示预测结果,含类别 + x、y、w、h + score
            """
看一下yolov5s.yaml的anchors信息
anchors:
  - [10,13, 16,30, 33,23]  # P3/8
  - [30,61, 62,45, 59,119]  # P4/16
  - [116,90, 156,198, 373,326]  # P5/32
其中,10,13;16,30;33,23分别表示预设的三种尺度的锚框,表示锚框的宽高尺度,另两行同理,分别对应8倍、16倍和32倍下采样倍数的输出特征图的预设锚框,所以每种尺度的输出特征图都会生成三种尺度的锚框的输出特征图,三种尺度的特征图共生成9种尺度的锚框。
所以,数据经过Detect类已经在特征图的基础上做了预测,也就可以理解看到一些解说网络在目标的位置预测上是预测位置的偏移量,因为是特征图数据乘以预设锚框参数的宽高得到目标的位置,并不是直接预测目标的位置。
其中,在获取数据的锚框信息时,实际上是在BaseModel类的_forward_once
函数中处理数据信息的:
class DetectionModel(BaseModel):
	......
	def forward(self, x, augment=False, profile=False, visualize=False):
        if augment:
            return self._forward_augment(x)  # augmented inference, None
        return self._forward_once(x, profile, visualize)  # single-scale inference, train

class BaseModel(nn.Module):
    # YOLOv5 base model
    def forward(self, x, profile=False, visualize=False):
        return self._forward_once(x, profile, visualize)  # single-scale inference, train

    def _forward_once(self, x, profile=False, visualize=False):
        y, dt = [], []  # outputs
        for m in self.model:
        """self.model是构建好的网络结构,输入x是实际数据"""
            if m.f != -1:  # if not from previous layer
                x = y[m.f] if isinstance(m.f, int) else [x if j == -1 else y[j] for j in m.f]  # from earlier layers
            if profile:
                self._profile_one_layer(m, x, dt)
            x = m(x)  # run
            y.append(x if m.i in self.save else None)  # save output
            if visualize:
                feature_visualization(x, m.type, m.i, save_dir=visualize)
        return x
        .......
这里输出的x与train.py里输出的pred是等效的
with torch.cuda.amp.autocast(amp):
    pred = model(imgs)  # forward
    loss, loss_items = compute_loss(pred, targets.to(device))  # loss scaled by batch_size```
若果要可视化锚框,建议对pred进行处理,具体处理方式建议参考Detect类中not training下的代码,我初步试过,是可以画出来的。
如果采用预训练模型,可能锚框显示效果不一定好,因为预训练模型已经经过一定数据的训练,网络的参数对目标具有一定的识别能力。
5、总结
在yolov5s中,anchors是通过register_buffer()函数把预设的锚框尺度信息作为参数注册到最后的Detect网络层中。因为目标的位置信息是 锚框参数 乘以 特征图数据 得到,所以网络预测的是一种相对锚框的位置信息,可以理解成是锚框的位置偏移量,网络通过学习预设锚框针对目标的位置偏移量来实现目标的类别识别和位置预测。