Vuex
1. 理解Vuex
1.1 组件之间共享数据的方式
父向子传值:v-bind 属性绑定
子向父传值:v-on 事件绑定
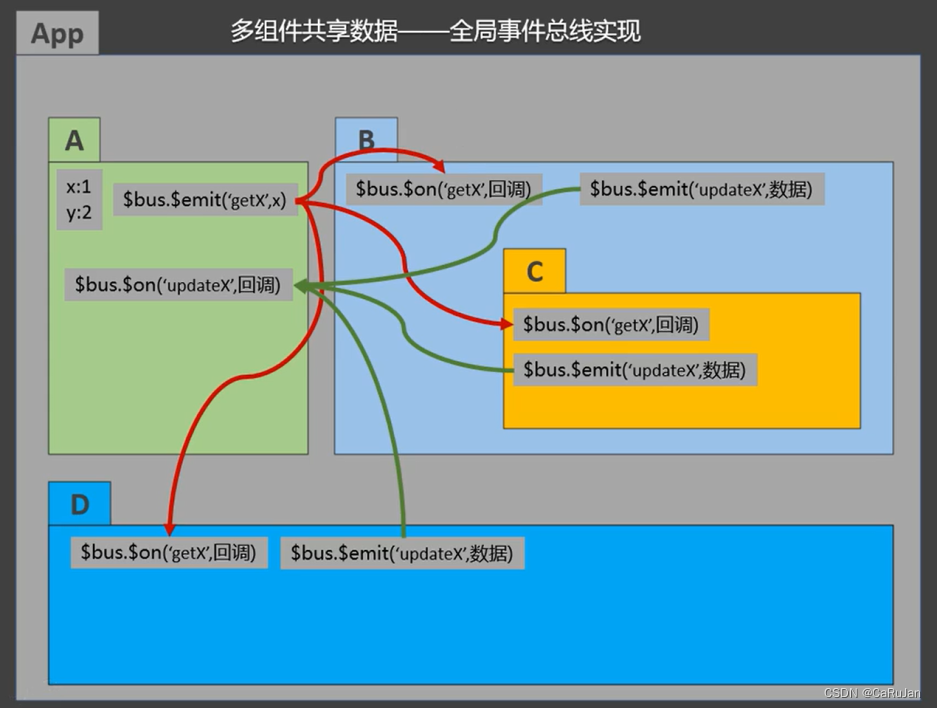
兄弟组件之间共享数据: EventBus(事件总线)
$on 接收数据的那个组件
$emit 发送数据的那个组件
1.2 Vuex是什么
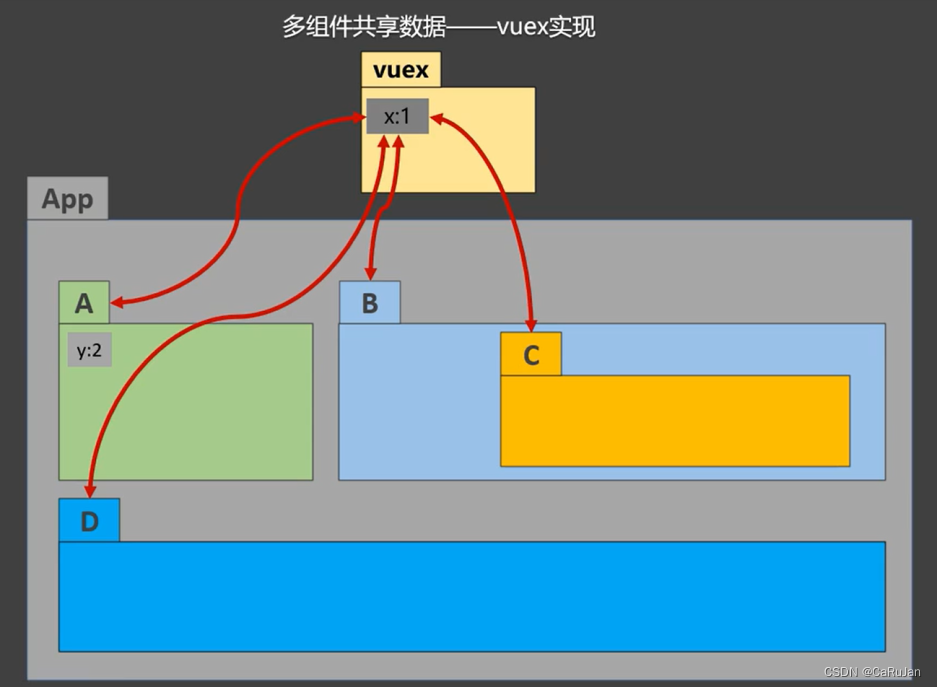
1.概念: 专门在 Vue 中实现集中式状态(数据)管理的一个 Vue 插件,对 Vue 应用中多个组件的共享状态进行集中式的管理 (读/写),也是一种组件间信的方式,且适用于任意组件间通信。
Vuex Github: https://github.com/vuejs/vuex
- 全局事件总线和Vuex对比
1.2 什么时候使用Vuex
处理大量的需要在组件间传递的数据,直接定义一个全局的data属性保存就行了。
如果我们的页面比较简单,切记千万不要没事找事引入Vuex,我们使用Vuex是因为项目变得复杂之后,有很多数据需要在父组件、子组件和孙组件之间传递,处理起来很繁琐,于是就需要Vuex这样一个可以对这一部分数据进行统一管理的东西,也是响应式
什么情况需要使用Vuex管理状态在多个组件间共享?
- 多个组件依赖于同一状态
- 来自不同组件的行为需要变更同一状态
大型项目中组件很多,多个组件中共用的数据
例如:用户的登录状态、用户名称、头像、地理位置信息等
例如:商品的收藏、购物车中的物品。
例如:传递组件之间传递层次太多、不相关组件、公用组件
Vuex有点类似cookie和session,session是用于服务器端共享,cookie是用于浏览器的,Vuex是用于前端组件间共享
1.3 Vuex的工作原理图

四个核心概念
Vuex 的四个核心概念分别是:
- The state tree:Vuex 使用单一状态树,用一个对象就包含了全部的应用层级状态。至此它便作为一个『唯一数据源(SSOT)』而存在。这也意味着,每个应用将仅仅包含一个 store 实例。单状态树让我们能够直接地定位任一特定的状态片段,在调试的过程中也能轻易地取得整个当前应用状态的快照。
- Getters:用来从 store 获取 Vue 组件数据。
- Mutation:事件处理器用来驱动状态的变化。
- Actions:可以给组件使用的函数,以此用来驱动事件处理器 mutations
Vuex和简单的全局对象是不同的,当Vuex从store中读取状态值的时候,若状态发生了变化,那么相应的组件也会高效的更新。并且,改变store中状态的唯一途径就是提交commit mutations。这样便于我们跟踪每一次状态的变化。只要发生了状态的变化,一定伴随着mutation的提交。
2 使用Vuex
2.1 搭建Vuex环境
- 下载安装 Vuex
npm i vuex@3
npm i vuex是安装最新版本的Vuex
注意:
- Vue2中,要用Vuex的3版本
- Vue3中,要用Vuex的4版本
- 创建
src/store/index.js该文件用于创建Vuex中最为核心的store
文件目录

store/index.js
写法一:
import Vue from 'vue'
import Vuex from 'vuex'   //引入Vuex

Vue.use(Vuex)    //应用Vuex

//创建并暴露store
export default new Vuex.Store({


  //数据,相当于data
  state: {

    },
  getters: {

    },      //里面定义方法,操作state方法
  mutations: {

    },    // 操作数据State
  actions: {

    },     //用于响应组件中的动作
  modules: {

    },
})
写法二:
import Vue from 'vue'
import Vuex from 'vuex'   //引入Vuex

Vue.use(Vuex)    //应用Vuex

 const actions = {

    }     //用于响应组件中的动作
 const mutations = {

    }   // 操作数据State
 const state = {

    }
 const getters= {

    }   //里面定义方法,操作state方法
 const modules1 = {

    }
 const modules2 = {

    }

//创建并暴露store
export default new Vuex.Store({


  //数据,相当于data
  state,
  getters,
  mutations,
  actions,
  modules: {


  	modules1,
  	modules2
  }
})
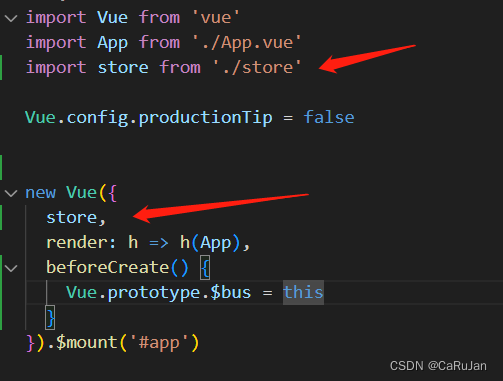
- 在
src/main.js中创建vm中传入store配置项
2.2 Vuex基本使用
Vuex的基本使用
Vuex中一共有五个状态 State、Getter、Mutation、Action、Module
2.2.1 State
提供唯一的公共数据源,所有共享的数据统一放到store的state进行储存,相似与data
在vuex中state中定义数据,可以在任何组件中进行调用
import Vue from 'vue'
import Vuex from 'vuex'

Vue.use(Vuex)

export default new Vuex.Store({


  //数据,相当于data
  state: {


    name:"张三",
    age:12,
    sex: '男',
    count:0
  },
})
读取
方法一:在标签中直接使用
<p>{

   { $store.state.name }}</p>
<p>{

   { $store.state.age}}</p>
方法二:
this.$store.state.全局数据名称
方法三:
从vuex中按需导入mapstate函数
// 1. 从 vuex 中按需导入 mapState 函数
import {

     mapState } from "vuex";
通过刚才导入的 mapState 函数,将当前组件需要的全局数据,映射为当前组件的 computed 计算属性:
// 2. 将全局数据,映射为当前组件的计算属性
computed: {


	// 对象写法
	...mapState({

    name:'name', age:'age', sex:'sex'})
	// 数组写法
	...mapState(['name', 'age', 'sex'])
}

修改Vuex中的数据
$store.dispatch('action中的方法名',数据)
//或是
$store.commit('mutations中的方法名',数据)
若没有网络请求或其他业务逻辑,组件中也可越过 actions,即不写 dispatch ,直接编
写commit
2.2.2 Getters
Getters 用于对 Store 中的数据进行加工处理形成新的数据。
①Getters 可以对 Store 中已有的数据加工处理之后形成新的数据,类似 Vue 的计算属性。
②Store 中数据发生变化,Getters 的数据也会跟着变化。
具体操作类似于前几种
在Vuex中定义:
// 定义 Getters
export default new Vuex.Store({


	state: {


		count: 0
	},
	getters: {


		showNum: state => {


			return '当前最新的数量是【'+ state.count * 10 +'】'
		}
	}
})
在组件中使用:
方法一:在标签中直接使用
<p>{

   { $store.getter.name }}</p>
<p>{

   { $store.state.age}}</p>
方法二:
this.$store.getters.名称
方法二:
从vuex中按需导入mapGetters 函数
import {

     mapGetters } from 'vuex'
通过刚才导入的 mapGetters 函数,用于帮助映射 getters中的数据为当前组件的 computed 计算属性:
computed: {


	//对象写法
	...mapGetters({

    showNum:'showNum'})
	//数组写法
	...mapGetters(['showNum'])
}
2.2.3 Mutations
Mutations 用于变更 Store中 的数据。
更改 Vuex 的 store 中的状态的唯一方法是提交 mutation。Vuex 中的 mutation 非常类似于事件:
每个 mutation 都有一个字符串的事件类型 (type)和一个回调函数 (handler)。这个回调函数就是我们实际进行状态更改的地方,并且它会接受 state 作为第一个参数:
① 只能通过 mutations 变更 Store 数据,不可以直接操作 Store 中的数据。
② 通过这种方式虽然操作起来稍微繁琐一些,但是可以集中监控所有数据的变化。
在Vuex中定义
export default new Vuex.Store({


  //数据,相当于data
  state: {


    name:"张三",
    age:12,
    sex: '男',
    count:0
  },
  mutations: {


	addCount(state, num) {


		state.count += num
	},
	reduce(state){


		state.count--
	}
  }
})
在组件中使用:
方法一:使用commit触发Mutations操作
// 触发mutations
methods: {


	btn() {


       // 触发 mutations 的第一种方式
       this.$store.commit('addCount', 10)     //每次加十
	}
	btn2() {


       // 触发 mutations 的第一种方式
       this.$store.commit('reduce')
	}
}
方法二:使用辅助函数进行操作,具体方法同上
从vuex中按需导入mapMutations 函数
// 1. 从 vuex 中按需导入 mapMutations 函数
import {

     mapMutations } from 'vuex'
通过刚才导入的 mapMutations 函数,将需要的 mutations 函数,映射为当前组件的 methods 方法:
// 2. 将指定的 mutations 函数,映射为当前组件的 methods 函数
methods: {


	// 触发 mutations 的第二种方式 对象写法
	...mapMutations({

    addCount: 'addCount', reduce:'reduce'}),
	//或是
	// 触发 mutations 的第二种方式 数组写法
	...mapMutations(['addCount', 'reduce']),
	btn() {


       this.addCount(10)     //每次加十
	}
	btn2() {


       this.reduce()
	}
}
2.2.4 Actions
Actions 用于处理异步任务。
如果通过异步操作变更数据,必须通过 Actions,而不能使用 Mutation,但是在 Actions 中还是要通过触发Mutation 的方式间接变更数据。
在Vuex中定义:
讲上面的操作改为异步操作
// 定义 Actions
export default new Vuex.Store({


	// ...省略其他代码
	mutations: {


		//第一个参数是state,第二参数是传的参数
		addCount(state, num) {


			//state中的数据的改变会触发页面上对应数据的改变
			state.count += num
		},
		reduce(state){


			state.count--
		}
	},
	// 异步操作
	actions: {


		asynReduce(context) {


			setTimeout(() => {


				context.commit('reduce')
			}, 1000)
		},
		//触发 actions 异步任务时携带参数,第一个参数是上下文对象,第二参数是传的参数
		asynAdd(context, num) {


			setTimeout(() => {


				//会找到mutation对应的方法
				context.commit('addCount', num)
			}, 1000)
		}

	}
})
在组件中使用:
方法一:直接使用 dispatch触发Action函数
methods: {


	btn() {


	   // 触发 actions 的第一种方式
       this.$store.dispatch("asynAdd", 10)
	}
	btn2() {


	   // 触发 actions 的第一种方式
       this.$store.dispatch("asynReduce")
	}
}
方法二:使用辅助函数
从vuex中按需导入mapActions 函数
// 1. 从 vuex 中按需导入 mapActions 函数
import {

     mapActions } from 'vuex'
通过刚才导入的 mapActions 函数,将需要的 actions 函数,映射为当前组件的 methods 方法:
// 2. 将指定的 actions 函数,映射为当前组件的 methods 函数
methods: {


	//对象写法
	...mapActions({

    asynAdd:'asynAdd', asynReduce:'asynReduce'}),
	//或是
	//数组写法
	...mapActions(['asynAdd', 'asynReduce']),

	btn() {


       this.asynAdd(10)     //每次加十
	}
	btn2() {


       this.asynReduce()
	}
}
2.2.5 Modules 模块化+命名空间
-
目的:让代码更好维护,让多种数据分类更加明确
-
场景:当遇见大型项目时,数据量大,store就会显得很臃肿
为了解决以上问题,Vuex 允许我们将 store 分割成模块(module)。每个模块拥有自己的 state、mutation、action、getter、甚至是嵌套子模块——从上至下进行同样方式的分割: -
基本写法
写法一:
const countAbout = {


    namespaced: true,
    state: {


    	sum: 0,
    	name: 'zhangsan',
	    sex: 'man',
    },
    mutations: {

    ...},
    actions: {

    ...},
    getters: {


    	bisSum(state){

     return state.sum * 10}
}

const personAbout= {


    namespaced: true,
    state: {


		personList: [{


	        id: '0001',
	        name: 'Lisi'
	    }]
	},
    mutations: {

    ...},
    actions: {

    ...},
    getters: {

     ... }
}

const store = new Vuex.Store({


	modules: {


		countAbout,
		personAbout
	}
})
写法二:
const store = new Vuex.Store({


	modules: {


		countAbout:{


			namespaced: true,
		    state: {

     ... },
		    mutations: {

    ...},
		    actions: {

    ...},
		    getters: {

     ... }
		},
		personAbout: {


			namespaced: true,
		    state: {

     ... },
		    mutations: {

    ...},
		    actions: {

    ...},
		    getters: {

     ... }
		}
	}
})
默认情况下,模块内部的 action 和 mutation 仍然是注册在全局命名空间的——这样使得多个模块能够对同一个 action 或 mutation 作出响应。
如果希望你的模块具有更高的封装度和复用性,你可以通过添加 namespaced: true 的方式使其成为带命名空间的模块。当模块被注册后,它的所有 getter、action 及 mutation 都会自动根据模块注册的路径调整命名。
- 开启命名空间后,组件中读取
state数据
//方法一:自己读取
this.$store.state.countAbout.sum
//方法二:借助mapState读取
...mapState('countAbout', ['sum', 'name', 'sex'])
- 开启命名空间后,组件中读取
getters数据
//方法一:自己读取
this.$store.getters['personAbout/firstPersonName']
//方法二:借助mapGetters读取
...mapGetters('countAbout', ['bisSum'])
- 开启命名空间后,组件中调用
commit
//方法一:自己commit
this.$store.commit('personAbout/addPerson', person)
//方法二:借助mapMutations读取
...mapMutations('countAbout',{

    increment: 'add', decrement: 'reduce'})
- 开启命名空间后,组件中调用
dispatch
//方法一:自己commit
this.$store.dispatch('personAbout/addPersonWang', person)
//方法二:借助mapMutations读取
...mapActions('countAbout',{

    incrementOdd:'asyncAddOdd', incrementWait:'asyncAddWait'})
3 求和案例
3.1 使用纯vue编写
App.vue
<template>
  <div class="container">
    <Count/>
  </div>
</template>

<script>
import Countfrom './components/Count'
export default {


  name: 'App',
  components: {

      Count}
}
</script>
<style></style>
Count.vue
<template>
  <div class="hello">
    <h1>当前求和为:{

   {sum}}</h1>
    <select v-model.number="n">
      <option value="1">1</option>
      <option value="2">2</option>
      <option value="3">3</option>
    </select>
    <button @click="increment">+</button>
    <button @click="decrement">-</button>
    <button @click="incrementOdd">当前求和为奇数再加</button>
    <button @click="incrementWait">等一等再加</button>
  </div>
</template>

<script>
export default {


  name: 'Count',
  data() {


    return {


      n: 1,
      sum: 0
    }
  },
  methods: {


    increment() {


      this.sum += this.n
    },
    decrement() {


      this.sum -= this.n
    },
    incrementOdd() {


      if (this.sum %2) {


        this.sum += this.n
      }
    },
    incrementWait() {


      setTimeout(() => {


        this.sum += this.n
      }, 500);
    }
  }
}
</script>
<style scoped></style>
3.2 使用Vuex编写
3.2.1 原始写法
src/store/index.js
import Vue from 'vue'
import Vuex from 'vuex'   //引入Vuex

Vue.use(Vuex)    //应用Vuex

//创建并暴露store
export default new Vuex.Store({


  //数据,相当于data
  state: {


    sum: 0,
    name: 'zhangsan',
    sex: 'man'
  },
  getters: {

    },      //里面定义方法,操作state方法
  mutations: {


    add(state, num) {


        state.sum += num
    },
    reduce(state){


        state.sum--
    }
  },    // 操作异步操作mutation
  actions: {


    asyncAddWait(context, num){


        setTimeout(()=>{


            context.commit('add', num)
        },500)
    },
    asyncAddOdd(context, num){


        if(context.state.sum % 2){


            context.commit('add', num)
        }
    }
  },     //用于响应组件中的动作
  modules: {

    },
})
Count.vue
<template>
  <div class="hello">
    <h1>当前求和为:{

   {$store.state.sum}}</h1>
    <h3>当前求和放大10倍:{

   {$store.getters.bigSum}}</h3>
    <h3>姓名:{

   { $store.statename }},性别: {

   { $store.statesex }}</h3>
    <select v-model.number="n">
      <option value="1">1</option>
      <option value="2">2</option>
      <option value="3">3</option>
    </select>
    <button @click="increment">+</button>
    <button @click="decrement">-</button>
    <button @click="incrementOdd">当前求和为奇数再加</button>
    <button @click="incrementWait">等一等再加</button>
  </div>
</template>

<script>
export default {


  name: 'Count',
  data() {


    return {


      n: 1
    }
  },
  methods: {


   //使用mutaion
    increment() {

      this.$store.commit('add', this.n)},
    decrement() {

       this.$store.commit('reduce')},
	//使用Actions异步
    incrementOdd() {

      this.$store.dispatch('asyncAddOdd', this.n)},
    incrementWait() {

      this.$store.dispatch('asyncAddWait', this.n)}
  }
}
</script>
<style scoped></style>
3.2.2 用mapXXX优化后
Count.vue
<template>
  <div class="hello">
    <h1>当前求和为:{

   { sum }}</h1>
    <h3>当前求和放大10倍:{

   {bigSum}}</h3>
    <h3>姓名:{

   { name }},性别: {

   { sex }}</h3>
    <select v-model.number="n">
      <option value="1">1</option>
      <option value="2">2</option>
      <option value="3">3</option>
    </select>
    <button @click="increment(n)">+</button>
    <button @click="decrement(n)">-</button>
    <button @click="incrementOdd(n)">当前求和为奇数再加</button>
    <button @click="incrementWait(n)">等一等再加</button>
  </div>
</template>

<script>
import {

      mapState,mapGetters,mapMutations, mapActions} from 'vuex'
export default {


  name: 'Count',
  data() {


    return {


      n: 1
    }
  },
  computed: {


    //借助mapSate和mapGetters生成计算属性
    ...mapState(['sum','name','sex']),
    ...mapGetters(['bigSum'])
  },
  methods: {


    ...mapMutations({

      increment: 'add', decrement: 'reduce'}),
    ...mapActions({

      incrementOdd:'asyncAddOdd', incrementWait:'asyncAddWait'})
    //使用mutaion
    //increment() {this.$store.commit('add', this.n)},
    //decrement() { this.$store.commit('reduce')},
	//使用Actions异步
    //incrementOdd() {this.$store.dispatch('asyncAddOdd', this.n)},
    //incrementWait() {this.$store.dispatch('asyncAddWait', this.n)}
  }
}
</script>
<style scoped></style>
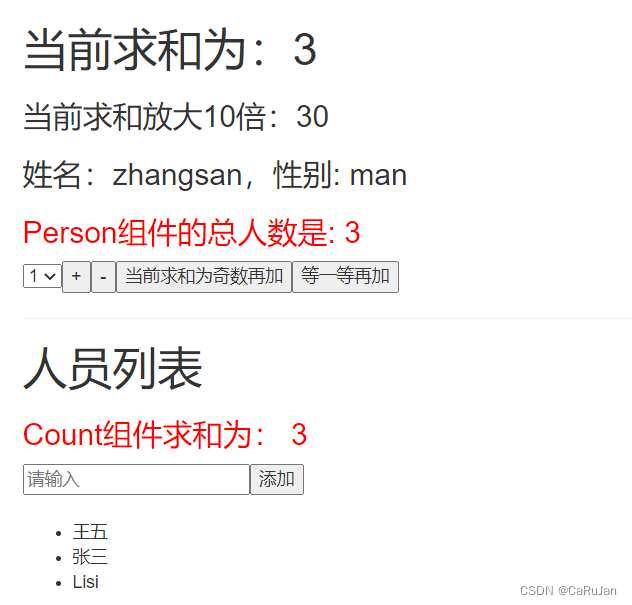
3.2.2 多组件共享数据
src/App.vue
<template>
  <div class="container">
    <Count/>
    <Person/>
  </div>
</template>

<script>
import Count from './components/Count'
import Person from './components/Person'
export default {


  name: 'App',
  components: {

      Count,Person}
}
</script>
<style></style>
src/components/Count.vue
<template>
  <div class="hello">
    <h1>当前求和为:{

   { sum }}</h1>
    <h3>当前求和放大10倍:{

   {bigSum}}</h3>
    <h3>姓名:{

   { name }},性别: {

   { sex }}</h3>
    <h3 style="color:red">Person组件的总人数是: {

   { personList.length }}</h3>
    <select v-model.number="n">
      <option value="1">1</option>
      <option value="2">2</option>
      <option value="3">3</option>
    </select>
    <button @click="increment(n)">+</button>
    <button @click="decrement(n)">-</button>
    <button @click="incrementOdd(n)">当前求和为奇数再加</button>
    <button @click="incrementWait(n)">等一等再加</button>
  </div>
</template>

<script>
import {

      mapState,mapGetters,mapMutations, mapActions} from 'vuex'
export default {


  name: 'Count',
  data() {


    return {


      n: 1
    }
  },
  computed: {


    //借助mapSate和mapGetters生成计算属性
    ...mapState(['sum','name','sex','personList']),
    ...mapGetters(['bigSum'])
  },
  methods: {


    ...mapMutations({

      increment: 'add', decrement: 'reduce'}),
   ...mapActions({

      incrementOdd:'asyncAddOdd', incrementWait:'asyncAddWait'})
  }
}
</script>
<style scoped></style>
src/components/Person.vue
<template>
  <div>
    <hr>
    <h1>人员列表</h1>
    <h3 style="color:red">Count组件求和为: {

   { sum }}</h3>
    <input type="text" placeholder="请输入" v-model="name">
    <button @click="add">添加</button>
    <br><br>
    <ul>
        <li v-for="p in personList" :key="p.id">{

   {p.name}}</li>
    </ul>
  </div>
</template>

<script>
import {

      mapState} from 'vuex'
import {

      nanoid} from 'nanoid'
export default {


  name: 'Person',
  components: {

      },
  props: {

      },
  data() {


    return {


        name: ''
    };
  },
  computed:{


    ...mapState(['personList', 'sum'])
  },
  methods: {


    add() {


        if(this.name === '') return
        const personObj = {

      id: nanoid(), name: this.name}
        this.$store.commit('addPerson', personObj)
        this.name = ''
    }
  }
};
</script>
<style scoped></style>
src/store/index.js
import Vue from 'vue'
import Vuex from 'vuex'   //引入Vuex

Vue.use(Vuex)    //应用Vuex

//创建并暴露store
export default new Vuex.Store({


  //数据,相当于data
  state: {


    sum: 0,
    name: 'zhangsan',
    sex: 'man',
    personList: [{


        id: '0001',
        name: 'Lisi'
    }]
  },
  //里面定义方法,操作state方法
  getters: {


    bigSum: state=>{


        return state.sum * 10
    }
  },
  // 操作异步操作mutation
  mutations: {


    add(state, num) {


        state.sum += num
    },
    reduce(state){


        state.sum--
    },
    addPerson(state, value) {


        state.personList.unshift(value)
    }
  },
  //用于响应组件中的动作
  actions: {


    asyncAddWait(context, num){


        setTimeout(()=>{


            context.commit('add', num)
        },500)
    },
    asyncAddOdd(context, num){


        if(context.state.sum % 2){


            context.commit('add', num)
        }
    }
  },
})
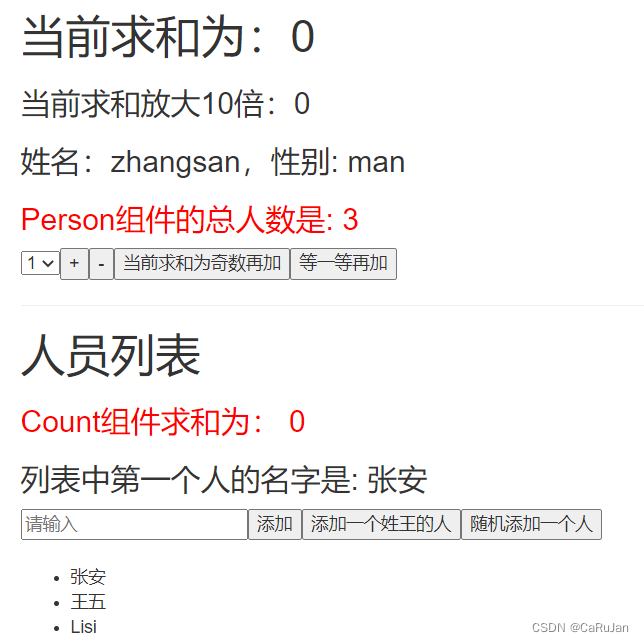
3.2.3 模块化优化后
src/store/index.js
import Vue from 'vue'
import Vuex from 'vuex'   //引入Vuex
import countOptions from './count'
import personOptions from './person'
import count from './count'
Vue.use(Vuex)    //应用Vuex

//创建并暴露store
export default new Vuex.Store({


  modules: {


    countAbout: countOptions,
    personAbout: personOptions
  },
})
src/store/count.js
export default {


    namespaced: true,
    state: {


        sum: 0,
        name: 'zhangsan',
        sex: 'man',
    },
    getters: {


        bigSum(state){

    return state.sum * 10}
    },
    mutations: {


        add(state, num) {


            state.sum += num
        },
        reduce(state){


            state.sum--
        },
    },
    actions: {


        asyncAddWait(context, num){


            setTimeout(()=>{


                context.commit('add', num)
            },500)
        },
        asyncAddOdd(context, num){


            if(context.state.sum % 2){


                context.commit('add', num)
            }
        }
    }
}
src/store/person.js
import axios from "axios"
import {

     nanoid } from 'nanoid'

export default {


    namespaced: true,
    state: {


        personList: [{


            id: '0001',
            name: 'Lisi'
        }]
    },
    getters: {


        firstPersonName(state) {

    return state.personList[0].name}
    },
    mutations: {


        addPerson(state, value) {


            state.personList.unshift(value)
        }
    },
    actions: {


        addPersonWang(context, value) {


            if(value.name.indexOf('王') === 0){


                context.commit('addPerson', value)
            }else {


                alert('添加的人必须为王')
            }
        },
        addPersonServer(context) {


            axios.get('http://api.uixsj.cn/hitokoto/get?type=social').then(
                response => {


                    context.commit('addPerson', {

    id: nanoid(), name:response.data})
                },
                error => {


                    alert(error.message)
                }
            )
        }
    }
}
Count和Person的呈现了两种不同的写法,一个是用mapXXX的写法,一个是直接使用this.$store的写法
src/components/Count.vue
<template>
  <div class="hello">
    <h1>当前求和为:{

   { sum }}</h1>
    <h3>当前求和放大10倍:{

   {bigSum}}</h3>
    <h3>姓名:{

   { name }},性别: {

   { sex }}</h3>
    <h3 style="color:red">Person组件的总人数是: {

   { personList.length }}</h3>
    <select v-model.number="n">
      <option value="1">1</option>
      <option value="2">2</option>
      <option value="3">3</option>
    </select>
    <button @click="increment(n)">+</button>
    <button @click="decrement(n)">-</button>
    <button @click="incrementOdd(n)">当前求和为奇数再加</button>
    <button @click="incrementWait(n)">等一等再加</button>
  </div>
</template>

<script>
import {

      mapState,mapGetters,mapMutations, mapActions} from 'vuex'
export default {


  name: 'Count',
  data() {


    return {


      n: 1
    }
  },
  computed: {


    //借助mapSate和mapGetters生成计算属性
    ...mapState('countAbout',['sum','name','sex']),
    ...mapState('personAbout', ['personList']),
    ...mapGetters('countAbout',['bigSum'])
  },
  methods: {


    ...mapMutations('countAbout',{

      increment: 'add', decrement: 'reduce'}),
    ...mapActions('countAbout',{

      incrementOdd:'asyncAddOdd', incrementWait:'asyncAddWait'})
  }
}
</script>
<style scoped></style>
src/components/Person.vue
<template>
  <div>
    <hr>
    <h1>人员列表</h1>
    <h3 style="color:red">Count组件求和为: {

   { sum }}</h3>
    <h3>列表中第一个人的名字是: {

   { firstPersonName }}</h3>
    <input type="text" placeholder="请输入" v-model="name">
    <button @click="add">添加</button>
    <button @click="addWang">添加一个姓王的人</button>
    <button @click="addRandom">随机添加一个人</button>
    <br><br>
    <ul>
        <li v-for="p in personList" :key="p.id">{

   {p.name}}</li>
    </ul>
  </div>
</template>

<script>
import {

      mapState, mapGetters,mapMutations,mapActions} from 'vuex'
import {

      nanoid} from 'nanoid'
export default {


  name: 'Person',
  components: {

      },
  props: {

      },
  data() {


    return {


        name: ''
    };
  },
  computed:{


    //直接读取的方法
    personList() {

       return this.$store.state.personAbout.personList },
    sum() {

       return this.$store.state.countAbout.sum },
    firstPersonName() {

       return this.$store.getters['personAbout/firstPersonName'] }
  },
  methods: {


    add() {


        if(this.name === '') return
        const personObj = {

      id: nanoid(), name: this.name}
        this.$store.commit('personAbout/addPerson', personObj)
        this.name = ''
    },
    addWang() {


        if(this.name === '') return
        const personObj = {

      id: nanoid(), name: this.name}
        this.$store.dispatch('personAbout/addPersonWang', personObj)
        this.name = ''
    },
    addRandom() {


        this.$store.dispatch('personAbout/addPersonServer')
    }
  }
};
</script>
<style scoped>
</style>
4 求和案例2
4.1 props传递值
helloword子组件使用Home组件声明的变量,可采用之前学习的组件传递值的方法
Home组件
<template>
  <div class="home">
    <h2>这是在单页模板中应用</h2>
    <h3>{

   {count}}</h3>
    <button @click="count--">-</button>
    <button @click="count++">+</button>
    <!-- 传递count给子组件helloword--->
    <HelloWorld :count="count" msg="Welcome to Your Vue.js App"/>
  </div>
</template>

<script>
// @ is an alias to /src
import HelloWorld from '@/components/HelloWorld.vue'
export default {


  name: 'Home',
  components: {


    HelloWorld
  },
  data() {


    return {


      count: 0
    }
  }
}
</script>
helloword子组件
<template>
  <div class="hello">
    <h1>{

   { msg }}</h1>
    <h3>在子组件hellword中应用Home中的Data</h3>
    <h3>{

   {count}}</h3>
  </div>
</template>

<script>
export default {


  name: 'HelloWorld',
  props: {


    count: Number
  }
}
</script>

<!-- Add "scoped" attribute to limit CSS to this component only -->
<style scoped lang="scss">
……
</style>
效果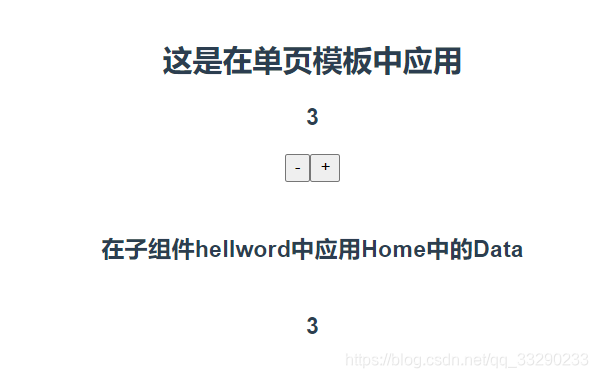
若About组件想要使用Home组件的count,通过组件传递的方式也可实现,就是有点麻烦,需要传递给中介App组件,App组件再传递给About组件。
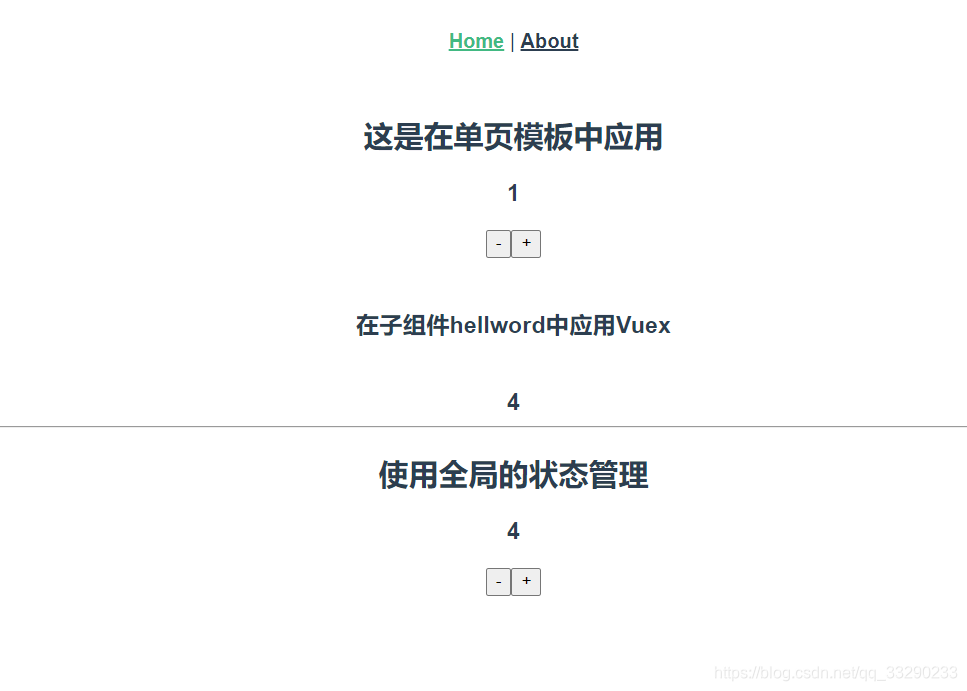
4.2 Vuex的state传递
因此,在这里可采用Vuex,其配置文件在/store/index.js
import {

     createStore } from 'vuex'

export default createStore({


  state: {


    //任何地方都可使用这个状态管理
    num: 0
  },
  mutations: {

     },
  actions: {

    },
  modules: {

    }
})
Home.vue
<template>
  <div class="home">
    <h2>使用全局的状态管理</h2>
    <h3>{

   {$store.state.num}}</h3>
    <button @click="$store.state.num--">-</button>
    <button @click="$store.state.num++">+</button>
  </div>
</template>

<script>
// @ is an alias to /src
import HelloWorld from '@/components/HelloWorld.vue'

export default {


  name: 'Home',
  components: {


    HelloWorld
  },
}
</script>
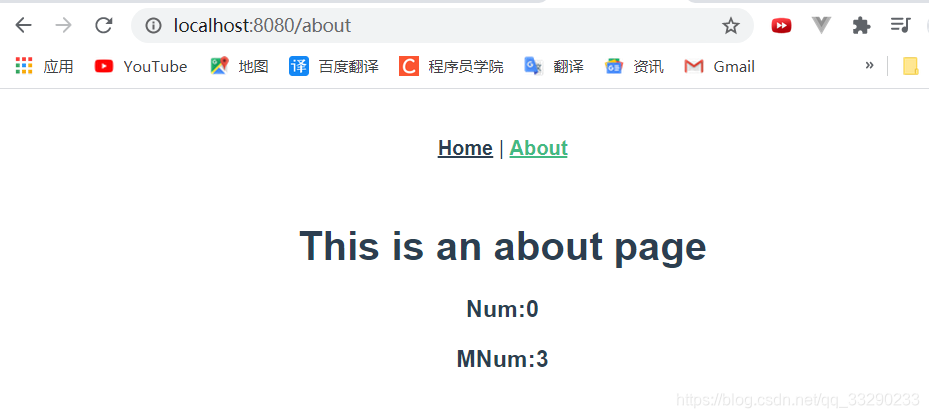
About.vue
<template>
  <div class="about">
    <h1>This is an about page</h1>
    <h3>{

   {$store.state.num}}</h3>
  </div>
</template>
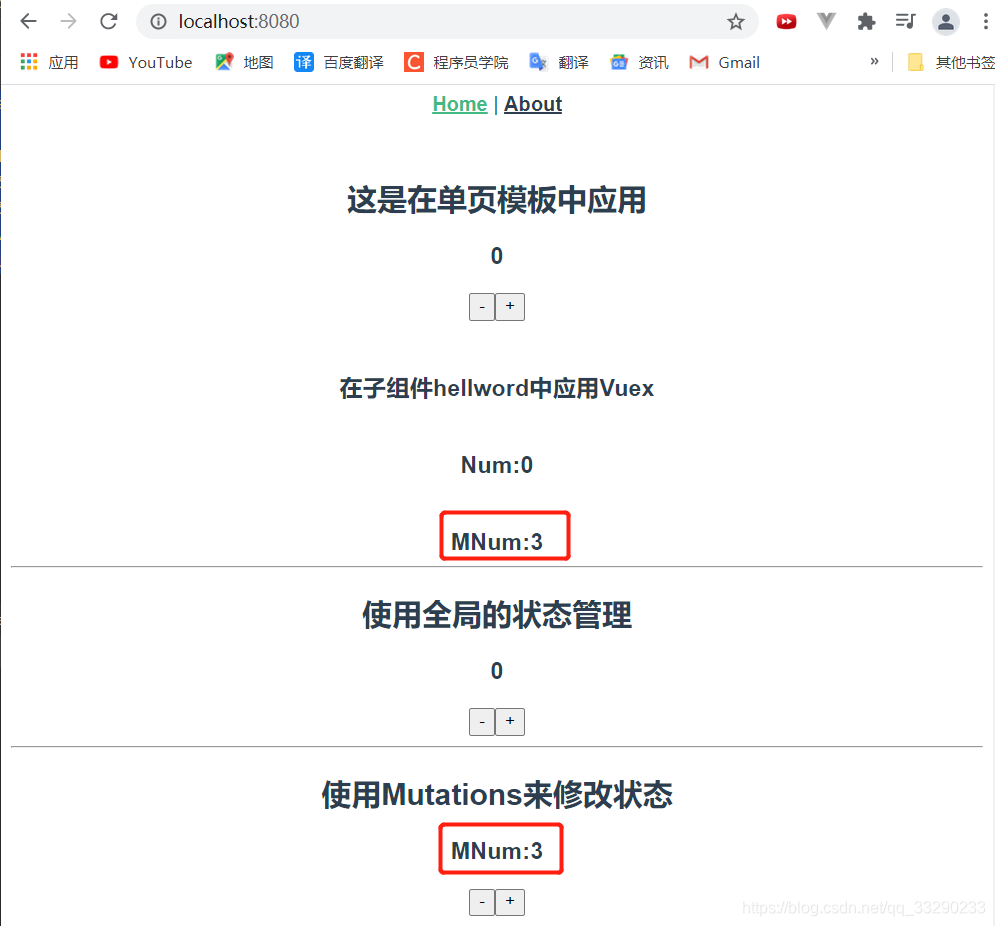
效果

4.3 Matuations来修改状态
Vuex最好采用Matuations来修改状态,而不是通过组件的形式
index.js
import {

     createStore } from 'vuex'

export default createStore({


  state: {


    //任何地方都可使用这个状态管理
    num: 0,
    mnum: 0
  },
  mutations: {


    //自动把state的参数传过来
    sub(state) {


      state.mnum--;
    },
    add(state) {


      state.mnum++;
    }
  },
  actions: {

     },
  modules: {

    }
})
Home.vue
<template>
  <div class="home">
    <h2>这是在单页模板中应用</h2>
    <h3>{

   {count}}</h3>
    <button @click="count--">-</button>
    <button @click="count++">+</button>
    <HelloWorld :count="count" msg="Welcome to Your Vue.js App"/>
    <hr>
    <h2>使用全局的状态管理</h2>
    <h3>{

   {$store.state.num}}</h3>
    <button @click="$store.state.num--">-</button>
    <button @click="$store.state.num++">+</button>
    <hr>
    <h2>使用Mutations来修改状态</h2>
    <h3>MNum:{

   {$store.state.mnum}}</h3>
    <button @click="sub1()">-</button>
    <button @click="add1()">+</button>
  </div>
</template>

<script>
// @ is an alias to /src
import HelloWorld from '@/components/HelloWorld.vue'

export default {


  name: 'Home',
  components: {


    HelloWorld
  },
  data() {


    return {


      count: 0
    }
  },
  methods: {


    add1() {


      this.$store.commit('add')
    },
    sub1() {


      this.$store.commit('sub')
    },
  }
}
</script>
About.vue
<template>
  <div class="about">
    <h1>This is an about page</h1>
    <h3>Num:{

   {$store.state.num}}</h3>
    <h3>MNum:{

   {$store.state.mnum}}</h3>
  </div>
</template>
效果
4.4 Mutations带参数传递修改状态
index.js
import {

     createStore } from 'vuex'

export default createStore({


  state: {


    //任何地方都可使用这个状态管理
    num: 0,
    mnum: 0
  },
  mutations: {


    //自动把state的参数传过来
    sub(state) {


      state.mnum--;
    },
    add(state) {


      state.mnum++;
    },
    //接收一个参数
    sub2(state,count) {


      console.log(count);
      state.mnum-=count;
    },
    add2(state,count) {


      console.log(count);
      state.mnum+=count;
    },
    //接收多个参数
    sub3(state,payload) {


      console.log(payload);
      state.mnum-=(payload.count+payload.num);
    },
    add3(state,payload) {


      console.log(payload);
      state.mnum+=(payload.count+payload.num);
    }

  },
  actions: {

    },
  modules: {

    }
})
Home.vue
<template>
  <div class="home">
    <hr>
    <h2>使用Mutations来修改状态</h2>
    <h3>MNum:{

   {$store.state.mnum}}</h3>
    <button @click="sub1()">-</button>
    <button @click="add1()">+</button>
    <hr>
    <h2>使用Mutations来修改状态带一个参数</h2>
    <h3>MNum:{

   {$store.state.mnum}}</h3>
    <button @click="sub2()">-</button>
    <button @click="add2()">+</button>
    <hr>
    <h2>使用Mutations来修改状态带多个参数</h2>
    <h3>MNum:{

   {$store.state.mnum}}</h3>
    <button @click="sub3()">-</button>
    <button @click="add3()">+</button>
  </div>
</template>

<script>
// @ is an alias to /src
import HelloWorld from '@/components/HelloWorld.vue'

export default {


  name: 'Home',
  components: {


    HelloWorld
  },
  data() {


    return {


      count: 0
    }
  },
  methods: {


    add1() {


      this.$store.commit('add')
    },
    sub1() {


      this.$store.commit('sub')
    },
    add2() {


      let count = 2;
      this.$store.commit('add2',count)
    },
    sub2() {


      let count = 2;
      this.$store.commit('sub2',count)
    },
    add3() {


      let payload = {

      count:2, num:1}
      this.$store.commit('add3',payload)
    },
    sub3() {


      let payload = {

      count:2, num:1}
      this.$store.commit('sub3',payload)
      //等价于
      //this.$store.commit({type:'sub3', payload})
    }
  }
}
</script>
效果
